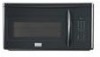

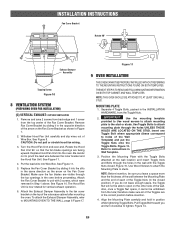
Installation Instructions (All Languages)
Page 4
...louver Figure 6-1 Bottom tab Tabs Figure 8 Tabs Figure 6-2 E4 Figure 9 Fan Cover Bracket Hood louver Scrrews Back of the unit. INSTALLATION INSTRUCTIONS 8 VENTILATION SYSTEM (PREPARING OVEN FOR INSTALLATION) This microwave oven/hood is designed for adaptation to three types of hood ventilation systems. Select the...end-over-end so that the fan blade openings are visible through the rear openings in your microwave oven, is used for nonvented, recirculated installation. Attach Fan Cover Bracket to remove from the top center of the Charcoal Filter, which was installed in the oven...
...louver Figure 6-1 Bottom tab Tabs Figure 8 Tabs Figure 6-2 E4 Figure 9 Fan Cover Bracket Hood louver Scrrews Back of the unit. INSTALLATION INSTRUCTIONS 8 VENTILATION SYSTEM (PREPARING OVEN FOR INSTALLATION) This microwave oven/hood is designed for adaptation to three types of hood ventilation systems. Select the...end-over-end so that the fan blade openings are visible through the rear openings in your microwave oven, is used for nonvented, recirculated installation. Attach Fan Cover Bracket to remove from the top center of the Charcoal Filter, which was installed in the oven...
Installation Instructions (All Languages)
Page 5
...Wire Box. Figure 15. NOTE: Before insertion, be sure you leave a space more than the thickness of the arrow on the Fan Cover Bracket. Align the Mounting Plate carefully and hold in Wall Template. 3. CAUTION: Do not pull or stretch hood fan wiring. 3. Turn the ...not leave enough space, the Toggle Nut will not be withdrawn from the top center of the wall. Figure 14. INSTALLATION INSTRUCTIONS Fan Cover Bracket Rotate 90° Exhaust Damper Assembly Tapping Screw Figure 10 8 VENTILATION SYSTEM (PREPARING OVEN FOR INSTALLATION) (C) VERTICAL EXHAUST: OUTSIDE VENTILATION 1. ...
...Wire Box. Figure 15. NOTE: Before insertion, be sure you leave a space more than the thickness of the arrow on the Fan Cover Bracket. Align the Mounting Plate carefully and hold in Wall Template. 3. CAUTION: Do not pull or stretch hood fan wiring. 3. Turn the ...not leave enough space, the Toggle Nut will not be withdrawn from the top center of the wall. Figure 14. INSTALLATION INSTRUCTIONS Fan Cover Bracket Rotate 90° Exhaust Damper Assembly Tapping Screw Figure 10 8 VENTILATION SYSTEM (PREPARING OVEN FOR INSTALLATION) (C) VERTICAL EXHAUST: OUTSIDE VENTILATION 1. ...


