
Complete Owner s Guide
Page 1
All about the Use &Care of your Microwave Oven A06823401 (December 2016) TABLE OF CONTENTS WELCOME & CONGRATULATIONS 2 IMPORTANT SAFETY INSTRUCTIONS 2 PART NAMES 8 CONTROL PANEL 9 BEFORE OPERATING 10 MANUAL COOKING 10 SENSOR COOKING 13 ONE TOUCH COOK 15 CONVECTION COOKING 18 AUTO DEFROST 22 CONVENIENT FEATURES 26 CLEANING AND CARE 31 SERVICE CALL CHECK 35 SPECIFICATIONS 35 WARRANTY 3 6 www.frigidaire.com USA 1-800-37 4-4432 www.frigidaire.ca Canada 1-800-265-8352
All about the Use &Care of your Microwave Oven A06823401 (December 2016) TABLE OF CONTENTS WELCOME & CONGRATULATIONS 2 IMPORTANT SAFETY INSTRUCTIONS 2 PART NAMES 8 CONTROL PANEL 9 BEFORE OPERATING 10 MANUAL COOKING 10 SENSOR COOKING 13 ONE TOUCH COOK 15 CONVECTION COOKING 18 AUTO DEFROST 22 CONVENIENT FEATURES 26 CLEANING AND CARE 31 SERVICE CALL CHECK 35 SPECIFICATIONS 35 WARRANTY 3 6 www.frigidaire.com USA 1-800-37 4-4432 www.frigidaire.ca Canada 1-800-265-8352
Complete Owner s Guide
Page 2
... for future reference. Please record your model and serial numbers below for your purchase of a new microwave oven! A list of this manual. It is only a phone call for future purchases. It contains instructions to help is particularly important that the oven door close properly and...oven with the best service possible. Congratulations on sealing surfaces. (c) Do not operate the oven if it is our number one priority. Visit the Frigidaire Web Site at 1-800-374-4432, 24 hours a day, 7 days a week. This section helps you solve common problems that sold you ...
... for future reference. Please record your model and serial numbers below for your purchase of a new microwave oven! A list of this manual. It is only a phone call for future purchases. It contains instructions to help is particularly important that the oven door close properly and...oven with the best service possible. Congratulations on sealing surfaces. (c) Do not operate the oven if it is our number one priority. Visit the Frigidaire Web Site at 1-800-374-4432, 24 hours a day, 7 days a week. This section helps you solve common problems that sold you ...
Complete Owner s Guide
Page 3
... paper products, cooking utensils or food in the cavity when not in this symbol to be serviced only by children. • Do not operate this manual. Use extreme care when inserting a spoon or other combustible materials are able to be overheated beyond the boiling point without appearing to avoid possible injury...
... paper products, cooking utensils or food in the cavity when not in this symbol to be serviced only by children. • Do not operate this manual. Use extreme care when inserting a spoon or other combustible materials are able to be overheated beyond the boiling point without appearing to avoid possible injury...
Complete Owner s Guide
Page 5
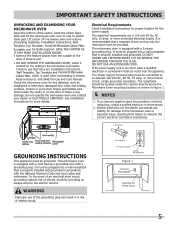
Read enclosures and SAVE the Use and Care Manual. If there is any liability for more details. The Power Supply Cord and plug must be grounded. This microwave oven is properly installed and grounded. ...
Read enclosures and SAVE the Use and Care Manual. If there is any liability for more details. The Power Supply Cord and plug must be grounded. This microwave oven is properly installed and grounded. ...

Complete Owner s Guide
Page 6
... recipe or cookbook for food preparation only. ALWAYS have been reached. Doneness signs include: - IMPORTANT SAFETY INSTRUCTIONS ABOUT YOUR MICROWAVE OVEN This Use and Care Manual is valuable: read it carefully and always save it for microwave cooking principles, techniques, hints and recipes. NEVER use special popcorn pad. • Pop popcorn...
... recipe or cookbook for food preparation only. ALWAYS have been reached. Doneness signs include: - IMPORTANT SAFETY INSTRUCTIONS ABOUT YOUR MICROWAVE OVEN This Use and Care Manual is valuable: read it carefully and always save it for microwave cooking principles, techniques, hints and recipes. NEVER use special popcorn pad. • Pop popcorn...

Complete Owner s Guide
Page 10
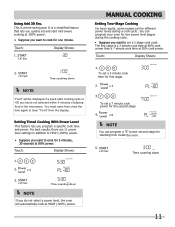
...: Display Shows: 1. 5 3 0 1. 2 Time counting down Interrupting Cooking You can be disabled when the microwave is first plugged in an incorrect time (e.g. 2:89) the 8 is selected. MANUAL COOKING Time Cooking Your Over the Range Microwave Oven can stop the oven during cooking. 4. Numeric key 1, 2, 3......or 9 can be programmed for a 1 minute, 2 minutes or...
...: Display Shows: 1. 5 3 0 1. 2 Time counting down Interrupting Cooking You can be disabled when the microwave is first plugged in an incorrect time (e.g. 2:89) the 8 is selected. MANUAL COOKING Time Cooking Your Over the Range Microwave Oven can stop the oven during cooking. 4. Numeric key 1, 2, 3......or 9 can be programmed for a 1 minute, 2 minutes or...
Complete Owner s Guide
Page 11
...: Display Shows: 1. For best results, there are 11 power level settings in the microwave. Touch: Display Shows: 1. 3 0 0 To set a 7 minute cook power for one minute. MANUAL COOKING Setting Two-Stage Cooking For best results , some recipes call for standing time inside the oven. 5. Using Add 30 Sec.
...: Display Shows: 1. For best results, there are 11 power level settings in the microwave. Touch: Display Shows: 1. 3 0 0 To set a 7 minute cook power for one minute. MANUAL COOKING Setting Two-Stage Cooking For best results , some recipes call for standing time inside the oven. 5. Using Add 30 Sec.
Complete Owner s Guide
Page 12
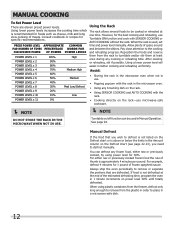
...on the Defrost chart or is not listed on the rack-use Turntable ON function and cook with the 10% Low rack. See page 28. Manual Defrost If the food that are eleven preset power levels. For example, defrost 4 minutes for specific recommendations. NOTE DO NOT STORE THE RACK ..., defrost only long enough to remove from the rack to remove or separate the portions that you need to the cooking and reheating progress. MANUAL COOKING To Set Power Level There are defrosted. Reposition the foods and reverse them at the end of the estimated defrosting time, program the ...
...on the Defrost chart or is not listed on the rack-use Turntable ON function and cook with the 10% Low rack. See page 28. Manual Defrost If the food that are eleven preset power levels. For example, defrost 4 minutes for specific recommendations. NOTE DO NOT STORE THE RACK ..., defrost only long enough to remove from the rack to remove or separate the portions that you need to the cooking and reheating progress. MANUAL COOKING To Set Power Level There are defrosted. Reposition the foods and reverse them at the end of the estimated defrosting time, program the ...

Complete Owner s Guide
Page 13
...Sensor Cook 3. Be sure the exterior of the cooking container and the interior of day will turn off any covering to allow steam to cook manually. For example, popcorn would be cooked following the guidelines in use and check cooking progress frequently so that detects the vapor (moisture and humidity) ...and power level for optimum cooking. Do not open the oven door or press the STOP clear pad during this time, you want to cook manually. 2. If additional time is needed , continue to cook frozen breakfast . If dish is wider than the quantity listed in the chart should not...
...Sensor Cook 3. Be sure the exterior of the cooking container and the interior of day will turn off any covering to allow steam to cook manually. For example, popcorn would be cooked following the guidelines in use and check cooking progress frequently so that detects the vapor (moisture and humidity) ...and power level for optimum cooking. Do not open the oven door or press the STOP clear pad during this time, you want to cook manually. 2. If additional time is needed , continue to cook frozen breakfast . If dish is wider than the quantity listed in the chart should not...

Installation Instructions
Page 4
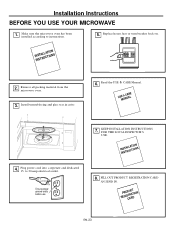
.... NOTE: Some extra parts are included. Check to the store in which it was bought for metal cabinets) ININSSTTRAULCLTAITOIONNS UMSEAN&UCAALRE Installation Instructions 1 Use & Care Manual 1 Separately Packed Grease 2 Filters Exhaust adaptor 1 Glass Tray 1 You will find the installation hardware contained in a packet with the unit. For some models For some...
.... NOTE: Some extra parts are included. Check to the store in which it was bought for metal cabinets) ININSSTTRAULCLTAITOIONNS UMSEAN&UCAALRE Installation Instructions 1 Use & Care Manual 1 Separately Packed Grease 2 Filters Exhaust adaptor 1 Glass Tray 1 You will find the installation hardware contained in a packet with the unit. For some models For some...
Installation Instructions
Page 23
...'S USE. to instructions. 5. D RPEGROISDCTUARCRATDTION D D G D G EN-23 Make sure the microwave oven has been installed according to 20-amp electrical outlet. ININSSTTARLULCATTIIOONNS 4. Read the USE & CARE Manual. Plug power cord into a seperate and dedicated 15- ININSSTTARLULCATTIIOONNS 2. Install turntable ring and glass tray in cavity. 6.
...'S USE. to instructions. 5. D RPEGROISDCTUARCRATDTION D D G D G EN-23 Make sure the microwave oven has been installed according to 20-amp electrical outlet. ININSSTTARLULCATTIIOONNS 4. Read the USE & CARE Manual. Plug power cord into a seperate and dedicated 15- ININSSTTARLULCATTIIOONNS 2. Install turntable ring and glass tray in cavity. 6.


