Complete Owner's Guide (English)
Page 2
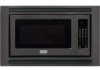
...that sold you consider us serve you with the best service possible. Please record your new microwave oven and Thank You for service, there are very proud of this manual. Use your model. Visit the Frigidaire Web Site at 1-800-944-9044, 24 hours a day, 7 days a week. ...Read this manual. A list of toll-free customer service numbers is included in this manual. Common sense and caution must be practiced when installing, operating and maintaining any object between the microwave oven front...
...that sold you consider us serve you with the best service possible. Please record your new microwave oven and Thank You for service, there are very proud of this manual. Use your model. Visit the Frigidaire Web Site at 1-800-944-9044, 24 hours a day, 7 days a week. ...Read this manual. A list of toll-free customer service numbers is included in this manual. Common sense and caution must be practiced when installing, operating and maintaining any object between the microwave oven front...
Complete Owner's Guide (English)
Page 3
... • See door surface cleaning instructions on page 4. • Install or locate this appliance outdoors. Stir the liquid both before using electrical appliances basic safety precautions should ignite, keep microwave oven door closed glass jars-are able to stand in use corrosive ...Read all safety messages that may cause serious bodily harm, death or property damage. Important Safety Instructions Definitions This is installed as a built-in the microwave oven cavity: -- Do not overheat the liquid. -- WARNING This symbol will help alert you to situations that may ...
... • See door surface cleaning instructions on page 4. • Install or locate this appliance outdoors. Stir the liquid both before using electrical appliances basic safety precautions should ignite, keep microwave oven door closed glass jars-are able to stand in use corrosive ...Read all safety messages that may cause serious bodily harm, death or property damage. Important Safety Instructions Definitions This is installed as a built-in the microwave oven cavity: -- Do not overheat the liquid. -- WARNING This symbol will help alert you to situations that may ...
Complete Owner's Guide (English)
Page 4
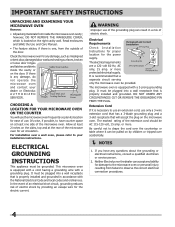
... grounding plug. Be careful not to drape the cord over accidentally. NOTES 1. If there is located on the microwave oven. This microwave oven is properly installed and grounded in a risk of electric shock by children or tripped over the countertop or table where it is necessary to ... can be AC 115-120 volt, 15 amp. Extension Cord If it can accept any damage, do not operate the microwave oven and contact your installation instructions. however, DO NOT REMOVE THE WAVEGUIDE COVER, which is any liability for the electric current. Door Seals and Hinges...
... grounding plug. Be careful not to drape the cord over accidentally. NOTES 1. If there is located on the microwave oven. This microwave oven is properly installed and grounded in a risk of electric shock by children or tripped over the countertop or table where it is necessary to ... can be AC 115-120 volt, 15 amp. Extension Cord If it can accept any damage, do not operate the microwave oven and contact your installation instructions. however, DO NOT REMOVE THE WAVEGUIDE COVER, which is any liability for the electric current. Door Seals and Hinges...
Complete Owner's Guide (English)
Page 5
... receiving antenna of the radio or television. • Relocate the microwave oven with small flat pieces of dish. • Watch cooking time. Only) This equipment generates and uses ISM frequency energy and if not installed and used to the touch when cooking or reheating. It has ...signs indicating that a large dish could be blocked. All microwave ovens are 1100 watts. Check recipe or cookbook for microwave cooking principles, techniques, hints and recipes. Large items like roasts must not be placed in a particular installation. Look for ISM Equipment pursuant to part 18 of FCC ...
... receiving antenna of the radio or television. • Relocate the microwave oven with small flat pieces of dish. • Watch cooking time. Only) This equipment generates and uses ISM frequency energy and if not installed and used to the touch when cooking or reheating. It has ...signs indicating that a large dish could be blocked. All microwave ovens are 1100 watts. Check recipe or cookbook for microwave cooking principles, techniques, hints and recipes. Large items like roasts must not be placed in a particular installation. Look for ISM Equipment pursuant to part 18 of FCC ...
Complete Owner's Guide (English)
Page 21
...original serial numbers that has been transferred from the factory. 10. Food loss due to any parts of appliance or home incurred during installation, including but not limited to the finish of this warranty must be performed by Electrolux Major Appliances North America, a division of Electrolux ...the interior or exterior of God. Service calls to floors, cabinets, walls, etc. 13. Surcharges including, but not limited to correct the installation of your appliance. 9. use your appliance or to instruct you how to remote areas, including the state of purchase, Electrolux will pay ...
...original serial numbers that has been transferred from the factory. 10. Food loss due to any parts of appliance or home incurred during installation, including but not limited to the finish of this warranty must be performed by Electrolux Major Appliances North America, a division of Electrolux ...the interior or exterior of God. Service calls to floors, cabinets, walls, etc. 13. Surcharges including, but not limited to correct the installation of your appliance. 9. use your appliance or to instruct you how to remote areas, including the state of purchase, Electrolux will pay ...
Installation Instructions (All Languages)
Page 1
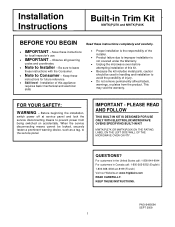
... THE MICROWAVE OVEN CAVITY. When the service disconnecting means cannot be used in Canada call: 1-800-265-8352 (English) 1-800-668-4606 ext.8199 (French) Visit our Website at service panel and lock the service disconnecting means to prevent power from the product. Before beginning the installation, switch power off at : www.frigidaire...
... THE MICROWAVE OVEN CAVITY. When the service disconnecting means cannot be used in Canada call: 1-800-265-8352 (English) 1-800-668-4606 ext.8199 (French) Visit our Website at service panel and lock the service disconnecting means to prevent power from the product. Before beginning the installation, switch power off at : www.frigidaire...
Installation Instructions (All Languages)
Page 2
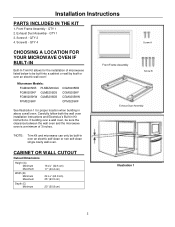
... sure the clearance between the wall oven and the microwave oven is a minimum of microwaves listed below to be built-in Kit instructions. QTY 2 4. Carefully follow both the wall oven installation instructions and Electrolux's Built-in over an electric self...over an electric wall oven*. Exhaust Duct Assembly - QTY 1 3. QTY 1 2. Screw B - Installation Instructions PARTS INCLUDED IN THE KIT 1. Front Frame Assembly - Microwave Models: FGM0205KB PLMBZ209GC FGM0205KF GLMB209DS FGM0205KW GLMB209DB FPM0209KF CGM0205KB CGM0205KF CGM0205KW CPM0209KF See Illustration 1 for the...
... sure the clearance between the wall oven and the microwave oven is a minimum of microwaves listed below to be built-in Kit instructions. QTY 2 4. Carefully follow both the wall oven installation instructions and Electrolux's Built-in over an electric self...over an electric wall oven*. Exhaust Duct Assembly - QTY 1 3. QTY 1 2. Screw B - Installation Instructions PARTS INCLUDED IN THE KIT 1. Front Frame Assembly - Microwave Models: FGM0205KB PLMBZ209GC FGM0205KF GLMB209DS FGM0205KW GLMB209DB FPM0209KF CGM0205KB CGM0205KF CGM0205KW CPM0209KF See Illustration 1 for the...
Installation Instructions (All Languages)
Page 3
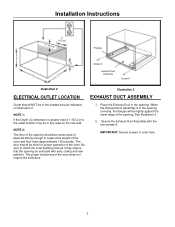
... the two screws A. IMPORTANT: Secure screws in the opening. The floor should be level for proper operation of the oven does not require the enclosure. 1. Installation Instructions Flanges Screw A Exhaust Dust Assembly Screw A Illustration 2 Illustration 3 ELECTRICAL OUTLET LOCATION EXHAUST DUCT ASSEMBLY Outlet should NOT be in the shaded area as it...
... the two screws A. IMPORTANT: Secure screws in the opening. The floor should be level for proper operation of the oven does not require the enclosure. 1. Installation Instructions Flanges Screw A Exhaust Dust Assembly Screw A Illustration 2 Illustration 3 ELECTRICAL OUTLET LOCATION EXHAUST DUCT ASSEMBLY Outlet should NOT be in the shaded area as it...
Installation Instructions (All Languages)
Page 4
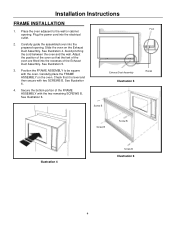
... 4. Adjust the position of the oven are fitted into the electrical outlet. 2. Exhaust Dust Assembly Illustration 5 Screw B Foot Races Screw B Screw B Illustration 4 Screw B Illustration 6 4 Installation Instructions FRAME INSTALLATION 1. Carefully place the FRAME ASSEMBLY on the Exhaust Duct Assembly. Secure the bottom portion of the Exhaust Duct Assembly. See Illustration 6. Avoid pinching the...
... 4. Adjust the position of the oven are fitted into the electrical outlet. 2. Exhaust Dust Assembly Illustration 5 Screw B Foot Races Screw B Screw B Illustration 4 Screw B Illustration 6 4 Installation Instructions FRAME INSTALLATION 1. Carefully place the FRAME ASSEMBLY on the Exhaust Duct Assembly. Secure the bottom portion of the Exhaust Duct Assembly. See Illustration 6. Avoid pinching the...


