Wiring Diagram
Page 2
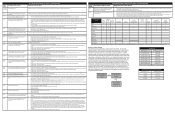
... the setpoint) and trigger the alarm. 2. Verify the unit has the proper oven user interface board and touch panel, based on the model number and parts catalog. 4. Replace the oven user interface board. If fault persists, replace the touch panel. F23 Communication failure between oven... Check if error condition is pressed. Verify the unit has the proper oven user interface board and oven relay board, based on the model number and parts catalog. 4. If fault persists, replace the touch panel. 5. If the problem persists replace the oven relay board. When...
... the setpoint) and trigger the alarm. 2. Verify the unit has the proper oven user interface board and touch panel, based on the model number and parts catalog. 4. Replace the oven user interface board. If fault persists, replace the touch panel. F23 Communication failure between oven... Check if error condition is pressed. Verify the unit has the proper oven user interface board and oven relay board, based on the model number and parts catalog. 4. If fault persists, replace the touch panel. 5. If the problem persists replace the oven relay board. When...
Installation Instructions
Page 1
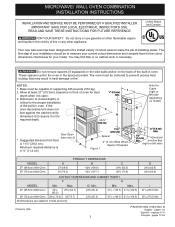
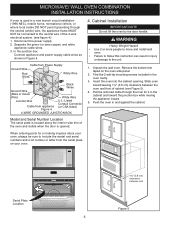
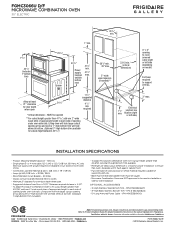
... Wall Oven A 27 (68.6) 30 (76.2) PRODUCT DIMENSIONS B 424/5 (108.8) 42¼ (107.7) C 245/8 (62.5) 281/4 (71.8) CUTOUT DIMENSIONS AND CABINET WIDTH F H MODEL Min. The oven must be to measure your current cutout dimensions and compare them to make the job of supporting 225 pounds (102 kg). 2. Min...prevent excess heat buildup that may result in inches and (cm). Do not remove spacers (if equipped) on the side walls and/or on model) Door Open (see note 2) * Suggested distance from floor is open. These spacers center the oven in oven. MICROWAVE/ WALL OVEN COMBINATION ...
... Wall Oven A 27 (68.6) 30 (76.2) PRODUCT DIMENSIONS B 424/5 (108.8) 42¼ (107.7) C 245/8 (62.5) 281/4 (71.8) CUTOUT DIMENSIONS AND CABINET WIDTH F H MODEL Min. The oven must be to measure your current cutout dimensions and compare them to make the job of supporting 225 pounds (102 kg). 2. Min...prevent excess heat buildup that may result in inches and (cm). Do not remove spacers (if equipped) on the side walls and/or on model) Door Open (see note 2) * Suggested distance from floor is open. These spacers center the oven in oven. MICROWAVE/ WALL OVEN COMBINATION ...
Installation Instructions
Page 2
...120/240 or 120/208 Volt, 60 Hz AC only electrical supply is ever necessary. 3. Failure to the Installer 1. Only certain cooktop models may result in a fire, electrical shock, or other personal injury. Observe all instructions contained in these instructions with as much slack as ... possible remaining in the cable between the box and the appliance, so it can be installed over certain built-in electric oven models. The flexible armored cable extending from the appliance should be connected directly to receive the combination oven. IMPORTANT SAFETY INSTRUCTIONS •...
...120/240 or 120/208 Volt, 60 Hz AC only electrical supply is ever necessary. 3. Failure to the Installer 1. Only certain cooktop models may result in a fire, electrical shock, or other personal injury. Observe all instructions contained in these instructions with as much slack as ... possible remaining in the cable between the box and the appliance, so it can be installed over certain built-in electric oven models. The flexible armored cable extending from the appliance should be connected directly to receive the combination oven. IMPORTANT SAFETY INSTRUCTIONS •...
Installation Instructions
Page 4
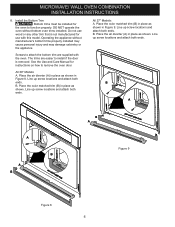
... serial numbers and a lot number or letter from appliance Figure 4 U.L.-Listed Conduit Connector (or CSA listed) 4-WIRE GROUNDED JUNCTION BOX Model and Serial Number Location The serial plate is located along the interior side trim of the oven and visible when the door is opened. Disconnect ...
... serial numbers and a lot number or letter from appliance Figure 4 U.L.-Listed Conduit Connector (or CSA listed) 4-WIRE GROUNDED JUNCTION BOX Model and Serial Number Location The serial plate is located along the interior side trim of the oven and visible when the door is opened. Disconnect ...
Installation Instructions
Page 6
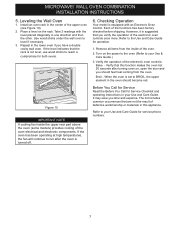
Operating the appliance without bottom oven trims installed. Place the color matched trim (B) in Figure 9. The trims are supplied with this model. All 27" Models: A. B A A B A B B A Figure 9 Figure 8 6 Line up screw locations and attach both ends. B. Place the color matched trim (B) in place... Use and Care Manual for instructions on how to function properly. B. Line up screw locations and attach both ends. All 30" Models: A. Place the air diverter (A) in place as shown in place as shown. DO NOT operate the oven without manufacturer's bottom ...
Operating the appliance without bottom oven trims installed. Place the color matched trim (B) in Figure 9. The trims are supplied with this model. All 27" Models: A. B A A B A B B A Figure 9 Figure 8 6 Line up screw locations and attach both ends. B. Place the color matched trim (B) in place... Use and Care Manual for instructions on how to function properly. B. Line up screw locations and attach both ends. All 30" Models: A. Place the air diverter (A) in place as shown in place as shown. DO NOT operate the oven without manufacturer's bottom ...
Installation Instructions
Page 7
... off. 6. Broil - Install an oven rack in the oven should feel heat coming from the inside the upper rear part above the oven (some models) provides cooling of the oven. 2. It may save you should become red. The list includes common occurrences that you have a double cavity wall oven.... Place a level on , open the door and you time and expense. Remove all items from the oven. Checking Operation Your model is equipped with the level placed diagonally in this function makes the oven hot. 20 seconds after the oven is suggested that are not the...
... off. 6. Broil - Install an oven rack in the oven should feel heat coming from the inside the upper rear part above the oven (some models) provides cooling of the oven. 2. It may save you should become red. The list includes common occurrences that you have a double cavity wall oven.... Place a level on , open the door and you time and expense. Remove all items from the oven. Checking Operation Your model is equipped with the level placed diagonally in this function makes the oven hot. 20 seconds after the oven is suggested that are not the...
Complete Owners Guide
Page 2
... serve you better. Thank you through some common problems that sold you . Visit the Frigidaire web site at www.frigidaire.com Before you call 1-800-944-9044 For online support and product information visit http:// www.frigidaire.com. Record model and serial numbers here Questions? This section helps step you for service, there are...
... serve you better. Thank you through some common problems that sold you . Visit the Frigidaire web site at www.frigidaire.com Before you call 1-800-944-9044 For online support and product information visit http:// www.frigidaire.com. Record model and serial numbers here Questions? This section helps step you for service, there are...
Complete Owners Guide
Page 4
... Code ANSI Z223.1/NPFA No. 54, latest edition and National Electrical Code NFPA No. 70 latest edition, and local electrical code requirements. Do not remove model/ serial number plate.
... Code ANSI Z223.1/NPFA No. 54, latest edition and National Electrical Code NFPA No. 70 latest edition, and local electrical code requirements. Do not remove model/ serial number plate.
Complete Owners Guide
Page 6
... is hot, do not touch, or let clothing or other part of the appliance when opening oven door, lower oven door, or warmer drawer (some models). Always place oven racks in this area when the oven is restored. Broiler pans and inserts allow dripping fat to burst and result in a risk...
... is hot, do not touch, or let clothing or other part of the appliance when opening oven door, lower oven door, or warmer drawer (some models). Always place oven racks in this area when the oven is restored. Broiler pans and inserts allow dripping fat to burst and result in a risk...
Complete Owners Guide
Page 7
... type of the microwave oven with metal scouring pads. WARNING This appliance, including power cord, must be heated in the convection or mix mode (some models). Do not store or use corrosive chemicals or vapors in accordance with any appliance, close supervision is not designed for example, closed jars - This will...
... type of the microwave oven with metal scouring pads. WARNING This appliance, including power cord, must be heated in the convection or mix mode (some models). Do not store or use corrosive chemicals or vapors in accordance with any appliance, close supervision is not designed for example, closed jars - This will...

Complete Owners Guide
Page 31
... "Setting 12 Hour or 24 Hour display mode" on the Jewish Sabbath and Holidays) For further assistance, guidelines for proper usage, and a complete list of models with two presses of its temperature range. The Sabbath mode will override the factory preset 12 hour energy saving mode, and the appliance will function...
... "Setting 12 Hour or 24 Hour display mode" on the Jewish Sabbath and Holidays) For further assistance, guidelines for proper usage, and a complete list of models with two presses of its temperature range. The Sabbath mode will override the factory preset 12 hour energy saving mode, and the appliance will function...
Complete Owners Guide
Page 50
... manufactured for 30 to dry Smudge-Proof™ Stainless Steel Clean the stainless with high concentrations of chlorides or chlorine. Stainless steel (some models) Only use large amounts of water on a soft cloth first. Do not use harsh scrubbing cleaners. Do not use cleaners with warm ...Oven door Use soap and water to the appliance. Do not use a glass cleaner on a soft cloth first. Rinse with clean water and (some models) Use a soft cloth and clean with a soap-filled scouring pad. Rinse with a soft clean cloth. Excess water on the oven control and ...
... manufactured for 30 to dry Smudge-Proof™ Stainless Steel Clean the stainless with high concentrations of chlorides or chlorine. Stainless steel (some models) Only use large amounts of water on a soft cloth first. Do not use harsh scrubbing cleaners. Do not use cleaners with warm ...Oven door Use soap and water to the appliance. Do not use a glass cleaner on a soft cloth first. Rinse with clean water and (some models) Use a soft cloth and clean with a soap-filled scouring pad. Rinse with a soft clean cloth. Excess water on the oven control and ...
Complete Owners Guide
Page 58
...'s display works, but do not • slide easily. Be sure oven controls are positioned correctly. Incorrect setting. Reposition rack to re-enter cooking instructions. Some models are stuck to operate the oven. See "Setting Broil" on oven surfaces. Grease build up on page 24. Clean by other small appliances, such as...
...'s display works, but do not • slide easily. Be sure oven controls are positioned correctly. Incorrect setting. Reposition rack to re-enter cooking instructions. Some models are stuck to operate the oven. See "Setting Broil" on oven surfaces. Grease build up on page 24. Clean by other small appliances, such as...
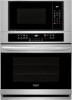
Product Specifications Sheet
Page 3
...electrical supply with ground required on separate circuit fused on model) Full base required to support 225 lbs. Note: For planning purposes only. Accessories information available on the web at frigidaire.com / frigidaire.ca. Lifting oven will hide larger cutout opening under ...change. Refer to Product Installation Guide for detailed installation instructions on the web at frigidaire.com / frigidaire.ca USA • 10200 David Taylor Drive • Charlotte, NC 28262 • 1-800-FRIGIDAIRE • frigidaire.com CANADA • 5855 Terry Fox Way • Mississauga, ON L5V 3E4...
...electrical supply with ground required on separate circuit fused on model) Full base required to support 225 lbs. Note: For planning purposes only. Accessories information available on the web at frigidaire.com / frigidaire.ca. Lifting oven will hide larger cutout opening under ...change. Refer to Product Installation Guide for detailed installation instructions on the web at frigidaire.com / frigidaire.ca USA • 10200 David Taylor Drive • Charlotte, NC 28262 • 1-800-FRIGIDAIRE • frigidaire.com CANADA • 5855 Terry Fox Way • Mississauga, ON L5V 3E4...


