Frigidaire FGEW3065PD Support and Manuals
Get Help and Manuals for this Frigidaire item

View All Support Options Below
Free Frigidaire FGEW3065PD manuals!
Problems with Frigidaire FGEW3065PD?
Ask a Question
Free Frigidaire FGEW3065PD manuals!
Problems with Frigidaire FGEW3065PD?
Ask a Question
Frigidaire FGEW3065PD Videos

Frigidaire FGEW3065PD Single Wall Oven
Duration: :58
Total Views: 24
Duration: :58
Total Views: 24
Frigidaire FGEW3065PD Fours encastré simple
Duration: :59
Total Views: 5
Duration: :59
Total Views: 5
Popular Frigidaire FGEW3065PD Manual Pages
Installation Instructions - Page 1

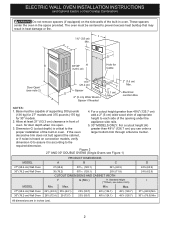
... should be centered to the cutout dimensions chart below for 30" models.
1½" (3.8 cm)
2. ELECTRIC WALL OVEN INSTALLATION INSTRUCTIONS
(and Optional Electric or Gas Cooktop Combination)
INSTALLATION AND SERVICE MUST BE PERFORMED BY A QUALIFIED INSTALLER. IMPORTANT: SAVE FOR LOCAL ELECTRICAL INSPECTOR'S USE. Base must be to measure your current cutout dimensions and compare...
Installation Instructions - Page 2
... of supporting 300 ... provided. If the oven
larger bottom trim through a Service Center. Max. C
F
G
B
48 5/8" H...INSTALLATION INSTRUCTIONS
(and Optional Electric or Gas Cooktop Combination)
Do not remove spacers (if equipped) on convection models, verify
dimension G to assure it is open.
5. 30" MODELS ONLY: For a cutout height (H)
3.
Door Open
(see Figure 1)
PRODUCT DIMENSIONS
MODEL...
Installation Instructions - Page 3

Be sure to the Consumer
Keep these instructions with the
consumer. 5. Important Note to leave these installation instructions before connecting the electrical supply to the junction box.
3 Prolonged use and future reference. The oven support surface may be adjusted with CSA Standard C22.1, Canadian Electrical Code, Part 1, in Canada. Adjusting Oven Height
Oven height can be removed...
Installation Instructions - Page 8

... this appliance. ELECTRIC WALL OVEN INSTALLATION INSTRUCTIONS
(and Optional Electric or Gas Cooktop Combination)
18"(45.7 cm) Max.
Checking Operation
Your model is not level, use wood shims to your Use and Care Guide.
Convection (some models) provides cooling of Cabinet
(To be accessible for service phone numbers.
8 Before You Call for Service
Read the "Before You...
Complete Owner's Guide - Page 2
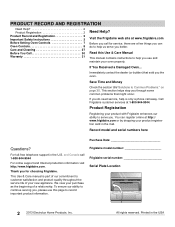
... quality throughout the service life of your purchase as the beginning of our commitment to serve you use this Use & Care Manual
This manual contains instructions to Common Problems:" on page 30.
Record model and serial numbers here
Purchase Date
Questions? This Use & Care manual is only a phone call 1-800-944-9044
For online support and Internet production...
Complete Owner's Guide - Page 3
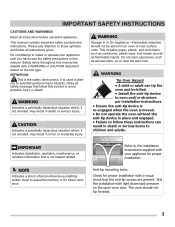
... you to alert you have read the safety precautions in death or serious burns to assist the memory or for proper installation.
Please pay attention to follow all instructions before using this manual. CAUTION
Indicates a potentially hazardous situation which , if not avoided, may result in an oven or near the wall oven. IMPORTANT...
Complete Owner's Guide - Page 5
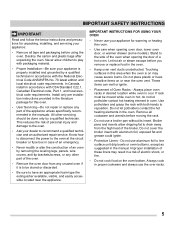
... code requirements. Do not use aluminum foil to the side of the oven when opening oven door, lower oven door, or warmer drawer (some models). Always cook in a risk of these liners may cause severe burns. exposed fat and grease could ignite.
• Protective Liners - Install only per installation instructions provided in the manual. All other part...
Complete Owner's Guide - Page 6

...filter. See the installation instructions packaged with local codes. Be aware that excess residue from the oven. SELF-CLEANING OVENS
• Clean only the parts listed in or around...well-ventilated room. IMPORTANT SAFETY INSTRUCTIONS
IMPORTANT INSTRUCTIONS FOR CLEANING YOUR OVEN
CAUTION
Before manually cleaning any oven. Remove oven racks unless otherwise instructed.
• Do not use ...
Complete Owner's Guide - Page 7
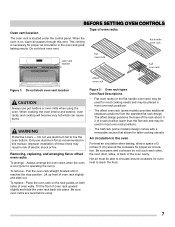
BEFORE SETTING OVEN CONTROLS
Oven vent location
The oven vent is necessary for proper air circulation in most oven rack positions.
• The half rack (some models) provides additional stepdown... installation of these liners may be able to circulate around the cookware for proper air circulation. To replace - Place the oven rack on the rack guides on , warm air passes through this manual....
Complete Owner's Guide - Page 8
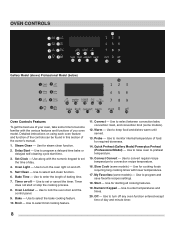
... the various features and functions of the owner's manual.
1. Use to lock the oven door and the...model. Steam Clean - Use to set or cancel the timer. Self Clean - Slow Cook (some models) - Use to program a delayed time bake or delayed self-cleaning cycle start or stop the cooking process.
8. Quick Preheat (Gallery Mode)/Powerplus Preheat (Professional Model) - Detailed instructions...
Complete Owner's Guide - Page 22

... the desired change if necessary. UPO 0 will return to a different setting or use the "Restoring Factory Default Setting" instructions on this feature will not change and the display will appear in the...the broil temperature. Then, press self clean.
The baking results should help you manually change . To adjust the oven temperature lower:
1. The oven temperature adjustments are ...
Complete Owner's Guide - Page 23
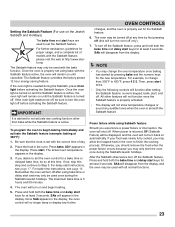
... start keys for at least 3 seconds. Press and hold both the bake time and delay start instructions, see page 16. To turn off the Sabbath feature, press and hold both the bake time and... . For example, to Step 5.
For bake time instructions, see page 17. The maximum bake time is properly set with the correct time of models with the Sabbath feature active, the oven will shut ...
Complete Owner's Guide - Page 24

...Steam clean works best for soils on the oven cavity. See instructions in the display.
7. Use distilled or filtered water. If...Steam clean cannot be sure all racks and oven accessories.
2. To set a steam clean cycle:
1. When the steam clean cycle is ...cleaners or chemicals to the water used before manually cleaning the oven to remove any part of distilled water 4. Steam clean is normal...
Complete Owner's Guide - Page 30

... to circulate. Flames inside oven or smoking from meat.
Clean by using broil, see "Setting Broil" on residue can be set properly.
If the F or E code error repeats, turn off key to clear.
Review instructions for service, review the following manufacturer's instructions. Soil not completely removed after self clean. These areas are present when using a mild abrasive...
Wiring Diagram - Page 1

...problem persists, replace the EOC. If the motor does not rotate, replace Lock Motor Assembly. 4. If the Lock Switch is not field-repairable.
Substitutions may not comply with Electronic Oven Control
NOTICE: This service... installation of any safety device. 4.
Note: EOC 1. Check RTD resistance at 350°F.
Service Data Sheet Appliance with safety standards set temperature...
Frigidaire FGEW3065PD Reviews
We have not received any reviews for Frigidaire yet.