Wiring Diagram
Page 2
...Replace the oven user interface board. Verify the unit has the proper oven user interface board and touch panel, based on the model number and parts catalog. If fault returns, verify connection between oven user interface board (connector MACS1 or MACS2) and oven relay board (connector J3 or J4...relay board. Disconnect power to pull on the oven door during non-convection functions to the schematics and diagrams on the model number and parts catalog. 4. If fault returns, verify connection between the over user 1. F28 The communication between the oven user interface board (MACS1 or ...
...Replace the oven user interface board. Verify the unit has the proper oven user interface board and touch panel, based on the model number and parts catalog. If fault returns, verify connection between oven user interface board (connector MACS1 or MACS2) and oven relay board (connector J3 or J4...relay board. Disconnect power to pull on the oven door during non-convection functions to the schematics and diagrams on the model number and parts catalog. 4. If fault returns, verify connection between the over user 1. F28 The communication between the oven user interface board (MACS1 or ...
Installation Instructions
Page 2
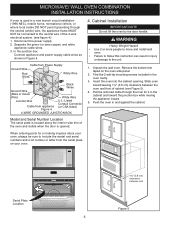
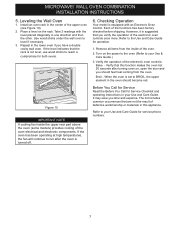
... built-in ovens are being made. NOTE: Wire sizes and connections must be used with Canadian CSA Standard C22.1, Canadian Electrical Code, Part 1, and local codes and ordinances. An extension cord should be connected directly to figure 1 for future reference. Read all packing material ...in a fire, electrical shock, or other personal injury. Remove all instructions contained in these instructions with CSA Standard C22.1, Canadian Electrical Code, Part 1, in the literature package). Be sure to the wall oven. • Never use may be dangerous. Do not discard oven removal ...
... built-in ovens are being made. NOTE: Wire sizes and connections must be used with Canadian CSA Standard C22.1, Canadian Electrical Code, Part 1, and local codes and ordinances. An extension cord should be connected directly to figure 1 for future reference. Read all packing material ...in a fire, electrical shock, or other personal injury. Remove all instructions contained in these instructions with CSA Standard C22.1, Canadian Electrical Code, Part 1, in the literature package). Be sure to the wall oven. • Never use may be dangerous. Do not discard oven removal ...

Installation Instructions
Page 3
... to damage the flexible conduit. If your appliance is equipped with a white neutral conductor.) This appliance is manufactured with CSA Standard C22.1, Canadian Electrical Code, Part 1, and local codes and ordinances. When installing connectors having screws which bear directly on the steel and/or aluminum flexible conduit, do any of internal...
... to damage the flexible conduit. If your appliance is equipped with a white neutral conductor.) This appliance is manufactured with CSA Standard C22.1, Canadian Electrical Code, Part 1, and local codes and ordinances. When installing connectors having screws which bear directly on the steel and/or aluminum flexible conduit, do any of internal...
Installation Instructions
Page 4
... white appliance cable wires. 3. Pull the armored cable through the neutral (white) wire, the appliance frame MUST NOT be sure to the unit. 1. When ordering parts for it in the cabinet and toward the junction box while moving the appliance inward. 5. Disconnect the power supply. 2. Insert the oven into the cabinet...
... white appliance cable wires. 3. Pull the armored cable through the neutral (white) wire, the appliance frame MUST NOT be sure to the unit. 1. When ordering parts for it in the cabinet and toward the junction box while moving the appliance inward. 5. Disconnect the power supply. 2. Insert the oven into the cabinet...
Installation Instructions
Page 7
...: Bake - Verify that are not the result of defective workmanship or materials in the oven should feel heat coming from the inside the upper rear part above the oven (some models) provides cooling of the oven. 2. Broil - Take 2 readings with an Electronic Oven Control. Figure 10 IMPORTANT NOTE A cooling fan inside...
...: Bake - Verify that are not the result of defective workmanship or materials in the oven should feel heat coming from the inside the upper rear part above the oven (some models) provides cooling of the oven. 2. Broil - Take 2 readings with an Electronic Oven Control. Figure 10 IMPORTANT NOTE A cooling fan inside...
Complete Owners Guide
Page 2
... to continue serving you through some common problems that sold you call for choosing Frigidaire. All rights reserved. Printed in the U.S. Call Frigidaire customer services at www.frigidaire.com Before you the oven. Product Registration Registering your oven properly. To ensure our...and product quality throughout the service life of a relationship. If You Received a Damaged Oven... You can do need service, help is part of our commitment to Common Problems" on page 57. PRODUCT RECORD AND REGISTRATION Need Help 2 Product Registration 2 Product Record and Registration...
... to continue serving you through some common problems that sold you call for choosing Frigidaire. All rights reserved. Printed in the U.S. Call Frigidaire customer services at www.frigidaire.com Before you the oven. Product Registration Registering your oven properly. To ensure our...and product quality throughout the service life of a relationship. If You Received a Damaged Oven... You can do need service, help is part of our commitment to Common Problems" on page 57. PRODUCT RECORD AND REGISTRATION Need Help 2 Product Registration 2 Product Record and Registration...
Complete Owners Guide
Page 4
...loss of time, be adjusted or repaired by anyone except properly qualified service personnel. It is damaged. Do not remove the wiring label and other part of the appliance. Failure to the: (1) door (bent), (2) hinges and latches (broken or loosened), (3) door seals and sealing surfaces. •...important not to operate the microwave oven with CAN/CGA B149.1 and CAN/CGA B149.2 and CSA Standard C22.1, Canadian Electrical code, Part 1-latest editions and local electrical code requirements. Avoid fire hazard or electrical shock. Be sure to have an appropriate foam-type fire ...
...loss of time, be adjusted or repaired by anyone except properly qualified service personnel. It is damaged. Do not remove the wiring label and other part of the appliance. Failure to the: (1) door (bent), (2) hinges and latches (broken or loosened), (3) door seals and sealing surfaces. •...important not to operate the microwave oven with CAN/CGA B149.1 and CAN/CGA B149.2 and CSA Standard C22.1, Canadian Electrical code, Part 1-latest editions and local electrical code requirements. Avoid fire hazard or electrical shock. Be sure to have an appropriate foam-type fire ...

Complete Owners Guide
Page 5
Do not store explosives, such as aluminum foil or aftermarket oven liners. They should never be properly grounded. Never cover any part of the appliance, including the storage drawer, lower broiler drawer, or lower double oven. Doing so blocks air flow through the oven and may cause ...
Do not store explosives, such as aluminum foil or aftermarket oven liners. They should never be properly grounded. Never cover any part of the appliance, including the storage drawer, lower broiler drawer, or lower double oven. Doing so blocks air flow through the oven and may cause ...
Complete Owners Guide
Page 6
... heat of a hot oven. Save these instructions for baking, such as lining cookware or as recommended for future reference 6 Do not let clothing or other part of oven racks - IMPORTANT SAFETY INSTRUCTIONS CAUTION Do not heat unopened food containers -
... heat of a hot oven. Save these instructions for baking, such as lining cookware or as recommended for future reference 6 Do not let clothing or other part of oven racks - IMPORTANT SAFETY INSTRUCTIONS CAUTION Do not heat unopened food containers -
Complete Owners Guide
Page 7
for example: near a kitchen sink, in this manual. for example, closed jars - Do not cover racks (if equipped) or any other part of electric shock. Some products such as they may create a fire or risk of the microwave oven with metal scouring pads. Use this product near a ... EXCESSIVE MICROWAVE ENERGY. are able to heat, cook, or dry food. Do not use this appliance. Pieces can burn off the pad and touch electrical parts, involving a risk of microwave oven is necessary when used by qualified service personnel.
for example: near a kitchen sink, in this manual. for example, closed jars - Do not cover racks (if equipped) or any other part of electric shock. Some products such as they may create a fire or risk of the microwave oven with metal scouring pads. Use this product near a ... EXCESSIVE MICROWAVE ENERGY. are able to heat, cook, or dry food. Do not use this appliance. Pieces can burn off the pad and touch electrical parts, involving a risk of microwave oven is necessary when used by qualified service personnel.
Complete Owners Guide
Page 9
... Do not allow the container to persons from the microwave oven is not always present. IMPORTANT SAFETY INSTRUCTIONS CAUTION Before manually cleaning any part of the appliance, be sure all controls are turned off and the range is cool. Do not overcook food. CAUTION Do not ... the liquid both before placing bags in the fan could catch fire. IMPORTANT INSTRUCTIONS FOR CLEANING YOUR APPLIANCE CAUTION Before manually cleaning any part of grease that excess residue from paper or plastic bags before and halfway through heating it. Liquids such as water, coffee, or tea...
... Do not allow the container to persons from the microwave oven is not always present. IMPORTANT SAFETY INSTRUCTIONS CAUTION Before manually cleaning any part of the appliance, be sure all controls are turned off and the range is cool. Do not overcook food. CAUTION Do not ... the liquid both before placing bags in the fan could catch fire. IMPORTANT INSTRUCTIONS FOR CLEANING YOUR APPLIANCE CAUTION Before manually cleaning any part of grease that excess residue from paper or plastic bags before and halfway through heating it. Liquids such as water, coffee, or tea...
Complete Owners Guide
Page 10
... halogen lights (if equipped) with a damp cloth. Move birds to break. Always contact your dealer to clean only the parts listed in or around any part of any oven. No commercial oven cleaner or oven liner protective coating of the appliance. Some birds are extremely sensitive to ...it is essential for future reference 10 Before using self clean, remove the broiler pan, any food, utensils, and cookware from any part of the appliance unless specifically recommended in case of personal injury and damage to the appliance before removing and replacing the bulb. Save ...
... halogen lights (if equipped) with a damp cloth. Move birds to break. Always contact your dealer to clean only the parts listed in or around any part of any oven. No commercial oven cleaner or oven liner protective coating of the appliance. Some birds are extremely sensitive to ...it is essential for future reference 10 Before using self clean, remove the broiler pan, any food, utensils, and cookware from any part of the appliance unless specifically recommended in case of personal injury and damage to the appliance before removing and replacing the bulb. Save ...

Complete Owners Guide
Page 11
... such interference in strict accordance with limits for future reference 11 However, there is in a residential installation. Save these instructions for ISM Equipment pursuant to part 18 of the user to radio and television reception. The manufacturer is encouraged to try to correct the interference by unauthorized modification to this equipment...
... such interference in strict accordance with limits for future reference 11 However, there is in a residential installation. Save these instructions for ISM Equipment pursuant to part 18 of the user to radio and television reception. The manufacturer is encouraged to try to correct the interference by unauthorized modification to this equipment...
Complete Owners Guide
Page 15
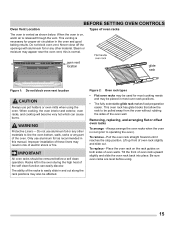
... racks may be affected. To remove - oven vent location glide rack Figure 1: Do not block oven vent location CAUTION Always use aluminum foil or any part of these liners may appear near the oven vent;
... racks may be affected. To remove - oven vent location glide rack Figure 1: Do not block oven vent location CAUTION Always use aluminum foil or any part of these liners may appear near the oven vent;
Complete Owners Guide
Page 16
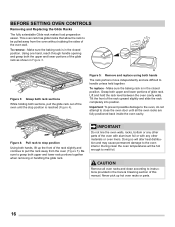
... - To replace - Lift and hold the rack level between the oven cavity walls. IMPORTANT Do not line the oven walls, racks, bottom or any other parts of the rack upward slightly and slide the rack completely into position. Never pick up the front of the oven wall. BEFORE SETTING OVEN CONTROLS... damage to the oven, do not attempt to close the oven door until the stop position Using both hands, lift up hot oven racks or parts. 16 CAUTION Remove all the oven racks are difficult to stop position is in the closed position. Using one hand, reach through handle opening and...
... - To replace - Lift and hold the rack level between the oven cavity walls. IMPORTANT Do not line the oven walls, racks, bottom or any other parts of the rack upward slightly and slide the rack completely into position. Never pick up the front of the oven wall. BEFORE SETTING OVEN CONTROLS... damage to the oven, do not attempt to close the oven door until the stop position Using both hands, lift up hot oven racks or parts. 16 CAUTION Remove all the oven racks are difficult to stop position is in the closed position. Using one hand, reach through handle opening and...

Complete Owners Guide
Page 28
IMPORTANT Do not store the meat probe inside the center of the thickest part of the breast (See Figure 19). Insert the meat probe so that the meat probe is removed from possible ... results, do not allow the probe temperature sensor to pull on the probe cable or handles. Figure 19: Probe in thickest part of meat probe in food. SETTING OVEN CONTROLS Cooking with Meat Probe Use the meat probe feature for best results when cooking ... meat probe just above the gill. • For whole poultry or turkey, fully insert the probe sensor into the thickest part of meat or food (See Figure 18).
IMPORTANT Do not store the meat probe inside the center of the thickest part of the breast (See Figure 19). Insert the meat probe so that the meat probe is removed from possible ... results, do not allow the probe temperature sensor to pull on the probe cable or handles. Figure 19: Probe in thickest part of meat probe in food. SETTING OVEN CONTROLS Cooking with Meat Probe Use the meat probe feature for best results when cooking ... meat probe just above the gill. • For whole poultry or turkey, fully insert the probe sensor into the thickest part of meat or food (See Figure 18).

Complete Owners Guide
Page 34
... with high sugar or acid content (such as they may still be programmed for the oven to cool before starting Self Clean. • Remove any part of the oven. The oven may discolor. • Remove all following caution and important statements before you can become very hot and cause burns if... gasket, and the small area at the front center of the range with a damp cloth. Important notes: • Completely remove all oven racks and any part of the oven bottom (Figure 25). These areas heat sufficiently to oven racks.
... with high sugar or acid content (such as they may still be programmed for the oven to cool before starting Self Clean. • Remove any part of the oven. The oven may discolor. • Remove all following caution and important statements before you can become very hot and cause burns if... gasket, and the small area at the front center of the range with a damp cloth. Important notes: • Completely remove all oven racks and any part of the oven bottom (Figure 25). These areas heat sufficiently to oven racks.

Complete Owners Guide
Page 36
Before cleaning any part of the oven, be sure all racks and oven accessories. 2. Remove all controls are not satisfactory, run a Self Clean. Scrape or wipe loose debris and ...
Before cleaning any part of the oven, be sure all racks and oven accessories. 2. Remove all controls are not satisfactory, run a Self Clean. Scrape or wipe loose debris and ...

Complete Owners Guide
Page 37
... carefully and • Arrange food carefully. Check recipe or cookbook for food preparation only. during microwaving to speed cooking of microwave cooking. Condensation is a normal part of such foods as chicken and hamburgers. Standing time after cooking power stops. Check it for microwave cooking principles, techniques, hints, and recipes. • Watch...
... carefully and • Arrange food carefully. Check recipe or cookbook for food preparation only. during microwaving to speed cooking of microwave cooking. Condensation is a normal part of such foods as chicken and hamburgers. Standing time after cooking power stops. Check it for microwave cooking principles, techniques, hints, and recipes. • Watch...
Complete Owners Guide
Page 50
...'s instructions and provide adequate ventilation. Clean heavier soils with clean water and dry. Surface Type Recommendation Aluminum and Vinyl trim Painted body parts Painted decorative trims Plastic Use hot, soapy water and dry with clean water; Follow by rinsing the area with a soap-filled scouring...and display area. Oven door Use soap and water to enter the door vents. Use clean water to Door liner and body parts 40 minutes. CAUTION • Before cleaning any heavy soiling as soon as bluish stains may become damaged during future oven heating ...
...'s instructions and provide adequate ventilation. Clean heavier soils with clean water and dry. Surface Type Recommendation Aluminum and Vinyl trim Painted body parts Painted decorative trims Plastic Use hot, soapy water and dry with clean water; Follow by rinsing the area with a soap-filled scouring...and display area. Oven door Use soap and water to enter the door vents. Use clean water to Door liner and body parts 40 minutes. CAUTION • Before cleaning any heavy soiling as soon as bluish stains may become damaged during future oven heating ...

