Wiring Diagram
Page 2
...during a 1. Self Clean cycle. 2. 3. Oven functions, if available, operate through a cooktop UI/UIB and a cooktop relay board. Low voltage operating and communications power for 30 seconds or more unit-specific details. Communication occurs through the wiring schemes. The individual boards are ... is not detectable by applying 120VAC directly to the schematics and diagrams and this sheet). The boards that generate low voltage operating and communications power depend upon power-up replace the touch panel. This communication is provided through software programming...
...during a 1. Self Clean cycle. 2. 3. Oven functions, if available, operate through a cooktop UI/UIB and a cooktop relay board. Low voltage operating and communications power for 30 seconds or more unit-specific details. Communication occurs through the wiring schemes. The individual boards are ... is not detectable by applying 120VAC directly to the schematics and diagrams and this sheet). The boards that generate low voltage operating and communications power depend upon power-up replace the touch panel. This communication is provided through software programming...

Complete Owners Guide
Page 47
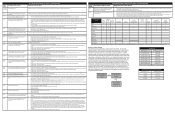
.... 4 8 oz. 8 Melt/Soften x3 Ice cream 1 pint 1 1.5 quarts 2 Melt/Soften x4 Cream cheese 3 oz. 3 8 oz. 8 2. Press START. SETTING THE MICROWAVE Melt / Soften The oven uses low power to serving temperature. Press Auto Cook until the correct food type displays. Veggies The Veggies feature pad lets you cook fresh and frozen vegetables...
.... 4 8 oz. 8 Melt/Soften x3 Ice cream 1 pint 1 1.5 quarts 2 Melt/Soften x4 Cream cheese 3 oz. 3 8 oz. 8 2. Press START. SETTING THE MICROWAVE Melt / Soften The oven uses low power to serving temperature. Press Auto Cook until the correct food type displays. Veggies The Veggies feature pad lets you cook fresh and frozen vegetables...

Complete Owners Guide
Page 49
Enter the time using the numeric keys. 3. "LOW", "MED", and "HIGH" will briefly display to show in a cycle. 3. Press START when the desired volume is a 12 hour clock. This is shown in the ...
Enter the time using the numeric keys. 3. "LOW", "MED", and "HIGH" will briefly display to show in a cycle. 3. Press START when the desired volume is a 12 hour clock. This is shown in the ...
Complete Owners Guide
Page 56
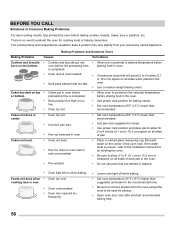
... rack position and place pan to allow 2" to 4" (5.1 cm to desired temperature before placing food in the oven. • Rack position too high or too low. • Oven too hot. • Use proper rack position for baking needs. • Set oven temperature 25°F (13°C) lower than recommended. • Use...
... rack position and place pan to allow 2" to 4" (5.1 cm to desired temperature before placing food in the oven. • Rack position too high or too low. • Oven too hot. • Use proper rack position for baking needs. • Set oven temperature 25°F (13°C) lower than recommended. • Use...