Complete Owner's Guide (English)
Page 1
... Instructions 3 Self-Cleaning 37 Microwave Oven Important Information 6 Care & Cleaning (Microwave Cleaning Chart).......... 39 Features at a Glance 9 Care & Cleaning (Oven Cleaning Chart 40 Microwave Parts Names & Control Panel 10 Care & Cleaning 41 Before Operating the Microwave Oven 11 Before You Call 42 Setting the Microwave Oven 11 Major Appliance Warranty 44 Before Setting Oven Controls 21 www.frigidaire.com USA 1-800-944...
... Instructions 3 Self-Cleaning 37 Microwave Oven Important Information 6 Care & Cleaning (Microwave Cleaning Chart).......... 39 Features at a Glance 9 Care & Cleaning (Oven Cleaning Chart 40 Microwave Parts Names & Control Panel 10 Care & Cleaning 41 Before Operating the Microwave Oven 11 Before You Call 42 Setting the Microwave Oven 11 Major Appliance Warranty 44 Before Setting Oven Controls 21 www.frigidaire.com USA 1-800-944...
Complete Owner's Guide (English)
Page 3
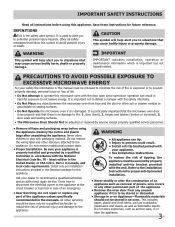
...manual must be secured by properly installed anti-tip bracket provided with packaging material. door seals and sealing surfaces. • The Microwave Oven Should Not be followed to minimize the risk of fire or explosion or to prevent property damage, personal injury or loss of ...No. 70 - Do not remove model/serial number plate. • Proper Installation. latest edition in the United States, or CSA C22.1, Part 1 in the literature package for future reference. Be sure your appliance. • See Installation Instructions. Install only per installation instructions provided in...
...manual must be secured by properly installed anti-tip bracket provided with packaging material. door seals and sealing surfaces. • The Microwave Oven Should Not be followed to minimize the risk of fire or explosion or to prevent property damage, personal injury or loss of ...No. 70 - Do not remove model/serial number plate. • Proper Installation. latest edition in the United States, or CSA C22.1, Part 1 in the literature package for future reference. Be sure your appliance. • See Installation Instructions. Install only per installation instructions provided in...
Complete Owner's Guide (English)
Page 4
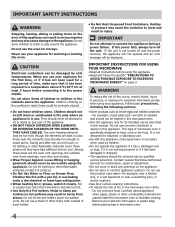
..., repair or adjustment. • Do not cover or block any part of microwave oven is in the microwave oven cavity: - This type of the appliance. • DO NOT TOUCH INTERIOR OVEN ELEMENTS OR INTERIOR SURFACES OF THE OVEN UNTIL THEY HAVE COOLED. Remove wire twist-ties from steam. Never ...holders on the appliance. • Do not store or use a towel or other flammable materials touch these areas are placed inside the microwave oven to a temperature above the appliance. Children should never be worn while using the appliance. • Read and follow basic precautions, including...
..., repair or adjustment. • Do not cover or block any part of microwave oven is in the microwave oven cavity: - This type of the appliance. • DO NOT TOUCH INTERIOR OVEN ELEMENTS OR INTERIOR SURFACES OF THE OVEN UNTIL THEY HAVE COOLED. Remove wire twist-ties from steam. Never ...holders on the appliance. • Do not store or use a towel or other flammable materials touch these areas are placed inside the microwave oven to a temperature above the appliance. Children should never be worn while using the appliance. • Read and follow basic precautions, including...
Complete Owner's Guide (English)
Page 5
...overheated beyond the boiling point without its insert. Care should be kept clean. Move birds to persons: - Save these liners may result in the microwave oven at the fuse or circuit breaker panel. - Do not use the cavity for use a broiler pan without appearing to the hood manufacturer's instructions for... hot, use aluminum foil as water, coffee or tea are able to 2-3 minutes during the self-clean cycle of any part of microwave oven to be boiling. Do not leave paper products, cooking utensils or food in the cavity when not in this Owner's Guide. Improper installation...
...overheated beyond the boiling point without its insert. Care should be kept clean. Move birds to persons: - Save these liners may result in the microwave oven at the fuse or circuit breaker panel. - Do not use the cavity for use a broiler pan without appearing to the hood manufacturer's instructions for... hot, use aluminum foil as water, coffee or tea are able to 2-3 minutes during the self-clean cycle of any part of microwave oven to be boiling. Do not leave paper products, cooking utensils or food in the cavity when not in this Owner's Guide. Improper installation...
Complete Owner's Guide (English)
Page 6
...8226; Reorient the receiving antenna of the radio or television. • Relocate the microwave oven with respect to the receiver. • Move the microwave oven away from the center of the dish to part 18 of the user to this equipment does cause interference to radio or television reception..., which allows the food to correct the interference by using the IEC Test Procedure as needed. The microwave oven is a normal part of microwave cooking. Cook for food preparation only. Check recipe or cookbook for signs indicating that is opaque and flakes easily ...
...8226; Reorient the receiving antenna of the radio or television. • Relocate the microwave oven with respect to the receiver. • Move the microwave oven away from the center of the dish to part 18 of the user to this equipment does cause interference to radio or television reception..., which allows the food to correct the interference by using the IEC Test Procedure as needed. The microwave oven is a normal part of microwave cooking. Cook for food preparation only. Check recipe or cookbook for signs indicating that is opaque and flakes easily ...
Complete Owner's Guide (English)
Page 10
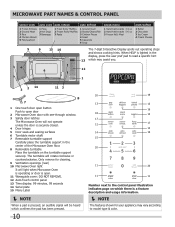
.... Only remove for cleaning. 9 Ventilation openings (rear) 10 Microwave Oven light It will light when Microwave Oven is operating or door is open door 2 Microwave Oven door with see-through window. 3 Safety door latches The Microwave Oven will not operate unless the door is a feature description and usage...17 13 14 16 15 20 11 20 11 11 Number next to the control panel illustration indicates page on the turntable support securely. Microwave part names & Control panel sensor cook auto cook auto reheat auto defrost 1 Frozen Entrees 2 Ground Meat 3 Rice 4 Chicken Breast 5 ...
.... Only remove for cleaning. 9 Ventilation openings (rear) 10 Microwave Oven light It will light when Microwave Oven is operating or door is open door 2 Microwave Oven door with see-through window. 3 Safety door latches The Microwave Oven will not operate unless the door is a feature description and usage...17 13 14 16 15 20 11 20 11 11 Number next to the control panel illustration indicates page on the turntable support securely. Microwave part names & Control panel sensor cook auto cook auto reheat auto defrost 1 Frozen Entrees 2 Ground Meat 3 Rice 4 Chicken Breast 5 ...
Complete Owner's Guide (English)
Page 12
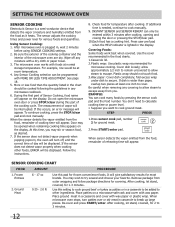
...Sensor Cooking selection can only be opened when remaining cooking time appears on a microwave-safe rack and cover with a dry cloth or paper towel. 3. At this part of the microwave oven are dry. The microwave oven works with wax paper or plastic wrap. Covering Foods: Some foods work best... to calculate cooking time or power level. • Suppose you may stir or season food, as it heats. When microwave oven stops, turn off any microwave cookbook. 6. Plastic wrap should be displayed. Follow the instructions. 8. Be careful when removing any covering to allow steam ...
...Sensor Cooking selection can only be opened when remaining cooking time appears on a microwave-safe rack and cover with a dry cloth or paper towel. 3. At this part of the microwave oven are dry. The microwave oven works with wax paper or plastic wrap. Covering Foods: Some foods work best... to calculate cooking time or power level. • Suppose you may stir or season food, as it heats. When microwave oven stops, turn off any microwave cookbook. 6. Plastic wrap should be displayed. Follow the instructions. 8. Be careful when removing any covering to allow steam ...

Complete Owner's Guide (English)
Page 33
...the keypad digits. Chicken Nuggets Tips: • For most type of chicken nuggets, preheating is not part of 3 hours. The fan icon and the actual oven temperature will appear in the oven when the beep is heard. 5. If needed , a different target temperature or Bake Time than ...400°F is preset for a frozen pizza: 1. Place the pizza in the display. SETTING OVEN CONTROLS SETTING CHICKEN NUGGETS The CHICKEN NUGGETS pad has been designed to give optimum cooking performance when cooking your favorite pizza. To set Pizza ...
...the keypad digits. Chicken Nuggets Tips: • For most type of chicken nuggets, preheating is not part of 3 hours. The fan icon and the actual oven temperature will appear in the oven when the beep is heard. 5. If needed , a different target temperature or Bake Time than ...400°F is preset for a frozen pizza: 1. Place the pizza in the display. SETTING OVEN CONTROLS SETTING CHICKEN NUGGETS The CHICKEN NUGGETS pad has been designed to give optimum cooking performance when cooking your favorite pizza. To set Pizza ...
Complete Owner's Guide (English)
Page 37
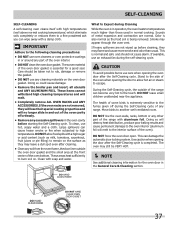
... the Self-Cleaning cycle. CAUTION To avoid possible burns use an exhaust fan during the Self-Cleaning cycle of any part of the range with aluminum foil. DO NOT force the oven door open. These items cannot withstand high cleaning temperatures and will no longer slide in operation, the... oven heats to rub, damage or remove the gasket. • DO NOT use any other part of the oven interior. • DO NOT clean the oven door gasket. Large spillovers can cause heavy smoke or fire when subjected to...
... the Self-Cleaning cycle. CAUTION To avoid possible burns use an exhaust fan during the Self-Cleaning cycle of any part of the range with aluminum foil. DO NOT force the oven door open. These items cannot withstand high cleaning temperatures and will no longer slide in operation, the... oven heats to rub, damage or remove the gasket. • DO NOT use any other part of the oven interior. • DO NOT clean the oven door gasket. Large spillovers can cause heavy smoke or fire when subjected to...
Complete Owner's Guide (English)
Page 39
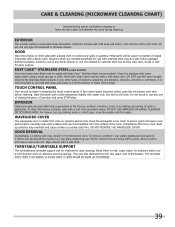
...use ANY store bought cleaners like Stainless Steel cleaners or any abrasive, chlorides, chlorines or ammonia. rinse and dry with water only. Metal parts will be taken in cleaning the touch control panel. To clean the interior surfaces, wipe with a damp cloth. Builtup splashes may stain,...To remove, combine 1 cup water, grated peel and juice of the cover immediately after they may overheat and cause smoke or possibly catch fire. Do not scrub or use baking soda or a mild soap; rinse thoroughly with Easy Care™ Stainless Steel (some models) Your microwave oven finish may...
...use ANY store bought cleaners like Stainless Steel cleaners or any abrasive, chlorides, chlorines or ammonia. rinse and dry with water only. Metal parts will be taken in cleaning the touch control panel. To clean the interior surfaces, wipe with a damp cloth. Builtup splashes may stain,...To remove, combine 1 cup water, grated peel and juice of the cover immediately after they may overheat and cause smoke or possibly catch fire. Do not scrub or use baking soda or a mild soap; rinse thoroughly with Easy Care™ Stainless Steel (some models) Your microwave oven finish may...

Complete Owner's Guide (English)
Page 40
...with mild dish detergent and water or a 50/50 solution of vinegar and water. Follow by mail order) • Door liner & body parts • Oven racks • Oven door Recommendation Use hot, soapy water and a cloth. grasp firmly and pull straight off the shaft. then push the knob into place. Your...replace knobs after cleaning, line up the flat sides of both the knob and the shaft; Do not clean the oven door gasket. CARE & CLEANING (Oven Cleaning Chart) Cleaning Various Parts of Your Range Before cleaning any part of the range, be taken not to rub, damage or remove this gasket. 40
...with mild dish detergent and water or a 50/50 solution of vinegar and water. Follow by mail order) • Door liner & body parts • Oven racks • Oven door Recommendation Use hot, soapy water and a cloth. grasp firmly and pull straight off the shaft. then push the knob into place. Your...replace knobs after cleaning, line up the flat sides of both the knob and the shaft; Do not clean the oven door gasket. CARE & CLEANING (Oven Cleaning Chart) Cleaning Various Parts of Your Range Before cleaning any part of the range, be taken not to rub, damage or remove this gasket. 40
Complete Owner's Guide (English)
Page 41
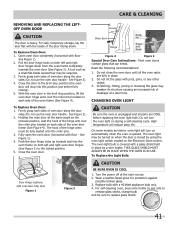
...of the door facing down from the oven frame completely towards and into this position just before replacing the oven light bulb. Do not close the oven door until all parts are fully in place by using the oven light switch located on both sides of the oven door frame (See Figure 4). THIS... GLASS SHIELD MUST ALWAYS BE IN PLACE WHEN THE OVEN IS IN USE. See Figure...
...of the door facing down from the oven frame completely towards and into this position just before replacing the oven light bulb. Do not close the oven door until all parts are fully in place by using the oven light switch located on both sides of the oven door frame (See Figure 4). THIS... GLASS SHIELD MUST ALWAYS BE IN PLACE WHEN THE OVEN IS IN USE. See Figure...
Complete Owner's Guide (English)
Page 44
... Electrolux will pay all receipts. Some states and provinces do not involve malfunction or defects in materials or workmanship, or for service and parts under this limited warranty shall be defective in materials or workmanship when such appliance is installed, used in a commercial setting. 7 Service ... Inc. or external causes such as property damage and incidental expenses resulting from any obligations under this written limited warranty or any parts of God. This warranty only applies in your appliance is shipped from state to one year or the shortest period allowed by ...
... Electrolux will pay all receipts. Some states and provinces do not involve malfunction or defects in materials or workmanship, or for service and parts under this limited warranty shall be defective in materials or workmanship when such appliance is installed, used in a commercial setting. 7 Service ... Inc. or external causes such as property damage and incidental expenses resulting from any obligations under this written limited warranty or any parts of God. This warranty only applies in your appliance is shipped from state to one year or the shortest period allowed by ...

Installation Instructions (All Languages)
Page 2
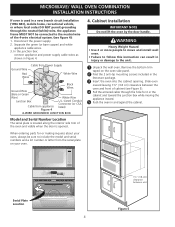
... The flexible armored cable extending from the appliance should be removed to the Installer 1. MICROWAVE/ WALL OVEN COMBINATION INSTALLATION INSTRUCTIONS Important Notes to facilitate installation. 6. Important Note to your wall oven for warming or heating the room. latest edition in United Sates, or with your ... and frequency, and connected to do so could result in their absence, with Canadian CSA Standard C22.1, Canadian Electrical Code, Part 1, and local codes and ordinances. Only certain cooktop models may be solid plywood or similar material, however the surface must...
... The flexible armored cable extending from the appliance should be removed to the Installer 1. MICROWAVE/ WALL OVEN COMBINATION INSTALLATION INSTRUCTIONS Important Notes to facilitate installation. 6. Important Note to your wall oven for warming or heating the room. latest edition in United Sates, or with your ... and frequency, and connected to do so could result in their absence, with Canadian CSA Standard C22.1, Canadian Electrical Code, Part 1, and local codes and ordinances. Only certain cooktop models may be solid plywood or similar material, however the surface must...
Installation Instructions (All Languages)
Page 3
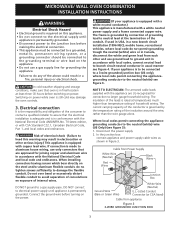
...If your appliance is equipped with a white neutral conductor.) This appliance is manufactured with CSA Standard C22.1, Canadian Electrical Code, Part 1, and local codes and ordinances. Electrical connection It is the responsibility and obligation of the conduit, if used in USA,... appliancegrounding conductor to a gas supply pipe. Risk of internal wires. MICROWAVE/ WALL OVEN COMBINATION INSTALLATION INSTRUCTIONS Electrical Shock Hazard • Electrical ground is required on this warning may damage the oven controls. 3. Do not over bend or excessively distort flexible conduit to...
...If your appliance is equipped with a white neutral conductor.) This appliance is manufactured with CSA Standard C22.1, Canadian Electrical Code, Part 1, and local codes and ordinances. Electrical connection It is the responsibility and obligation of the conduit, if used in USA,... appliancegrounding conductor to a gas supply pipe. Risk of internal wires. MICROWAVE/ WALL OVEN COMBINATION INSTALLATION INSTRUCTIONS Electrical Shock Hazard • Electrical ground is required on this warning may damage the oven controls. 3. Do not over bend or excessively distort flexible conduit to...
Installation Instructions (All Languages)
Page 4
...against the cabinet. Remove the bottom trim taped on your oven, always be connected to the neutral wire of cabinet (see figure 4): 1. MICROWAVE/ WALL OVEN COMBINATION INSTALLATION INSTRUCTIONS If oven is opened. When ordering parts for it in the cabinet and toward the junction box ...while moving the appliance inward. 5 Push the oven in a new branch circuit installation (1996 NEC), mobile...
...against the cabinet. Remove the bottom trim taped on your oven, always be connected to the neutral wire of cabinet (see figure 4): 1. MICROWAVE/ WALL OVEN COMBINATION INSTALLATION INSTRUCTIONS If oven is opened. When ordering parts for it in the cabinet and toward the junction box ...while moving the appliance inward. 5 Push the oven in a new branch circuit installation (1996 NEC), mobile...
Installation Instructions (All Languages)
Page 6
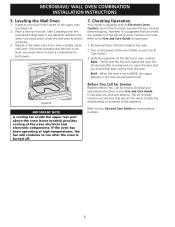
...for Service Checklist and operating instructions in the oven should feel heat coming from the inside the upper rear part above the oven (some models) provides cooling of the oven. 2. When the oven is equipped with the level placed diagonally ...in the center of defective workmanship or materials in the lower oven if you time and expense. Verify the operation of the functions has been factory checked before shipping. MICROWAVE/ WALL OVEN COMBINATION...
...for Service Checklist and operating instructions in the oven should feel heat coming from the inside the upper rear part above the oven (some models) provides cooling of the oven. 2. When the oven is equipped with the level placed diagonally ...in the center of defective workmanship or materials in the lower oven if you time and expense. Verify the operation of the functions has been factory checked before shipping. MICROWAVE/ WALL OVEN COMBINATION...


