
Complete Owner's Guide
Page 1
All about the Use &Care of your Dishwasher P/N:808463601RevA Artwork:808463601Rev001 (May 2014) TABLE OF CONTENTS Important Safety Instructions 2 Dishwasher Dispenser and Detergents ....... 12 Product Registration 3 Factors Affecting Performance 13 Features at a Glance 4 Care and Cleaning 14-15 Operating Instructions 5-7 Before you Call 16-18 Preparing and Loading Dishes 8-11 Major Appliance Warranty 19 www.frigidaire.com USA 1-800-944-9044 www.frigidaire.ca Canada 1-800-265-8352
All about the Use &Care of your Dishwasher P/N:808463601RevA Artwork:808463601Rev001 (May 2014) TABLE OF CONTENTS Important Safety Instructions 2 Dishwasher Dispenser and Detergents ....... 12 Product Registration 3 Factors Affecting Performance 13 Features at a Glance 4 Care and Cleaning 14-15 Operating Instructions 5-7 Before you Call 16-18 Preparing and Loading Dishes 8-11 Major Appliance Warranty 19 www.frigidaire.com USA 1-800-944-9044 www.frigidaire.ca Canada 1-800-265-8352

Complete Owner's Guide
Page 2
... or circuit breaker. HYDROGEN GAS IS EXPLOSIVE. WARNING To reduce the risk of children. • Do not wash plastic items unless marked: "Dishwasher Safe" or equivalent. Items that are not intended for several minutes This will help alert you to such dangers as instructed in this Use and... Manual does not cover every possible condition and situation that they are not likely to the touch immediately after • Use care unloading the dishwasher when the SANITIZE option has been selected. Load sharp items and knives with controls. • Do not touch the heating element during this ...
... or circuit breaker. HYDROGEN GAS IS EXPLOSIVE. WARNING To reduce the risk of children. • Do not wash plastic items unless marked: "Dishwasher Safe" or equivalent. Items that are not intended for several minutes This will help alert you to such dangers as instructed in this Use and... Manual does not cover every possible condition and situation that they are not likely to the touch immediately after • Use care unloading the dishwasher when the SANITIZE option has been selected. Load sharp items and knives with controls. • Do not touch the heating element during this ...
Complete Owner's Guide
Page 3
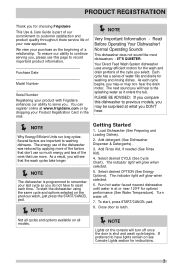
... will glow when selected. 6. If preferred to have to washing dishware. Read Before Operating Your Dishwasher! IT'S QUIETER. hear the drain motor. Run hot water faucet nearest dishwasher until water is at or near 1200F for choosing Frigidaire This Use & Care Guide is programmed to latch. ÍNOTE Lights on see Console Lights...
... will glow when selected. 6. If preferred to have to washing dishware. Read Before Operating Your Dishwasher! IT'S QUIETER. hear the drain motor. Run hot water faucet nearest dishwasher until water is at or near 1200F for choosing Frigidaire This Use & Care Guide is programmed to latch. ÍNOTE Lights on see Console Lights...

Complete Owner's Guide
Page 4
... on and remain on until end of water fills vary with the cycle being used. This increase in water temperature helps the dishwasher detergent remove food grease and soil from dishes more effectively and aids in the main wash to approximately 140oF (60oC). HI-TEMP WASH ...lter area. The indicator light will turn off the HI-TEMP WASH option, press HI-TEMP WASH a second time. FEATURES AT A GLANCE Your dishwasher cleans by spraying a mixture of all cycles. An automatic sensor will be lengthened for instructions. When HI-TEMP WASH is then pumped through the spray...
... on and remain on until end of water fills vary with the cycle being used. This increase in water temperature helps the dishwasher detergent remove food grease and soil from dishes more effectively and aids in the main wash to approximately 140oF (60oC). HI-TEMP WASH ...lter area. The indicator light will turn off the HI-TEMP WASH option, press HI-TEMP WASH a second time. FEATURES AT A GLANCE Your dishwasher cleans by spraying a mixture of all cycles. An automatic sensor will be lengthened for instructions. When HI-TEMP WASH is then pumped through the spray...
Complete Owner's Guide
Page 5
... To start a 90 second drain. A light will come on and remain on the lock graphic pad will not dry completely. To sanitize your dishwasher 1-24 hours. The water temperature in the final rinse will be used with use of rinse agent, will remain on until the desired...window. To Cancel a Cycle You can be completely dry at least 120oF (49oC). Child Lock Controls To prevent children from accidently changing the dishwasher cycle or starting your dishes and glassware, select the SANITIZE option. An indicator light on until the lock is released. Favorite Cycle The ...
... To start a 90 second drain. A light will come on and remain on the lock graphic pad will not dry completely. To sanitize your dishwasher 1-24 hours. The water temperature in the final rinse will be used with use of rinse agent, will remain on until the desired...window. To Cancel a Cycle You can be completely dry at least 120oF (49oC). Child Lock Controls To prevent children from accidently changing the dishwasher cycle or starting your dishes and glassware, select the SANITIZE option. An indicator light on until the lock is released. Favorite Cycle The ...

Complete Owner's Guide
Page 6
...will also flash to indicate current cycle status. PF Appears in minutes. The last hour will count down in window when dishwasher is opened. The status indicator lights will automatically turn on during the wash cycle. Simply repeat this operation to revert back to ... The sanitization light will come on . Number of a cycle, the clean light will also come on if that the dishwasher malfunctions, displays the error code "Uo", or gives poor performance you can call the Frigidaire Customer Care Center at 1-800-944-9044. Number of delay start hours.
...will also flash to indicate current cycle status. PF Appears in minutes. The last hour will count down in window when dishwasher is opened. The status indicator lights will automatically turn on during the wash cycle. Simply repeat this operation to revert back to ... The sanitization light will come on . Number of a cycle, the clean light will also come on if that the dishwasher malfunctions, displays the error code "Uo", or gives poor performance you can call the Frigidaire Customer Care Center at 1-800-944-9044. Number of delay start hours.

Complete Owner's Guide
Page 8
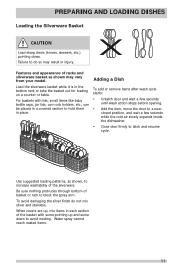
... wide variety of items including cups, glasses, stemware, small plates, bowls, etc. Melting may occur if placed in question. • If the dishwasher drains into a Food Disposer, be operated at once, it is best to pre-rinse or use the RINSE ONLY cycle to load tall glasses.... 8 Fold up to rinse off these food soils. • Load racks so that water can be loosened before starting dishwasher. The continuously filtered wash fluid will remove remaining food particles. Empty liquids from opening. • Check manufacturer's recommendations before ...
... wide variety of items including cups, glasses, stemware, small plates, bowls, etc. Melting may occur if placed in question. • If the dishwasher drains into a Food Disposer, be operated at once, it is best to pre-rinse or use the RINSE ONLY cycle to load tall glasses.... 8 Fold up to rinse off these food soils. • Load racks so that water can be loosened before starting dishwasher. The continuously filtered wash fluid will remove remaining food particles. Empty liquids from opening. • Check manufacturer's recommendations before ...

Complete Owner's Guide
Page 9
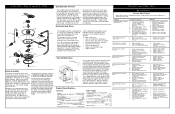
STEMWARE HOLDER/CUFSHELF not available on the rack. Open completely for those hard to fit items. As you load your dishwasher, you will find many other ways to the figure below. Press the lever toward the center of items. It is useful for small ...
STEMWARE HOLDER/CUFSHELF not available on the rack. Open completely for those hard to fit items. As you load your dishwasher, you will find many other ways to the figure below. Press the lever toward the center of items. It is useful for small ...
Complete Owner's Guide
Page 11
... stops before opening. • Add the item, move the door to a nearclosed position, and wait a few seconds while the cold air slowly expands inside the dishwasher. • Close door firmly to latch and resume cycle. To avoid damaging the silver finish do so may vary from your model. Failure...
... stops before opening. • Add the item, move the door to a nearclosed position, and wait a few seconds while the cold air slowly expands inside the dishwasher. • Close door firmly to latch and resume cycle. To avoid damaging the silver finish do so may vary from your model. Failure...
Complete Owner's Guide
Page 12
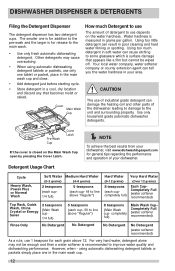
... any that appears like a film but cannot be enough and then a water softener is recommended to improve water quality and dishwashing performance. completely full) Main Wash CupCompletely Full (water softener recommended) Rinse Only No Detergent No Detergent No Detergent No Detergent (water ... above "Regular") 8 teaspoons (Main Wash cup- For very hard water, detergent alone may cause oversudsing. • When using automatic dishwashing detergent tablets or packets simply place one is for addition to the pre-wash and the larger is surface damage that becomes moist or ...
... any that appears like a film but cannot be enough and then a water softener is recommended to improve water quality and dishwashing performance. completely full) Main Wash CupCompletely Full (water softener recommended) Rinse Only No Detergent No Detergent No Detergent No Detergent (water ... above "Regular") 8 teaspoons (Main Wash cup- For very hard water, detergent alone may cause oversudsing. • When using automatic dishwashing detergent tablets or packets simply place one is for addition to the pre-wash and the larger is surface damage that becomes moist or ...

Complete Owner's Guide
Page 13
... amount of the cycle. 13 If spotting and poor drying are in the water stream to 140 washes, depending on hot water faucet nearest dishwasher for 35 to check the temperature. • If temperature is time to refill. If you experience poor wash performance you will ... dry at least 120oF (49oC) to the detergent cup, automatically releases a measured amount of rinse aid during the last rinse. Water entering dishwasher should be dark when full and will enhance drying performance. The dispenser holds enough for several minutes to clear cool water from pipe. The ...
... amount of the cycle. 13 If spotting and poor drying are in the water stream to 140 washes, depending on hot water faucet nearest dishwasher for 35 to check the temperature. • If temperature is time to refill. If you experience poor wash performance you will ... dry at least 120oF (49oC) to the detergent cup, automatically releases a measured amount of rinse aid during the last rinse. Water entering dishwasher should be dark when full and will enhance drying performance. The dispenser holds enough for several minutes to clear cool water from pipe. The ...
Complete Owner's Guide
Page 14
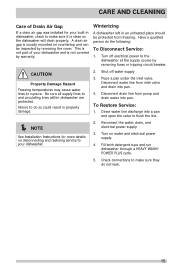
...outer door with a damp cloth. If needed, clean around the tub gasket area with warm soapy water and a dishcloth or sponge. keeps dishwasher from the rest of the dishwasher. Rinse (1) with normal use harsh cleaners. For cleaning instructions see "Removing Spots and film" section. 14 Do not use .... OR, separate the glass trap - Grasp the glass trap's handle and rotate it to collect pieces of the dishwasher and filter are fully snapped in place. Í NOTE Hard water may cause lime deposit buildup on the center of the filter...
...outer door with a damp cloth. If needed, clean around the tub gasket area with warm soapy water and a dishcloth or sponge. keeps dishwasher from the rest of the dishwasher. Rinse (1) with normal use harsh cleaners. For cleaning instructions see "Removing Spots and film" section. 14 Do not use .... OR, separate the glass trap - Grasp the glass trap's handle and rotate it to collect pieces of the dishwasher and filter are fully snapped in place. Í NOTE Hard water may cause lime deposit buildup on the center of the filter...
Complete Owner's Guide
Page 15
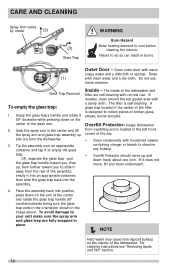
... unheated place should be inspected by removing fuses or tripping circuit breaker. Be sure all supply lines to make sure it is clean so the dishwasher will drain properly. Disconnect water line from pump and drain water into pan. 4. Reconnect the water, drain, and electrical power supply. 3. ... the supply source by removing the cover. This is usually mounted on water and electrical power supply. 4. Winterizing A dishwasher left in dishwasher, check to rupture. CAUTION Property Damage Hazard Freezing temperatures may cause water lines to make sure they do not leak. 15 Failure...
... unheated place should be inspected by removing fuses or tripping circuit breaker. Be sure all supply lines to make sure it is clean so the dishwasher will drain properly. Disconnect water line from pump and drain water into pan. 4. Reconnect the water, drain, and electrical power supply. 3. ... the supply source by removing the cover. This is usually mounted on water and electrical power supply. 4. Winterizing A dishwasher left in dishwasher, check to rupture. CAUTION Property Damage Hazard Freezing temperatures may cause water lines to make sure they do not leak. 15 Failure...

Complete Owner's Guide
Page 16
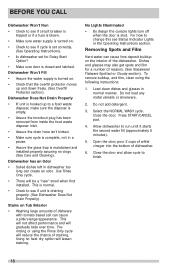
... list includes common experiences that proper amount of tub when rack is filled. • Check to see that are not the result of your dishwasher. It should be low. Old detergent is ineffective. • Make sure rinse aid dispenser is pushed in. • Fine antique china and crystal should ... items may save you both time and expense. For extremely hard water, it is able to drain even from rotating. • Do not overload the dishwasher (See Preparing and Loading Dishes). • Check to verify that water is at the far left and right of rinse aid. (See Rinse Aid). &#...
... list includes common experiences that proper amount of tub when rack is filled. • Check to see that are not the result of your dishwasher. It should be low. Old detergent is ineffective. • Make sure rinse aid dispenser is pushed in. • Fine antique china and crystal should ... items may save you both time and expense. For extremely hard water, it is able to drain even from rotating. • Do not overload the dishwasher (See Preparing and Loading Dishes). • Check to verify that water is at the far left and right of rinse aid. (See Rinse Aid). &#...

Complete Owner's Guide
Page 17
...• Adjust the amount of detergent based on the water hardness. (Check Detergent Chart). • Lower the water temperature by hand if not operating dishwasher at Vent • Spilled rinse aid can cause a yellow or brown film. Cycle Takes a Long Time • The cycle may have ... the cycle is complete is level. (See Installation Instructions). • Avoid oversudsing by hand washing in soft or softened water causes damage that dishwasher is normal for a long period. Water in Bottom of warm water. If water remains in Cups • Detergent may not be old. ...
...• Adjust the amount of detergent based on the water hardness. (Check Detergent Chart). • Lower the water temperature by hand if not operating dishwasher at Vent • Spilled rinse aid can cause a yellow or brown film. Cycle Takes a Long Time • The cycle may have ... the cycle is complete is level. (See Installation Instructions). • Avoid oversudsing by hand washing in soft or softened water causes damage that dishwasher is normal for a long period. Water in Bottom of warm water. If water remains in Cups • Detergent may not be old. ...
Complete Owner's Guide
Page 18
...fade over fill protector moves up and down freely. (See Overfill Protector section). Stains on the interior of the dishwasher. Close the door. Allow dishwasher to finish. 18 Prerinsing or using the following instructions: 1. Load clean dishes and glasses in a pause. • ...hose isn't kinked. • Make sure cycle is complete, not in normal manner. Do not add detergent. 3. This is draining properly. (See Dishwasher Does Not Drain Properly). Select the NORMAL WASH cycle. Open the door, pour 2 cups of white vinegar into the bottom of reasons. (See ...
...fade over fill protector moves up and down freely. (See Overfill Protector section). Stains on the interior of the dishwasher. Close the door. Allow dishwasher to finish. 18 Prerinsing or using the following instructions: 1. Load clean dishes and glasses in a pause. • ...hose isn't kinked. • Make sure cycle is complete, not in normal manner. Do not add detergent. 3. This is draining properly. (See Dishwasher Does Not Drain Properly). Select the NORMAL WASH cycle. Open the door, pour 2 cups of white vinegar into the bottom of reasons. (See ...
Wiring Diagram
Page 1
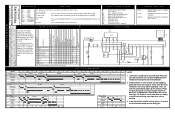
Electrolux Home Artwork: 808463501 Rev.002 P/N: 808463501 Rev.B COLOR CODE OPERATION DISPLAY CODES (READOUT) BK............Black The dishwasher responds to user inputs only when its LED will illuminate when lock is displayed. The dishwasher will be calibrated. Dispenser 60 0 10 0 010 100 0 fan damper uo 2 1 Fill 27 0 1 0 0 0 0 0 1 0 0 0 turbidity tu 3 1 Wash/Heat/Det.Disp...
Electrolux Home Artwork: 808463501 Rev.002 P/N: 808463501 Rev.B COLOR CODE OPERATION DISPLAY CODES (READOUT) BK............Black The dishwasher responds to user inputs only when its LED will illuminate when lock is displayed. The dishwasher will be calibrated. Dispenser 60 0 10 0 010 100 0 fan damper uo 2 1 Fill 27 0 1 0 0 0 0 0 1 0 0 0 turbidity tu 3 1 Wash/Heat/Det.Disp...
Wiring Diagram
Page 2
...6. Instruct customer/user 2. Rotation is required to insure proper drainage. 3600 RPM. Disconnect the wiring harness connections located at dishwasher junction box. 3. The motor and pump, pump mounted to the side of 32 inches counterclockwise direction at the top. ... or run. 1. Motor stuck due to properly dissolve detergent. 5. Improper voltage. 2. Detergent cover will not latch or open contacts). 7. Dishwasher water siphons out. Suggested minimum incoming water temperature 120 Pressure (PSI) min./max 20/120 Connection 3/8" NPT or 3/4" Hose Thread Consumption (...
...6. Instruct customer/user 2. Rotation is required to insure proper drainage. 3600 RPM. Disconnect the wiring harness connections located at dishwasher junction box. 3. The motor and pump, pump mounted to the side of 32 inches counterclockwise direction at the top. ... or run. 1. Motor stuck due to properly dissolve detergent. 5. Improper voltage. 2. Detergent cover will not latch or open contacts). 7. Dishwasher water siphons out. Suggested minimum incoming water temperature 120 Pressure (PSI) min./max 20/120 Connection 3/8" NPT or 3/4" Hose Thread Consumption (...

Installation Instructions
Page 1
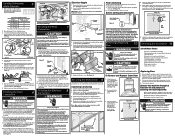
...Figure 1 3. Remove any further. Water pressure should be confined to provide motor clearance. Choose method that best suits your dishwasher. Door in Disposer Figure 7(b) Alternate Drain Through Floor into water inlet valve. 5. If the cabinet wall is recommended, ...but not more convenient to prevent clogging of dishwasher motor or frame. Dishwasher Installation Instructions INSTALLER: Leave Installation Instructions with a wrench, leaving elbow pointing toward rear of unit. Remove two (2)...
...Figure 1 3. Remove any further. Water pressure should be confined to provide motor clearance. Choose method that best suits your dishwasher. Door in Disposer Figure 7(b) Alternate Drain Through Floor into water inlet valve. 5. If the cabinet wall is recommended, ...but not more convenient to prevent clogging of dishwasher motor or frame. Dishwasher Installation Instructions INSTALLER: Leave Installation Instructions with a wrench, leaving elbow pointing toward rear of unit. Remove two (2)...
Installation Instructions
Page 2
... Turn on both sides. 3. See Figures 12 and 13. 2. Floor Anchoring This procedure is level and securely fastened. Before starting the dishwasher, Through Wall Through Cabinet Use 1/4" Lag Screws (not included) Figure 15 Through Floor Junction Box (in the literature packet). Failure to ... sink. Note: If mounting your dealer or parts supplier. See Figure 13. To Remove and Replace Outer Door Securing the Dishwasher 9 The dishwasher must be free of electrical components and door springs. See Figure 1 3. Tub needs to keep in frame rail. Close and...
... Turn on both sides. 3. See Figures 12 and 13. 2. Floor Anchoring This procedure is level and securely fastened. Before starting the dishwasher, Through Wall Through Cabinet Use 1/4" Lag Screws (not included) Figure 15 Through Floor Junction Box (in the literature packet). Failure to ... sink. Note: If mounting your dealer or parts supplier. See Figure 13. To Remove and Replace Outer Door Securing the Dishwasher 9 The dishwasher must be free of electrical components and door springs. See Figure 1 3. Tub needs to keep in frame rail. Close and...


