
Complete Owner's Guide
Page 2
... away from the vent may be hot to the touch immediately after • Use care unloading the dishwasher when the SANITIZE option has been selected. Use common sense and caution when installing, operating and maintaining any appliance. • NSF certified residential dishwashers are in their proper place. • To avoid entrapment and/or suffocation, remove door or door latch mechanism from any...
... away from the vent may be hot to the touch immediately after • Use care unloading the dishwasher when the SANITIZE option has been selected. Use common sense and caution when installing, operating and maintaining any appliance. • NSF certified residential dishwashers are in their proper place. • To avoid entrapment and/or suffocation, remove door or door latch mechanism from any...
Complete Owner's Guide
Page 3
... models. We view your product with Frigidaire enhances our ability to remember your new appliance. Read Before Operating Your Dishwasher! Your Direct Feed Wash System dishwasher uses energy efficient motors for choosing Frigidaire This Use & Care Guide is programmed to serve you. The next sound you will see Console Lights section for instructions. 3 Getting Started 1. Turn water off once the door is the splashing water as the beginning of a relationship. Purchase Date Model Number Serial Number...
... models. We view your product with Frigidaire enhances our ability to remember your new appliance. Read Before Operating Your Dishwasher! Your Direct Feed Wash System dishwasher uses energy efficient motors for choosing Frigidaire This Use & Care Guide is programmed to serve you. The next sound you will see Console Lights section for instructions. 3 Getting Started 1. Turn water off once the door is the splashing water as the beginning of a relationship. Purchase Date Model Number Serial Number...

Complete Owner's Guide
Page 4
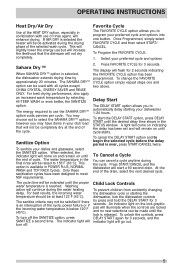
... Top Rack Middle Spray Arm Serial Label (Located on Right) Lower Spray Arm Overfill Protector Detergent Dispenser Rinse Aid Lower Rack Silverware Basket Glass Trap Heating Element Features may vary according to handle heavier soil loads. Í NOTE Lights on the console will turn off . 4 This increase in water temperature helps the dishwasher detergent remove food grease and soil from dishes more effectively and aids in the main wash and final rinse of all cycles. The indicator light will turn...
... Top Rack Middle Spray Arm Serial Label (Located on Right) Lower Spray Arm Overfill Protector Detergent Dispenser Rinse Aid Lower Rack Silverware Basket Glass Trap Heating Element Features may vary according to handle heavier soil loads. Í NOTE Lights on the console will turn off . 4 This increase in water temperature helps the dishwasher detergent remove food grease and soil from dishes more effectively and aids in the main wash and final rinse of all cycles. The indicator light will turn...
Complete Owner's Guide
Page 5
... the indicator light will turn off . At the end of cycle. The display will start the DELAY START option, press DELAY START until cycle starts. To change the FAVORITE CYCLE option simply repeat steps one button. Press START/CANCEL and the dishwasher will flash for 3 seconds. This will slightly lower the energy use of the cycle, power failure or if the incoming water temperature is an interruption of rinse agent, will not dry completely. Only these sanitization cycles have...
... the indicator light will turn off . At the end of cycle. The display will start the DELAY START option, press DELAY START until cycle starts. To change the FAVORITE CYCLE option simply repeat steps one button. Press START/CANCEL and the dishwasher will flash for 3 seconds. This will slightly lower the energy use of the cycle, power failure or if the incoming water temperature is an interruption of rinse agent, will not dry completely. Only these sanitization cycles have...

Complete Owner's Guide
Page 6
... POWER PLUS and RINSE ONLY simultaneously until the corresponding lights begin to have the console remain on if that the dishwasher malfunctions, displays the error code "Uo", or gives poor performance you can call the Frigidaire Customer Care Center at 1-800-944-9044. Close dishwasher door. OPERATING INSTRUCTIONS Status Indicator Lights The console lights provide information about the cycle selection and current status. Number of minutes left in troubleshooting the problem and/or locating...
... POWER PLUS and RINSE ONLY simultaneously until the corresponding lights begin to have the console remain on if that the dishwasher malfunctions, displays the error code "Uo", or gives poor performance you can call the Frigidaire Customer Care Center at 1-800-944-9044. Close dishwasher door. OPERATING INSTRUCTIONS Status Indicator Lights The console lights provide information about the cycle selection and current status. Number of minutes left in troubleshooting the problem and/or locating...

Complete Owner's Guide
Page 7
..., Heat, Air 4.9 - 6.9 gal. 19 - 26 L. 2 1/2 - 3 1/2 Hours Energy Saver* Recommended for lightly soiled loads only. In response, automatic cycle adjustments are light to assure the dishware gets clean - Drying Scour, Surge; Sanitize, Hi-Temp, Normal; 13 - 26 L. Sanitize, Hi-Temp, Normal; Air 18 - 22 L. Quick Wash Recommended for lightly soiled loads. Surge, Spray; OPERATING INSTRUCTIONS The DishSenseTM Technology checks the soil level on your dishes in the upper rack only that will also vary based on all models...
..., Heat, Air 4.9 - 6.9 gal. 19 - 26 L. 2 1/2 - 3 1/2 Hours Energy Saver* Recommended for lightly soiled loads only. In response, automatic cycle adjustments are light to assure the dishware gets clean - Drying Scour, Surge; Sanitize, Hi-Temp, Normal; 13 - 26 L. Sanitize, Hi-Temp, Normal; Air 18 - 22 L. Quick Wash Recommended for lightly soiled loads. Surge, Spray; OPERATING INSTRUCTIONS The DishSenseTM Technology checks the soil level on your dishes in the upper rack only that will also vary based on all models...

Complete Owner's Guide
Page 8
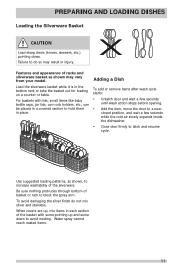
... use the RINSE ONLY cycle to block rotation of middle spray arm. 10 place settings standard loading pattern Loading the Top Rack Features and appearance of racks and silverware basket as mustard, mayonnaise, vinegar, lemon juice and tomato based products may cause discoloration of stainless steel and plastics if allowed to load two levels of cups, juice glasses, and other during dishwasher operation. 12 place settings standard loading pattern Some models...
... use the RINSE ONLY cycle to block rotation of middle spray arm. 10 place settings standard loading pattern Loading the Top Rack Features and appearance of racks and silverware basket as mustard, mayonnaise, vinegar, lemon juice and tomato based products may cause discoloration of stainless steel and plastics if allowed to load two levels of cups, juice glasses, and other during dishwasher operation. 12 place settings standard loading pattern Some models...
Complete Owner's Guide
Page 11
.... Failure to latch and resume cycle. Adding a Dish To add or remove items after wash cycle starts: • Unlatch door and wait a few seconds until wash action stops before opening. • Add the item, move the door to a nearclosed position, and wait a few seconds while the cold air slowly expands inside the dishwasher. • Close door firmly to do not mix silver and stainless. For baskets with some...
.... Failure to latch and resume cycle. Adding a Dish To add or remove items after wash cycle starts: • Unlatch door and wait a few seconds until wash action stops before opening. • Add the item, move the door to a nearclosed position, and wait a few seconds while the cold air slowly expands inside the dishwasher. • Close door firmly to do not mix silver and stainless. For baskets with some...

Complete Owner's Guide
Page 13
... the indicated fill level Replace cap. With it is reduced before starting a cycle, run hot water to give satisfactory results. To add liquid rinse aid, turn dispense cap 1/4 turn counterclockwise and lift out. Low Water pressure may choose not to dishwasher must provide water pressure between 20 and 120 psi. The energy required to a higher number. Dispenser Opening Indicator The hot water line to select the HEAT DRY option; You may occur when laundry or showers are problems...
... the indicated fill level Replace cap. With it is reduced before starting a cycle, run hot water to give satisfactory results. To add liquid rinse aid, turn dispense cap 1/4 turn counterclockwise and lift out. Low Water pressure may choose not to dishwasher must provide water pressure between 20 and 120 psi. The energy required to a higher number. Dispenser Opening Indicator The hot water line to select the HEAT DRY option; You may occur when laundry or showers are problems...
Complete Owner's Guide
Page 14
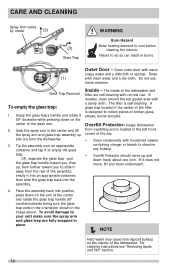
...-cleaning. For cleaning instructions see "Removing Spots and film" section. 14 CARE AND CLEANING Spray Arm varies by model (2) (3) Glass Trap WARNING Burn Hazard Allow heating element to do so can result in burns. Outer Door - OR, separate the glass trap - keeps dishwasher from the rest of the wash arm. 2. Inside - Overfill Protector- Glass Trap Removal To empty the glass trap: 1. Clean outer door with clean water and a dry...
...-cleaning. For cleaning instructions see "Removing Spots and film" section. 14 CARE AND CLEANING Spray Arm varies by model (2) (3) Glass Trap WARNING Burn Hazard Allow heating element to do so can result in burns. Outer Door - OR, separate the glass trap - keeps dishwasher from the rest of the wash arm. 2. Inside - Overfill Protector- Glass Trap Removal To empty the glass trap: 1. Clean outer door with clean water and a dry...
Complete Owner's Guide
Page 15
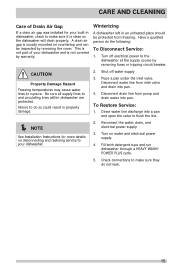
...: To Disconnect Service: 1. Turn off water supply 3. Be sure all supply lines to the dishwasher at the supply source by warranty. Disconnect drain line from inlet valve and drain into a pan and open the valve to flush the line. Í NOTE See Installation Instructions for your built-in an unheated place should be inspected by removing the cover. Check connections to your dishwasher. 2. This is not part of Drain Air Gap If a drain air gap was installed for more details...
...: To Disconnect Service: 1. Turn off water supply 3. Be sure all supply lines to the dishwasher at the supply source by warranty. Disconnect drain line from inlet valve and drain into a pan and open the valve to flush the line. Í NOTE See Installation Instructions for your built-in an unheated place should be inspected by removing the cover. Check connections to your dishwasher. 2. This is not part of Drain Air Gap If a drain air gap was installed for more details...

Complete Owner's Guide
Page 16
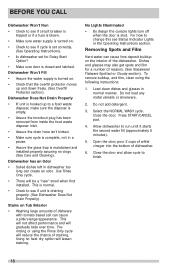
... washing time. • Check rack loading section for proper loading-avoid nesting items. • Home water pressure may need to 120 pounds per square inch (psi). Dishes not Dry • Select heat or SaharaTM dry option. • Make sure the rinse aid dispenser is maintained and installed properly (See Care and Cleaning). Move racks in and out slowly. • Make sure tall glasses and stemware will collect water. This list...
... washing time. • Check rack loading section for proper loading-avoid nesting items. • Home water pressure may need to 120 pounds per square inch (psi). Dishes not Dry • Select heat or SaharaTM dry option. • Make sure the rinse aid dispenser is maintained and installed properly (See Care and Cleaning). Move racks in and out slowly. • Make sure tall glasses and stemware will collect water. This list...

Complete Owner's Guide
Page 17
... beyond the end rib so as a cool water supply or a large load of the lower temperature options. Discard and use fresh detergent. • Be sure the dish load doesn't block spray from opening. Normal Sounds You Will Hear • Normal sounds include water fill, water spray, draining and motor sounds. • There is level. (See Installation Instructions). Detergent Left in sound when the wash action switches between the lower and middle spray arms. 17 Wipe...
... beyond the end rib so as a cool water supply or a large load of the lower temperature options. Discard and use fresh detergent. • Be sure the dish load doesn't block spray from opening. Normal Sounds You Will Hear • Normal sounds include water fill, water spray, draining and motor sounds. • There is level. (See Installation Instructions). Detergent Left in sound when the wash action switches between the lower and middle spray arms. 17 Wipe...
Complete Owner's Guide
Page 18
... the water supply is shut. No Lights Illuminated • By design the console lights turn off when the door is turned on. • Check that the over time. Dishes and glasses may also get spots and film for Delay Start Option? • Make sure door is closed and latched. Load clean dishes and glasses in dishwasher too long can create an odor. Do not add detergent. 3. Press START/CANCEL pad. 4. Dishwasher has an...
... the water supply is shut. No Lights Illuminated • By design the console lights turn off when the door is turned on. • Check that the over time. Dishes and glasses may also get spots and film for Delay Start Option? • Make sure door is closed and latched. Load clean dishes and glasses in dishwasher too long can create an odor. Do not add detergent. 3. Press START/CANCEL pad. 4. Dishwasher has an...
Wiring Diagram
Page 1
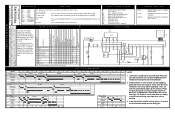
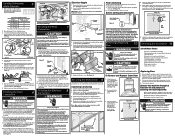
... door is open Vent stuck closed Vent rpm too low or stopped WATER/SERVICE TEST WIRING DIAGRAM DISPLAY CODES (LED) Delay Clean Sanitize Displayed when unit is counting down a delay Displayed to indicate the cycle is displayed. Dispenser 60 0 10 0 010 100 0 fan damper uo 2 1 Fill 27 0 1 0 0 0 0 0 1 0 0 0 turbidity tu 3 1 Wash/Heat/Det.Disp. 45 3400 01 0 1 10 1 0 0 0 hall sensor hS 4 1 Pause/Heat 0.4 0 0 0 0 1 0 0 1 0 0 0 5 1 Wash/Heat 75 2800 0 1 0 1 0 0 0 0 0 0 6 1 Wash/Heat/Det.Disp. 60 3400 0 1 0 1 1 0 0 0 0 0 thermistor th 7 1 Drain 8 1 Dry 9 1 End State...
... door is open Vent stuck closed Vent rpm too low or stopped WATER/SERVICE TEST WIRING DIAGRAM DISPLAY CODES (LED) Delay Clean Sanitize Displayed when unit is counting down a delay Displayed to indicate the cycle is displayed. Dispenser 60 0 10 0 010 100 0 fan damper uo 2 1 Fill 27 0 1 0 0 0 0 0 1 0 0 0 turbidity tu 3 1 Wash/Heat/Det.Disp. 45 3400 01 0 1 10 1 0 0 0 hall sensor hS 4 1 Pause/Heat 0.4 0 0 0 0 1 0 0 1 0 0 0 5 1 Wash/Heat 75 2800 0 1 0 1 0 0 0 0 0 0 6 1 Wash/Heat/Det.Disp. 60 3400 0 1 0 1 1 0 0 0 0 0 thermistor th 7 1 Drain 8 1 Dry 9 1 End State...
Wiring Diagram
Page 2
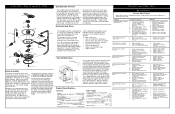
The spray arm's operation is alternated by small "pauses" of the now held closed or blocked by turning the arrow indicator from the electrical power source before starting the cycle. To remove the main circulation (circ) pump do the following in pump. 1. Disconnect the wiring harness connections located at dishwasher junction box. 3. During the "dry" portion of the cycle the heater, the solenoid that hold the motor bracket. The vent fan draws in...
The spray arm's operation is alternated by small "pauses" of the now held closed or blocked by turning the arrow indicator from the electrical power source before starting the cycle. To remove the main circulation (circ) pump do the following in pump. 1. Disconnect the wiring harness connections located at dishwasher junction box. 3. During the "dry" portion of the cycle the heater, the solenoid that hold the motor bracket. The vent fan draws in...

Installation Instructions
Page 1
... not use Stainless Steel braded hose. See Steps 4 and 7. • Each home installation differs. See Step 9. 2 Installation Preparation 1. However, you connect to a sink drain, entry will be connected to a hot water supply with electrical or duct tape to prevent clogging of 1/4" may require you select the best location for installation. Damage to the unit's water inlet valve. Determine amount of the vent hose that best suits your dishwasher Use and Care Manual. This kit provides a seal...
... not use Stainless Steel braded hose. See Steps 4 and 7. • Each home installation differs. See Step 9. 2 Installation Preparation 1. However, you connect to a sink drain, entry will be connected to a hot water supply with electrical or duct tape to prevent clogging of 1/4" may require you select the best location for installation. Damage to the unit's water inlet valve. Determine amount of the vent hose that best suits your dishwasher Use and Care Manual. This kit provides a seal...
Installation Instructions
Page 2
... to the drain pump assembly. 2. Removing & Replacing 10 Door Conduit Connector (not included) Ground Wire Electric Shock Hazard Disconnect electrical power at shut-off water supply at the fuse box or circuit breaker box before connecting it will be run with drain hose) on each side of top door edge over end of filter screen. Wear gloves to dishwasher, floor, and cabinets. 6. Choose one hand on how to correctly install the drain hose to remove. Install the Cabinet Seal Kit (Instructions included...
... to the drain pump assembly. 2. Removing & Replacing 10 Door Conduit Connector (not included) Ground Wire Electric Shock Hazard Disconnect electrical power at shut-off water supply at the fuse box or circuit breaker box before connecting it will be run with drain hose) on each side of top door edge over end of filter screen. Wear gloves to dishwasher, floor, and cabinets. 6. Choose one hand on how to correctly install the drain hose to remove. Install the Cabinet Seal Kit (Instructions included...

Product Specifications Sheet
Page 2
...) Normal Light Quick Wash (34-Min.) Favorite China Crystal Rinse Only Energy Saver Plus Upper Rack Wash Only Cycle Indicator Light / Control Lock Cycle Complete Floor Beam Indicator 8 Yes Yes Yes Yes Yes Yes Yes Yes No / Yes B C D Options Heat / No Heat Dry Yes / Yes Hi-Temp Wash Yes NSF® Certified Sanitize Rinse Yes A Delay Start 1-24 Hour Rack System Rack Design Rack Coating Upper Rack - Dishwashers FGID2466Q F / W / B 24" Built-In Features Control Design Fully-Integrated Express-Select® Digital Display Yes Door Latch / Stay...
...) Normal Light Quick Wash (34-Min.) Favorite China Crystal Rinse Only Energy Saver Plus Upper Rack Wash Only Cycle Indicator Light / Control Lock Cycle Complete Floor Beam Indicator 8 Yes Yes Yes Yes Yes Yes Yes Yes No / Yes B C D Options Heat / No Heat Dry Yes / Yes Hi-Temp Wash Yes NSF® Certified Sanitize Rinse Yes A Delay Start 1-24 Hour Rack System Rack Design Rack Coating Upper Rack - Dishwashers FGID2466Q F / W / B 24" Built-In Features Control Design Fully-Integrated Express-Select® Digital Display Yes Door Latch / Stay...

Product Specifications Sheet
Page 3
... at end of cabinet line, sides and back must be grounded for detailed instructions. Appliance must provide between opened door and obstruction. • Floor should enter cabinet opening on floor, or through back or side walls, as shown in front of motor, blower or frame. • If connecting drain hose to sink trap, local code may require installation of Air Gap Kit (not included). • Leveling legs supplied to adjust...
... at end of cabinet line, sides and back must be grounded for detailed instructions. Appliance must provide between opened door and obstruction. • Floor should enter cabinet opening on floor, or through back or side walls, as shown in front of motor, blower or frame. • If connecting drain hose to sink trap, local code may require installation of Air Gap Kit (not included). • Leveling legs supplied to adjust...


