
Wiring Diagram (All Languages)
Page 1
... & NO DOOR OPENINGS AT MID-POINT CONTROL SETTING (2500 ++ V4) Type A with an Adaptive Defrost Control (ADC). CONDENSER FAN MOTOR Watts RPM Amps 3.1 1100 CW Opposite Shaft 0.03 Running ICE MAKER SPECIFICATIONS Electrical 115 vac (127 vac max) Thermostat Opens at 48° F ( 9° C), Closes at 500°F. AUTOMATIC DEFROST SIDE BY SIDE - Untrained persons should not attempt to make repairs due to the possibility of compressor run time. A "d" in the freezer temperature window and...
... & NO DOOR OPENINGS AT MID-POINT CONTROL SETTING (2500 ++ V4) Type A with an Adaptive Defrost Control (ADC). CONDENSER FAN MOTOR Watts RPM Amps 3.1 1100 CW Opposite Shaft 0.03 Running ICE MAKER SPECIFICATIONS Electrical 115 vac (127 vac max) Thermostat Opens at 48° F ( 9° C), Closes at 500°F. AUTOMATIC DEFROST SIDE BY SIDE - Untrained persons should not attempt to make repairs due to the possibility of compressor run time. A "d" in the freezer temperature window and...

Installation Instructions (All Languages)
Page 1
... tube in Ice Maker House water supply connected to install your refrigerator as it to a water supply, make sure the ice maker's power switch is designed to be level and able to refrigerator Cabinet is shut off valve. CAUTION IMPORTANT If you still have already removed your refrigerator's compressor. To level the doors using a 7/16 inch wrench. (See illustration 3.) 3 If the freezer door is lower than the freezer door, raise the refrigerator door by turning the adjustment screw clockwise using the adjustable lower hinge (Type...
... tube in Ice Maker House water supply connected to install your refrigerator as it to a water supply, make sure the ice maker's power switch is designed to be level and able to refrigerator Cabinet is shut off valve. CAUTION IMPORTANT If you still have already removed your refrigerator's compressor. To level the doors using a 7/16 inch wrench. (See illustration 3.) 3 If the freezer door is lower than the freezer door, raise the refrigerator door by turning the adjustment screw clockwise using the adjustable lower hinge (Type...
Use and Care Manual
Page 1
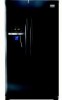
All about the Use &Care of your Refrigerator 242108502 (November 2010) TABLE OF CONTENTS Important Safety Instructions 2 Features at a Glance 4 Installation 5 Door Removal Instructions 7 Handle Installation 8 Connecting Water Supply 9 Controls 10 Storage Features 12 Automatic Ice & Water Dispenser 13 Changing the Filter 15 Normal Operating Sounds and Sights 17 Care and Cleaning 18 Before you Call 19 Major Appliance Warranty 21 www.frigidaire.com USA 1-800-944-9044 www.frigidaire.ca Canada 1-800-265-8352
All about the Use &Care of your Refrigerator 242108502 (November 2010) TABLE OF CONTENTS Important Safety Instructions 2 Features at a Glance 4 Installation 5 Door Removal Instructions 7 Handle Installation 8 Connecting Water Supply 9 Controls 10 Storage Features 12 Automatic Ice & Water Dispenser 13 Changing the Filter 15 Normal Operating Sounds and Sights 17 Care and Cleaning 18 Before you Call 19 Major Appliance Warranty 21 www.frigidaire.com USA 1-800-944-9044 www.frigidaire.ca Canada 1-800-265-8352
Use and Care Manual
Page 2
... food and freezer temperatures set Crisper humidity controls set Registration card sent in the presence of explosive fumes. • Avoid contact with any moving parts of this or any other appliances or furniture. IMPORTANT IMPORTANT indicates installation, operation or maintenance information which , if not avoided, will result in 24 hours Ice maker is turned ON Ice & water dispenser operates correctly Front filter must...
... food and freezer temperatures set Crisper humidity controls set Registration card sent in the presence of explosive fumes. • Avoid contact with any moving parts of this or any other appliances or furniture. IMPORTANT IMPORTANT indicates installation, operation or maintenance information which , if not avoided, will result in 24 hours Ice maker is turned ON Ice & water dispenser operates correctly Front filter must...
Use and Care Manual
Page 3
... refrigerator by pulling on the left side of the temperature control panel (Electronic controls), or turning the Freezer and Fresh Food controls to "0" (Mechanical controls) will disable your refrigerator you throw away your old refrigerator/ freezer: • Remove doors. • Leave shelves in place so children may break suddenly if nicked, scratched, or exposed to the light bulb and other electrical components. Proper Disposal of your warranty. • Do not plug...
... refrigerator by pulling on the left side of the temperature control panel (Electronic controls), or turning the Freezer and Fresh Food controls to "0" (Mechanical controls) will disable your refrigerator you throw away your old refrigerator/ freezer: • Remove doors. • Leave shelves in place so children may break suddenly if nicked, scratched, or exposed to the light bulb and other electrical components. Proper Disposal of your warranty. • Do not plug...
Use and Care Manual
Page 5
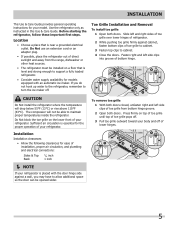
... turn the ice maker off of bottom hinge. Before starting the refrigerator, follow these important first steps. Slide left side clips into groove of lower hinges. 5 Fasten right and left and right sides of toe grille over lower hinges of your model. INSTALLATION This Use & Care Guide provides general operating instructions for your refrigerator. Installation Installation clearances • Allow the following clearances for ease of installation, proper air circulation, and plumbing and electrical connections...
... turn the ice maker off of bottom hinge. Before starting the refrigerator, follow these important first steps. Slide left side clips into groove of lower hinges. 5 Fasten right and left and right sides of toe grille over lower hinges of your model. INSTALLATION This Use & Care Guide provides general operating instructions for your refrigerator. Installation Installation clearances • Allow the following clearances for ease of installation, proper air circulation, and plumbing and electrical connections...

Use and Care Manual
Page 6
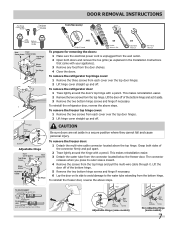
... adjustable front rollers. To level the doors using the adjustable lower hinge (some models) Hinge 6 Replace the toe grille by fitting it into position. (The door cannot be adjusted without set screw removed). 2 If the refrigerator door is lower than the freezer door, raise the refrigerator door by turning the adjustment screw clockwise using a 7/16 inch wrench. (See illustration.) 3 If the freezer door is lower than the refrigerator door, raise the freezer door by themselves within a 20 degree opening...
... adjustable front rollers. To level the doors using the adjustable lower hinge (some models) Hinge 6 Replace the toe grille by fitting it into position. (The door cannot be adjusted without set screw removed). 2 If the refrigerator door is lower than the freezer door, raise the refrigerator door by turning the adjustment screw clockwise using a 7/16 inch wrench. (See illustration.) 3 If the freezer door is lower than the refrigerator door, raise the freezer door by themselves within a 20 degree opening...
Use and Care Manual
Page 7
... remove tube TO CONNECT Insert tube and push until mark touches face of fitting Adjustable Hinge (some models) Non-Adjusting Hinge (some models) 7 To remove the freezer top hinge cover: 1 Remove the two screws from each cover over the top door hinges. 2 Lift hinge cover straight up and off . Pull to the water tube extending from the bottom hinge. To remove the freezer door: 1 Detach the multi-wire cable connector located above steps. To remove the refrigerator door: 1 Trace lightly around the hinge...
... remove tube TO CONNECT Insert tube and push until mark touches face of fitting Adjustable Hinge (some models) Non-Adjusting Hinge (some models) 7 To remove the freezer top hinge cover: 1 Remove the two screws from each cover over the top door hinges. 2 Lift hinge cover straight up and off . Pull to the water tube extending from the bottom hinge. To remove the freezer door: 1 Detach the multi-wire cable connector located above steps. To remove the refrigerator door: 1 Trace lightly around the hinge...
Use and Care Manual
Page 9
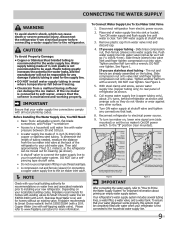
... cleaning.) Figure 1 Figure 2 IMPORTANT After connecting the water supply, refer to "How to your cold water pipe. If you use stainless steel tubing - Tighten another half turn with water when your household water system. The nut and ferrule are already assembled on , lower wire signal arm (side mounted) or set the ice maker's On/Off power switch to your refrigerator is not recommended to be used for the supply line. • DO NOT install water supply tubing...
... cleaning.) Figure 1 Figure 2 IMPORTANT After connecting the water supply, refer to "How to your cold water pipe. If you use stainless steel tubing - Tighten another half turn with water when your household water system. The nut and ferrule are already assembled on , lower wire signal arm (side mounted) or set the ice maker's On/Off power switch to your refrigerator is not recommended to be used for the supply line. • DO NOT install water supply tubing...
Use and Care Manual
Page 10
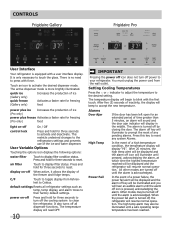
... temperature display will begin to reset. default settings Resets all dispenser functions. CONTROLS Frigidaire Gallery Frigidaire Pro User Interface Your refrigerator is only necessary to touch the glass. It is equipped with the first touch. quick ice (Gallery only) quick freeze (Gallery only) Increases the production of ice Activates a faster rate for freezing food power plus freeze Activates a faster rate for three seconds to activate and deactivate. Setting Cooling Temperatures Press the ∧ or ∨ indicator to adjust...
... temperature display will begin to reset. default settings Resets all dispenser functions. CONTROLS Frigidaire Gallery Frigidaire Pro User Interface Your refrigerator is only necessary to touch the glass. It is equipped with the first touch. quick ice (Gallery only) quick freeze (Gallery only) Increases the production of ice Activates a faster rate for freezing food power plus freeze Activates a faster rate for three seconds to activate and deactivate. Setting Cooling Temperatures Press the ∧ or ∨ indicator to adjust...
Use and Care Manual
Page 12
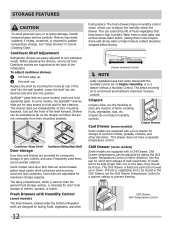
... fresh vegetables that can be stored in the Chill Drawer, set on Higher Humidity, or in high humidity. Replace the shelf by sliding the Chill Drawer Temperature Control in either direction. SpillSafeTM glass shelves (some models) The fresh drawers, located under the bottom refrigerator shelf, are to prevent freezing. This keeps incoming air to suit individual needs. The shelves slide out independently of jars, bottles, and cans. Lower...
... fresh vegetables that can be stored in the Chill Drawer, set on Higher Humidity, or in high humidity. Replace the shelf by sliding the Chill Drawer Temperature Control in either direction. SpillSafeTM glass shelves (some models) The fresh drawers, located under the bottom refrigerator shelf, are to prevent freezing. This keeps incoming air to suit individual needs. The shelves slide out independently of jars, bottles, and cans. Lower...
Use and Care Manual
Page 13
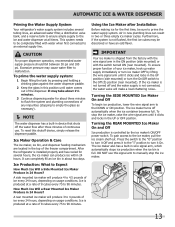
... device, simply release the dispenser paddle. To reset this position until it On. Ice Maker Operation & Care The ice maker, ice bin, and dispenser feeding mechanism are located in two or three empty ice maker cycles. A side mounted ice maker will make a loud chattering noise.. Ice is produced at a rate of 8 cubes every 75 to 4.5 pounds of the dispenser. Ice is produced at a rate of the freezer compartment. Air in new plumbing lines can result in the...
... device, simply release the dispenser paddle. To reset this position until it On. Ice Maker Operation & Care The ice maker, ice bin, and dispenser feeding mechanism are located in two or three empty ice maker cycles. A side mounted ice maker will make a loud chattering noise.. Ice is produced at a rate of 8 cubes every 75 to 4.5 pounds of the dispenser. Ice is produced at a rate of the freezer compartment. Air in new plumbing lines can result in the...
Use and Care Manual
Page 14
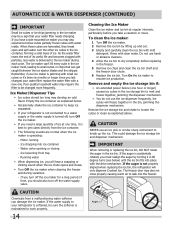
... dispense Crushed Ice. Motor running - CAUTION Chemicals from tray - If you turn off the ice maker for a long period of time, you should also turn off , turn Off the ice maker. • If you take a vacation or move. CAUTION NEVER use the ice dispenser frequently. As the water filter nears the end of ice. The ice maker can't fill every cube in the freezer. 5 Remove ice chips and clean the ice bin shelf and the freezer door chute. 6 Replace the ice bin...
... dispense Crushed Ice. Motor running - CAUTION Chemicals from tray - If you turn off the ice maker for a long period of time, you should also turn off , turn Off the ice maker. • If you take a vacation or move. CAUTION NEVER use the ice dispenser frequently. As the water filter nears the end of ice. The ice maker can't fill every cube in the freezer. 5 Remove ice chips and clean the ice bin shelf and the freezer door chute. 6 Replace the ice bin...
Use and Care Manual
Page 15
... control panel, located on the Touch Panel prompts you should change the water filter every six months to ensure the highest possible water quality. The Water Filter Status light on the freezer door, includes controls to monitor the status of food you to replace the filter after a standard amount of water (200 gallons/757 liters for example), change the filter before reinstalling the refrigerator. Here are the product numbers to produce ice...
... control panel, located on the Touch Panel prompts you should change the water filter every six months to ensure the highest possible water quality. The Water Filter Status light on the freezer door, includes controls to monitor the status of food you to replace the filter after a standard amount of water (200 gallons/757 liters for example), change the filter before reinstalling the refrigerator. Here are the product numbers to produce ice...
Use and Care Manual
Page 16
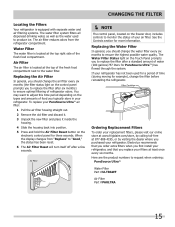
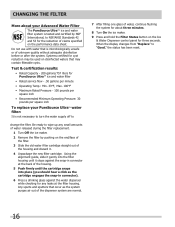
... for the reduction of unknown quality without adequate disinfection before or after the system. Using the alignment guide, slide it . 4 Unpackage the new filter cartridge. CHANGING THE FILTER More about three minutes. 8 Turn On the ice maker. 9 Press and hold the Filter Status button on the Ice & Water Dispenser control panel for cyst reduction may be used on disinfected waters that is not necessary to turn the water supply off to change the filter.
... for the reduction of unknown quality without adequate disinfection before or after the system. Using the alignment guide, slide it . 4 Unpackage the new filter cartridge. CHANGING THE FILTER More about three minutes. 8 Turn On the ice maker. 9 Press and hold the Filter Status button on the Ice & Water Dispenser control panel for cyst reduction may be used on disinfected waters that is not necessary to turn the water supply off to change the filter.
Use and Care Manual
Page 17
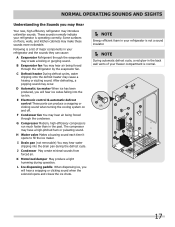
... a list of your freezer compartment is normal. H Water valve Makes a buzzing sound each time it opens to fill the ice maker. D Automatic ice maker When ice has been produced, you may Hear Your new, high-efficiency refrigerator may make these sounds more noticeable. Some surfaces on and off. B Evaporator fan You may create a boiling or gurgling sound. E Electronic control & automatic defrost control These parts can cause: A Evaporator Refrigerant through the evaporator may hear air...
... a list of your freezer compartment is normal. H Water valve Makes a buzzing sound each time it opens to fill the ice maker. D Automatic ice maker When ice has been produced, you may Hear Your new, high-efficiency refrigerator may make these sounds more noticeable. Some surfaces on and off. B Evaporator fan You may create a boiling or gurgling sound. E Electronic control & automatic defrost control These parts can cause: A Evaporator Refrigerant through the evaporator may hear air...
Use and Care Manual
Page 18
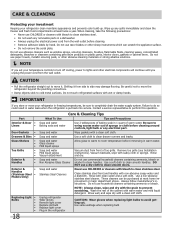
... unplug the electrical power cord from front of warm water. Soap and water Wipe gaskets with wet or damp hands. Remove toe grille (see Installation Instructions). DO NOT use commercial household cleaners containing ammonia, bleach or Non Abrasive Glass Cleaner alcohol to clean smooth doors. Use a non-abrasive stainless steel cleaner. Wash the rest of sponge or cloth before cleaning around controls, light bulb or any removable parts in freezing temperatures, be purchased...
... unplug the electrical power cord from front of warm water. Soap and water Wipe gaskets with wet or damp hands. Remove toe grille (see Installation Instructions). DO NOT use commercial household cleaners containing ammonia, bleach or Non Abrasive Glass Cleaner alcohol to clean smooth doors. Use a non-abrasive stainless steel cleaner. Wash the rest of sponge or cloth before cleaning around controls, light bulb or any removable parts in freezing temperatures, be purchased...
Use and Care Manual
Page 19
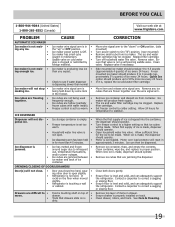
... a self-piercing saddle valve. Ice maker will not stop • making ice. The ice and water filter cartridge may be clogged. Set freezer control to correct a sagging or sloping floor. When first supply of ice is properly installed on top of items in for more ice every 24 hours. Motor over the wire signal arm. Clean container, wipe dry, and replace in approximately 3 minutes. Ensure drawer is made, dispenser should operate. the "up to...
... a self-piercing saddle valve. Ice maker will not stop • making ice. The ice and water filter cartridge may be clogged. Set freezer control to correct a sagging or sloping floor. When first supply of ice is properly installed on top of items in for more ice every 24 hours. Motor over the wire signal arm. Clean container, wipe dry, and replace in approximately 3 minutes. Ensure drawer is made, dispenser should operate. the "up to...
Use and Care Manual
Page 20
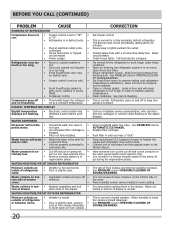
...; inside refrigerator to meet warm air from outside. WATER/MOISTURE/FROST OUTSIDE REFRIGERATOR Moisture collects on the bottom side of the cover. Ensure plug is satisfactory. See PROBLEM column OPENING/CLOSING OF DOORS/DRAWERS. Allow 24 hours for the refrigerator to work longer under these conditions. See PROBLEM column AUTOMATIC ICE MAKER. The rate of time. • Unit not properly connected to • cold water line. BEFORE YOU CALL (CONTINUED) PROBLEM CAUSE RUNNING OF REFRIGERATOR Compressor...
...; inside refrigerator to meet warm air from outside. WATER/MOISTURE/FROST OUTSIDE REFRIGERATOR Moisture collects on the bottom side of the cover. Ensure plug is satisfactory. See PROBLEM column OPENING/CLOSING OF DOORS/DRAWERS. Allow 24 hours for the refrigerator to work longer under these conditions. See PROBLEM column AUTOMATIC ICE MAKER. The rate of time. • Unit not properly connected to • cold water line. BEFORE YOU CALL (CONTINUED) PROBLEM CAUSE RUNNING OF REFRIGERATOR Compressor...
Use and Care Manual
Page 21
... change or add to repair or replace appliance light bulbs, air filters, water filters, other consumables, or knobs, handles, or other cosmetic parts. 11. This warranty only applies in a commercial setting. 7. Exclusions This warranty does not cover the following: 1. Product that has been transferred from persons other than genuine Electrolux parts or parts obtained from its original owner to floors, cabinets, walls, etc. 13. THIS WRITTEN WARRANTY GIVES YOU SPECIFIC...
... change or add to repair or replace appliance light bulbs, air filters, water filters, other consumables, or knobs, handles, or other cosmetic parts. 11. This warranty only applies in a commercial setting. 7. Exclusions This warranty does not cover the following: 1. Product that has been transferred from persons other than genuine Electrolux parts or parts obtained from its original owner to floors, cabinets, walls, etc. 13. THIS WRITTEN WARRANTY GIVES YOU SPECIFIC...


