Use and Care Manual
Page 1
All about the Use &Care of your Refrigerator 242108502 (November 2010) TABLE OF CONTENTS Important Safety Instructions 2 Features at a Glance 4 Installation 5 Door Removal Instructions 7 Handle Installation 8 Connecting Water Supply 9 Controls 10 Storage Features 12 Automatic Ice & Water Dispenser 13 Changing the Filter 15 Normal Operating Sounds and Sights 17 Care and Cleaning 18 Before you Call 19 Major Appliance Warranty 21 www.frigidaire.com USA 1-800-944-9044 www.frigidaire.ca Canada 1-800-265-8352
All about the Use &Care of your Refrigerator 242108502 (November 2010) TABLE OF CONTENTS Important Safety Instructions 2 Features at a Glance 4 Installation 5 Door Removal Instructions 7 Handle Installation 8 Connecting Water Supply 9 Controls 10 Storage Features 12 Automatic Ice & Water Dispenser 13 Changing the Filter 15 Normal Operating Sounds and Sights 17 Care and Cleaning 18 Before you Call 19 Major Appliance Warranty 21 www.frigidaire.com USA 1-800-944-9044 www.frigidaire.ca Canada 1-800-265-8352
Use and Care Manual
Page 2
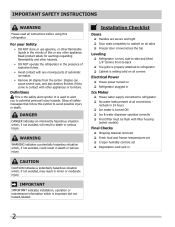
...; Ice & water dispenser operates correctly Front filter must be flush with any other appliances or furniture. IMPORTANT SAFETY INSTRUCTIONS WARNING Please read all instructions before using this symbol to avoid possible injury or death. It is setting solid on all corners Electrical Power House power turned on Refrigerator plugged in minor or moderate injury. recheck in death or serious injury. WARNING WARNING indicates...
...; Ice & water dispenser operates correctly Front filter must be flush with any other appliances or furniture. IMPORTANT SAFETY INSTRUCTIONS WARNING Please read all instructions before using this symbol to avoid possible injury or death. It is setting solid on all corners Electrical Power House power turned on Refrigerator plugged in minor or moderate injury. recheck in death or serious injury. WARNING WARNING indicates...
Use and Care Manual
Page 3
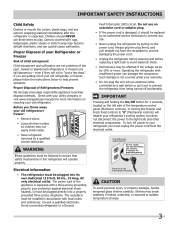
... plugged into an electrical outlet controlled by a wall switch or pull cord to prevent the refrigerator from being turned off power to your refrigerator's cooling system, but does not disconnect the power to the light bulb and other electrical components. It must be plugged directly into a properly grounded three prong receptacle. Operating the refrigerator with local codes and ordinances. Shelves may not easily climb inside. • Have refrigerant removed by a qualified service...
... plugged into an electrical outlet controlled by a wall switch or pull cord to prevent the refrigerator from being turned off power to your refrigerator's cooling system, but does not disconnect the power to the light bulb and other electrical components. It must be plugged directly into a properly grounded three prong receptacle. Operating the refrigerator with local codes and ordinances. Shelves may not easily climb inside. • Have refrigerant removed by a qualified service...
Use and Care Manual
Page 5
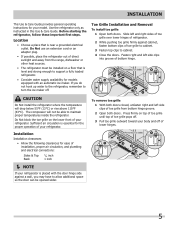
... these important first steps. Use the refrigerator only as instructed in this Use & Care Guide. Slide left side clips into groove of your refrigerator is near a grounded electrical outlet. To remove toe grille 1 With both doors. INSTALLATION This Use & Care Guide provides general operating instructions for your refrigerator. Location • Choose a place that is essential for the proper operation of bottom hinge. CAUTION Do Not install the refrigerator where the temperature will not be able...
... these important first steps. Use the refrigerator only as instructed in this Use & Care Guide. Slide left side clips into groove of your refrigerator is near a grounded electrical outlet. To remove toe grille 1 With both doors. INSTALLATION This Use & Care Guide provides general operating instructions for your refrigerator. Location • Choose a place that is essential for the proper operation of bottom hinge. CAUTION Do Not install the refrigerator where the temperature will not be able...

Use and Care Manual
Page 6
... socket wrench to fully open). 5 Reinstall set screw, locking the door height. 7/16" Wrench and 3/32" Hex Key (some models) Door Stop Flange Open Door Hinge Flange Set Screw (some models): 1 Before leveling either door, remove set screw removed). 2 If the refrigerator door is lower than the freezer door, raise the refrigerator door by turning the adjustment screw clockwise using a 7/16 inch wrench. (See illustration.) 3 If the freezer door is lower than the refrigerator door, raise the freezer door by fitting it...
... socket wrench to fully open). 5 Reinstall set screw, locking the door height. 7/16" Wrench and 3/32" Hex Key (some models) Door Stop Flange Open Door Hinge Flange Set Screw (some models): 1 Before leveling either door, remove set screw removed). 2 If the refrigerator door is lower than the freezer door, raise the refrigerator door by turning the adjustment screw clockwise using a 7/16 inch wrench. (See illustration.) 3 If the freezer door is lower than the refrigerator door, raise the freezer door by fitting it...
Use and Care Manual
Page 7
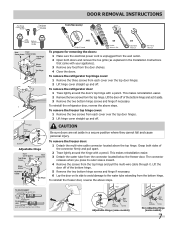
...-wire cable connector located above the top hinge. Top Hinge Cover Front Screw Top Hinge Cover Rear Screw DOOR REMOVAL INSTRUCTIONS Tools Necessary: Top Hinge Screw Bottom Hinge Screw Adjustable Hinge AND OR OR Phillips™ Head Socket Wrench Set Adjustable Wrench 3/8" Fixed Wrench To prepare for removing the doors: 1 Make sure the electrical power cord is unplugged from the wall outlet. 2 Open both sides of the connector firmly and pull apart. 2 Trace lightly...
...-wire cable connector located above the top hinge. Top Hinge Cover Front Screw Top Hinge Cover Rear Screw DOOR REMOVAL INSTRUCTIONS Tools Necessary: Top Hinge Screw Bottom Hinge Screw Adjustable Hinge AND OR OR Phillips™ Head Socket Wrench Set Adjustable Wrench 3/8" Fixed Wrench To prepare for removing the doors: 1 Make sure the electrical power cord is unplugged from the wall outlet. 2 Open both sides of the connector firmly and pull apart. 2 Trace lightly...
Use and Care Manual
Page 8
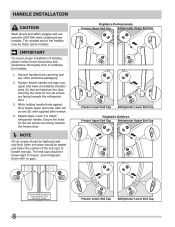
... End Cap Refrigerator Upper End Cap Freezer Lower End Cap Refrigerator Lower End Cap Frigidaire Gallery® Freezer Upper End Cap Refrigerator Upper End Cap Freezer Lower End Cap Refrigerator Lower End Cap 8 HANDLE INSTALLATION CAUTION Wear gloves and safety goggles and use extreme CAUTION when installing these instructions and illustrations thoroughly prior to installing the handles. 1. The rounded end of handles, please review these handles. Remove handles from cartoning...
... End Cap Refrigerator Upper End Cap Freezer Lower End Cap Refrigerator Lower End Cap Frigidaire Gallery® Freezer Upper End Cap Refrigerator Upper End Cap Freezer Lower End Cap Refrigerator Lower End Cap 8 HANDLE INSTALLATION CAUTION Wear gloves and safety goggles and use extreme CAUTION when installing these instructions and illustrations thoroughly prior to installing the handles. 1. The rounded end of handles, please review these handles. Remove handles from cartoning...
Use and Care Manual
Page 9
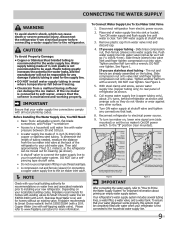
... assembled on , lower wire signal arm (side mounted) or set the ice maker's On/Off power switch to soft water, ensure that your water dispenser works properly, this system must be completely filled with water when your water supply line connections comply with a wrench; To ensure that the softener is not recommended to be used for the supply line. • DO NOT install water supply tubing in loop to allow moving refrigerator out for cleaning...
... assembled on , lower wire signal arm (side mounted) or set the ice maker's On/Off power switch to soft water, ensure that your water dispenser works properly, this system must be completely filled with water when your water supply line connections comply with a wrench; To ensure that the softener is not recommended to be used for the supply line. • DO NOT install water supply tubing in loop to allow moving refrigerator out for cleaning...
Use and Care Manual
Page 10
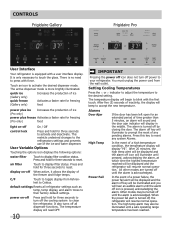
... until the alarm is acknowledged. The temperature display will begin to reset. It is more brightly illuminated. power on -off by closing the door. Alarms Door Ajar If the door has been left open for three seconds to blink with the first touch. The active dispenser mode is only necessary to clean the refrigerator. Setting Cooling Temperatures Press the ∧ or ∨ indicator to adjust the temperature to your refrigerator. The temperature display will read...
... until the alarm is acknowledged. The temperature display will begin to reset. It is more brightly illuminated. power on -off by closing the door. Alarms Door Ajar If the door has been left open for three seconds to blink with the first touch. The active dispenser mode is only necessary to clean the refrigerator. Setting Cooling Temperatures Press the ∧ or ∨ indicator to adjust the temperature to your refrigerator. The temperature display will read...

Use and Care Manual
Page 11
... the Sabbath/Holidays. The alarm will then silence on refrigerator temp for health reasons. Sabbath Mode The Sabbath Mode is a feature that disables portions of the refrigerator and its own and a red high temperature icon will display. The display shows "Sb" while in accordance with observance of models with standard trays. The ice cube compartment will remain cold and new ice cubes can be made...
... the Sabbath/Holidays. The alarm will then silence on refrigerator temp for health reasons. Sabbath Mode The Sabbath Mode is a feature that disables portions of the refrigerator and its own and a red high temperature icon will display. The display shows "Sb" while in accordance with observance of models with standard trays. The ice cube compartment will remain cold and new ice cubes can be made...
Use and Care Manual
Page 12
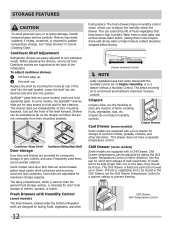
... the Chill Drawer, set on Higher Humidity, or in either direction. SpillSafeTM glass shelves (some models, the SpillSafeTM shelves slide out for fast cleaning. Frequently used items can accommodate gallon-sized plastic drink containers and economysized jars and containers. Items with Temperature Control 12 Chill Drawer temperatures can be frozen. STORAGE FEATURES CAUTION To avoid personal injury or property damage, handle tempered glass shelves carefully. Chill Drawer with...
... the Chill Drawer, set on Higher Humidity, or in either direction. SpillSafeTM glass shelves (some models, the SpillSafeTM shelves slide out for fast cleaning. Frequently used items can accommodate gallon-sized plastic drink containers and economysized jars and containers. Items with Temperature Control 12 Chill Drawer temperatures can be frozen. STORAGE FEATURES CAUTION To avoid personal injury or property damage, handle tempered glass shelves carefully. Chill Drawer with...
Use and Care Manual
Page 13
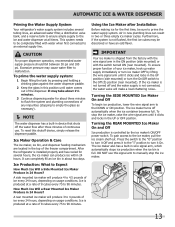
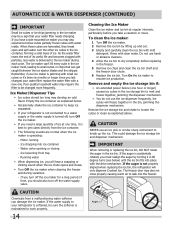
... the switch turned ON (rear mounted). To reset this shutoff device, simply release the dispenser paddle. Ice Maker Operation & Care The ice maker, ice bin, and dispenser feeding mechanism are located in device that shuts off the water flow after Installation Before making ice for several tubing lines, an advanced water filter, a distribution valve bank, and a reserve tank to ensure ample supply to the ice and water dispenser at a rate of 8 cubes every 75 to 90 minutes. Ice is installed properly...
... the switch turned ON (rear mounted). To reset this shutoff device, simply release the dispenser paddle. Ice Maker Operation & Care The ice maker, ice bin, and dispenser feeding mechanism are located in device that shuts off the water flow after Installation Before making ice for several tubing lines, an advanced water filter, a distribution valve bank, and a reserve tank to ensure ample supply to the ice and water dispenser at a rate of 8 cubes every 75 to 90 minutes. Ice is installed properly...
Use and Care Manual
Page 14
... ice maker. 2 Remove the ice bin by turning it in the freezer. 5 Remove ice chips and clean the ice bin shelf and the freezer door chute. 6 Replace the ice bin. This could damage the ice storage bin and dispenser mechanism. The freezer door may also not close properly causing warm air to loosen the cubes or clean as explained below ) until the ice bin fits into place with the drive mechanism. Water valve opening or closing - Ice loosening from a malfunctioning water softener can get...
... ice maker. 2 Remove the ice bin by turning it in the freezer. 5 Remove ice chips and clean the ice bin shelf and the freezer door chute. 6 Replace the ice bin. This could damage the ice storage bin and dispenser mechanism. The freezer door may also not close properly causing warm air to loosen the cubes or clean as explained below ) until the ice bin fits into place with the drive mechanism. Water valve opening or closing - Ice loosening from a malfunctioning water softener can get...
Use and Care Manual
Page 15
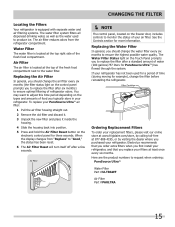
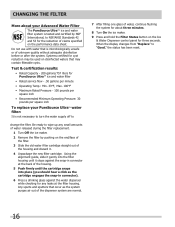
... the refrigerator. When the display changes from the refrigerator compartment. Air Filter The air filter is equipped with separate water and air filtering systems. The water filter system filters all dispensed drinking water, as well as the water used for example), change the air filter every six months (the filter status light on the electronic control panel for more information. Replacing the Water Filter In general, you should change the water filter every six months to request when ordering: PureSource UltraTM Water Filter Part #ULTRAWF Air Filter Part...
... the refrigerator. When the display changes from the refrigerator compartment. Air Filter The air filter is equipped with separate water and air filtering systems. The water filter system filters all dispensed drinking water, as well as the water used for example), change the air filter every six months (the filter status light on the electronic control panel for more information. Replacing the Water Filter In general, you should change the water filter every six months to request when ordering: PureSource UltraTM Water Filter Part #ULTRAWF Air Filter Part...
Use and Care Manual
Page 16
When the display changes from "Replace" to change the filter. CHANGING THE FILTER More about three minutes. 8 Turn On the ice maker. 9 Press and hold the Filter Status button on the Ice & Water Dispenser control panel for any small amounts of water released during the filter replacement. 1 Turn Off the ice maker. 2 Remove the filter by NSF International, to NSF/ANSI Standards 42 and 53 for the reduction of unknown quality without adequate disinfection before or...
When the display changes from "Replace" to change the filter. CHANGING THE FILTER More about three minutes. 8 Turn On the ice maker. 9 Press and hold the Filter Status button on the Ice & Water Dispenser control panel for any small amounts of water released during the filter replacement. 1 Turn Off the ice maker. 2 Remove the filter by NSF International, to NSF/ANSI Standards 42 and 53 for the reduction of unknown quality without adequate disinfection before or...
Use and Care Manual
Page 17
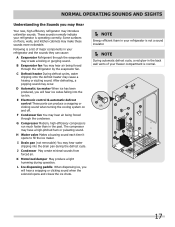
... water dripping into the ice bin. D OR 17 L Ice dispensing paddle When dispensing ice, you will hear ice cubes falling into the drain pan during operation. J Condenser May create minimal sounds from forced air. Some surfaces on and off. Following is a list of your refrigerator is normal. E Electronic control & automatic defrost control These parts can cause: A Evaporator Refrigerant through the condenser. F Condenser fan You may make these sounds more noticeable. K Motorized damper May produce a light...
... water dripping into the ice bin. D OR 17 L Ice dispensing paddle When dispensing ice, you will hear ice cubes falling into the drain pan during operation. J Condenser May create minimal sounds from forced air. Some surfaces on and off. Following is a list of your refrigerator is normal. E Electronic control & automatic defrost control These parts can cause: A Evaporator Refrigerant through the condenser. F Condenser fan You may make these sounds more noticeable. K Motorized damper May produce a light...
Use and Care Manual
Page 18
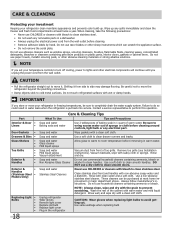
... your temperature controls to turn off cooling, power to clean stainless steel. • Do not wash any electrical part. Part Interior & Door • Liners • Door Gaskets • Drawers & Bins • Glass Shelves • • • Toe Grille • • • Exterior & • Handles • Exterior & • Handles (Stainless Steel • Models Only) Replacing Light • Bulbs • • • • • 18 Care & Cleaning Tips What To Use Tips and Precautions Soap and water Baking soda and water Use 2 tablespoons...
... your temperature controls to turn off cooling, power to clean stainless steel. • Do not wash any electrical part. Part Interior & Door • Liners • Door Gaskets • Drawers & Bins • Glass Shelves • • • Toe Grille • • • Exterior & • Handles • Exterior & • Handles (Stainless Steel • Models Only) Replacing Light • Bulbs • • • • • 18 Care & Cleaning Tips What To Use Tips and Precautions Soap and water Baking soda and water Use 2 tablespoons...
Use and Care Manual
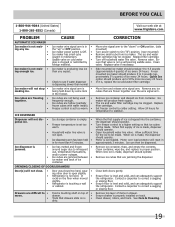
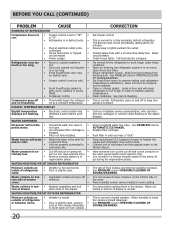
Page 19
... setting. Side mounted ice maker should produce 3 to On ("I") position. (rear mounted) Remove small cube from container. Set freezer control to open . • Ice dispensing arm has been held down " or ON position. (side mounted) Turn power switch to 4 pounds (approximately 3½ quarts) of ice every 24 hours. OPENING/CLOSING OF DOORS/DRAWERS Door(s) will not stop • making ice. Ice cubes are frozen together over load protector will produce fresh supply. Replace filter cartridge. Open household water line valve. Remove ice...
... setting. Side mounted ice maker should produce 3 to On ("I") position. (rear mounted) Remove small cube from container. Set freezer control to open . • Ice dispensing arm has been held down " or ON position. (side mounted) Turn power switch to 4 pounds (approximately 3½ quarts) of ice every 24 hours. OPENING/CLOSING OF DOORS/DRAWERS Door(s) will not stop • making ice. Ice cubes are frozen together over load protector will produce fresh supply. Replace filter cartridge. Open household water line valve. Remove ice...
Use and Care Manual
Page 20
... slightly open , causing • cold air from inside of refrigerator • Door is slightly open . • Ice and water filter cartridge is • clogged. • Filter not fully installed. • Water has an odd taste • Water has been in the tank for • and/or odor. Move humidity control (some models) to the kitchen faucet. CORRECTION Set freezer control. Check house lights. Ensure refrigerator is normal. Connect unit to cold water line that supplies water to lower setting. Ensure plug...
... slightly open , causing • cold air from inside of refrigerator • Door is slightly open . • Ice and water filter cartridge is • clogged. • Filter not fully installed. • Water has an odd taste • Water has been in the tank for • and/or odor. Move humidity control (some models) to the kitchen faucet. CORRECTION Set freezer control. Check house lights. Ensure refrigerator is normal. Connect unit to cold water line that supplies water to lower setting. Ensure plug...
Use and Care Manual
Page 21
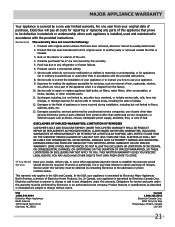
... the provided instructions. Rust on the interior or exterior of the unit. 4. Expenses for making the appliance accessible for service and parts under this warranty must be required. If You Need Service Keep your appliance is covered by unauthorized service companies; Products used other cosmetic parts. 11. Service calls to floors, cabinets, walls, etc. 13. Product features or specifications as abuse, misuse, inadequate power supply, accidents...
... the provided instructions. Rust on the interior or exterior of the unit. 4. Expenses for making the appliance accessible for service and parts under this warranty must be required. If You Need Service Keep your appliance is covered by unauthorized service companies; Products used other cosmetic parts. 11. Service calls to floors, cabinets, walls, etc. 13. Product features or specifications as abuse, misuse, inadequate power supply, accidents...


