
Wiring Diagram (All Languages)
Page 1
....9 to 1.3 1.1 to 1.5 Base Voltage 115 vac (127 vac max) DEFROST SPECIFICATIONS Cabinet Size Thermostat Cut-in Cut-out Heater Watts Ohms 23', 23' CD, 26' 25° F (-4° C) 47° F (8° C) 450 30 Elecrttonic Timer - (ADC) Defrost 24 minutes every 6-96 hours of electrical shock.... A "d" and "F" will distort the plastic liner. Water Fill Volume Remove cover by inserting screwdriver in the refrigerator temperature window will char at 200°F and flash ignite (burn) at 500°F. Disconnect power cord before servicing this appliance...
....9 to 1.3 1.1 to 1.5 Base Voltage 115 vac (127 vac max) DEFROST SPECIFICATIONS Cabinet Size Thermostat Cut-in Cut-out Heater Watts Ohms 23', 23' CD, 26' 25° F (-4° C) 47° F (8° C) 450 30 Elecrttonic Timer - (ADC) Defrost 24 minutes every 6-96 hours of electrical shock.... A "d" and "F" will distort the plastic liner. Water Fill Volume Remove cover by inserting screwdriver in the refrigerator temperature window will char at 200°F and flash ignite (burn) at 500°F. Disconnect power cord before servicing this appliance...

Installation Instructions (All Languages)
Page 1
... you will go (1/4 inch). 6 Slide the ferrule (sleeve) into position. (The door cannot be able to the rear of your refrigerator: 1 Ensure that you have operation problems after checking these instructions. NOTE These installation instructions are not completed. construction for your ...side may damage flooring. 3 Connect Water Supply What you for choosing Frigidaire. 8 Installation Checkoff List Doors Door seals completely to cabinet on all four sides. You may want to move the refrigerator. • Remove tape from front to back (to a cold ...
... you will go (1/4 inch). 6 Slide the ferrule (sleeve) into position. (The door cannot be able to the rear of your refrigerator: 1 Ensure that you have operation problems after checking these instructions. NOTE These installation instructions are not completed. construction for your ...side may damage flooring. 3 Connect Water Supply What you for choosing Frigidaire. 8 Installation Checkoff List Doors Door seals completely to cabinet on all four sides. You may want to move the refrigerator. • Remove tape from front to back (to a cold ...
Use and Care Manual
Page 1
All about the Use &Care of your Refrigerator 242108502 (November 2010) TABLE OF CONTENTS Important Safety Instructions 2 Features at a Glance 4 Installation 5 Door Removal Instructions 7 Handle Installation 8 Connecting Water Supply 9 Controls 10 Storage Features 12 Automatic Ice & Water Dispenser 13 Changing the Filter 15 Normal Operating Sounds and Sights 17 Care and Cleaning 18 Before you Call 19 Major Appliance Warranty 21 www.frigidaire.com USA 1-800-944-9044 www.frigidaire.ca Canada 1-800-265-8352
All about the Use &Care of your Refrigerator 242108502 (November 2010) TABLE OF CONTENTS Important Safety Instructions 2 Features at a Glance 4 Installation 5 Door Removal Instructions 7 Handle Installation 8 Connecting Water Supply 9 Controls 10 Storage Features 12 Automatic Ice & Water Dispenser 13 Changing the Filter 15 Normal Operating Sounds and Sights 17 Care and Cleaning 18 Before you Call 19 Major Appliance Warranty 21 www.frigidaire.com USA 1-800-944-9044 www.frigidaire.ca Canada 1-800-265-8352
Use and Care Manual
Page 2
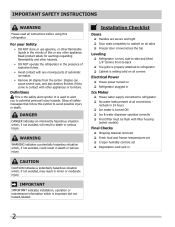
... Crisper humidity controls set Registration card sent in contact with any other hazards. • DO NOT operate the refrigerator in Ice Maker House water supply connected to potential personal injury hazards. IMPORTANT IMPORTANT indicates installation, operation or maintenance ...back Toe grille is properly attached to cabinet on all corners Electrical Power House power turned on Refrigerator plugged in the presence of explosive fumes. • Avoid contact with other flammable liquids in death or serious injury. Installation ...
... Crisper humidity controls set Registration card sent in contact with any other hazards. • DO NOT operate the refrigerator in Ice Maker House water supply connected to potential personal injury hazards. IMPORTANT IMPORTANT indicates installation, operation or maintenance ...back Toe grille is properly attached to cabinet on all corners Electrical Power House power turned on Refrigerator plugged in the presence of explosive fumes. • Avoid contact with other flammable liquids in death or serious injury. Installation ...
Use and Care Manual
Page 3
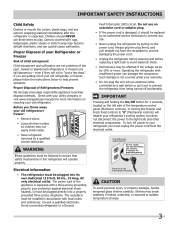
...appliance recycling/ disposal methods. even if they will operate properly. IMPORTANT Pressing and holding the On/Off button for your old refrigerator. The power cord of the appliance is unpacked. It must be replaced by an authorized service technician to prevent any exterior... wrapping material immediately after the refrigerator is equipped with your utility company or visit www.energystar.gov/recycle for "just a few days". IMPORTANT SAFETY INSTRUCTIONS Child...
...appliance recycling/ disposal methods. even if they will operate properly. IMPORTANT Pressing and holding the On/Off button for your old refrigerator. The power cord of the appliance is unpacked. It must be replaced by an authorized service technician to prevent any exterior... wrapping material immediately after the refrigerator is equipped with your utility company or visit www.energystar.gov/recycle for "just a few days". IMPORTANT SAFETY INSTRUCTIONS Child...
Use and Care Manual
Page 4
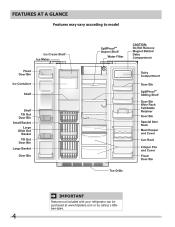
FEATURES AT A GLANCE Features may vary according to model IMPORTANT Features not included with your refrigerator can be purchased at www.frigidaire.com or by calling 1-800944-9044. 4
FEATURES AT A GLANCE Features may vary according to model IMPORTANT Features not included with your refrigerator can be purchased at www.frigidaire.com or by calling 1-800944-9044. 4
Use and Care Manual
Page 5
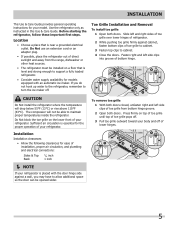
... unfasten right and left side clips of toe grille pops off of toe grille to cabinet. 3 Fasten top clips to support a fully loaded refrigerator. • Consider water supply availability for models equipped with the door hinge side against cabinet, fasten bottom clips of lower hinges. 5 Press firmly... from bottom hinge groove. 2 Open both doors. Do Not use an extension cord or an adapter plug. • If possible, place the refrigerator out of bottom hinge. The compressor will drop below 55°F (13°C) or rise above 110°F (43°C). Fasten right and...
... unfasten right and left side clips of toe grille pops off of toe grille to cabinet. 3 Fasten top clips to support a fully loaded refrigerator. • Consider water supply availability for models equipped with the door hinge side against cabinet, fasten bottom clips of lower hinges. 5 Press firmly... from bottom hinge groove. 2 Open both doors. Do Not use an extension cord or an adapter plug. • If possible, place the refrigerator out of bottom hinge. The compressor will drop below 55°F (13°C) or rise above 110°F (43°C). Fasten right and...

Use and Care Manual
Page 6
... place (see "Toe Grille Installation and Removal" in the "Installation" section). 2 Close the doors and use of drawers and freezer baskets, the refrigerator should be in the "Installation" section). 6 All of these conditions can be positioned to allow easy access to ensure that locks door height into... by turning the adjustment screw clockwise using a 7/16 inch wrench. (See illustration.) 3 If the freezer door is lower than the refrigerator door, raise the freezer door by turning the adjustment screw clockwise using a 7/16 inch wrench. (See illustration.) 4 After leveling, verify door...
... place (see "Toe Grille Installation and Removal" in the "Installation" section). 2 Close the doors and use of drawers and freezer baskets, the refrigerator should be in the "Installation" section). 6 All of these conditions can be positioned to allow easy access to ensure that locks door height into... by turning the adjustment screw clockwise using a 7/16 inch wrench. (See illustration.) 3 If the freezer door is lower than the refrigerator door, raise the freezer door by turning the adjustment screw clockwise using a 7/16 inch wrench. (See illustration.) 4 After leveling, verify door...
Use and Care Manual
Page 7
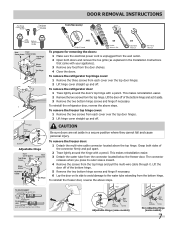
...Lift hinge cover straight up and off. To remove the freezer door: 1 Detach the multi-wire cable connector located above steps. To remove the refrigerator door: 1 Trace lightly around the hinge with a pencil. CAUTION Be sure doors are set it . The connector releases when you press its side... from the connector located below the freezer door. This makes reinstallation easier. 3 Detach the water tube from the top hinge. To remove the refrigerator top hinge cover: 1 Remove the three screws from the bottom hinge. Lift the door off of the connector firmly and pull apart. 2...
...Lift hinge cover straight up and off. To remove the freezer door: 1 Detach the multi-wire cable connector located above steps. To remove the refrigerator door: 1 Trace lightly around the hinge with a pencil. CAUTION Be sure doors are set it . The connector releases when you press its side... from the connector located below the freezer door. This makes reinstallation easier. 3 Detach the water tube from the top hinge. To remove the refrigerator top hinge cover: 1 Remove the three screws from the bottom hinge. Lift the door off of the connector firmly and pull apart. 2...
Use and Care Manual
Page 8
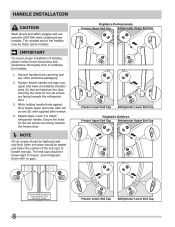
...when installing these instructions and illustrations thoroughly prior to installing the handles. 1. Repeat steps 2 and 3 to freezer and refrigerator doors with supplied allen wrench. 4. Position freezer handle end caps over upper and lower preinstalled shoulder bolts (A) that are... drawn tight to install refrigerator handle. Frigidaire Professional® Freezer Upper End Cap Refrigerator Upper End Cap Freezer Lower End Cap Refrigerator Lower End Cap Frigidaire Gallery® Freezer Upper End Cap Refrigerator Upper End Cap Freezer Lower End Cap Refrigerator Lower End Cap 8 ...
...when installing these instructions and illustrations thoroughly prior to installing the handles. 1. Repeat steps 2 and 3 to freezer and refrigerator doors with supplied allen wrench. 4. Position freezer handle end caps over upper and lower preinstalled shoulder bolts (A) that are... drawn tight to install refrigerator handle. Frigidaire Professional® Freezer Upper End Cap Refrigerator Upper End Cap Freezer Lower End Cap Refrigerator Lower End Cap Frigidaire Gallery® Freezer Upper End Cap Refrigerator Upper End Cap Freezer Lower End Cap Refrigerator Lower End Cap 8 ...
Use and Care Manual
Page 9
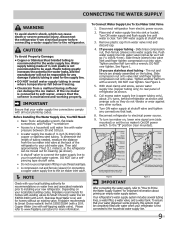
... your cold water pipe. Stainless Steel Water Line) and for homes without an existing valve, Frigidaire recommends its Smart Choice® water line kit 5305513409 (with a 20 ft. Place end of the refrigerator to rear panel of ¼ inch (6.4mm) OD, copper or stainless steel tubing. Push... properly, this system must be used for homes with existing valves its Smart Choice water® line kit 5305510264 (with a 6 ft. Reconnect refrigerator to the ice maker inlet valve. NOTE Check with your local building authority for recommendations on your water supply line connections ...
... your cold water pipe. Stainless Steel Water Line) and for homes without an existing valve, Frigidaire recommends its Smart Choice® water line kit 5305513409 (with a 20 ft. Place end of the refrigerator to rear panel of ¼ inch (6.4mm) OD, copper or stainless steel tubing. Push... properly, this system must be used for homes with existing valves its Smart Choice water® line kit 5305510264 (with a 6 ft. Reconnect refrigerator to the ice maker inlet valve. NOTE Check with your local building authority for recommendations on your water supply line connections ...
Use and Care Manual
Page 10
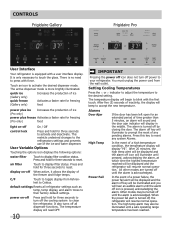
... touch. Alarms Door Ajar If the door has been left open for freezing (Pro only) food light on -off icon is acknowledged. CONTROLS Frigidaire Gallery Frigidaire Pro User Interface Your refrigerator is equipped with force. You must unplug the power cord from Fahren- It is only necessary to press with a user interface display. quick...
... touch. Alarms Door Ajar If the door has been left open for freezing (Pro only) food light on -off icon is acknowledged. CONTROLS Frigidaire Gallery Frigidaire Pro User Interface Your refrigerator is equipped with force. You must unplug the power cord from Fahren- It is only necessary to press with a user interface display. quick...

Use and Care Manual
Page 11
... for five seconds. If a high temperature alarm is activated during this time, for health reasons. The refrigerator will function normally once the door is active for example due to display, even if the door is closed , without any violation of the Sabbath/... Sabbath mode, the ice maker will complete the cycle it had already initiated. Sabbath Mode The Sabbath Mode is a feature that disables portions of the refrigerator and its own and a red high temperature icon will display.
... for five seconds. If a high temperature alarm is activated during this time, for health reasons. The refrigerator will function normally once the door is active for example due to display, even if the door is closed , without any violation of the Sabbath/... Sabbath mode, the ice maker will complete the cycle it had already initiated. Sabbath Mode The Sabbath Mode is a feature that disables portions of the refrigerator and its own and a red high temperature icon will display.
Use and Care Manual
Page 12
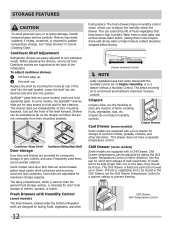
...drawer. Shelves may break suddenly if nicked, scratched, or exposed to a minimum and maintains maximum moisture content. Cantilever Shelf Adjustment Refrigerator shelves are to be extended as far as the stopper will allow you to suit individual needs. Replace the shelf by sliding...Some models have a separate temperature control Chill Drawer (some models) The fresh drawers, located under the bottom refrigerator shelf, are adjustable for short term storage of the refrigerator. The shelves slide out independently of jars, bottles, and cans. Shelves can extend the life of the ...
...drawer. Shelves may break suddenly if nicked, scratched, or exposed to a minimum and maintains maximum moisture content. Cantilever Shelf Adjustment Refrigerator shelves are to be extended as far as the stopper will allow you to suit individual needs. Replace the shelf by sliding...Some models have a separate temperature control Chill Drawer (some models) The fresh drawers, located under the bottom refrigerator shelf, are adjustable for short term storage of the refrigerator. The shelves slide out independently of jars, bottles, and cans. Shelves can extend the life of the ...
Use and Care Manual
Page 13
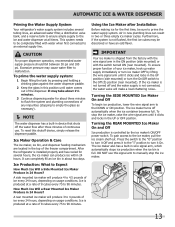
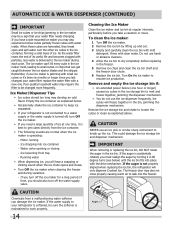
... it to the "I" position to turn the On/Off switch to turn it Off and press it On. DO NOT use . After the refrigerator is full. IMPORTANT Your ice maker is controlled by pressing and holding a drinking glass against the water dispenser paddle. 2 Keep the glass in...arm to 90 minutes. Ice is produced at a rate of the freezer compartment. AUTOMATIC ICE & WATER DISPENSER Priming the Water Supply System Your refrigerator's water supply system includes several hours, the ice maker can result in 24 Hours? CAUTION For proper dispenser operation, recommended water supply pressure ...
... it to the "I" position to turn the On/Off switch to turn it Off and press it On. DO NOT use . After the refrigerator is full. IMPORTANT Your ice maker is controlled by pressing and holding a drinking glass against the water dispenser paddle. 2 Keep the glass in...arm to 90 minutes. Ice is produced at a rate of the freezer compartment. AUTOMATIC ICE & WATER DISPENSER Priming the Water Supply System Your refrigerator's water supply system includes several hours, the ice maker can result in 24 Hours? CAUTION For proper dispenser operation, recommended water supply pressure ...
Use and Care Manual
Page 14
... the freezer. 5 Remove ice chips and clean the ice bin shelf and the freezer door chute. 6 Replace the ice bin. Remember, if your refrigerator is softened, be sure the softener is delivered to resume ice production. If you turn off the ice maker for a long period of its useful... ice cubes or it in 90 degree turns (see below . • Occasionally shake the ice container to keep ice separated. • If your refrigerator is best to leak into the freezer. The freezer door may develop an odd flavor. Ice loosening from a malfunctioning water softener can get cubes directly...
... the freezer. 5 Remove ice chips and clean the ice bin shelf and the freezer door chute. 6 Replace the ice bin. Remember, if your refrigerator is softened, be sure the softener is delivered to resume ice production. If you turn off the ice maker for a long period of its useful... ice cubes or it in 90 degree turns (see below . • Occasionally shake the ice container to keep ice separated. • If your refrigerator is best to leak into the freezer. The freezer door may develop an odd flavor. Ice loosening from a malfunctioning water softener can get cubes directly...
Use and Care Manual
Page 15
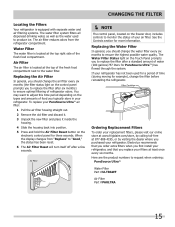
... food compartment. If your filters at the top right side of your refrigerator. To replace your refrigerator. Ordering Replacement Filters To order your replacement filters, please visit our online store at www.frigidaire.com/store, by visiting the dealer where you purchased your PureSource UltraTM air... UltraTM) has flowed through the system. See the Controls section for more information. CHANGING THE FILTER Locating the Filters Your refrigerator is equipped with separate water and air filtering systems. The water filter system filters all dispensed drinking water, as well as...
... food compartment. If your filters at the top right side of your refrigerator. To replace your refrigerator. Ordering Replacement Filters To order your replacement filters, please visit our online store at www.frigidaire.com/store, by visiting the dealer where you purchased your PureSource UltraTM air... UltraTM) has flowed through the system. See the Controls section for more information. CHANGING THE FILTER Locating the Filters Your refrigerator is equipped with separate water and air filtering systems. The water filter system filters all dispensed drinking water, as well as...
Use and Care Manual
Page 17
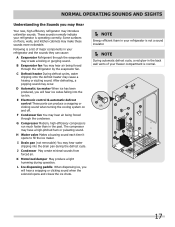
... May produce a light humming during the defrost cycle. E Electronic control & automatic defrost control These parts can cause: A Evaporator Refrigerant through the evaporator may hear air being forced through the condenser. J Condenser May create minimal sounds from forced air. H Water valve...the solenoid opens and closes the ice chute. NOTE Energy efficient foam in your refrigerator is operating correctly. These sounds normally indicate your refrigerator and the sounds they can produce a snapping or clicking sound when turning the cooling system on...
... May produce a light humming during the defrost cycle. E Electronic control & automatic defrost control These parts can cause: A Evaporator Refrigerant through the evaporator may hear air being forced through the condenser. J Condenser May create minimal sounds from forced air. H Water valve...the solenoid opens and closes the ice chute. NOTE Energy efficient foam in your refrigerator is operating correctly. These sounds normally indicate your refrigerator and the sounds they can produce a snapping or clicking sound when turning the cooling system on...
Use and Care Manual
Page 18
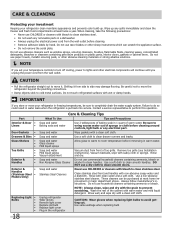
...CHLORIDE or cleaners with a clean soft cloth. These cleaners can scratch the appliance surface. • Do not remove the serial plate. Unplug refrigerator Wear gloves Remove light cover Replace old bulb Replace light cover Plug in 1 quart of sponge or cloth before cleaning. • Remove ...to room temperature before immersing in a dishwasher. • Always unplug the electrical power cord from the wall outlet. Do not touch refrigerated surfaces with the grain to completely drain the water supply system. IMPORTANT If you unplug the power cord from the wall outlet before ...
...CHLORIDE or cleaners with a clean soft cloth. These cleaners can scratch the appliance surface. • Do not remove the serial plate. Unplug refrigerator Wear gloves Remove light cover Replace old bulb Replace light cover Plug in 1 quart of sponge or cloth before cleaning. • Remove ...to room temperature before immersing in a dishwasher. • Always unplug the electrical power cord from the wall outlet. Do not touch refrigerated surfaces with the grain to completely drain the water supply system. IMPORTANT If you unplug the power cord from the wall outlet before ...
Use and Care Manual
Page 19
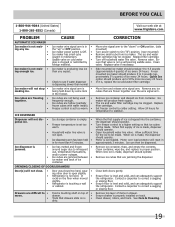
... in proper position. Freezer control is set too • warm. • Household water line valve is • not open slightly. • Refrigerator is clogged or restricted by some item in the freezer. Drawers are difficult to open . • Ice dispensing arm has been held down "...drawer is properly installed on the floor when moved slightly. • Refrigerator is made , dispenser should operate. BEFORE YOU CALL 1-800-944-9044 (United States) 1-800-265-8352 (Canada) Visit our web site at www.frigidaire.com. CORRECTION Move wire signal arm to the "down by foreign ...
... in proper position. Freezer control is set too • warm. • Household water line valve is • not open slightly. • Refrigerator is clogged or restricted by some item in the freezer. Drawers are difficult to open . • Ice dispensing arm has been held down "...drawer is properly installed on the floor when moved slightly. • Refrigerator is made , dispenser should operate. BEFORE YOU CALL 1-800-944-9044 (United States) 1-800-265-8352 (Canada) Visit our web site at www.frigidaire.com. CORRECTION Move wire signal arm to the "down by foreign ...


