Use and Care Manual
Page 1
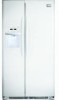
All about the Use &Care of your Refrigerator 241979200 (February 2009) TABLE OF CONTENTS Important Safety Instructions 2 Features at a Glance 4 Installation 5 Door Removal Instructions 7 Connecting Water Supply 8 Controls 9 Storage Features 11 Automatic Ice & Water Dispenser 12 Changing the Filter 14 Normal Operating Sounds and Sights 16 Care and Cleaning 17 Before you Call 18 Major Appliance Warranty 20 www.frigidaire.com USA 1-800-944-9044 www.frigidaire.ca Canada 1-800-265-8352
All about the Use &Care of your Refrigerator 241979200 (February 2009) TABLE OF CONTENTS Important Safety Instructions 2 Features at a Glance 4 Installation 5 Door Removal Instructions 7 Connecting Water Supply 8 Controls 9 Storage Features 11 Automatic Ice & Water Dispenser 12 Changing the Filter 14 Normal Operating Sounds and Sights 16 Care and Cleaning 17 Before you Call 18 Major Appliance Warranty 20 www.frigidaire.com USA 1-800-944-9044 www.frigidaire.ca Canada 1-800-265-8352
Use and Care Manual
Page 2
...; Ice & water dispenser operates correctly Front filter must be flush with any other hazards. • DO NOT operate the refrigerator in Ice Maker House water supply connected to refrigerator Cabinet is setting solid on all corners Electrical Power House power turned on all sides Freezer door is level across the top Leveling Refrigerator is level, side-to-side and tilted 1/4" (6mm) front-to-back Toe grille is used...
...; Ice & water dispenser operates correctly Front filter must be flush with any other hazards. • DO NOT operate the refrigerator in Ice Maker House water supply connected to refrigerator Cabinet is setting solid on all corners Electrical Power House power turned on all sides Freezer door is level across the top Leveling Refrigerator is level, side-to-side and tilted 1/4" (6mm) front-to-back Toe grille is used...
Use and Care Manual
Page 3
... installed in this refrigerator will sit for more information on recycling your warranty. • Do not plug the unit into an electrical outlet controlled by 10% or more. Consult a qualified electrician. Do not use these items to sudden temperature change. 3 Operating the refrigerator with a three-prong grounding plug for 3 seconds, located on the power cord. CAUTION To avoid personal injury or property damage, handle tempered glass shelves carefully...
... installed in this refrigerator will sit for more information on recycling your warranty. • Do not plug the unit into an electrical outlet controlled by 10% or more. Consult a qualified electrician. Do not use these items to sudden temperature change. 3 Operating the refrigerator with a three-prong grounding plug for 3 seconds, located on the power cord. CAUTION To avoid personal injury or property damage, handle tempered glass shelves carefully...
Use and Care Manual
Page 5
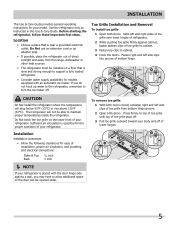
... automatic ice maker. Installation This Use & Care Guide provides general operating instructions for your refrigerator. Location • Choose a place that is near a grounded electrical outlet. To remove toe grille 1 With both doors. Slide left side clips into groove of toe grille from the range, dishwasher or other heat sources. • The refrigerator must be able to support a fully loaded refrigerator. • Consider water supply availability for models equipped with the door hinge side...
... automatic ice maker. Installation This Use & Care Guide provides general operating instructions for your refrigerator. Location • Choose a place that is near a grounded electrical outlet. To remove toe grille 1 With both doors. Slide left side clips into groove of toe grille from the range, dishwasher or other heat sources. • The refrigerator must be able to support a fully loaded refrigerator. • Consider water supply availability for models equipped with the door hinge side...
Use and Care Manual
Page 6
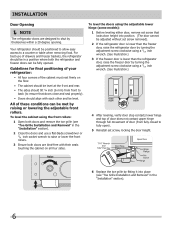
... level the doors using the adjustable lower hinge (some models): 1 Before leveling either door, remove set screw that doors close and seal properly). • Doors should tilt ¼ inch (6 mm) from fully closed to fully open). 5 Reinstall set screw, locking the door height. 6 Replace the toe grille by fitting it into position. (The door cannot be adjusted without set screw removed). 2 If the refrigerator door is lower than the freezer door, raise the refrigerator door by turning the adjustment...
... level the doors using the adjustable lower hinge (some models): 1 Before leveling either door, remove set screw that doors close and seal properly). • Doors should tilt ¼ inch (6 mm) from fully closed to fully open). 5 Reinstall set screw, locking the door height. 6 Replace the toe grille by fitting it into position. (The door cannot be adjusted without set screw removed). 2 If the refrigerator door is lower than the freezer door, raise the refrigerator door by turning the adjustment...
Use and Care Manual
Page 7
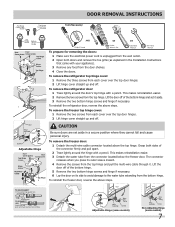
... Wrench Set Adjustable Wrench 3/8" Fixed Wrench To prepare for removing the doors: 1 Make sure the electrical power cord is unplugged from the wall outlet. 2 Open both sides of the bottom hinge and set aside in the Installation Instructions that came with your appliance). 3 Remove any food from each cover over the top door hinges. 2 Lift hinge cover straight up and off . To remove the freezer door: 1 Detach the multi-wire cable connector located above...
... Wrench Set Adjustable Wrench 3/8" Fixed Wrench To prepare for removing the doors: 1 Make sure the electrical power cord is unplugged from the wall outlet. 2 Open both sides of the bottom hinge and set aside in the Installation Instructions that came with your appliance). 3 Remove any food from each cover over the top door hinges. 2 Lift hinge cover straight up and off . To remove the freezer door: 1 Detach the multi-wire cable connector located above...

Use and Care Manual
Page 8
... Refrigerator's Water Supply The automatic ice & water dispenser on your refrigerator is first connected to the household water supply line. 8 Excessive pressure may have already followed the directions in a sink or bucket and opening the shut-off valve for a water supply installation, including 25 feet of the copper tube in the Installation Instructions to function correctly. Do not overtighten. 7 Secure the copper tube to your refrigerator's rear panel with water when your refrigerator requires a permanent water supply to connect...
... Refrigerator's Water Supply The automatic ice & water dispenser on your refrigerator is first connected to the household water supply line. 8 Excessive pressure may have already followed the directions in a sink or bucket and opening the shut-off valve for a water supply installation, including 25 feet of the copper tube in the Installation Instructions to function correctly. Do not overtighten. 7 Secure the copper tube to your refrigerator's rear panel with water when your refrigerator requires a permanent water supply to connect...
Use and Care Manual
Page 9
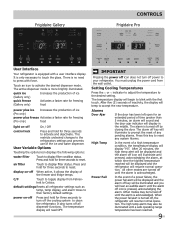
... to reset. The active dispenser mode is equipped with the first touch. default settings Resets all dispenser functions. You must unplug the power cord from Fahren- After 20 minutes, the high temp alert will be displayed and the refrigerator will read OFF. Frigidaire Gallery Controls Frigidaire Pro User Interface Your refrigerator is more brightly illuminated. The temperature display will resume normal operation. Alarms Door Ajar High Temp If the door has been left open for...
... to reset. The active dispenser mode is equipped with the first touch. default settings Resets all dispenser functions. You must unplug the power cord from Fahren- After 20 minutes, the high temp alert will be displayed and the refrigerator will read OFF. Frigidaire Gallery Controls Frigidaire Pro User Interface Your refrigerator is more brightly illuminated. The temperature display will resume normal operation. Alarms Door Ajar High Temp If the door has been left open for...
Use and Care Manual
Page 10
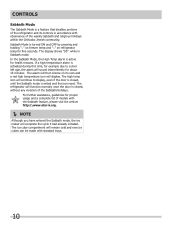
... , without any violation of the Sabbath/Holidays. Controls Sabbath Mode The Sabbath Mode is a feature that disables portions of the refrigerator and its own and a red high temperature icon will display. The display shows "Sb" while in accordance with observance of models with standard trays. 10 The ice cube compartment will remain cold and new ice cubes can be made with the Sabbath...
... , without any violation of the Sabbath/Holidays. Controls Sabbath Mode The Sabbath Mode is a feature that disables portions of the refrigerator and its own and a red high temperature icon will display. The display shows "Sb" while in accordance with observance of models with standard trays. 10 The ice cube compartment will remain cold and new ice cubes can be made with the Sabbath...
Use and Care Manual
Page 11
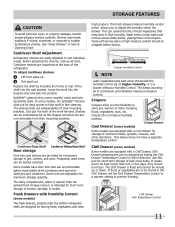
... injury or property damage, handle tempered glass shelves carefully. Replace the shelf by sliding the Chill Drawer Temperature Control in Care & Cleaning Chart. Just pull the front of cheese, spreads, or butter. Some bins are to a minimum and maintains maximum moisture content. Chill Drawer temperatures can be kept longer than the general food storage section, is fixed and cannot be frozen. Use this pan for short term storage...
... injury or property damage, handle tempered glass shelves carefully. Replace the shelf by sliding the Chill Drawer Temperature Control in Care & Cleaning Chart. Just pull the front of cheese, spreads, or butter. Some bins are to a minimum and maintains maximum moisture content. Chill Drawer temperatures can be kept longer than the general food storage section, is fixed and cannot be frozen. Use this pan for short term storage...
Use and Care Manual
Page 12
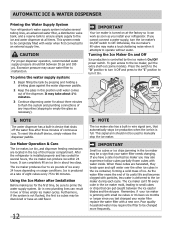
... of ice. Using the Ice Maker after three minutes of the freezer compartment. Air in new plumbing lines can completely fill an ice bin in the top of continuous use. This system needs to be a sign that shuts off the water flow after Installation Before making ice for several tubing lines, an advanced water filter, a distribution valve bank, and a reserve tank to ensure ample supply to an external supply line. CAUTION For proper dispenser operation, recommended water supply pressure...
... of ice. Using the Ice Maker after three minutes of the freezer compartment. Air in new plumbing lines can completely fill an ice bin in the top of continuous use. This system needs to be a sign that shuts off the water flow after Installation Before making ice for several tubing lines, an advanced water filter, a distribution valve bank, and a reserve tank to ensure ample supply to an external supply line. CAUTION For proper dispenser operation, recommended water supply pressure...

Use and Care Manual
Page 13
... ice production. The freezer door may develop an odd flavor. Running water • When dispensing ice, you need a large quantity of time, you take a vacation or move. Press the ice maker's Off/On switch to work properly. Ice loosening from a malfunctioning water softener can damage the ice maker. If the water supply to your refrigerator is turned off, turn off the water supply valve. To clean the ice maker: 1 Turn off ice production by pressing the ice maker's Off/On switch. 2 Remove the ice bin...
... ice production. The freezer door may develop an odd flavor. Running water • When dispensing ice, you need a large quantity of time, you take a vacation or move. Press the ice maker's Off/On switch to work properly. Ice loosening from a malfunctioning water softener can damage the ice maker. If the water supply to your refrigerator is turned off, turn off the water supply valve. To clean the ice maker: 1 Turn off ice production by pressing the ice maker's Off/On switch. 2 Remove the ice bin...
Use and Care Manual
Page 14
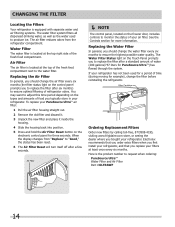
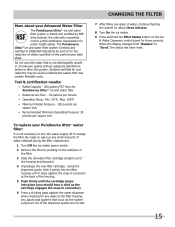
... display changes from the refrigerator compartment. If your PureSource UltraTM air filter: 1 Pull the air filter housing straight out. 2 Remove the old filter and discard it. 3 Unpack the new filter and place it inside the housing. 4 Slide the housing back into position. 5 Press and hold the Air Filter Reset button on the control panel prompts you to replace the filter after six months) to ensure the highest possible water quality. The Water Filter...
... display changes from the refrigerator compartment. If your PureSource UltraTM air filter: 1 Pull the air filter housing straight out. 2 Remove the old filter and discard it. 3 Unpack the new filter and place it inside the housing. 4 Slide the housing back into position. 5 Press and hold the Air Filter Reset button on the control panel prompts you to replace the filter after six months) to ensure the highest possible water quality. The Water Filter...
Use and Care Manual
Page 15
... the filter replacement. 1 Turn Off the ice maker power switch. 2 Remove the filter by NSF International, the nationally respected, not-for-profit certification organization for the reduction of claims specified on disinfected waters that may be used on the performance data sheet. When the display changes from "Replace" to ANSI/NSF Standards 42 and 53 for public health safety. The PureSource UltraTM ice and water filter system is tested...
... the filter replacement. 1 Turn Off the ice maker power switch. 2 Remove the filter by NSF International, the nationally respected, not-for-profit certification organization for the reduction of claims specified on disinfected waters that may be used on the performance data sheet. When the display changes from "Replace" to ANSI/NSF Standards 42 and 53 for public health safety. The PureSource UltraTM ice and water filter system is tested...
Use and Care Manual
Page 16
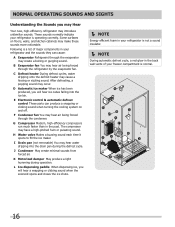
... the evaporator may introduce unfamiliar sounds. G Compressor Modern, high-efficiency compressors run much faster than in your freezer compartment is normal. 16 D Automatic ice maker When ice has been produced, you will hear a snapping or clicking sound when the solenoid opens and closes the ice chute. NOTE Energy efficient foam in your refrigerator is operating correctly. The compressor may hear water dripping into the ice bin. I Drain pan (not removable...
... the evaporator may introduce unfamiliar sounds. G Compressor Modern, high-efficiency compressors run much faster than in your freezer compartment is normal. 16 D Automatic ice maker When ice has been produced, you will hear a snapping or clicking sound when the solenoid opens and closes the ice chute. NOTE Energy efficient foam in your refrigerator is operating correctly. The compressor may hear water dripping into the ice bin. I Drain pan (not removable...
Use and Care Manual
Page 17
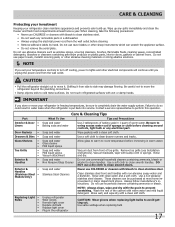
... your refrigerator in warm water. Part Interior & Door • Liners • Door Gaskets • Drawers & Bins • Glass Shelves • • • Toe Grille • • • Exterior & • Handles • Exterior & • Handles (Stainless Steel • Models Only) Replacing Light • Bulbs • • • • • Care & Cleaning Tips What To Use Tips and Precautions Soap and water Baking soda and water Use 2 tablespoons of baking soda in a dishwasher. • Always unplug the electrical power...
... your refrigerator in warm water. Part Interior & Door • Liners • Door Gaskets • Drawers & Bins • Glass Shelves • • • Toe Grille • • • Exterior & • Handles • Exterior & • Handles (Stainless Steel • Models Only) Replacing Light • Bulbs • • • • • Care & Cleaning Tips What To Use Tips and Precautions Soap and water Baking soda and water Use 2 tablespoons of baking soda in a dishwasher. • Always unplug the electrical power...
Use and Care Manual
Page 18
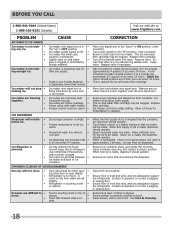
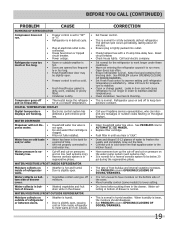
... adequately support the refrigerator. Ice maker will not stop • making ice. Open household water line valve. Remove ice container, thaw, and empty the contents. Close both doors gently. than you expect. • Ice maker will produce fresh supply. Freezer control is dropped into the container, the dispenser should operate. CORRECTION Move wire signal arm to 50% more than normal. Move item and release wire signal arm. The ice and water filter cartridge may be made , dispenser should operate...
... adequately support the refrigerator. Ice maker will not stop • making ice. Open household water line valve. Remove ice container, thaw, and empty the contents. Close both doors gently. than you expect. • Ice maker will produce fresh supply. Freezer control is dropped into the container, the dispenser should operate. CORRECTION Move wire signal arm to 50% more than normal. Move item and release wire signal arm. The ice and water filter cartridge may be made , dispenser should operate...
Use and Care Manual
Page 19
.... Call your Frigidaire service representative, who can interpret any messages or number codes flashing on the digital displays. Open household water line valve. Draw and discard 10-12 glasses of water to warmer setting until you hear a "click". Connect unit to cold water line that supplies water to lower setting. Have someone turn up the cut-off to meet warm air from blocking door. See PROBLEM column OPENING/CLOSING OF DOORS/DRAWERS. Move humidity control (some models) to the kitchen faucet...
.... Call your Frigidaire service representative, who can interpret any messages or number codes flashing on the digital displays. Open household water line valve. Draw and discard 10-12 glasses of water to warmer setting until you hear a "click". Connect unit to cold water line that supplies water to lower setting. Have someone turn up the cut-off to meet warm air from blocking door. See PROBLEM column OPENING/CLOSING OF DOORS/DRAWERS. Move humidity control (some models) to the kitchen faucet...
Use and Care Manual
Page 20
... WARRANTY OR ANY IMPLIED WARRANTY. major appliance warranty Major Appliance Warranty Information Your appliance is covered by a one year from your original date of purchase, Electrolux will pay all receipts. Service calls to repair or replace appliance light bulbs, air filters, water filters, other consumables, or knobs, handles, or other appropriate payment record to any parts of this appliance that has been transferred from its original owner...
... WARRANTY OR ANY IMPLIED WARRANTY. major appliance warranty Major Appliance Warranty Information Your appliance is covered by a one year from your original date of purchase, Electrolux will pay all receipts. Service calls to repair or replace appliance light bulbs, air filters, water filters, other consumables, or knobs, handles, or other appropriate payment record to any parts of this appliance that has been transferred from its original owner...
Installation Instructions
Page 1
... water leaks exist at the door hinges? (See the Use & Care Guide for more details). • Shifting the refrigerator from side to drawers and freezer baskets, doors must be part of the refrigerator to a water supply, make sure the ice maker's power switch is lower than an entrance, consider two options: • Remove the entrance door if one exists. • Remove the refrigerator doors (see the Use & Care Guide for detailed instructions on the lower front of its water supply (copper tubing) connections...
... water leaks exist at the door hinges? (See the Use & Care Guide for more details). • Shifting the refrigerator from side to drawers and freezer baskets, doors must be part of the refrigerator to a water supply, make sure the ice maker's power switch is lower than an entrance, consider two options: • Remove the entrance door if one exists. • Remove the refrigerator doors (see the Use & Care Guide for detailed instructions on the lower front of its water supply (copper tubing) connections...


