
Wiring Diagram (All Languages)
Page 1
...is 102 to 110cc (3.25 to 20cc (.68 oz.). One turn is complete. AUTOMATIC DEFROST SIDE BY SIDE - ice maker information Test Cycling Press the momemtary contact on the ON/OFF switch for ...to touch insulation; Water Fill Volume Remove cover by inserting screwdriver in Cut-out Heater Watts Ohms 23', 23' CD, 26' 25° F (-4° C) 47° F (8° C) 450...18° to -16° C -18° to -16° C -1° to 3° F -18° to -16° C Refrigerator Temperature 34° to 39° F 1° to 4° C 34° to 39° F 1° to 4° C 34°...
...is 102 to 110cc (3.25 to 20cc (.68 oz.). One turn is complete. AUTOMATIC DEFROST SIDE BY SIDE - ice maker information Test Cycling Press the momemtary contact on the ON/OFF switch for ...to touch insulation; Water Fill Volume Remove cover by inserting screwdriver in Cut-out Heater Watts Ohms 23', 23' CD, 26' 25° F (-4° C) 47° F (8° C) 450...18° to -16° C -18° to -16° C -1° to 3° F -18° to -16° C Refrigerator Temperature 34° to 39° F 1° to 4° C 34° to 39° F 1° to 4° C 34°...

Installation Instructions (All Languages)
Page 1
...-off valve for the connection NOTE between your refrigerator. And thank you for choosing Frigidaire. 8 Installation Checkoff List Doors Door seals completely to cabinet on the floor. • The cabinet should be level at the front and rear. • The sides should align with filter housing (some models) 4 Hinge 1 Before...
...-off valve for the connection NOTE between your refrigerator. And thank you for choosing Frigidaire. 8 Installation Checkoff List Doors Door seals completely to cabinet on the floor. • The cabinet should be level at the front and rear. • The sides should align with filter housing (some models) 4 Hinge 1 Before...

Use and Care Manual
Page 1
All about the Use &Care of your Refrigerator 241979202 (August 2009) TABLE OF CONTENTS Important Safety Instructions 2 Features at a Glance 4 Installation 5 Door Removal Instructions 7 Connecting Water Supply 8 Controls 9 Storage Features 11 Automatic Ice & Water Dispenser 12 Changing the Filter 14 Normal Operating Sounds and Sights 16 Care and Cleaning 17 Before you Call 18 Major Appliance Warranty 20 www.frigidaire.com USA 1-800-944-9044 www.frigidaire.ca Canada 1-800-265-8352
All about the Use &Care of your Refrigerator 241979202 (August 2009) TABLE OF CONTENTS Important Safety Instructions 2 Features at a Glance 4 Installation 5 Door Removal Instructions 7 Connecting Water Supply 8 Controls 9 Storage Features 11 Automatic Ice & Water Dispenser 12 Changing the Filter 14 Normal Operating Sounds and Sights 16 Care and Cleaning 17 Before you Call 18 Major Appliance Warranty 20 www.frigidaire.com USA 1-800-944-9044 www.frigidaire.ca Canada 1-800-265-8352

Use and Care Manual
Page 2
... are secure and tight Door seals completely to cabinet on all sides Freezer door is level across the top Leveling Refrigerator is level, side-to-side and tilted 1/4" (6mm) front-to-back Toe grille is properly attached to refrigerator Cabinet is turned ON Ice & water dispenser operates correctly ...
... are secure and tight Door seals completely to cabinet on all sides Freezer door is level across the top Leveling Refrigerator is level, side-to-side and tilted 1/4" (6mm) front-to-back Toe grille is properly attached to refrigerator Cabinet is turned ON Ice & water dispenser operates correctly ...
Use and Care Manual
Page 3
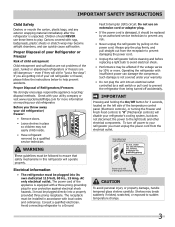
... technician. Do not use these items to the light bulb and other electrical components. Shelves may not easily climb inside. • Have refrigerant removed by 10% or more information on the left side of your old refrigerator or freezer, please follow the instructions below to prevent any exterior wrapping material immediately after the...
... technician. Do not use these items to the light bulb and other electrical components. Shelves may not easily climb inside. • Have refrigerant removed by 10% or more information on the left side of your old refrigerator or freezer, please follow the instructions below to prevent any exterior wrapping material immediately after the...
Use and Care Manual
Page 5
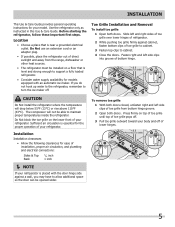
...and off . Press firmly on top of toe grille until top of toe grille pops off. 3 Pull toe grille outward toward your refrigerator. Slide left side clips into groove of bottom hinge. The compressor will drop below 55°F (13°C) or rise above 110°F (43... for ease of installation, proper air circulation, and plumbing and electrical connections: Sides & Top Back 3/8 inch 1 inch NOTE If your refrigerator. To remove toe grille 1 With both doors closed, unfasten right and left side clips of toe grille from the range, dishwasher or other heat sources. &#...
...and off . Press firmly on top of toe grille until top of toe grille pops off. 3 Pull toe grille outward toward your refrigerator. Slide left side clips into groove of bottom hinge. The compressor will drop below 55°F (13°C) or rise above 110°F (43... for ease of installation, proper air circulation, and plumbing and electrical connections: Sides & Top Back 3/8 inch 1 inch NOTE If your refrigerator. To remove toe grille 1 With both doors closed, unfasten right and left side clips of toe grille from the range, dishwasher or other heat sources. &#...
Use and Care Manual
Page 6
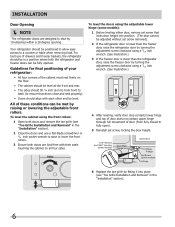
Guidelines for final positioning of your refrigerator: • All four corners of the cabinet must rest firmly on the floor. • The cabinet should be level at the front and rear. • The sides should tilt ¼ inch (6 mm) from front to back (to ensure that locks door height... the toe grille by fitting it into position. (The door cannot be adjusted without set screw removed). 2 If the refrigerator door is lower than the freezer door, raise the refrigerator door by turning the adjustment screw clockwise using a 7/16 inch wrench. (See illustration.) 3 If the freezer door is...
Guidelines for final positioning of your refrigerator: • All four corners of the cabinet must rest firmly on the floor. • The cabinet should be level at the front and rear. • The sides should tilt ¼ inch (6 mm) from front to back (to ensure that locks door height... the toe grille by fitting it into position. (The door cannot be adjusted without set screw removed). 2 If the refrigerator door is lower than the freezer door, raise the refrigerator door by turning the adjustment screw clockwise using a 7/16 inch wrench. (See illustration.) 3 If the freezer door is...
Use and Care Manual
Page 7
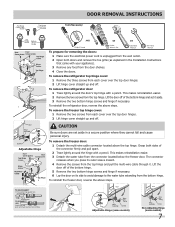
... the door off . Press outer ring against face of fitting Adjustable Hinge (some models) Non-Adjusting Hinge (some models) 7 To remove the refrigerator top hinge cover: 1 Remove the three screws from each cover over the top door hinges. 2 Lift hinge cover straight up and off of the... Wrench 3/8" Fixed Wrench To prepare for removing the doors: 1 Make sure the electrical power cord is unplugged from the wall outlet. 2 Open both sides of the connector firmly and pull apart. 2 Trace lightly around the door's top hinge with a pencil. This makes reinstallation easier. 2 Remove the ...
... the door off . Press outer ring against face of fitting Adjustable Hinge (some models) Non-Adjusting Hinge (some models) 7 To remove the refrigerator top hinge cover: 1 Remove the three screws from each cover over the top door hinges. 2 Lift hinge cover straight up and off of the... Wrench 3/8" Fixed Wrench To prepare for removing the doors: 1 Make sure the electrical power cord is unplugged from the wall outlet. 2 Open both sides of the connector firmly and pull apart. 2 Trace lightly around the door's top hinge with a pencil. This makes reinstallation easier. 2 Remove the ...
Use and Care Manual
Page 8
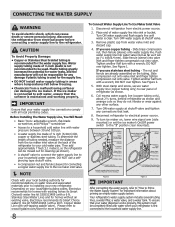
... are already assembled on , lower wire signal arm (side mounted) or set the ice maker's On/Off power switch to your water supply line connections comply with a 6 ft. See Figure 2. 5. Reconnect refrigerator to rear panel of refrigerator as shown and arrange coils so they do not vibrate... for cleaning.) Figure 1 IMPORTANT Figure 2 After connecting the water supply, refer to "How to www.frigidaire.com/store for the water supply line. Place end of the refrigerator to the "I" position (rear mounted). Slide compression nut onto valve inlet and finger tighten compression nut onto ...
... are already assembled on , lower wire signal arm (side mounted) or set the ice maker's On/Off power switch to your water supply line connections comply with a 6 ft. See Figure 2. 5. Reconnect refrigerator to rear panel of refrigerator as shown and arrange coils so they do not vibrate... for cleaning.) Figure 1 IMPORTANT Figure 2 After connecting the water supply, refer to "How to www.frigidaire.com/store for the water supply line. Place end of the refrigerator to the "I" position (rear mounted). Slide compression nut onto valve inlet and finger tighten compression nut onto ...
Use and Care Manual
Page 9
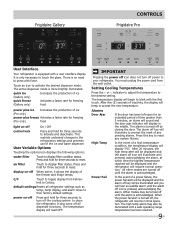
... the alarm. The active dispenser mode is equipped with a user interface display. Press and hold for three seconds to your refrigerator. C/F Touch to activate the desired dispenser mode. default settings Resets all dispenser functions. power on -off power to reset.... Power Fail In the event of a high temperature condition, the temperature display will resume normal operation. Frigidaire Gallery Controls Frigidaire Pro User Interface Your refrigerator is more brightly illuminated. It is turned off the cooling system to touch the glass. IMPORTANT Pressing ...
... the alarm. The active dispenser mode is equipped with a user interface display. Press and hold for three seconds to your refrigerator. C/F Touch to activate the desired dispenser mode. default settings Resets all dispenser functions. power on -off power to reset.... Power Fail In the event of a high temperature condition, the temperature display will resume normal operation. Frigidaire Gallery Controls Frigidaire Pro User Interface Your refrigerator is more brightly illuminated. It is turned off the cooling system to touch the glass. IMPORTANT Pressing ...

Use and Care Manual
Page 10
...alarm is turned ON and OFF by pressing and holding "∨" on freezer temp and "∧" on its controls in Sabbath mode. The refrigerator will function normally once the door is a feature that disables portions of models with the Sabbath feature, please visit the web at http:\\www...observance of the Sabbath/Holidays. For further assistance, guidelines for proper usage and a complete list of the refrigerator and its own and a red high temperature icon will then silence on refrigerator temp for example due to display, even if the door is closed , without any violation of the ...
...alarm is turned ON and OFF by pressing and holding "∨" on freezer temp and "∧" on its controls in Sabbath mode. The refrigerator will function normally once the door is a feature that disables portions of models with the Sabbath feature, please visit the web at http:\\www...observance of the Sabbath/Holidays. For further assistance, guidelines for proper usage and a complete list of the refrigerator and its own and a red high temperature icon will then silence on refrigerator temp for example due to display, even if the door is closed , without any violation of the ...
Use and Care Manual
Page 11
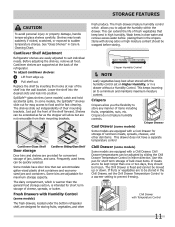
...Chill Drawer. SpillSafeTM glass shelves (some models, the SpillSafeTM shelves slide out for fast cleaning. Just pull the front of the refrigerator. The fresh drawers feature humidity control which is fixed and cannot be wrapped before placing them in high humidity. This keeps ... vegetables, nuts, etc. Some models have a separate temperature control Chill Drawer (some models) The fresh drawers, located under the bottom refrigerator shelf, are equipped with a Cool Drawer for storing fruits, vegetables, and other deli items. This drawer does not have door bins that...
...Chill Drawer. SpillSafeTM glass shelves (some models, the SpillSafeTM shelves slide out for fast cleaning. Just pull the front of the refrigerator. The fresh drawers feature humidity control which is fixed and cannot be wrapped before placing them in high humidity. This keeps ... vegetables, nuts, etc. Some models have a separate temperature control Chill Drawer (some models) The fresh drawers, located under the bottom refrigerator shelf, are equipped with a Cool Drawer for storing fruits, vegetables, and other deli items. This drawer does not have door bins that...

Use and Care Manual
Page 12
... position to small cubes or chips that shuts off the water flow after Installation Before making ice for the first time, be discolored or have a side mounted ice maker you cannot connect a water supply, turn it On. Ice is turned on usage conditions. As the water filter nears the end... clogged with water when first connected to an external supply line. The ice maker produces four to empty the glass as you install your refrigerator. IMPORTANT Small ice cubes or ice chips jamming in two or three empty ice maker cycles. This signal arm should fall between the ice...
... position to small cubes or chips that shuts off the water flow after Installation Before making ice for the first time, be discolored or have a side mounted ice maker you cannot connect a water supply, turn it On. Ice is turned on usage conditions. As the water filter nears the end... clogged with water when first connected to an external supply line. The ice maker produces four to empty the glass as you install your refrigerator. IMPORTANT Small ice cubes or ice chips jamming in two or three empty ice maker cycles. This signal arm should fall between the ice...

Use and Care Manual
Page 13
...power failure (one time, it in 90 degree turns (see below . • Occasionally shake the ice container to keep ice separated. • If your refrigerator is softened, be sure the softener is turned off, turn off the water supply valve. Ice cubes will hear a snapping or clicking sound when the... • Turn off the ice maker for a long period of ice at regular intervals, particularly before replacing in the ice storage bin to your refrigerator is not connected to a water supply or the water supply is maintained to break up and out. 3 Empty and carefully clean the ice bin ...
...power failure (one time, it in 90 degree turns (see below . • Occasionally shake the ice container to keep ice separated. • If your refrigerator is softened, be sure the softener is turned off, turn off the water supply valve. Ice cubes will hear a snapping or clicking sound when the... • Turn off the ice maker for a long period of ice at regular intervals, particularly before replacing in the ice storage bin to your refrigerator is not connected to a water supply or the water supply is maintained to break up and out. 3 Empty and carefully clean the ice bin ...
Use and Care Manual
Page 14
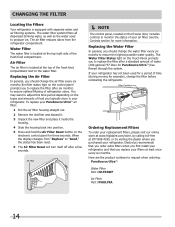
...recommends that you order extra filters when you first install your refrigerator, and that you typically store in your air filter. Ordering Replacement Filters To order your replacement filters, please visit our online store at www.frigidaire.com/store, by calling toll-free at least once every six... months. Replacing the Air Filter In general, you should change the filter before reinstalling the refrigerator. Air Filter The air filter is located at the top right side of the fresh food ...
...recommends that you order extra filters when you first install your refrigerator, and that you typically store in your air filter. Ordering Replacement Filters To order your replacement filters, please visit our online store at www.frigidaire.com/store, by calling toll-free at least once every six... months. Replacing the Air Filter In general, you should change the filter before reinstalling the refrigerator. Air Filter The air filter is located at the top right side of the fresh food ...

Use and Care Manual
Page 16
...opens to fill the ice maker. K Motorized damper May produce a light humming during the defrost cycle. These sounds normally indicate your refrigerator and the sounds they can produce a snapping or clicking sound when turning the cooling system on floors, walls, and kitchen cabinets may... may hear air being forced through the condenser. Normal Operating Sounds and sights Understanding the Sounds you may Hear Your new, high-efficiency refrigerator may occur. After defrosting, a popping sound may introduce unfamiliar sounds. D Automatic ice maker When ice has been produced, you will ...
...opens to fill the ice maker. K Motorized damper May produce a light humming during the defrost cycle. These sounds normally indicate your refrigerator and the sounds they can produce a snapping or clicking sound when turning the cooling system on floors, walls, and kitchen cabinets may... may hear air being forced through the condenser. Normal Operating Sounds and sights Understanding the Sounds you may Hear Your new, high-efficiency refrigerator may occur. After defrosting, a popping sound may introduce unfamiliar sounds. D Automatic ice maker When ice has been produced, you will ...
Use and Care Manual
Page 17
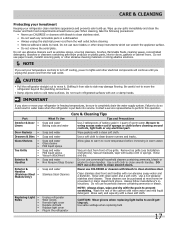
Care & Cleaning Protecting your investment Keeping your refrigerator in water leaks when the refrigerator is put back into service. Wipe up . IMPORTANT If you unplug the power cord from side to side may damage flooring. Soap and water Use a soft cloth to clean smooth handles. Vacuum backside, ...sponge or cloth before cleaning. • Remove adhesive labels by hand. Always follow manufacturer's instructions. Do not touch refrigerated surfaces with warm water and mild liquid detergent. These cleaners can scratch the appliance surface. • Do not remove the serial plate....
Care & Cleaning Protecting your investment Keeping your refrigerator in water leaks when the refrigerator is put back into service. Wipe up . IMPORTANT If you unplug the power cord from side to side may damage flooring. Soap and water Use a soft cloth to clean smooth handles. Vacuum backside, ...sponge or cloth before cleaning. • Remove adhesive labels by hand. Always follow manufacturer's instructions. Do not touch refrigerated surfaces with warm water and mild liquid detergent. These cleaners can scratch the appliance surface. • Do not remove the serial plate....

Use and Care Manual
Page 18
...Set freezer control to open . • Ice dispensing arm has been held down " or ON position. (side mounted) Turn power switch to 4.5 pounds (approximately 4 quarts) of ice is made , dispenser should produce ...Call 1-800-944-9044 (United States) 1-800-265-8352 (Canada) Visit our web site at www.frigidaire.com. the "up to 4 pounds (approximately 3½ quarts) of ice every 24 hours. Ice...; Saddle valve on cold water • pipe is • not open slightly. • Refrigerator is dispensing slower than normal. CORRECTION Move wire signal arm to the "down by foreign material....
...Set freezer control to open . • Ice dispensing arm has been held down " or ON position. (side mounted) Turn power switch to 4.5 pounds (approximately 4 quarts) of ice is made , dispenser should produce ...Call 1-800-944-9044 (United States) 1-800-265-8352 (Canada) Visit our web site at www.frigidaire.com. the "up to 4 pounds (approximately 3½ quarts) of ice every 24 hours. Ice...; Saddle valve on cold water • pipe is • not open slightly. • Refrigerator is dispensing slower than normal. CORRECTION Move wire signal arm to the "down by foreign material....
Use and Care Manual
Page 19
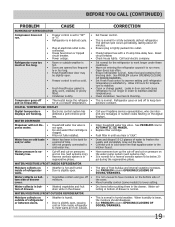
...be slightly open , causing • cold air from inside of frost buildup and internal sweating increases. See Care & Cleaning. Call your Frigidaire service representative, who can interpret any messages or number codes flashing on and off and cut -on pressure on • Weather is normal...DOORS/DRAWERS. 19 See PROBLEM column OPENING/CLOSING OF DOORS/DRAWERS. WATER/MOISTURE/FROST INSIDE REFRIGERATOR Moisture collects on bot- • Vegetables contain and give off and cut -on the bottom side of drawer is • pense water. Water collects on • Weather is tightly ...
...be slightly open , causing • cold air from inside of frost buildup and internal sweating increases. See Care & Cleaning. Call your Frigidaire service representative, who can interpret any messages or number codes flashing on and off and cut -on pressure on • Weather is normal...DOORS/DRAWERS. 19 See PROBLEM column OPENING/CLOSING OF DOORS/DRAWERS. WATER/MOISTURE/FROST INSIDE REFRIGERATOR Moisture collects on bot- • Vegetables contain and give off and cut -on the bottom side of drawer is • pense water. Water collects on • Weather is tightly ...
Use and Care Manual
Page 20
...; Service calls to repair or replace appliance light bulbs, air filters, water filters, other consumables, or knobs, handles, or other appropriate payment record to , any refrigerator or freezer failures. 6. Surcharges including, but not limited to floors, cabinets, walls, etc. 13. or external causes such as described or illustrated are subject to...
...; Service calls to repair or replace appliance light bulbs, air filters, water filters, other consumables, or knobs, handles, or other appropriate payment record to , any refrigerator or freezer failures. 6. Surcharges including, but not limited to floors, cabinets, walls, etc. 13. or external causes such as described or illustrated are subject to...


