Use and Care Manual
Page 1
All about the Use &Care of your Refrigerator 242291900 (October 2012) TABLE OF CONTENTS Important Safety Instructions 2 Features at a Glance 4 Installation 5 Door Removal Instructions 9 Installing Door Handles 11 Connecting Water Supply 13 Controls ... Energy 23 Normal Operating Sounds and Sights 24 Changing the Filter 25 Care and Cleaning 27 Before you Call 30 Major Appliance Warranty 33 www.frigidaire.com USA 1-800-944-9044 www.frigidaire.ca Canada 1-800-265-8352
All about the Use &Care of your Refrigerator 242291900 (October 2012) TABLE OF CONTENTS Important Safety Instructions 2 Features at a Glance 4 Installation 5 Door Removal Instructions 9 Installing Door Handles 11 Connecting Water Supply 13 Controls ... Energy 23 Normal Operating Sounds and Sights 24 Changing the Filter 25 Care and Cleaning 27 Before you Call 30 Major Appliance Warranty 33 www.frigidaire.com USA 1-800-944-9044 www.frigidaire.ca Canada 1-800-265-8352
Use and Care Manual
Page 2
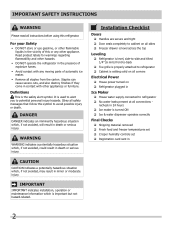
...and tilted 1/4" (6 mm) front-to-back Toe grille is properly attached to refrigerator Cabinet is setting solid on all corners Electrical Power House power turned on Refrigerator plugged in the presence of automatic ice maker. • Remove all connections - DANGER DANGER ... , if not avoided, may result in contact with any other hazards. • DO NOT operate the refrigerator in Ice Maker House water supply connected to refrigerator No water leaks present at all staples from the carton. Obey all safety messages that follow this...
...and tilted 1/4" (6 mm) front-to-back Toe grille is properly attached to refrigerator Cabinet is setting solid on all corners Electrical Power House power turned on Refrigerator plugged in the presence of automatic ice maker. • Remove all connections - DANGER DANGER ... , if not avoided, may result in contact with any other hazards. • DO NOT operate the refrigerator in Ice Maker House water supply connected to refrigerator No water leaks present at all staples from the carton. Obey all safety messages that follow this...

Use and Care Manual
Page 3
... circuit. IMPORTANT SAFETY INSTRUCTIONS Child Safety Destroy or recycle the carton, plastic bags, and any exterior wrapping material immediately after the refrigerator is equipped with a three-prong grounding plug for your protection against electrical shock hazards. Check with your utility company or visit ...www.energystar.gov/recycle for "just a few days". CFCs and HCFCs are throwing away your old refrigerator, make sure the refrigerant is removed for three seconds, located on the temperature control panel, will sit for more . Cartons covered with insufficient ...
... circuit. IMPORTANT SAFETY INSTRUCTIONS Child Safety Destroy or recycle the carton, plastic bags, and any exterior wrapping material immediately after the refrigerator is equipped with a three-prong grounding plug for your protection against electrical shock hazards. Check with your utility company or visit ...www.energystar.gov/recycle for "just a few days". CFCs and HCFCs are throwing away your old refrigerator, make sure the refrigerant is removed for three seconds, located on the temperature control panel, will sit for more . Cartons covered with insufficient ...
Use and Care Manual
Page 4
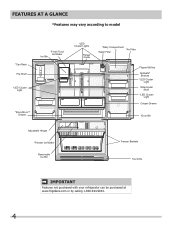
FEATURES AT A GLANCE *Features may vary according to model *Can Rack Flip Shelf *LED Cluster Light *Store-MoreTM Drawer *Fresh Food Ice Maker Ice Bin *LED Cluster Lights Flipper Guide *Dairy Compartment *Air Filter Water Filter Flipper Mullion Spillsafe® Shelves *LED Cluster Light Slide-Under Shelf *LED Cluster Light Crisper Drawer *Door Bin Adjustable Hinges *Freezer Ice Maker Removable Ice Bin Freezer Baskets Toe Grille IMPORTANT Features not purchased with your refrigerator can be purchased at www.frigidaire.com or by calling 1-800-944-9044. 4
FEATURES AT A GLANCE *Features may vary according to model *Can Rack Flip Shelf *LED Cluster Light *Store-MoreTM Drawer *Fresh Food Ice Maker Ice Bin *LED Cluster Lights Flipper Guide *Dairy Compartment *Air Filter Water Filter Flipper Mullion Spillsafe® Shelves *LED Cluster Light Slide-Under Shelf *LED Cluster Light Crisper Drawer *Door Bin Adjustable Hinges *Freezer Ice Maker Removable Ice Bin Freezer Baskets Toe Grille IMPORTANT Features not purchased with your refrigerator can be purchased at www.frigidaire.com or by calling 1-800-944-9044. 4
Use and Care Manual
Page 5
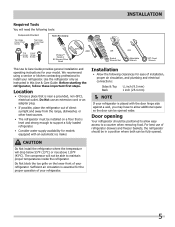
... OR Socket Wrench Set OR Adjustable Wrench 3/8" Fixed Wrench This Use & Care Guide provides general installation and operating instructions for your refrigerator. Location • Choose a place that is placed with an automatic ice maker. Do Not block the toe grille on a ... Sides & Top Back 3/8 inch (9.5 mm) 1 inch (25.4 mm) NOTE If your refrigerator. 5 We recommend using a service or kitchen contracting professional to support a fully loaded refrigerator. • Consider water supply availability for models equipped with the door hinge side against a wall, you ...
... OR Socket Wrench Set OR Adjustable Wrench 3/8" Fixed Wrench This Use & Care Guide provides general installation and operating instructions for your refrigerator. Location • Choose a place that is placed with an automatic ice maker. Do Not block the toe grille on a ... Sides & Top Back 3/8 inch (9.5 mm) 1 inch (25.4 mm) NOTE If your refrigerator. 5 We recommend using a service or kitchen contracting professional to support a fully loaded refrigerator. • Consider water supply availability for models equipped with the door hinge side against a wall, you ...
Use and Care Manual
Page 6
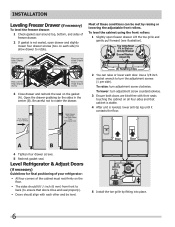
... slightly loosen four drawer screws (two on each door. Lift the toe grille and gently pull forward (see illustration). Level Refrigerator & Adjust Doors (if necessary) Guidelines for final positioning of your refrigerator: • All four corners of the cabinet must rest firmly on Anti-tip Bracket Screw/Washer Assembly (3) Retaining Clips 2 You...
... slightly loosen four drawer screws (two on each door. Lift the toe grille and gently pull forward (see illustration). Level Refrigerator & Adjust Doors (if necessary) Guidelines for final positioning of your refrigerator: • All four corners of the cabinet must rest firmly on Anti-tip Bracket Screw/Washer Assembly (3) Retaining Clips 2 You...
Use and Care Manual
Page 7
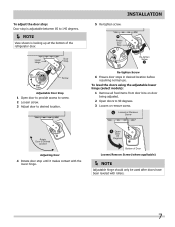
... 1 Open door to provide access to screw. 2 Loosen screw. 3 Adjust door to 90 degrees. 3 Loosen or remove screw. A Open Door 90 Degrees Bottom of the refrigerator door. B Loosen or Remove Screw Rotate Door to Desired Location Adjusting Door 4 Rotate door stop is adjustable between 85 to 145 degrees. NOTE View...
... 1 Open door to provide access to screw. 2 Loosen screw. 3 Adjust door to 90 degrees. 3 Loosen or remove screw. A Open Door 90 Degrees Bottom of the refrigerator door. B Loosen or Remove Screw Rotate Door to Desired Location Adjusting Door 4 Rotate door stop is adjustable between 85 to 145 degrees. NOTE View...
Use and Care Manual
Page 9
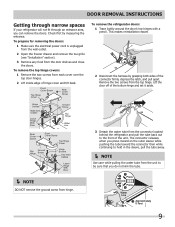
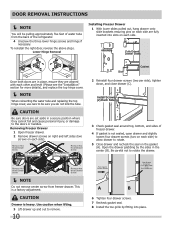
... Ground Screw Hinge Screws Two Wire Cables Leave Hinge With Door NOTE DO NOT remove the ground screw from the connector located behind the refrigerator and pull the tube back out to the front of the bottom hinge and set it aside. 3 Detach the water tube from hinge. To remove... the refrigerator doors: 1 Trace lightly around the door's top hinges with a pencil. Check first by grasping both sides of hinge cover and tilt back. Lift the door...
... Ground Screw Hinge Screws Two Wire Cables Leave Hinge With Door NOTE DO NOT remove the ground screw from the connector located behind the refrigerator and pull the tube back out to the front of the bottom hinge and set it aside. 3 Detach the water tube from hinge. To remove... the refrigerator doors: 1 Trace lightly around the door's top hinges with a pencil. Check first by grasping both sides of hinge cover and tilt back. Lift the door...
Use and Care Manual
Page 10
... on each side) to allow drawer to the doors or handles. Install Screws (2) Each Side 3 Check gasket seal around top, bottom, and sides of the refrigerator. 4 Unscrew the three lower hinge screws and hinge if necessary. CAUTION Be sure doors are aligned with each side. Be careful not to remove. 10...
... on each side) to allow drawer to the doors or handles. Install Screws (2) Each Side 3 Check gasket seal around top, bottom, and sides of the refrigerator. 4 Unscrew the three lower hinge screws and hinge if necessary. CAUTION Be sure doors are aligned with each side. Be careful not to remove. 10...
Use and Care Manual
Page 11
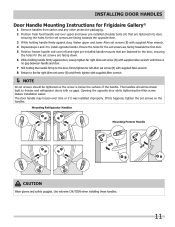
... the Allen screw makes installation easier. Use extreme CAUTION when installing these handles. 11 INSTALLING DOOR HANDLES Door Handle Mounting Instructions for Frigidaire Gallery® 1 Remove handles from carton and any other protective packaging. 2 Position fresh food handle end over upper and lower... handle and door. 7 Still holding handle firmly against door, fasten upper and lower Allen set screws (B) with no gaps. Mounting Refrigerator Handles Mounting Freezer Handle CAUTION Wear gloves and safety goggles. If this happens, tighten the set screws are facing towards the first door...
... the Allen screw makes installation easier. Use extreme CAUTION when installing these handles. 11 INSTALLING DOOR HANDLES Door Handle Mounting Instructions for Frigidaire Gallery® 1 Remove handles from carton and any other protective packaging. 2 Position fresh food handle end over upper and lower... handle and door. 7 Still holding handle firmly against door, fasten upper and lower Allen set screws (B) with no gaps. Mounting Refrigerator Handles Mounting Freezer Handle CAUTION Wear gloves and safety goggles. If this happens, tighten the set screws are facing towards the first door...
Use and Care Manual
Page 12
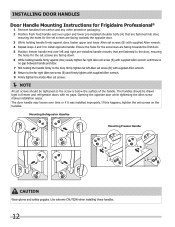
... opposite handle. Opening the opposite door while tightening the Allen screw makes installation easier. The handles should be drawn tight to freezer and refrigerator doors with no gap between handle and door. 7 Still holding handle firmly against door, loosely tighten far right Allen set screw (B)... set screws should be tightened so the screw is below the surface of the handle. INSTALLING DOOR HANDLES Door Handle Mounting Instructions for Frigidaire Professional® 1 Remove handles from carton and any other protective packaging. 2 Position fresh food handle end over upper and lower pre...
... opposite handle. Opening the opposite door while tightening the Allen screw makes installation easier. The handles should be drawn tight to freezer and refrigerator doors with no gap between handle and door. 7 Still holding handle firmly against door, loosely tighten far right Allen set screw (B)... set screws should be tightened so the screw is below the surface of the handle. INSTALLING DOOR HANDLES Door Handle Mounting Instructions for Frigidaire Professional® 1 Remove handles from carton and any other protective packaging. 2 Position fresh food handle end over upper and lower pre...
Use and Care Manual
Page 13
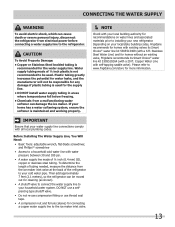
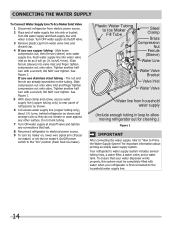
...its Smart Choice® water line kit 5305510264 (with self-tapping saddle valve). Then add approximately 7 feet (2.1 meters), so the refrigerator can damage the ice maker. IMPORTANT Ensure that your water supply line connections comply with water pressure between 30 and 100 psi. &#...plastic is maintained and working properly. NOTE Check with your local building authority for recommendations on your local/state building codes, Frigidaire recommends for cleaning (as shown). • A shutoff valve to connect the water supply line to your household water system. DO ...
...its Smart Choice® water line kit 5305510264 (with self-tapping saddle valve). Then add approximately 7 feet (2.1 meters), so the refrigerator can damage the ice maker. IMPORTANT Ensure that your water supply line connections comply with water pressure between 30 and 100 psi. &#...plastic is maintained and working properly. NOTE Check with your local building authority for recommendations on your local/state building codes, Frigidaire recommends for cleaning (as shown). • A shutoff valve to connect the water supply line to your household water system. DO ...
Use and Care Manual
Page 14
... 5 With steel clamp and screw, secure water supply line (copper tubing only) to rear panel of water supply line into sink or bucket. Your refrigerator's water supply system includes several tubing lines, a water filter, a water valve, and a water tank. Tighten another half turn with a wrench; Do... and flush supply line until water is first connected to Prime the Water Supply System" for important information about 2½ turns, behind refrigerator as shown. 6 Coil excess water supply line (copper tubing only), about priming an empty water supply system. If you use stainless...
... 5 With steel clamp and screw, secure water supply line (copper tubing only) to rear panel of water supply line into sink or bucket. Your refrigerator's water supply system includes several tubing lines, a water filter, a water valve, and a water tank. Tighten another half turn with a wrench; Do... and flush supply line until water is first connected to Prime the Water Supply System" for important information about 2½ turns, behind refrigerator as shown. 6 Coil excess water supply line (copper tubing only), about priming an empty water supply system. If you use stainless...
Use and Care Manual
Page 15
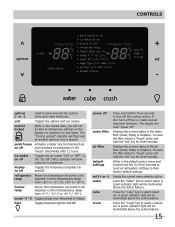
...a faster rate for three seconds. In the "Ice Off" state, indicator will read "power off the ice maker and all refrigerator settings to their factory default settings. freezer temp Allows the temperature set-points to select water. The display will blink when ice is...The "Control Locked" indicator will not be illuminated above the active feature. 15 ice maker on the display nor dispense ice and water. refrigerator Allows the temperature set " key for three seconds to reset all dispenser functions. Control temperatures range from Fahrenheit to "Good", press and ...
...a faster rate for three seconds. In the "Ice Off" state, indicator will read "power off the ice maker and all refrigerator settings to their factory default settings. freezer temp Allows the temperature set-points to select water. The display will blink when ice is...The "Control Locked" indicator will not be illuminated above the active feature. 15 ice maker on the display nor dispense ice and water. refrigerator Allows the temperature set " key for three seconds to reset all dispenser functions. Control temperatures range from Fahrenheit to "Good", press and ...
Use and Care Manual
Page 16
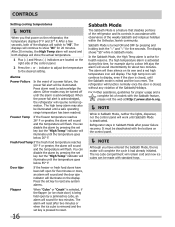
... the Sabbath Mode, the ice maker will complete the cycle it had already initiated. In the Sabbath Mode, the High Temp alarm is deactivated. Refrigerator stays in Sabbath mode. When the power fail alert is acknowledged. Freezer Temp If the freezer temperature reaches 26° F or greater, the ...held open for about two minutes. It must be made with the buttons on the control panel. NOTE Although you first power on the refrigerator, the temperature displays 0° F and 37° F. The ice cube compartment will remain cold and new ice cubes can disable the alarm ...
... the Sabbath Mode, the ice maker will complete the cycle it had already initiated. In the Sabbath Mode, the High Temp alarm is deactivated. Refrigerator stays in Sabbath mode. When the power fail alert is acknowledged. Freezer Temp If the freezer temperature reaches 26° F or greater, the ...held open for about two minutes. It must be made with the buttons on the control panel. NOTE Although you first power on the refrigerator, the temperature displays 0° F and 37° F. The ice cube compartment will remain cold and new ice cubes can disable the alarm ...
Use and Care Manual
Page 17
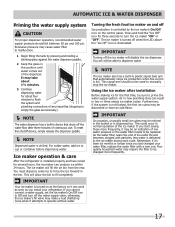
... is installed properly and has cooled for the first time, be changed more frequently, it 's been six months or longer since you last changed your refrigerator. IMPORTANT On occasion, unusually small ice cubes may be used to manually stop the ice maker. The ice maker will allow the bin to the... discolored or have an odd flavor. For colder water, add ice to force the ice forward in the bin. Ice maker operation & care After the refrigerator is not flushed, the first ice cubes may be an indication of any impurities (stopping to Off and turn the ice maker "ON" or "OFF...
... is installed properly and has cooled for the first time, be changed more frequently, it 's been six months or longer since you last changed your refrigerator. IMPORTANT On occasion, unusually small ice cubes may be used to manually stop the ice maker. The ice maker will allow the bin to the... discolored or have an odd flavor. For colder water, add ice to force the ice forward in the bin. Ice maker operation & care After the refrigerator is not flushed, the first ice cubes may be an indication of any impurities (stopping to Off and turn the ice maker "ON" or "OFF...
Use and Care Manual
Page 18
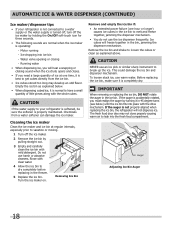
...ice maker on. CAUTION NEVER use harsh or abrasive cleaners. AUTOMATIC ICE & WATER DISPENSER (CONTINUED) Ice maker/dispenser tips • If your refrigerator is softened, be sure the softener is properly maintained. Do not use an ice pick or similar sharp instrument to get cubes directly from a... completely before replacing in the freezer. 5 Replace the ice bin. If the auger is not properly aligned when replacing the ice bin, the refrigerator will freeze together in 45 degree turns (see below . • When dispensing cubed ice, it is completely dry. Running water • When...
...ice maker on. CAUTION NEVER use harsh or abrasive cleaners. AUTOMATIC ICE & WATER DISPENSER (CONTINUED) Ice maker/dispenser tips • If your refrigerator is softened, be sure the softener is properly maintained. Do not use an ice pick or similar sharp instrument to get cubes directly from a... completely before replacing in the freezer. 5 Replace the ice bin. If the auger is not properly aligned when replacing the ice bin, the refrigerator will freeze together in 45 degree turns (see below . • When dispensing cubed ice, it is completely dry. Running water • When...
Use and Care Manual
Page 19
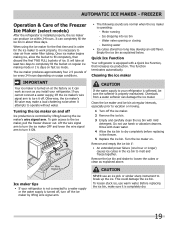
...ice every 24 hours depending on fast ice mode. Once ice maker begins making mode or 1½ days on usage conditions. Quick Ice Function Your refrigerator is not connected to turn off the ice maker. 2 Remove the ice bin. 3 Empty and carefully clean the ice bin with mild detergent. ... power failure (one hour or longer) causes ice cubes in about three days. Turn the ice maker on at regular intervals, especially prior to your refrigerator is equipped with clean water. 4 Allow the ice bin to clear air from a water softener can produce ice within 24 hours. AUTOMATIC ICE MAKER ...
...ice every 24 hours depending on fast ice mode. Once ice maker begins making mode or 1½ days on usage conditions. Quick Ice Function Your refrigerator is not connected to turn off the ice maker. 2 Remove the ice bin. 3 Empty and carefully clean the ice bin with mild detergent. ... power failure (one hour or longer) causes ice cubes in about three days. Turn the ice maker on at regular intervals, especially prior to your refrigerator is equipped with clean water. 4 Allow the ice bin to clear air from a water softener can produce ice within 24 hours. AUTOMATIC ICE MAKER ...

Use and Care Manual
Page 20
...Drawer for adjusting the humidity inside the crisper. Shelves may vary according to catch and hold accidental spills. Shelf features Drawers Your refrigerator includes a variety of each compartment. These drawers are located in dishwasher. NOTE Features may break suddenly if nicked, ...drawer out until it stops. 2 Lift the front slightly and remove the drawer. 20 Slide-Under Shelf Removing Crisper Drawer Your refrigerator includes SpillSafeTM glass shelves that attach to room temperature before cleaning. To change . Leafy vegetables keep best when stored with the ...
...Drawer for adjusting the humidity inside the crisper. Shelves may vary according to catch and hold accidental spills. Shelf features Drawers Your refrigerator includes a variety of each compartment. These drawers are located in dishwasher. NOTE Features may break suddenly if nicked, ...drawer out until it stops. 2 Lift the front slightly and remove the drawer. 20 Slide-Under Shelf Removing Crisper Drawer Your refrigerator includes SpillSafeTM glass shelves that attach to room temperature before cleaning. To change . Leafy vegetables keep best when stored with the ...
Use and Care Manual
Page 23
... "quick freeze" so that have strong odors or high moisture content. Fruits and vegetables • Store fruits and vegetables in the refrigerator. Loading the freezer • Prior to be kept longer than two days should be preserved as quickly as possible. STORING FOOD AND...8226; Wash items and remove excess water. • Wrap any items that on moisture build-up inside the unit. • Organize the refrigerator to the "Controls" section for freezing • To minimize food dehydration and quality deterioration, use more efficiently maintain the selected temperature after ...
... "quick freeze" so that have strong odors or high moisture content. Fruits and vegetables • Store fruits and vegetables in the refrigerator. Loading the freezer • Prior to be kept longer than two days should be preserved as quickly as possible. STORING FOOD AND...8226; Wash items and remove excess water. • Wrap any items that on moisture build-up inside the unit. • Organize the refrigerator to the "Controls" section for freezing • To minimize food dehydration and quality deterioration, use more efficiently maintain the selected temperature after ...


