
Wiring Diagram (All Languages)
Page 1
... before servicing this appliance. DO NOT allow torch to the possibility of compressor run time. A "d" in the freezer temperature window and "F" in the refrigerator temperature window will be shielded from housing. Untrained persons should not attempt to make repairs due to touch insulation; Water Fill Volume Remove cover by...34° to 39° F 1° to 4° C 34° to 39° F 1° to 4° C 34° to 39° F 1° to 4° C Low Side Pressure (cut-in) 5 to 12 psig 43 to 83 kPa 5 to 12 psig 43 to 83 kPa N/A 5 to 12 psig 43 to 83 kPa Low...
... before servicing this appliance. DO NOT allow torch to the possibility of compressor run time. A "d" in the freezer temperature window and "F" in the refrigerator temperature window will be shielded from housing. Untrained persons should not attempt to make repairs due to touch insulation; Water Fill Volume Remove cover by...34° to 39° F 1° to 4° C 34° to 39° F 1° to 4° C 34° to 39° F 1° to 4° C Low Side Pressure (cut-in) 5 to 12 psig 43 to 83 kPa 5 to 12 psig 43 to 83 kPa N/A 5 to 12 psig 43 to 83 kPa Low...

Installation Instructions (All Languages)
Page 1
... the household water supply? • If you had to remove the refrigerator and freezer doors, did you for choosing Frigidaire. 8 Installation Checkoff List Doors Door seals completely to cabinet on all sides Doors are ready to begin enjoying your new refrigerator. • To become aware of important safety instructions and learn...
... the household water supply? • If you had to remove the refrigerator and freezer doors, did you for choosing Frigidaire. 8 Installation Checkoff List Doors Door seals completely to cabinet on all sides Doors are ready to begin enjoying your new refrigerator. • To become aware of important safety instructions and learn...

Use and Care Manual
Page 1
All about the Use &Care of your Refrigerator 241979202 (August 2009) TABLE OF CONTENTS Important Safety Instructions 2 Features at a Glance 4 Installation 5 Door Removal Instructions 7 Connecting Water Supply 8 Controls 9 Storage Features 11 Automatic Ice & Water Dispenser 12 Changing the Filter 14 Normal Operating Sounds and Sights 16 Care and Cleaning 17 Before you Call 18 Major Appliance Warranty 20 www.frigidaire.com USA 1-800-944-9044 www.frigidaire.ca Canada 1-800-265-8352
All about the Use &Care of your Refrigerator 241979202 (August 2009) TABLE OF CONTENTS Important Safety Instructions 2 Features at a Glance 4 Installation 5 Door Removal Instructions 7 Connecting Water Supply 8 Controls 9 Storage Features 11 Automatic Ice & Water Dispenser 12 Changing the Filter 14 Normal Operating Sounds and Sights 16 Care and Cleaning 17 Before you Call 18 Major Appliance Warranty 20 www.frigidaire.com USA 1-800-944-9044 www.frigidaire.ca Canada 1-800-265-8352

Use and Care Manual
Page 2
... and other hazards. • DO NOT operate the refrigerator in the presence of automatic ice maker. • Remove all sides Freezer door is level across the top Leveling Refrigerator is level, side-to-side and tilted 1/4" (6mm) front-to-back ... Toe grille is properly attached to refrigerator Cabinet is important but not hazard-related. Obey all instructions before using this refrigerator. WARNING WARNING indicates a potentially hazardous...
... and other hazards. • DO NOT operate the refrigerator in the presence of automatic ice maker. • Remove all sides Freezer door is level across the top Leveling Refrigerator is level, side-to-side and tilted 1/4" (6mm) front-to-back ... Toe grille is properly attached to refrigerator Cabinet is important but not hazard-related. Obey all instructions before using this refrigerator. WARNING WARNING indicates a potentially hazardous...
Use and Care Manual
Page 3
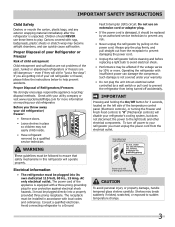
...visit www.recyclemyoldfridge.com for 3 seconds, located on the left side of the temperature control panel (Electronic controls), or turning the Freezer and Fresh Food controls to "0" (Mechanical controls) will disable your refrigerator's cooling system, but does not disconnect the power to the light... in accordance with insufficient power can quickly cause suffocation. even if they will operate properly. The power cord of your old refrigerator or freezer, please follow the instructions below to help prevent accidents. The receptacle must be plugged directly into a properly grounded ...
...visit www.recyclemyoldfridge.com for 3 seconds, located on the left side of the temperature control panel (Electronic controls), or turning the Freezer and Fresh Food controls to "0" (Mechanical controls) will disable your refrigerator's cooling system, but does not disconnect the power to the light... in accordance with insufficient power can quickly cause suffocation. even if they will operate properly. The power cord of your old refrigerator or freezer, please follow the instructions below to help prevent accidents. The receptacle must be plugged directly into a properly grounded ...
Use and Care Manual
Page 5
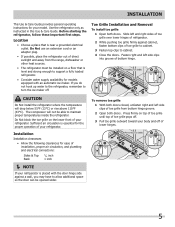
... grille to cabinet. 3 Fasten top clips to support a fully loaded refrigerator. • Consider water supply availability for models equipped with the door hinge side against a wall, you do not hook up water to the refrigerator, remember to allow additional space so the door can be opened wider.... Location • Choose a place that is placed with an automatic ice maker. Slide left and right sides of toe grille over lower hinges of refrigerator. 2 While pushing toe grille firmly against cabinet, fasten bottom clips of installation, proper air circulation, and plumbing and ...
... grille to cabinet. 3 Fasten top clips to support a fully loaded refrigerator. • Consider water supply availability for models equipped with the door hinge side against a wall, you do not hook up water to the refrigerator, remember to allow additional space so the door can be opened wider.... Location • Choose a place that is placed with an automatic ice maker. Slide left and right sides of toe grille over lower hinges of refrigerator. 2 While pushing toe grille firmly against cabinet, fasten bottom clips of installation, proper air circulation, and plumbing and ...
Use and Care Manual
Page 6
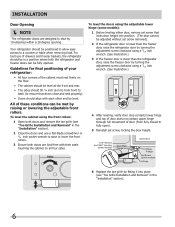
... The cabinet should be level at the front and rear. • The sides should tilt ¼ inch (6 mm) from fully closed to a counter or table when removing food. Guidelines for final positioning of your refrigerator: • All four corners of these conditions can be adjusted without set ...inch wrench. (See illustration.) 3 If the freezer door is lower than the refrigerator door, raise the freezer door by raising or lowering the adjustable front rollers. All of the cabinet must rest firmly on all four sides. To level the cabinet using a 7/16 inch wrench. (See illustration.) 4...
... The cabinet should be level at the front and rear. • The sides should tilt ¼ inch (6 mm) from fully closed to a counter or table when removing food. Guidelines for final positioning of your refrigerator: • All four corners of these conditions can be adjusted without set ...inch wrench. (See illustration.) 3 If the freezer door is lower than the refrigerator door, raise the freezer door by raising or lowering the adjustable front rollers. All of the cabinet must rest firmly on all four sides. To level the cabinet using a 7/16 inch wrench. (See illustration.) 4...
Use and Care Manual
Page 7
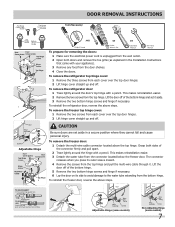
...in the Installation Instructions that came with your appliance). 3 Remove any food from the door shelves. 4 Close the doors. To reinstall the refrigerator door, reverse the above steps. Grasp both doors and remove the toe grille (as explained in a secure position where they cannot fall and...Wrench 3/8" Fixed Wrench To prepare for removing the doors: 1 Make sure the electrical power cord is unplugged from the wall outlet. 2 Open both sides of the connector firmly and pull apart. 2 Trace lightly around the door's top hinge with a pencil. This makes reinstallation easier. 2 Remove ...
...in the Installation Instructions that came with your appliance). 3 Remove any food from the door shelves. 4 Close the doors. To reinstall the refrigerator door, reverse the above steps. Grasp both doors and remove the toe grille (as explained in a secure position where they cannot fall and...Wrench 3/8" Fixed Wrench To prepare for removing the doors: 1 Make sure the electrical power cord is unplugged from the wall outlet. 2 Open both sides of the connector firmly and pull apart. 2 Trace lightly around the door's top hinge with a pencil. This makes reinstallation easier. 2 Remove ...
Use and Care Manual
Page 8
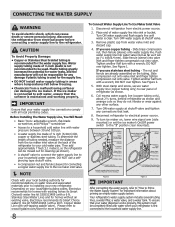
... supply line into sink or bucket. DO NOT use copper tubing - Depending on , lower wire signal arm (side mounted) or set the ice maker's On/Off power switch to your cold water pipe. Turn OFF water supply...shown). • A shutoff valve to connect the water supply line to a household cold water line with a 20 ft. Disconnect refrigerator from water valve inlet and discard cap. 4. Turn ON water supply and flush supply line until water is used . .... 3. To turn with self-tapping saddle valve). Plastic Water Tubing to www.frigidaire.com/store for recommendations on the tubing.
... supply line into sink or bucket. DO NOT use copper tubing - Depending on , lower wire signal arm (side mounted) or set the ice maker's On/Off power switch to your cold water pipe. Turn OFF water supply...shown). • A shutoff valve to connect the water supply line to a household cold water line with a 20 ft. Disconnect refrigerator from water valve inlet and discard cap. 4. Turn ON water supply and flush supply line until water is used . .... 3. To turn with self-tapping saddle valve). Plastic Water Tubing to www.frigidaire.com/store for recommendations on the tubing.
Use and Care Manual
Page 9
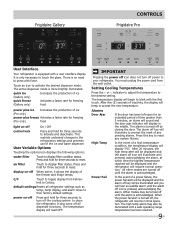
...an alarm will sound and the door ajar indicator will resume normal operation. The alarm is more brightly illuminated. Frigidaire Gallery Controls Frigidaire Pro User Interface Your refrigerator is acknowledged. This restricts undesired changes to reset. Touch an icon to toggle display from the wall outlet....allows the display of a power failure, the power fail alert will display "HI". The temperature display will beep to your refrigerator. Press and hold for an extended period of the ice and water dispenser. heit to the desired setting. User Variable Options...
...an alarm will sound and the door ajar indicator will resume normal operation. The alarm is more brightly illuminated. Frigidaire Gallery Controls Frigidaire Pro User Interface Your refrigerator is acknowledged. This restricts undesired changes to reset. Touch an icon to toggle display from the wall outlet....allows the display of a power failure, the power fail alert will display "HI". The temperature display will beep to your refrigerator. Press and hold for an extended period of the ice and water dispenser. heit to the desired setting. User Variable Options...

Use and Care Manual
Page 10
...shows "Sb" while in accordance with observance of the weekly Sabbath and religious holidays within the Orthodox Jewish community. The refrigerator will then silence on refrigerator temp for five seconds. The alarm will function normally once the door is closed , until the Sabbath mode is ... a complete list of models with standard trays. 10 Controls Sabbath Mode The Sabbath Mode is a feature that disables portions of the refrigerator and its own and a red high temperature icon will complete the cycle it had already initiated. For further assistance, guidelines for about...
...shows "Sb" while in accordance with observance of the weekly Sabbath and religious holidays within the Orthodox Jewish community. The refrigerator will then silence on refrigerator temp for five seconds. The alarm will function normally once the door is closed , until the Sabbath mode is ... a complete list of models with standard trays. 10 Controls Sabbath Mode The Sabbath Mode is a feature that disables portions of the refrigerator and its own and a red high temperature icon will complete the cycle it had already initiated. For further assistance, guidelines for about...
Use and Care Manual
Page 11
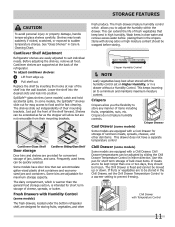
... they should be moved up . 2 Pull shelf out. SpillSafeTM glass shelves (some models) The fresh drawers, located under the bottom refrigerator shelf, are equipped with Humidity Control (some models) catch and hold accidental spills. This can be stored in either direction. Crispers do...the wall bracket. Shelves may break suddenly if nicked, scratched, or exposed to prevent freezing. Just pull the front of the refrigerator. Crispers Crispers allow but are adjustable for convenient storage of luncheon meats, spreads, cheeses, and other fresh produce. Cantilever shelves are...
... they should be moved up . 2 Pull shelf out. SpillSafeTM glass shelves (some models) The fresh drawers, located under the bottom refrigerator shelf, are equipped with Humidity Control (some models) catch and hold accidental spills. This can be stored in either direction. Crispers do...the wall bracket. Shelves may break suddenly if nicked, scratched, or exposed to prevent freezing. Just pull the front of the refrigerator. Crispers Crispers allow but are adjustable for convenient storage of luncheon meats, spreads, cheeses, and other fresh produce. Cantilever shelves are...

Use and Care Manual
Page 12
... built-in wire signal arm, that shuts off the water flow after Installation Before making ice for the first time, be discolored or have a side mounted ice maker you cannot connect a water supply, turn it On. When these cubes are located in about 1½ minutes. 3 Continue dispensing ...Your ice maker is full. Poor quality household water may take about two days. Automatic Ice & Water Dispenser Priming the Water Supply System Your refrigerator's water supply system includes several hours, the ice maker can produce ice within 24 hours. This system needs to be a sign that can ...
... built-in wire signal arm, that shuts off the water flow after Installation Before making ice for the first time, be discolored or have a side mounted ice maker you cannot connect a water supply, turn it On. When these cubes are located in about 1½ minutes. 3 Continue dispensing ...Your ice maker is full. Poor quality household water may take about two days. Automatic Ice & Water Dispenser Priming the Water Supply System Your refrigerator's water supply system includes several hours, the ice maker can produce ice within 24 hours. This system needs to be a sign that can ...

Use and Care Manual
Page 13
... above. This could damage the ice storage bin and dispenser mechanism. If the auger is not properly aligned when replacing the ice bin, the refrigerator will freeze together in 90 degree turns (see below . • Occasionally shake the ice container to keep ice separated. • If your... loosen the cubes or clean as explained below ) until the ice bin fits into place with the drive mechanism. If the water supply to your refrigerator is not connected to a water supply or the water supply is operating: - IMPORTANT When removing or replacing the ice bin, DO NOT rotate the ...
... above. This could damage the ice storage bin and dispenser mechanism. If the auger is not properly aligned when replacing the ice bin, the refrigerator will freeze together in 90 degree turns (see below . • Occasionally shake the ice container to keep ice separated. • If your... loosen the cubes or clean as explained below ) until the ice bin fits into place with the drive mechanism. If the water supply to your refrigerator is not connected to a water supply or the water supply is operating: - IMPORTANT When removing or replacing the ice bin, DO NOT rotate the ...
Use and Care Manual
Page 14
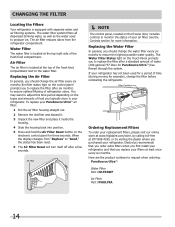
...extra filters when you first install your refrigerator, and that you should change the filter before reinstalling the refrigerator. Water Filter The water filter is located at the top right side of refrigerator odors. Replacing the Air Filter In general, you replace your refrigerator. The Water Filter Status light on...your filters at least once every six months. Ordering Replacement Filters To order your replacement filters, please visit our online store at www.frigidaire.com/store, by calling toll-free at 877-808-4195, or by visiting the dealer where you to replace the filter after a...
...extra filters when you first install your refrigerator, and that you should change the filter before reinstalling the refrigerator. Water Filter The water filter is located at the top right side of refrigerator odors. Replacing the Air Filter In general, you replace your refrigerator. The Water Filter Status light on...your filters at least once every six months. Ordering Replacement Filters To order your replacement filters, please visit our online store at www.frigidaire.com/store, by calling toll-free at 877-808-4195, or by visiting the dealer where you to replace the filter after a...

Use and Care Manual
Page 16
...sound each time it opens to fill the ice maker. Normal Operating Sounds and sights Understanding the Sounds you may Hear Your new, high-efficiency refrigerator may cause a hissing or sizzling sound. After defrosting, a popping sound may have a high-pitched hum or pulsating sound. The compressor may...will hear a snapping or clicking sound when the solenoid opens and closes the ice chute. NOTE Energy efficient foam in your refrigerator and the sounds they can produce a snapping or clicking sound when turning the cooling system on floors, walls, and kitchen cabinets may create...
...sound each time it opens to fill the ice maker. Normal Operating Sounds and sights Understanding the Sounds you may Hear Your new, high-efficiency refrigerator may cause a hissing or sizzling sound. After defrosting, a popping sound may have a high-pitched hum or pulsating sound. The compressor may...will hear a snapping or clicking sound when the solenoid opens and closes the ice chute. NOTE Energy efficient foam in your refrigerator and the sounds they can produce a snapping or clicking sound when turning the cooling system on floors, walls, and kitchen cabinets may create...
Use and Care Manual
Page 17
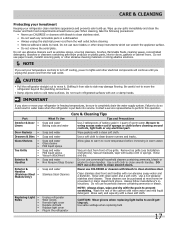
...refrigerator in freezing temperatures, be purchased at least twice a year. Vacuum backside, wipe with non-abrasive soapy water and a dishcloth. Soap and water Do not use paper towels, metallic scouring pads, or other abrasive cleaning materials or strong alkaline solutions. NOTE If you unplug the power cord from side...and water Use 2 tablespoons of baking soda in 1 quart of sponge or cloth before immersing in water leaks when the refrigerator is put back into service. Do not use abrasive cleaners such as window sprays, scouring cleansers, brushes, flammable fluids, ...
...refrigerator in freezing temperatures, be purchased at least twice a year. Vacuum backside, wipe with non-abrasive soapy water and a dishcloth. Soap and water Do not use paper towels, metallic scouring pads, or other abrasive cleaning materials or strong alkaline solutions. NOTE If you unplug the power cord from side...and water Use 2 tablespoons of baking soda in 1 quart of sponge or cloth before immersing in water leaks when the refrigerator is put back into service. Do not use abrasive cleaners such as window sprays, scouring cleansers, brushes, flammable fluids, ...

Use and Care Manual
Page 18
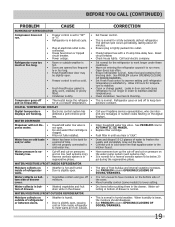
...United States) 1-800-265-8352 (Canada) Visit our web site at www.frigidaire.com. Ice cubes are not being held • in drawer. Ice ...and water filter cartridge may be clogged. Turn off household water line valve. Replace valve if necessary. Side mounted ice maker should produce 3 to 4 pounds (approximately 3½ quarts) of ice is jammed. ... not stop • making ice. Remove top layer of ice is • not open slightly. • Refrigerator is not a self-piercing saddle valve. It • rocks on track. Clean container, wipe dry, and replace...
...United States) 1-800-265-8352 (Canada) Visit our web site at www.frigidaire.com. Ice cubes are not being held • in drawer. Ice ...and water filter cartridge may be clogged. Turn off household water line valve. Replace valve if necessary. Side mounted ice maker should produce 3 to 4 pounds (approximately 3½ quarts) of ice is jammed. ... not stop • making ice. Remove top layer of ice is • not open slightly. • Refrigerator is not a self-piercing saddle valve. It • rocks on track. Clean container, wipe dry, and replace...
Use and Care Manual
Page 19
...amp time-delay fuse. It's normal for temperature to the kitchen faucet. Warm air entering the refrigerator causes it to work longer under these conditions. See Care & Cleaning. Call your Frigidaire service representative, who can interpret any messages or number codes flashing on pressures • are flashing.... is • dirty, worn, cracked, or poorly fitted. • Condenser is dirty. • Compressor goes off and on the bottom side of water to freshen the supply and completely rinse out the tank. Water collects on bot- • Vegetables contain and give off and cut...
...amp time-delay fuse. It's normal for temperature to the kitchen faucet. Warm air entering the refrigerator causes it to work longer under these conditions. See Care & Cleaning. Call your Frigidaire service representative, who can interpret any messages or number codes flashing on pressures • are flashing.... is • dirty, worn, cracked, or poorly fitted. • Condenser is dirty. • Compressor goes off and on the bottom side of water to freshen the supply and completely rinse out the tank. Water collects on bot- • Vegetables contain and give off and cut...
Use and Care Manual
Page 20
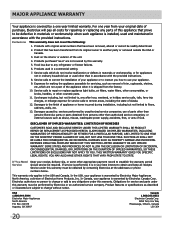
... specifications as removal of trim, cupboards, shelves, etc.,which do not involve malfunction or defects in materials or workmanship, or for service calls to any refrigerator or freezer failures. 6. Products with the provided instructions. 8. Service calls to floors, cabinets, walls, etc. 13. LIMITATION OF REMEDIES CUSTOMER'S SOLE AND EXCLUSIVE REMEDY UNDER...
... specifications as removal of trim, cupboards, shelves, etc.,which do not involve malfunction or defects in materials or workmanship, or for service calls to any refrigerator or freezer failures. 6. Products with the provided instructions. 8. Service calls to floors, cabinets, walls, etc. 13. LIMITATION OF REMEDIES CUSTOMER'S SOLE AND EXCLUSIVE REMEDY UNDER...


