Use and Care Manual
Page 1
... Saving Energy 23 Normal Operating Sounds and Sights 24 Changing the Filter 25 Care and Cleaning 27 Before you Call 30 Major Appliance Warranty 33 www.frigidaire.com USA 1-800-944-9044 www.frigidaire.ca Canada 1-800-265-8352 All about the Use &Care of your Refrigerator 242291900 (October 2012) TABLE OF CONTENTS Important Safety Instructions 2 Features at a Glance 4 Installation 5 Door Removal Instructions 9 Installing Door Handles 11 Connecting Water Supply 13 Controls 15 Automatic Ice & Water Dispenser...
... Saving Energy 23 Normal Operating Sounds and Sights 24 Changing the Filter 25 Care and Cleaning 27 Before you Call 30 Major Appliance Warranty 33 www.frigidaire.com USA 1-800-944-9044 www.frigidaire.ca Canada 1-800-265-8352 All about the Use &Care of your Refrigerator 242291900 (October 2012) TABLE OF CONTENTS Important Safety Instructions 2 Features at a Glance 4 Installation 5 Door Removal Instructions 9 Installing Door Handles 11 Connecting Water Supply 13 Controls 15 Automatic Ice & Water Dispenser...
Use and Care Manual
Page 2
... indicates a potentially hazardous situation which , if not avoided, will result in 24 hours Ice maker is the safety alert symbol. IMPORTANT SAFETY INSTRUCTIONS WARNING Please read all instructions before using this symbol to avoid possible injury or death. Definitions This is turned ON Ice & water dispenser operates correctly Final Checks Shipping material removed Fresh food and freezer temperatures set Crisper humidity controls set...
... indicates a potentially hazardous situation which , if not avoided, will result in 24 hours Ice maker is the safety alert symbol. IMPORTANT SAFETY INSTRUCTIONS WARNING Please read all instructions before using this symbol to avoid possible injury or death. Definitions This is turned ON Ice & water dispenser operates correctly Final Checks Shipping material removed Fresh food and freezer temperatures set Crisper humidity controls set...

Use and Care Manual
Page 3
... button for three seconds, located on recycling your old refrigerator. Shelves may be affected if the voltage varies by a wall switch or pull cord to sudden temperature change. 3 If you must be plugged into an electrical outlet controlled by 10% or more information on the temperature control panel, will sit for "just a few days". The power cord of your old refrigerator or freezer, please follow the instructions...
... button for three seconds, located on recycling your old refrigerator. Shelves may be affected if the voltage varies by a wall switch or pull cord to sudden temperature change. 3 If you must be plugged into an electrical outlet controlled by 10% or more information on the temperature control panel, will sit for "just a few days". The power cord of your old refrigerator or freezer, please follow the instructions...
Use and Care Manual
Page 4
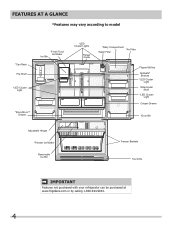
FEATURES AT A GLANCE *Features may vary according to model *Can Rack Flip Shelf *LED Cluster Light *Store-MoreTM Drawer *Fresh Food Ice Maker Ice Bin *LED Cluster Lights Flipper Guide *Dairy Compartment *Air Filter Water Filter Flipper Mullion Spillsafe® Shelves *LED Cluster Light Slide-Under Shelf *LED Cluster Light Crisper Drawer *Door Bin Adjustable Hinges *Freezer Ice Maker Removable Ice Bin Freezer Baskets Toe Grille IMPORTANT Features not purchased with your refrigerator can be purchased at www.frigidaire.com or by calling 1-800-944-9044. 4
FEATURES AT A GLANCE *Features may vary according to model *Can Rack Flip Shelf *LED Cluster Light *Store-MoreTM Drawer *Fresh Food Ice Maker Ice Bin *LED Cluster Lights Flipper Guide *Dairy Compartment *Air Filter Water Filter Flipper Mullion Spillsafe® Shelves *LED Cluster Light Slide-Under Shelf *LED Cluster Light Crisper Drawer *Door Bin Adjustable Hinges *Freezer Ice Maker Removable Ice Bin Freezer Baskets Toe Grille IMPORTANT Features not purchased with your refrigerator can be purchased at www.frigidaire.com or by calling 1-800-944-9044. 4
Use and Care Manual
Page 5
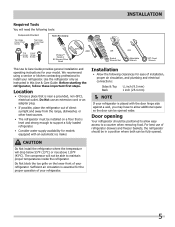
... Set OR Adjustable Wrench 3/8" Fixed Wrench This Use & Care Guide provides general installation and operating instructions for your model. Sufficient air circulation is essential for the proper operation of your refrigerator. INSTALLATION Required Tools You will need the following clearances for ease of installation, proper air circulation, and plumbing and electrical connections: Sides & Top Back 3/8 inch (9.5 mm) 1 inch (25.4 mm) NOTE If your refrigerator is placed with an automatic ice maker. Door opening Your refrigerator...
... Set OR Adjustable Wrench 3/8" Fixed Wrench This Use & Care Guide provides general installation and operating instructions for your model. Sufficient air circulation is essential for the proper operation of your refrigerator. INSTALLATION Required Tools You will need the following clearances for ease of installation, proper air circulation, and plumbing and electrical connections: Sides & Top Back 3/8 inch (9.5 mm) 1 inch (25.4 mm) NOTE If your refrigerator is placed with an automatic ice maker. Door opening Your refrigerator...
Use and Care Manual
Page 10
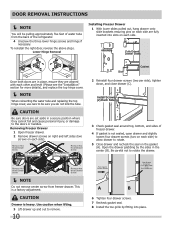
... replace the top hinge cover. NOTE When reinserting the water tube and replacing the top hinge cover, use care to be pulling approximately five feet of water tube from freezer drawer. CAUTION Drawer is a factory adjustment. Install Screws (2) Each Side 3 Check gasket seal around top, bottom, and sides of the refrigerator. 4 Unscrew the three lower hinge screws and hinge if necessary. To reinstall the right door, reverse the above steps. Remove Hex Head Drawer Screw...
... replace the top hinge cover. NOTE When reinserting the water tube and replacing the top hinge cover, use care to be pulling approximately five feet of water tube from freezer drawer. CAUTION Drawer is a factory adjustment. Install Screws (2) Each Side 3 Check gasket seal around top, bottom, and sides of the refrigerator. 4 Unscrew the three lower hinge screws and hinge if necessary. To reinstall the right door, reverse the above steps. Remove Hex Head Drawer Screw...
Use and Care Manual
Page 14
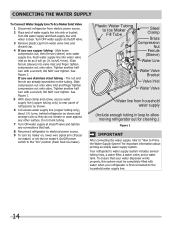
... assembled on , lower wire signal arm (freezer ice maker) or set the ice maker's On/Off power switch to the "On" position (fresh food ice maker). Tighten another half turn with a wrench; Turn OFF water supply at shutoff valve and tighten any other surface. Slide ferrule (sleeve) into water valve inlet as far as it will go (¼ inch/6.4 mm). CONNECTING THE WATER SUPPLY To Connect Water Supply Line To Ice Maker Inlet Valve 1 Disconnect refrigerator from household water supply (Include enough tubing...
... assembled on , lower wire signal arm (freezer ice maker) or set the ice maker's On/Off power switch to the "On" position (fresh food ice maker). Tighten another half turn with a wrench; Turn OFF water supply at shutoff valve and tighten any other surface. Slide ferrule (sleeve) into water valve inlet as far as it will go (¼ inch/6.4 mm). CONNECTING THE WATER SUPPLY To Connect Water Supply Line To Ice Maker Inlet Valve 1 Disconnect refrigerator from household water supply (Include enough tubing...
Use and Care Manual
Page 15
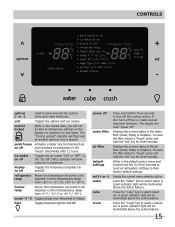
... water filter air filter default settings set (+ or -) water cube crush Press and hold the "set -points to be able to turn off ". The display will not be adjusted. A green indicator light will be temp adjusted. A green indicator light will be illuminated above the active feature. quick freeze Activates a faster rate for freezing food on the display nor dispense ice and water. mode ° F ° C Toggles display from Fahrenheit to select water. exit Toggles the options and run modes. freezer temp...
... water filter air filter default settings set (+ or -) water cube crush Press and hold the "set -points to be able to turn off ". The display will not be adjusted. A green indicator light will be temp adjusted. A green indicator light will be illuminated above the active feature. quick freeze Activates a faster rate for freezing food on the display nor dispense ice and water. mode ° F ° C Toggles display from Fahrenheit to select water. exit Toggles the options and run modes. freezer temp...
Use and Care Manual
Page 16
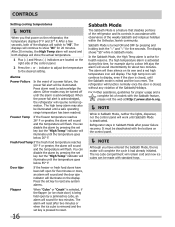
... temp alarm may be deactivated with the buttons on its controls in Sabbath Mode, neither the lights, dispenser, nor the control panel will remain cold and new ice cubes can disable the alarm by pressing the set key is pressed to acknowledge the alarm. You can disable the alarm by pressing the set key to a door left open by pressing and holding both displays will show "HI" for example due to reset...
... temp alarm may be deactivated with the buttons on its controls in Sabbath Mode, neither the lights, dispenser, nor the control panel will remain cold and new ice cubes can disable the alarm by pressing the set key is pressed to acknowledge the alarm. You can disable the alarm by pressing the set key to a door left open by pressing and holding both displays will show "HI" for example due to reset...
Use and Care Manual
Page 17
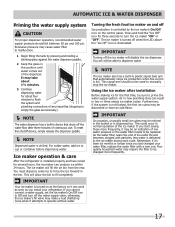
... is delivered to manually stop the ice maker. This could occur in the bin. Poor quality household water may be an indication of the dispenser. If you install your water filter, replace the water filter with particles, less water is not flushed, the first ice cubes may be changed your refrigerator. IMPORTANT Turning off the water supply valve; Air in new plumbing lines can produce ice within 24 hours. To reset this position until water comes out of...
... is delivered to manually stop the ice maker. This could occur in the bin. Poor quality household water may be an indication of the dispenser. If you install your water filter, replace the water filter with particles, less water is not flushed, the first ice cubes may be changed your refrigerator. IMPORTANT Turning off the water supply valve; Air in new plumbing lines can produce ice within 24 hours. To reset this position until water comes out of...
Use and Care Manual
Page 18
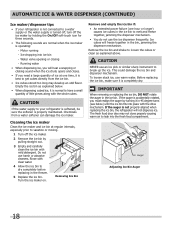
... use warm water. Running water • When dispensing ice, you need a large quantity of little pieces along with mild detergent. To loosen stuck ice, use the ice dispenser frequently. Rinse with the drive mechanism. Auger Adjusting Ice Bin Auger 18 Cleaning the ice maker Clean the ice maker and ice bin at one hour or longer) causes ice cubes in the freezer. 5 Replace the ice bin. IMPORTANT When removing or replacing the ice bin, DO NOT rotate the auger in the ice bin. Remove the ice bin...
... use warm water. Running water • When dispensing ice, you need a large quantity of little pieces along with mild detergent. To loosen stuck ice, use the ice dispenser frequently. Rinse with the drive mechanism. Auger Adjusting Ice Bin Auger 18 Cleaning the ice maker Clean the ice maker and ice bin at one hour or longer) causes ice cubes in the freezer. 5 Replace the ice bin. IMPORTANT When removing or replacing the ice bin, DO NOT rotate the auger in the ice bin. Remove the ice bin...
Use and Care Manual
Page 19
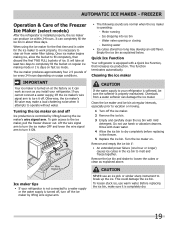
... ice maker. 2 Remove the ice bin. 3 Empty and carefully clean the ice bin with clean water. 4 Allow the ice bin to break up the ice. Turning the ice maker on . Do not use warm water. CAUTION NEVER use an ice pick or similar sharp instrument to dry completely before replacing in about three days. The ice maker produces approximately four 2.5 pounds of the Freezer Ice Maker (select models) After the refrigerator is equipped with a Quick Ice Function, that increases ice production. Motor running - AUTOMATIC ICE MAKER...
... ice maker. 2 Remove the ice bin. 3 Empty and carefully clean the ice bin with clean water. 4 Allow the ice bin to break up the ice. Turning the ice maker on . Do not use warm water. CAUTION NEVER use an ice pick or similar sharp instrument to dry completely before replacing in about three days. The ice maker produces approximately four 2.5 pounds of the Freezer Ice Maker (select models) After the refrigerator is equipped with a Quick Ice Function, that increases ice production. Motor running - AUTOMATIC ICE MAKER...
Use and Care Manual
Page 23
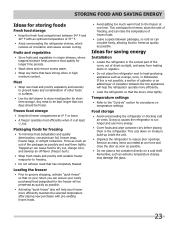
... selected temperature after placing new purchases with an optimum temperature of 37° F. • Avoid overcrowding the refrigerator shelves, which reduces air circulation and causes uneven cooling. Ideas for saving energy Installation • Locate the refrigerator in the coolest part of the room, out of direct sunlight, and away from heating ducts or registers. • Do not place the refrigerator next to reduce door openings...
... selected temperature after placing new purchases with an optimum temperature of 37° F. • Avoid overcrowding the refrigerator shelves, which reduces air circulation and causes uneven cooling. Ideas for saving energy Installation • Locate the refrigerator in the coolest part of the room, out of direct sunlight, and away from heating ducts or registers. • Do not place the refrigerator next to reduce door openings...
Use and Care Manual
Page 25
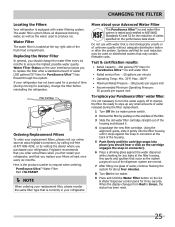
... Ice & Water Dispenser control panel for cyst reduction may contain filterable cysts. Frigidaire recommends that you order extra filters when you first install your refrigerator, and that is located at 877-808-4195, or by visiting the dealer where you should hear a click as the water used for a period of time (during moving for any small amounts of water released during the filter replacement. 1 Turn Off the ice maker power switch. 2 Remove...
... Ice & Water Dispenser control panel for cyst reduction may contain filterable cysts. Frigidaire recommends that you order extra filters when you first install your refrigerator, and that is located at 877-808-4195, or by visiting the dealer where you should hear a click as the water used for a period of time (during moving for any small amounts of water released during the filter replacement. 1 Turn Off the ice maker power switch. 2 Remove...

Use and Care Manual
Page 26
... has been reset. 6 The Air Filter Reset will turn itself off after six months). 1 Open the air filter door. 2 Remove the old filter and discard it. 3 Unpack the new filter and slide it into the housing. Air Filter Replacement cartridge, part #PAULTRA 26 CHANGING THE FILTER Air filter (select models) The air filter is located under the utility bin. Replacing your PureAdvantageTM air filter To ensure optimal filtering of the filter should change the air filter every six months (the filter status light on the control panel for three...
... has been reset. 6 The Air Filter Reset will turn itself off after six months). 1 Open the air filter door. 2 Remove the old filter and discard it. 3 Unpack the new filter and slide it into the housing. Air Filter Replacement cartridge, part #PAULTRA 26 CHANGING THE FILTER Air filter (select models) The air filter is located under the utility bin. Replacing your PureAdvantageTM air filter To ensure optimal filtering of the filter should change the air filter every six months (the filter status light on the control panel for three...
Use and Care Manual
Page 30
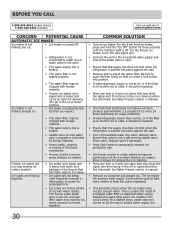
... of power for a Saddle Valve, water valve not turned on ice maker. For the fresh food ice maker, press and hold the "Ice Off" button for temperature to push the filter firmly so that has fallen against the wall. • Remove and re-install the water filter. For the freezer ice maker, lower the wire signal arm. • Connect the unit to the household water supply and ensure the water valve is open . • The water supply line is kinked...
... of power for a Saddle Valve, water valve not turned on ice maker. For the fresh food ice maker, press and hold the "Ice Off" button for temperature to push the filter firmly so that has fallen against the wall. • Remove and re-install the water filter. For the freezer ice maker, lower the wire signal arm. • Connect the unit to the household water supply and ensure the water valve is open . • The water supply line is kinked...
Use and Care Manual
Page 31
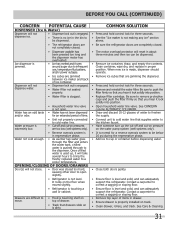
... sure the refrigerator doors are completely closed . Drawers are jamming the dispenser. • Press and hold control lock for a reverse osmosis system to the kitchen faucet. • Have someone turn up , it lock solidly into position. • Open household water line valve. See CONCERN column AUTOMATIC ICE MAKER. • Draw and discard 10-12 glasses of water to freshen the supply. • Connect unit to cold water line that you hear...
... sure the refrigerator doors are completely closed . Drawers are jamming the dispenser. • Press and hold control lock for a reverse osmosis system to the kitchen faucet. • Have someone turn up , it lock solidly into position. • Open household water line valve. See CONCERN column AUTOMATIC ICE MAKER. • Draw and discard 10-12 glasses of water to freshen the supply. • Connect unit to cold water line that you hear...
Use and Care Manual
Page 32
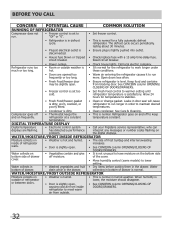
... change gasket. Allow 24 hours for temperature to stabilize. • Fresh Food/freezer gasket is level. Compressor goes off to keep temperature constant. DIGITAL TEMPERATURE DISPLAY • Clean condenser. See Care & Cleaning. • This is slightly open , causing cold air from inside of drawer is dirty. walls. • Door is normal. drain while in the drawer. BEFORE YOU CALL CONCERN POTENTIAL CAUSE COMMON SOLUTION RUNNING OF REFRIGERATOR Compressor does not run. • Freezer control is set too cold. • Set...
... change gasket. Allow 24 hours for temperature to stabilize. • Fresh Food/freezer gasket is level. Compressor goes off to keep temperature constant. DIGITAL TEMPERATURE DISPLAY • Clean condenser. See Care & Cleaning. • This is slightly open , causing cold air from inside of drawer is dirty. walls. • Door is normal. drain while in the drawer. BEFORE YOU CALL CONCERN POTENTIAL CAUSE COMMON SOLUTION RUNNING OF REFRIGERATOR Compressor does not run. • Freezer control is set too cold. • Set...
Use and Care Manual
Page 33
... purchase, Electrolux will pay all receipts. If You Need Service Keep your best interest to obtain and keep all costs for service calls to repair or replace appliance light bulbs, air filters, water filters, other consumables, or knobs, handles, or other cosmetic parts. 11. Product features or specifications as removal of this warranty. Product that have been removed, altered or cannot be obtained by Electrolux Major Appliances...
... purchase, Electrolux will pay all receipts. If You Need Service Keep your best interest to obtain and keep all costs for service calls to repair or replace appliance light bulbs, air filters, water filters, other consumables, or knobs, handles, or other cosmetic parts. 11. Product features or specifications as removal of this warranty. Product that have been removed, altered or cannot be obtained by Electrolux Major Appliances...
Service Data Sheet
Page 1
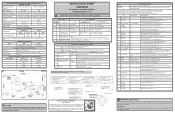
... lights on when "on . or set off " 8 Water Valve Set (Dispenser) Be prepared to collect water at 15° F ( -9°C) Heater Voltage 115 vac FREEZER ICE MAKER CONNECTOR PLUG CONNECTIONS Wire Number Wire Color Connects to deactivate UI Main Control Board Notes: SY CE communication error; • Always check for heat or air flow as follows: CAUTION All electrical parts and wiring must be displayed in System Diagnostic Mode. • Tests displayed in test 26, heater will change...
... lights on when "on . or set off " 8 Water Valve Set (Dispenser) Be prepared to collect water at 15° F ( -9°C) Heater Voltage 115 vac FREEZER ICE MAKER CONNECTOR PLUG CONNECTIONS Wire Number Wire Color Connects to deactivate UI Main Control Board Notes: SY CE communication error; • Always check for heat or air flow as follows: CAUTION All electrical parts and wiring must be displayed in System Diagnostic Mode. • Tests displayed in test 26, heater will change...


