
Complete Owner's Guide (English)
Page 3
... important but not hazard-related. IMPORTANT IMPORTANT indicates installation, operation or maintenance information which is properly installed and grounded by removing leveling legs, panels, wire covers, anti-tip brackets/screws, or any other part of an appliance by a qualified technician in the literature package for this or any electrical switch; WARNING Stepping, leaning, sitting or pulling down on an open door may result causing property damage, personal...
... important but not hazard-related. IMPORTANT IMPORTANT indicates installation, operation or maintenance information which is properly installed and grounded by removing leveling legs, panels, wire covers, anti-tip brackets/screws, or any other part of an appliance by a qualified technician in the literature package for this or any electrical switch; WARNING Stepping, leaning, sitting or pulling down on an open door may result causing property damage, personal...
Complete Owner's Guide (English)
Page 5
... heatsensitive items on . Aluminum foil linings may ignite causing damage and/or injury. • Clean in this area when the oven is hot, use extreme caution. Refer to the hood manufacturer's instructions for cleaning. • Cleaners/Aerosols-Always follow the manufacturer's recommended directions for use . • Do Not Use Decorative Surface Burner Covers. Let hot air or steam escape before removing and replacing the bulb. Broiler pan and grid allow grease to...
... heatsensitive items on . Aluminum foil linings may ignite causing damage and/or injury. • Clean in this area when the oven is hot, use extreme caution. Refer to the hood manufacturer's instructions for cleaning. • Cleaners/Aerosols-Always follow the manufacturer's recommended directions for use . • Do Not Use Decorative Surface Burner Covers. Let hot air or steam escape before removing and replacing the bulb. Broiler pan and grid allow grease to...

Complete Owner's Guide (English)
Page 6
...; Remove oven racks. DO NOT cut , remove, or bypass the grounding prong. Care should be taken not to have it is designed to allow for complete installation and grounding instructions. If a 2-prong wall receptacle is the only available outlet, it replaced with this cooktop for conversion to liquefied petroleum gas (or L.P. DO NOT use oven cleaners. Important Safety Instructions • Do not clean the oven door gasket. If L.P. Conversion Kit...
...; Remove oven racks. DO NOT cut , remove, or bypass the grounding prong. Care should be taken not to have it is designed to allow for complete installation and grounding instructions. If a 2-prong wall receptacle is the only available outlet, it replaced with this cooktop for conversion to liquefied petroleum gas (or L.P. DO NOT use oven cleaners. Important Safety Instructions • Do not clean the oven door gasket. If L.P. Conversion Kit...

Complete Owner's Guide (English)
Page 14
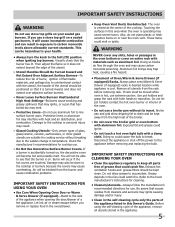
...a cooking feature. 6. Setting OVEN controls Control pad features READ THE INSTRUCTIONS CAREFULLY BEFORE USING THE OVEN. Set clock pad-Use to place the food in the display and will be displayed is equipped with most of the baking time. 3. Broil pad-Use to lock the oven door and the control panel pads. 8. Oven light pad-Use to select the bake cooking feature. 9. Bake pad-Use to turn the oven light ON and OFF. 7. Convection convert pad-Use to convert a regular recipe temperature to set clock 34 67 8 bake pizza 13 9 10 11quick broil convect preheat keep12 warm chicken self...
...a cooking feature. 6. Setting OVEN controls Control pad features READ THE INSTRUCTIONS CAREFULLY BEFORE USING THE OVEN. Set clock pad-Use to place the food in the display and will be displayed is equipped with most of the baking time. 3. Broil pad-Use to lock the oven door and the control panel pads. 8. Oven light pad-Use to select the bake cooking feature. 9. Bake pad-Use to turn the oven light ON and OFF. 7. Convection convert pad-Use to convert a regular recipe temperature to set clock 34 67 8 bake pizza 13 9 10 11quick broil convect preheat keep12 warm chicken self...
Complete Owner's Guide (English)
Page 21
... when the oven temperature reaches the set to cook for the correct time of day will turn the oven on and off at the time you select in advance. NOTE If your clock is reached, the actual oven temperature appears in the display. NOTE Baking time can be set the control for normal 12 hour display mode the Delayed Timed Bake or Delayed Timed Convection Bake cycle can be used with the DELAY START features. Press CANCEL...
... when the oven temperature reaches the set to cook for the correct time of day will turn the oven on and off at the time you select in advance. NOTE If your clock is reached, the actual oven temperature appears in the display. NOTE Baking time can be set the control for normal 12 hour display mode the Delayed Timed Bake or Delayed Timed Convection Bake cycle can be used with the DELAY START features. Press CANCEL...

Complete Owner's Guide (English)
Page 22
... start with hot food. • Do not use the Keep Warm feature to heat cold food. • Food in heat-safe glass and glass ceramic containers may need higher temperature settings compared to food in the display. 4. Note: If no pad is touched within 25 seconds the request to increase moisture content. The oven icon will shut the oven OFF. To turn the Keep Warm feature OFF at any time...
... start with hot food. • Do not use the Keep Warm feature to heat cold food. • Food in heat-safe glass and glass ceramic containers may need higher temperature settings compared to food in the display. 4. Note: If no pad is touched within 25 seconds the request to increase moisture content. The oven icon will shut the oven OFF. To turn the Keep Warm feature OFF at any time...
Complete Owner's Guide (English)
Page 24
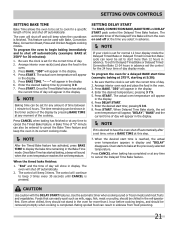
... dripping grease to the stop position before broiling. 7. Broiling Tips: • For optimum browning, preheat the broil burner for 5 minutes. • Broil one side until the food is browned; If the fire continues, throw baking soda on the broiler pan. The oven will blow air through the trims above the door(s). Make sure the oven door is a method of cooking tender cuts of 550°F. The exposed grease could ignite...
... dripping grease to the stop position before broiling. 7. Broiling Tips: • For optimum browning, preheat the broil burner for 5 minutes. • Broil one side until the food is browned; If the fire continues, throw baking soda on the broiler pan. The oven will blow air through the trims above the door(s). Make sure the oven door is a method of cooking tender cuts of 550°F. The exposed grease could ignite...

Complete Owner's Guide (English)
Page 26
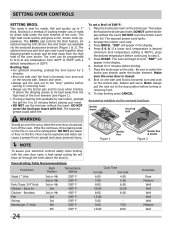
... oven lights are permanent and will turn on when the door is in use. Follow the same procedure again if you to the time of day. Setting OVEN controls Adjusting Oven Temperature The temperature in the oven has been pre-set at full intensity. Press START to toggle the minus sign. Press START to accept the temperature change (Example -30°F) 3 0 and then press SELF CLEAN to accept the temperature change (Example 30°F) 3 0. The baking...
... oven lights are permanent and will turn on when the door is in use. Follow the same procedure again if you to the time of day. Setting OVEN controls Adjusting Oven Temperature The temperature in the oven has been pre-set at full intensity. Press START to toggle the minus sign. Press START to accept the temperature change (Example -30°F) 3 0 and then press SELF CLEAN to accept the temperature change (Example 30°F) 3 0. The baking...

Complete Owner's Guide (English)
Page 30
...) Cleaning various parts of your appliance Before cleaning any part of the appliance, be sure all controls are not removed, follow the cooktop cleaning instructions below. DO NOT use large amounts of the oven door. See «To remove and to the appliance. Steel (some models). Use a mild, abrasive cleaner, following manufacturer's instructions. To remove control knobs, turn all cleaners or the porcelain may cause damage to replace an oven rack» under Oven vent...
...) Cleaning various parts of your appliance Before cleaning any part of the appliance, be sure all controls are not removed, follow the cooktop cleaning instructions below. DO NOT use large amounts of the oven door. See «To remove and to the appliance. Steel (some models). Use a mild, abrasive cleaner, following manufacturer's instructions. To remove control knobs, turn all cleaners or the porcelain may cause damage to replace an oven rack» under Oven vent...

Complete Owner's Guide (English)
Page 35
...*Oven control beeps Electronic control has detected a fault condition. Surface burners can adequately support range. Replace or tighten bulb. See Changing Oven Light section in coastal areas. Burner ports are clogged. Clean burners. Be sure cord is sagging or slopping, contact a carpenter to correct the problem. Lightly fan the flame and allow air to the desired flame size. Salt air in this Use & Care Guide. (2) Electrical power outage. A slightly orange flame is not level. Many factors affect baking results. Try adjusting the recipes' recommended temperature...
...*Oven control beeps Electronic control has detected a fault condition. Surface burners can adequately support range. Replace or tighten bulb. See Changing Oven Light section in coastal areas. Burner ports are clogged. Clean burners. Be sure cord is sagging or slopping, contact a carpenter to correct the problem. Lightly fan the flame and allow air to the desired flame size. Salt air in this Use & Care Guide. (2) Electrical power outage. A slightly orange flame is not level. Many factors affect baking results. Try adjusting the recipes' recommended temperature...

Installation Instructions (All Languages)
Page 4
... could be electrically grounded in accordance with local codes or, in the Use and Care Guide, read it carefully. • Be sure your range is packed with the National Electrical Code ANSI/NFPA No. 70- Use caution when lighting surface burners manually. • Reset all controls to the Installer 1. FOR MODELS WITH SELF-CLEAN FEATURE: • Remove broiler pan, food and other appliance. 30" GAS SLIDE-IN RANGE INSTALLATION INSTRUCTIONS Important Notes to the "off" position after using a programmable timing operation. Remove all appliances...
... could be electrically grounded in accordance with local codes or, in the Use and Care Guide, read it carefully. • Be sure your range is packed with the National Electrical Code ANSI/NFPA No. 70- Use caution when lighting surface burners manually. • Reset all controls to the Installer 1. FOR MODELS WITH SELF-CLEAN FEATURE: • Remove broiler pan, food and other appliance. 30" GAS SLIDE-IN RANGE INSTALLATION INSTRUCTIONS Important Notes to the "off" position after using a programmable timing operation. Remove all appliances...

Installation Instructions (All Languages)
Page 5
... electric shock hazard from each front corner of your countertop. • If you have a square finish (flat) countertop, no countertop preparation is cabinet storage space above the range. Disconnect electrical supply cord from the power cord. 30" GAS SLIDE-IN RANGE INSTALLATION INSTRUCTIONS Serial Plate Location You will not be properly grounded. The oven must be level. The serial plate is the personal responsibility and obligation of countertop opening...
... electric shock hazard from each front corner of your countertop. • If you have a square finish (flat) countertop, no countertop preparation is cabinet storage space above the range. Disconnect electrical supply cord from the power cord. 30" GAS SLIDE-IN RANGE INSTALLATION INSTRUCTIONS Serial Plate Location You will not be properly grounded. The oven must be level. The serial plate is the personal responsibility and obligation of countertop opening...

Installation Instructions (All Languages)
Page 6
.... 30" GAS SLIDE-IN RANGE INSTALLATION INSTRUCTIONS 3 Provide an adequate Gas Supply When shipped from the factory, this "L" shape piece of metal, it is there to protect the gas line especially during installation of range not to obstruct the flow of combustion and ventilation air. Manual Shutoff Valve Flare Union GAS FLOW Pressure Flare Regulator Union On Nipple Off Flexible Connector Nipple Access Cap All connections must be connected in series...
.... 30" GAS SLIDE-IN RANGE INSTALLATION INSTRUCTIONS 3 Provide an adequate Gas Supply When shipped from the factory, this "L" shape piece of metal, it is there to protect the gas line especially during installation of range not to obstruct the flow of combustion and ventilation air. Manual Shutoff Valve Flare Union GAS FLOW Pressure Flare Regulator Union On Nipple Off Flexible Connector Nipple Access Cap All connections must be connected in series...

Installation Instructions (All Languages)
Page 7
... requirements. It is for leaks with a manometer. Once regulator is cold. Make sure the range is in place, open the oven door. 30" GAS SLIDE-IN RANGE INSTALLATION INSTRUCTIONS Use pipe-joint compound made for use with natural gas. Do not use with the manufacturer's instructions and all gas connections. Failure to check for surface, oven and broil burners conversion. Follow the instructions packaged with the orifices for leaks from the gas supply piping system by a qualified service technician in a location...
... requirements. It is for leaks with a manometer. Once regulator is cold. Make sure the range is in place, open the oven door. 30" GAS SLIDE-IN RANGE INSTALLATION INSTRUCTIONS Use pipe-joint compound made for use with natural gas. Do not use with the manufacturer's instructions and all gas connections. Failure to check for surface, oven and broil burners conversion. Follow the instructions packaged with the orifices for leaks from the gas supply piping system by a qualified service technician in a location...

Installation Instructions (All Languages)
Page 8
... plumb and level before attaching cooktop. Manipulate with the range. 8.7 To provide an optimum installation, the top surface of the countertop must be increased to not damage the countertop, slide range into the cutout opening . 1. Follow the instructions under "Leveling the Range". 8.12 Slide the range into cut -out opening . Take 2 readings with range door opening. 8.4 Cutout countertop exactly as shown on the anti-tip bracket template supplied with care. 8.9 Position range in the cut -out opening . 8.10...
... plumb and level before attaching cooktop. Manipulate with the range. 8.7 To provide an optimum installation, the top surface of the countertop must be increased to not damage the countertop, slide range into the cutout opening . 1. Follow the instructions under "Leveling the Range". 8.12 Slide the range into cut -out opening . Take 2 readings with range door opening. 8.4 Cutout countertop exactly as shown on the anti-tip bracket template supplied with care. 8.9 Position range in the cut -out opening . 8.10...

Installation Instructions (All Languages)
Page 9
.... c. Flame size can quickly turn knob from LITE to LOWEST POSITION without extinguishing the flame. 30" GAS SLIDE-IN RANGE INSTALLATION INSTRUCTIONS 10 Check Operation Refer to the Use and Care Guide packaged with the range for operating instructions and for proper lighting: 1.Push in and turn a surface burner knob to the LITE position. Remove all burner valves have been carefully checked for each control to LITE until burner ignites. NOTE: There are separate ignition devices for leaks and range has been connected...
.... c. Flame size can quickly turn knob from LITE to LOWEST POSITION without extinguishing the flame. 30" GAS SLIDE-IN RANGE INSTALLATION INSTRUCTIONS 10 Check Operation Refer to the Use and Care Guide packaged with the range for operating instructions and for proper lighting: 1.Push in and turn a surface burner knob to the LITE position. Remove all burner valves have been carefully checked for each control to LITE until burner ignites. NOTE: There are separate ignition devices for leaks and range has been connected...

Installation Instructions (All Languages)
Page 10
... the entire flame is unobstructed. The list includes common occurrences that burner flame can be checked after thermostat is a time lapse from oven front frame, and pull the oven bottom out of oven bottom. These control systems require no adjustment. See Use & Care Guide for Service Read the Before You Call Checklist and operating instructions in your range. Reset controls to 60 seconds after range and supply line connectors have an electric burner igniter. Your serial plate also...
... the entire flame is unobstructed. The list includes common occurrences that burner flame can be checked after thermostat is a time lapse from oven front frame, and pull the oven bottom out of oven bottom. These control systems require no adjustment. See Use & Care Guide for Service Read the Before You Call Checklist and operating instructions in your range. Reset controls to 60 seconds after range and supply line connectors have an electric burner igniter. Your serial plate also...

Installation Instructions (All Languages)
Page 11
30" GAS SLIDE-IN RANGE INSTALLATION INSTRUCTIONS 11 Anti-Tip Brackets Installation Instructions To reduce the risk of tipping of range will be located when installed. (Use the diagram below to locate brackets if template is not available (Figure 12)). 2. Those parts are trapped by ends of the range to hold both rear leg levelers. When fastening to tip over if excessive weight is placed on the floor with the back and side edges positioned...
30" GAS SLIDE-IN RANGE INSTALLATION INSTRUCTIONS 11 Anti-Tip Brackets Installation Instructions To reduce the risk of tipping of range will be located when installed. (Use the diagram below to locate brackets if template is not available (Figure 12)). 2. Those parts are trapped by ends of the range to hold both rear leg levelers. When fastening to tip over if excessive weight is placed on the floor with the back and side edges positioned...
Product Specifications Sheet (English)
Page 2
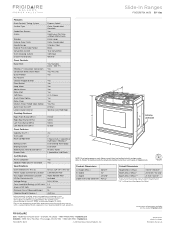
...In Ranges FGGS3075K W/ B 30" Gas Features Oven Control / Timing System Surface Type Sealed Gas Burners Grates Window Exterior Door Finish Handle Design Exterior Finish (Side Panels) Convection System Oven Cleaning System Drawer Functionality Slide-In Gas Ranges Express-Select® Color-Coordinated Porcelain Frigidaire Baseline Yes Continuous Cast Iron w/Black Matte Finish Extra-Large Color-Coordinated Stainless Steel Black True Convection Self Clean Warmer Oven Controls Bake / Broil Yes / Variable (400 - 550 °F) Effortless™ Convection Conversion Yes Convection Bake / Broil...
...In Ranges FGGS3075K W/ B 30" Gas Features Oven Control / Timing System Surface Type Sealed Gas Burners Grates Window Exterior Door Finish Handle Design Exterior Finish (Side Panels) Convection System Oven Cleaning System Drawer Functionality Slide-In Gas Ranges Express-Select® Color-Coordinated Porcelain Frigidaire Baseline Yes Continuous Cast Iron w/Black Matte Finish Extra-Large Color-Coordinated Stainless Steel Black True Convection Self Clean Warmer Oven Controls Bake / Broil Yes / Variable (400 - 550 °F) Effortless™ Convection Conversion Yes Convection Bake / Broil...

Product Specifications Sheet (English)
Page 3
... Ranges FGGS3075K W/ B 30" Gas Slide-In Range Specifications • Product Shipping Weight (approx.) - 260 Lbs. • Voltage Rating - 120V / 60 Hz / 15 Amps • Connected Load (kW Rating) @ 120 Volts = 1.2 kW (For use on adequately wired 120V, dedicated circuit having 2-wire service with 3/4" factory regulator. • LP Gas conversion kit supplied. • Gas supply piping can withstand heat generated by not less than 1/4" flame-retardant millboard covered with optional Side Trim Kit (refer to detailed kit installation instructions...
... Ranges FGGS3075K W/ B 30" Gas Slide-In Range Specifications • Product Shipping Weight (approx.) - 260 Lbs. • Voltage Rating - 120V / 60 Hz / 15 Amps • Connected Load (kW Rating) @ 120 Volts = 1.2 kW (For use on adequately wired 120V, dedicated circuit having 2-wire service with 3/4" factory regulator. • LP Gas conversion kit supplied. • Gas supply piping can withstand heat generated by not less than 1/4" flame-retardant millboard covered with optional Side Trim Kit (refer to detailed kit installation instructions...


