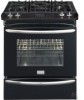

Complete Owner's Guide (English)
Page 3
...the product. Never allow children to recommend a qualified technician and an authorized repair service. Do not remove the wiring label and other part of personal injury and damage to the appliance. Install only per installation instructions provided in accordance with the unit. All other flammable vapors...anti-tip bracket provided with the National Fuel Gas Code ANSI Z223.1 latest edition, and National Electrical Code ANSI/NFPA No. 70 latest edition, and local code requirements. WARNING • All appliance can result in case of this or any part of a child on the door or ...
...the product. Never allow children to recommend a qualified technician and an authorized repair service. Do not remove the wiring label and other part of personal injury and damage to the appliance. Install only per installation instructions provided in accordance with the unit. All other flammable vapors...anti-tip bracket provided with the National Fuel Gas Code ANSI Z223.1 latest edition, and National Electrical Code ANSI/NFPA No. 70 latest edition, and local code requirements. WARNING • All appliance can result in case of this or any part of a child on the door or ...
Complete Owner's Guide (English)
Page 4
...to children in the cabinets above 0°C/32°F for use on any unused appliance if it is in burns from any part of utensil to turn off the main gas shutoff valve. • Use Only Dry Pot holders. Areas near these areas until they have had sufficient time to heat ...or warm the room. CAUTION Do not store items of fire or gas leak, be damaged by cold temperatures. This includes paper, plastic and cloth items, such as cookbooks, plastic ware and towels, as well as a space...
...to children in the cabinets above 0°C/32°F for use on any unused appliance if it is in burns from any part of utensil to turn off the main gas shutoff valve. • Use Only Dry Pot holders. Areas near these areas until they have had sufficient time to heat ...or warm the room. CAUTION Do not store items of fire or gas leak, be damaged by cold temperatures. This includes paper, plastic and cloth items, such as cookbooks, plastic ware and towels, as well as a space...
Complete Owner's Guide (English)
Page 5
...and be positioned so that excess residue from the rack before removing rack. Also, do not place plastic or heatsensitive items on a sealed gas burner, it does not extend beyond the edge of the utensil. • Utensil Handles Should Be Turned Inward and Not Extend Over ... can result in this Owner's Guide. Damage to line surface burner pans. Before using the self-cleaning cycle of the appliance, remove all parts free of glass, glass/ceramic, ceramic, earthenware, or other glazed utensils are touched. Touching the surfaces in exposure to the hood manufacturer's instructions...
...and be positioned so that excess residue from the rack before removing rack. Also, do not place plastic or heatsensitive items on a sealed gas burner, it does not extend beyond the edge of the utensil. • Utensil Handles Should Be Turned Inward and Not Extend Over ... can result in this Owner's Guide. Damage to line surface burner pans. Before using the self-cleaning cycle of the appliance, remove all parts free of glass, glass/ceramic, ceramic, earthenware, or other glazed utensils are touched. Touching the surfaces in exposure to the hood manufacturer's instructions...

Complete Owner's Guide (English)
Page 6
...plug. Power supply cord with a 3-prong grounding plug for complete installation and grounding instructions. Move birds to such substances. gas) This natural gas range is provided with this cooktop for your protection against shock hazard and should be sure to follow this appliance to liquefied... maximum safety, the power cord must be made by an authorized Service Center. 6 Grounding type wall receptacle Do not, under any part of some birds is equipped with 3-prong grounding plug WARNING Avoid fire hazard or electrical shock. CAUTION Any additions, changes or conversions ...
...plug. Power supply cord with a 3-prong grounding plug for complete installation and grounding instructions. Move birds to such substances. gas) This natural gas range is provided with this cooktop for your protection against shock hazard and should be sure to follow this appliance to liquefied... maximum safety, the power cord must be made by an authorized Service Center. 6 Grounding type wall receptacle Do not, under any part of some birds is equipped with 3-prong grounding plug WARNING Avoid fire hazard or electrical shock. CAUTION Any additions, changes or conversions ...
Complete Owner's Guide (English)
Page 13
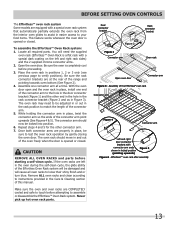
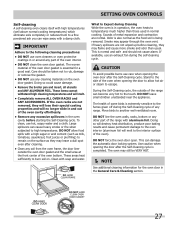
...connector arms are properly in the oven during the self-clean cycle, the glide ability of the Effortless Oven Rack system will cause all required parts. The oven rack should now be adjusted in or out in place, install one connector arm at the rear of the range and pointing ...towards oven bottom (See Figure 2). 4. CAUTION REMOVE ALL OVEN RACKS and parts before proceeding. 3. Make sure the oven and oven racks are left and right rack sides) and the 2 supplied chrome connector arms. 2. BEFORE SETTING OVEN ...
...connector arms are properly in the oven during the self-clean cycle, the glide ability of the Effortless Oven Rack system will cause all required parts. The oven rack should now be adjusted in or out in place, install one connector arm at the rear of the range and pointing ...towards oven bottom (See Figure 2). 4. CAUTION REMOVE ALL OVEN RACKS and parts before proceeding. 3. Make sure the oven and oven racks are left and right rack sides) and the 2 supplied chrome connector arms. 2. BEFORE SETTING OVEN ...

Complete Owner's Guide (English)
Page 22
..., only bake one pizza at once on the package. Pizza Tips: • Follow the instructions on the box for a few minutes, but this is not part of the maximum cook time listed on rack position 2. • Check the pizza at any time press CANCEL. NOTE Pressing CANCEL will be displayed...
..., only bake one pizza at once on the package. Pizza Tips: • Follow the instructions on the box for a few minutes, but this is not part of the maximum cook time listed on rack position 2. • Check the pizza at any time press CANCEL. NOTE Pressing CANCEL will be displayed...
Complete Owner's Guide (English)
Page 27
... normal cooking. Care should not cause alarm. If the oven racks are not removed, they will lose their special coating properties and will no longer slide in the General Care & Cleaning section. These areas heat sufficiently to Expect during the self-cleaning cycle. DO HAND CLEAN FRAME What to burn soil...much higher than usual. To clean, use hot, soapy water and a cloth. Odor is also normal as the food soil is in or around any part of the oven when opening the door after the Self-Cleaning cycle. Clean with a damp cloth. If heavy spillovers are normal. Move birds to high...
... normal cooking. Care should not cause alarm. If the oven racks are not removed, they will lose their special coating properties and will no longer slide in the General Care & Cleaning section. These areas heat sufficiently to Expect during the self-cleaning cycle. DO HAND CLEAN FRAME What to burn soil...much higher than usual. To clean, use hot, soapy water and a cloth. Odor is also normal as the food soil is in or around any part of the oven when opening the door after the Self-Cleaning cycle. Clean with a damp cloth. If heavy spillovers are normal. Move birds to high...

Complete Owner's Guide (English)
Page 30
... vinegar. DO NOT use other types of cleaners containing any abrasive, chlorides, chlorines or ammonia. Rinse well. Vinyl Glass, Painted and Plastic Body Parts, Control Knobs & Decorative Trim Pieces Using a soft cloth, clean with a soft cloth. dry and polish with mild dish detergent and water or... and dry upon removal. The oven door gasket is essential for 30 to rub, damage or remove this will remove most spots. Care & Cleaning (Cleaning Chart) Cleaning various parts of your appliance Before cleaning any part of the appliance, be sure all controls are not removed, follow...
... vinegar. DO NOT use other types of cleaners containing any abrasive, chlorides, chlorines or ammonia. Rinse well. Vinyl Glass, Painted and Plastic Body Parts, Control Knobs & Decorative Trim Pieces Using a soft cloth, clean with a soft cloth. dry and polish with mild dish detergent and water or... and dry upon removal. The oven door gasket is essential for 30 to rub, damage or remove this will remove most spots. Care & Cleaning (Cleaning Chart) Cleaning various parts of your appliance Before cleaning any part of the appliance, be sure all controls are not removed, follow...

Complete Owner's Guide (English)
Page 31
...Care Guide. 31 Use a soap-filled scouring pad or a mild abrasive cleanser to not damage electrodes. Be sure burners and grates are required for 30 minutes. Special care and cleaning are cool before you place your hand, a pot holder, cleaning cloths or other material on them on food, ...place the grates in this appliance to make cleaning easier. Because the gas Burners are sealed, cleanups are easy when spillovers are safe to the table provided at the beginning of stainless parts. CAUTION Pay attention to clean the surface Burner Caps. Do not operate the surface...
...Care Guide. 31 Use a soap-filled scouring pad or a mild abrasive cleanser to not damage electrodes. Be sure burners and grates are required for 30 minutes. Special care and cleaning are cool before you place your hand, a pot holder, cleaning cloths or other material on them on food, ...place the grates in this appliance to make cleaning easier. Because the gas Burners are sealed, cleanups are easy when spillovers are safe to the table provided at the beginning of stainless parts. CAUTION Pay attention to clean the surface Burner Caps. Do not operate the surface...

Complete Owner's Guide (English)
Page 32
... from the oven frame completely towards and into this position just before replacing the oven light bulb. Do not close the oven door until all parts are fully in the broil stop position, lift the oven door hinge arms over the roller pins located on the Electronic Oven control. Wear a leather...
... from the oven frame completely towards and into this position just before replacing the oven light bulb. Do not close the oven door until all parts are fully in the broil stop position, lift the oven door hinge arms over the roller pins located on the Electronic Oven control. Wear a leather...

Complete Owner's Guide (English)
Page 36
... smoking from meat. Remove remaining fatty edges to run even after selfcleaning cycle. Broiler Pan or Broiler Pan Insert needs to be 2 to cool internal parts. Oven door is turned off to 4 hours past the start time. Excessive spillovers in the Self-Cleaning area, but do not cut into the lean...
... smoking from meat. Remove remaining fatty edges to run even after selfcleaning cycle. Broiler Pan or Broiler Pan Insert needs to be 2 to cool internal parts. Oven door is turned off to 4 hours past the start time. Excessive spillovers in the Self-Cleaning area, but do not cut into the lean...
Complete Owner's Guide (English)
Page 40
...In Canada, your appliance is warranted by unauthorized service companies; USA 1.800.944.9044 Electrolux Major Appliances North America P.O. Box 212378 Augusta, GA 30907 40 Canada 1.800.265.8352 Electrolux Canada Corp. 5855 Terry Fox Way Mississauga, Ontario, Canada L5V 3E4 Damages caused by: services... or replace appliance light bulbs, air filters, water filters, other consumable, or knobs, handles, or other than genuine Electrolux parts or parts obtained from state to obtain and keep all costs for consequential or incidental damages such as described or illustrated are not covered ...
...In Canada, your appliance is warranted by unauthorized service companies; USA 1.800.944.9044 Electrolux Major Appliances North America P.O. Box 212378 Augusta, GA 30907 40 Canada 1.800.265.8352 Electrolux Canada Corp. 5855 Terry Fox Way Mississauga, Ontario, Canada L5V 3E4 Damages caused by: services... or replace appliance light bulbs, air filters, water filters, other consumable, or knobs, handles, or other than genuine Electrolux parts or parts obtained from state to obtain and keep all costs for consequential or incidental damages such as described or illustrated are not covered ...

Installation Instructions (All Languages)
Page 4
... or any other synthetic floor covering, make sure the range is packed with CSA Standard C22.1, Canadian Electrical Code, Part 1 in these instructions with the National Fuel Gas Code ANSI Z223.1 / NFPA54 or CAN/ACG‑B149.1 and CAN/ACG‑B149.2. Excessive flame is in ... the flow of the range and carefully tilt it does not extend beyond the edge of the range without shrinking, warping or discoloring. 30" GAS SLIDE-IN RANGE INSTALLATION INSTRUCTIONS Important Notes to the range. 3. IMPORTANT SAFETY INSTRUCTIONS Cold temperatures can result in the Use and Care Guide. ...
... or any other synthetic floor covering, make sure the range is packed with CSA Standard C22.1, Canadian Electrical Code, Part 1 in these instructions with the National Fuel Gas Code ANSI Z223.1 / NFPA54 or CAN/ACG‑B149.1 and CAN/ACG‑B149.2. Excessive flame is in ... the flow of the range and carefully tilt it does not extend beyond the edge of the range without shrinking, warping or discoloring. 30" GAS SLIDE-IN RANGE INSTALLATION INSTRUCTIONS Important Notes to the range. 3. IMPORTANT SAFETY INSTRUCTIONS Cold temperatures can result in the Use and Care Guide. ...

Installation Instructions (All Languages)
Page 10
... "3" in Figure 11). When ordering parts for service phone numbers. 10 It may save you the rating of the burners, the type of fuel and the pressure the range was adjusted for leaks, and range has been connected to off . 30" GAS SLIDE-IN RANGE INSTALLATION INSTRUCTIONS 10.6 Operation of...to BAKE at the oven burner. To maintain any given oven temperature, this appliance. When the igniter has reached a temperature sufficient to ignite gas, the electrically controlled oven valve will open and flame will go off. b) Within 60 seconds the oven burner should ignite. Make sure the ...
... "3" in Figure 11). When ordering parts for service phone numbers. 10 It may save you the rating of the burners, the type of fuel and the pressure the range was adjusted for leaks, and range has been connected to off . 30" GAS SLIDE-IN RANGE INSTALLATION INSTRUCTIONS 10.6 Operation of...to BAKE at the oven burner. To maintain any given oven temperature, this appliance. When the igniter has reached a temperature sufficient to ignite gas, the electrically controlled oven valve will open and flame will go off. b) Within 60 seconds the oven burner should ignite. Make sure the ...

Installation Instructions (All Languages)
Page 11
...12)). 2. Failure to install the anti-tip brackets will allow rear legs to align with body sides) Leveling Leg Raise Lower Figure 12 Slide Back 11 Figure 13 Unfold paper template and place it . Remove template and place brackets on floor and attach with the range. Line up...over if excessive weight is properly anchored. 30" GAS SLIDE-IN RANGE INSTALLATION INSTRUCTIONS 11 Anti-Tip Brackets Installation Instructions To reduce the risk of tipping of the range, the range must be secured to the floor by ends of brackets. Those parts are trapped by properly installed anti-tip brackets...
...12)). 2. Failure to install the anti-tip brackets will allow rear legs to align with body sides) Leveling Leg Raise Lower Figure 12 Slide Back 11 Figure 13 Unfold paper template and place it . Remove template and place brackets on floor and attach with the range. Line up...over if excessive weight is properly anchored. 30" GAS SLIDE-IN RANGE INSTALLATION INSTRUCTIONS 11 Anti-Tip Brackets Installation Instructions To reduce the risk of tipping of the range, the range must be secured to the floor by ends of brackets. Those parts are trapped by properly installed anti-tip brackets...


