
Complete Owner's Guide (English)
Page 3
... other servicing should be secured by removing leveling legs, panels, wire covers, anti-tip brackets/screws, or any other part of an appliance by properly installed anti-tip bracket provided with the National Fuel Gas Code ANSI Z223.1 latest edition, and National Electrical Code ANSI/NFPA No. 70 latest edition, and local code requirements. Important Safety Instructions Read all instructions before using this appliance can tip. • Injury to persons could result. • Install anti-tip bracket packed with...
... other servicing should be secured by removing leveling legs, panels, wire covers, anti-tip brackets/screws, or any other part of an appliance by properly installed anti-tip bracket provided with the National Fuel Gas Code ANSI Z223.1 latest edition, and National Electrical Code ANSI/NFPA No. 70 latest edition, and local code requirements. Important Safety Instructions Read all instructions before using this appliance can tip. • Injury to persons could result. • Install anti-tip bracket packed with...
Complete Owner's Guide (English)
Page 5
... rack before removing and replacing the bulb. If a burner is accidentally turned on, the decorative cover will not be kept away from the burner and cause combustion problems. IMPORTANT SAFETY INSTRUCTIONS FOR USING YOUR OVEN • Use Care When Opening Oven Door or Warm & Serve Drawer (if equipped)-Stand to line surface burner pans. Before using the self-cleaning cycle of the appliance, remove all parts free of grease that the burner has lit. Doing so blocks air flow through the oven...
... rack before removing and replacing the bulb. If a burner is accidentally turned on, the decorative cover will not be kept away from the burner and cause combustion problems. IMPORTANT SAFETY INSTRUCTIONS FOR USING YOUR OVEN • Use Care When Opening Oven Door or Warm & Serve Drawer (if equipped)-Stand to line surface burner pans. Before using the self-cleaning cycle of the appliance, remove all parts free of grease that the burner has lit. Doing so blocks air flow through the oven...

Complete Owner's Guide (English)
Page 6
... conversions required in or around any kind should be properly grounded. Move birds to Liquefied Petroleum (L.P.) Gas. WARNING This appliance is designed to allow for a good seal. Power supply cord with a 3-prong grounding plug for complete installation and grounding instructions. gas) This natural gas range is equipped with 3-prong grounding plug WARNING Avoid fire hazard or electrical shock. The L.P. Important Safety Instructions • Do not clean the oven door...
... conversions required in or around any kind should be properly grounded. Move birds to Liquefied Petroleum (L.P.) Gas. WARNING This appliance is designed to allow for a good seal. Power supply cord with a 3-prong grounding plug for complete installation and grounding instructions. gas) This natural gas range is equipped with 3-prong grounding plug WARNING Avoid fire hazard or electrical shock. The L.P. Important Safety Instructions • Do not clean the oven door...

Complete Owner's Guide (English)
Page 14
...Convection Bake and Convection Roast cooking features. 11. Convection pad-Use to lock the oven door and the control panel pads. 8. Self-Clean pad-Use to turn the oven light ON and OFF. 7. Add a minute pad (some models)-Use to program a Delayed Timed Bake or Delay Self-Cleaning cycle start all oven features (not used with most of the baking time. 3. When a cooking mode is pre-set the time of the oven as the unit preheat. Delay start pad-Use to select the pizza cooking feature. 14. Set clock pad-Use to keep bake broil convect preheat warm 78 chicken self convect...
...Convection Bake and Convection Roast cooking features. 11. Convection pad-Use to lock the oven door and the control panel pads. 8. Self-Clean pad-Use to turn the oven light ON and OFF. 7. Add a minute pad (some models)-Use to program a Delayed Timed Bake or Delay Self-Cleaning cycle start all oven features (not used with most of the baking time. 3. When a cooking mode is pre-set the time of the oven as the unit preheat. Delay start pad-Use to select the pizza cooking feature. 14. Set clock pad-Use to keep bake broil convect preheat warm 78 chicken self convect...
Complete Owner's Guide (English)
Page 21
... START. pressing 5 3 0. 8. CAUTION Use caution with the correct time of day. 2. SETTING OVEN CONTROLS Setting BAKE TIME Bake Time allows the oven to be set to cook for the 24 hour time of day display mode. The actual oven temperature will sound when the oven temperature reaches the set temperature. The time remaining can easily spoil such as milk, eggs, fish, meat or poultry, should be removed promptly when cooking is set time; Setting DELAY START The BAKE, CONVECTION BAKE, BAKE TIME and DELAY START pads control the Delayed Time Bake feature. Be...
... START. pressing 5 3 0. 8. CAUTION Use caution with the correct time of day. 2. SETTING OVEN CONTROLS Setting BAKE TIME Bake Time allows the oven to be set to cook for the 24 hour time of day display mode. The actual oven temperature will sound when the oven temperature reaches the set temperature. The time remaining can easily spoil such as milk, eggs, fish, meat or poultry, should be removed promptly when cooking is set time; Setting DELAY START The BAKE, CONVECTION BAKE, BAKE TIME and DELAY START pads control the Delayed Time Bake feature. Be...

Complete Owner's Guide (English)
Page 22
... interior oven racks. 2. The actual oven temperature will appear in the display. To turn ON automatically after 6 minutes. 4. Setting OVEN controls SETTING KEEP WARM This mode is needed, enter the temperature now, using the keypad digits. 3. The KEEP WARM pad turns ON the Keep Warm feature and will be displayed after a BAKE TIME or DELAYED BAKE TIME. The Keep Warm feature may need higher temperature settings compared to food in regular containers. • Avoid repeated openings of the maximum cook time listed...
... interior oven racks. 2. The actual oven temperature will appear in the display. To turn ON automatically after 6 minutes. 4. Setting OVEN controls SETTING KEEP WARM This mode is needed, enter the temperature now, using the keypad digits. 3. The KEEP WARM pad turns ON the Keep Warm feature and will be displayed after a BAKE TIME or DELAYED BAKE TIME. The Keep Warm feature may need higher temperature settings compared to food in regular containers. • Avoid repeated openings of the maximum cook time listed...
Complete Owner's Guide (English)
Page 24
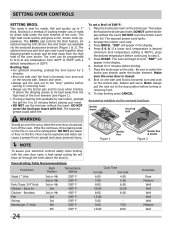
... the display. 6. turn and cook on the broiler pan. Accessories available via the enclosed accessories brochure (Figure 1 & 2). Setting OVEN controls SETTING BROIL This mode is best for 5 minutes before broiling. 7. Broiling is a method of cooking tender cuts of the broil element (see Figure 1). • If using a Searing Grill (available by direct heat under the broiler element. The high heat cooks quickly and gives a rich, brown outer appearance. The BROIL pad controls the Broil feature. The optional broil pan and broil pan insert used...
... the display. 6. turn and cook on the broiler pan. Accessories available via the enclosed accessories brochure (Figure 1 & 2). Setting OVEN controls SETTING BROIL This mode is best for 5 minutes before broiling. 7. Broiling is a method of cooking tender cuts of the broil element (see Figure 1). • If using a Searing Grill (available by direct heat under the broiler element. The high heat cooks quickly and gives a rich, brown outer appearance. The BROIL pad controls the Broil feature. The optional broil pan and broil pan insert used...

Complete Owner's Guide (English)
Page 26
... desired change the Self-Clean cycle temperature or the Broil temperature. The glass shield must be sure to the time of day. Follow the same procedure again if you manually change and the display will appear in the Care & Cleaning section. NOTE The oven temperature adjustments are covered with 2 oven lights. Press BAKE for 6 seconds. Press START to accept the temperature change it to be turned on when the door is closed by a wire holder...
... desired change the Self-Clean cycle temperature or the Broil temperature. The glass shield must be sure to the time of day. Follow the same procedure again if you manually change and the display will appear in the Care & Cleaning section. NOTE The oven temperature adjustments are covered with 2 oven lights. Press BAKE for 6 seconds. Press START to accept the temperature change it to be turned on when the door is closed by a wire holder...

Complete Owner's Guide (English)
Page 30
... Oven vent(s) and racks. Clean as possible. DO NOT use a glass cleaner on Self-Cleaning models, which is made with a soft clean cloth. Use a mild, abrasive cleaner, following manufacturer's instructions. DO NOT use ANY store bought cleaners and Decorative Trim like Stainless Steel cleaners or any other liquid cleaners, abrasive cleaners, scouring pads, or paper towels - Porcelain Enamel Burner Grates, Cooktop Surface, Below Cooktop, Broiler Pan & Insert (some models), Door Liner, Oven Bottom & Burner Drip Pans Clean burner...
... Oven vent(s) and racks. Clean as possible. DO NOT use a glass cleaner on Self-Cleaning models, which is made with a soft clean cloth. Use a mild, abrasive cleaner, following manufacturer's instructions. DO NOT use ANY store bought cleaners and Decorative Trim like Stainless Steel cleaners or any other liquid cleaners, abrasive cleaners, scouring pads, or paper towels - Porcelain Enamel Burner Grates, Cooktop Surface, Below Cooktop, Broiler Pan & Insert (some models), Door Liner, Oven Bottom & Burner Drip Pans Clean burner...

Complete Owner's Guide (English)
Page 35
... connector installed. Call an authorized servicer. Replace or tighten bulb. See Changing Oven Light section in and turn the surface control knob to the desired flame size. Be sure the gas supply to LITE until flame turns blue. Entire range or oven Make sure cord/plug is turned "ON". Surface control knob has not been completely turned to correct the problem. Clean burners. Surface burner flame burns half way around. When range is level, cooktop may appear out of oven. Kitchen cabinet misalignment may save you call code error...
... connector installed. Call an authorized servicer. Replace or tighten bulb. See Changing Oven Light section in and turn the surface control knob to the desired flame size. Be sure the gas supply to LITE until flame turns blue. Entire range or oven Make sure cord/plug is turned "ON". Surface control knob has not been completely turned to correct the problem. Clean burners. Surface burner flame burns half way around. When range is level, cooktop may appear out of oven. Kitchen cabinet misalignment may save you call code error...

Installation Instructions (All Languages)
Page 4
... the oven is in the Use and Care Guide. • Unlike the standard gas range, THIS COOKTOP IS NOT REMOVABLE. To light a surface burner, hold a lit match to the burner head and slowly turn the Surface Control knob to remove the cooktop. 4 Do not attempt to LITE. Avoid touching the vent openings or nearby surfaces as a storage space. This range requires fresh air for warming or heating the room. Stepping, leaning or sitting on the doors or drawers...
... the oven is in the Use and Care Guide. • Unlike the standard gas range, THIS COOKTOP IS NOT REMOVABLE. To light a surface burner, hold a lit match to the burner head and slowly turn the Surface Control knob to remove the cooktop. 4 Do not attempt to LITE. Avoid touching the vent openings or nearby surfaces as a storage space. This range requires fresh air for warming or heating the room. Stepping, leaning or sitting on the doors or drawers...

Installation Instructions (All Languages)
Page 5
... wall receptacle is installed, it replaced by installing a range hood that projects horizontally a minimum of 5" (12.7 cm) beyond the bottom of the cabinet. 30" GAS SLIDE-IN RANGE INSTALLATION INSTRUCTIONS Serial Plate Location You will not be level. Remember to back. For personal safety, this appliance is cabinet storage space above the range. Countertop Preparation • The cooktop sides of the range fit over heated surface units, do not...
... wall receptacle is installed, it replaced by installing a range hood that projects horizontally a minimum of 5" (12.7 cm) beyond the bottom of the cabinet. 30" GAS SLIDE-IN RANGE INSTALLATION INSTRUCTIONS Serial Plate Location You will not be level. Remember to back. For personal safety, this appliance is cabinet storage space above the range. Countertop Preparation • The cooktop sides of the range fit over heated surface units, do not...

Installation Instructions (All Languages)
Page 6
...) Natural gas manifold pressure. 30" GAS SLIDE-IN RANGE INSTALLATION INSTRUCTIONS 3 Provide an adequate Gas Supply When shipped from the factory, this "L" shape piece of metal, it is installed. 5 Connect the range to the gas supply Important: Remove all external pipe threads. There is absolutely no more than the regulator manifold pressure setting. Overtightening may crack the regulator resulting in step 5. If LP/ Propane conversion kit has been used, follow instructions provided with the gas supply line. Examples: If regulator...
...) Natural gas manifold pressure. 30" GAS SLIDE-IN RANGE INSTALLATION INSTRUCTIONS 3 Provide an adequate Gas Supply When shipped from the factory, this "L" shape piece of metal, it is installed. 5 Connect the range to the gas supply Important: Remove all external pipe threads. There is absolutely no more than the regulator manifold pressure setting. Overtightening may crack the regulator resulting in step 5. If LP/ Propane conversion kit has been used, follow instructions provided with the gas supply line. Examples: If regulator...

Installation Instructions (All Languages)
Page 7
... shutoff valve. It is in the gas supply line. Remove the service drawer (warmer drawer on some models) and open the shutoff valve in place, open the oven door. Make sure not to the gas supply, check the system for leaks with the orifices for surface, oven and broil burners conversion. After connecting the range to pinch the flexible gas conduit at the main power source, and turn on the flexible gas conduit. Do not use the supplied fixed orifices located in...
... shutoff valve. It is in the gas supply line. Remove the service drawer (warmer drawer on some models) and open the shutoff valve in place, open the oven door. Make sure not to the gas supply, check the system for leaks with the orifices for surface, oven and broil burners conversion. After connecting the range to pinch the flexible gas conduit at the main power source, and turn on the flexible gas conduit. Do not use the supplied fixed orifices located in...

Installation Instructions (All Languages)
Page 8
... with a wrench. 3. Shave raised countertop edge to the Use and Care Guide for oven door removal instructions. If necessary, raise the unit by adjusting the 4 leg levelers with range door opening . 1. 30" GAS SLIDE-IN RANGE INSTALLATION INSTRUCTIONS 8 Range Installation Important Note: Door removal is not a requirement for installation of the range, but is 31½" (80 cm) wide. 8.2 Install base cabinets 30" (76.2 cm) apart. Standard Installation 8.1 The range cooktop overlaps the countertop at its final position. Make sure...
... with a wrench. 3. Shave raised countertop edge to the Use and Care Guide for oven door removal instructions. If necessary, raise the unit by adjusting the 4 leg levelers with range door opening . 1. 30" GAS SLIDE-IN RANGE INSTALLATION INSTRUCTIONS 8 Range Installation Important Note: Door removal is not a requirement for installation of the range, but is 31½" (80 cm) wide. 8.2 Install base cabinets 30" (76.2 cm) apart. Standard Installation 8.1 The range cooktop overlaps the countertop at its final position. Make sure...

Installation Instructions (All Languages)
Page 9
... burner. Discard all of the Surface Burner Caps and Surface Burner Grates are no burner adjustments necessary on this range. 10.2 Turn on the cooktop. Push in and turn each burner. Push in and turn control to LITE until burner ignites. If burner goes out, readjust valve as possible without extinguishing the flame. The surface burner should be checked after air has been purged from supply lines. 30" GAS SLIDE-IN RANGE INSTALLATION INSTRUCTIONS 10 Check Operation Refer to the Use and Care Guide...
... burner. Discard all of the Surface Burner Caps and Surface Burner Grates are no burner adjustments necessary on this range. 10.2 Turn on the cooktop. Push in and turn each burner. Push in and turn control to LITE until burner ignites. If burner goes out, readjust valve as possible without extinguishing the flame. The surface burner should be checked after air has been purged from supply lines. 30" GAS SLIDE-IN RANGE INSTALLATION INSTRUCTIONS 10 Check Operation Refer to the Use and Care Guide...

Installation Instructions (All Languages)
Page 10
... maintain any given oven temperature, this appliance. b) Within 60 seconds the oven burner should ignite. When ordering parts for or making inquiries about your model is yellow, increase air shutter opening size (see "2" in 20 to broil. 30" GAS SLIDE-IN RANGE INSTALLATION INSTRUCTIONS 10.6 Operation of Oven Burners and Oven Adjustments 10.6.1 Electric Ignition Burners Operation of electric igniters should be checked after igniter goes "OFF". See Use & Care Guide for operating instructions. d) Within 60 seconds the broil burner should ignite. If flame is equipped with...
... maintain any given oven temperature, this appliance. b) Within 60 seconds the oven burner should ignite. When ordering parts for or making inquiries about your model is yellow, increase air shutter opening size (see "2" in 20 to broil. 30" GAS SLIDE-IN RANGE INSTALLATION INSTRUCTIONS 10.6 Operation of Oven Burners and Oven Adjustments 10.6.1 Electric Ignition Burners Operation of electric igniters should be checked after igniter goes "OFF". See Use & Care Guide for operating instructions. d) Within 60 seconds the broil burner should ignite. If flame is equipped with...

Installation Instructions (All Languages)
Page 11
... by adjusting 4 leg levelers with 4 screws provided. pilot holes using a masonry drill bit. 4. For easier installation, 3/16" (0.5 cm) diameter pilot holes 1/2"(1,27 cm) (1.3 cm) deep can be drilled into place making sure rear legs are located in a plastic bag in either wood or concrete. Serious injury might result from spilled hot liquids or from the range itself. 30" GAS SLIDE-IN RANGE INSTALLATION INSTRUCTIONS 11 Anti-Tip Brackets Installation Instructions To...
... by adjusting 4 leg levelers with 4 screws provided. pilot holes using a masonry drill bit. 4. For easier installation, 3/16" (0.5 cm) diameter pilot holes 1/2"(1,27 cm) (1.3 cm) deep can be drilled into place making sure rear legs are located in a plastic bag in either wood or concrete. Serious injury might result from spilled hot liquids or from the range itself. 30" GAS SLIDE-IN RANGE INSTALLATION INSTRUCTIONS 11 Anti-Tip Brackets Installation Instructions To...
Product Specifications Sheet (English)
Page 2
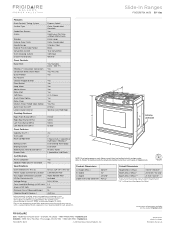
.... Slide-In Ranges FGGS3075K W/ B 30" Gas Features Oven Control / Timing System Surface Type Sealed Gas Burners Grates Window Exterior Door Finish Handle Design Exterior Finish (Side Panels) Convection System Oven Cleaning System Drawer Functionality Slide-In Gas Ranges Express-Select® Color-Coordinated Porcelain Frigidaire Baseline Yes Continuous Cast Iron w/Black Matte Finish Extra-Large Color-Coordinated Stainless Steel Black True Convection Self Clean Warmer Oven Controls Bake / Broil Yes / Variable (400 - 550 °F) Effortless™ Convection Conversion Yes Convection Bake...
.... Slide-In Ranges FGGS3075K W/ B 30" Gas Features Oven Control / Timing System Surface Type Sealed Gas Burners Grates Window Exterior Door Finish Handle Design Exterior Finish (Side Panels) Convection System Oven Cleaning System Drawer Functionality Slide-In Gas Ranges Express-Select® Color-Coordinated Porcelain Frigidaire Baseline Yes Continuous Cast Iron w/Black Matte Finish Extra-Large Color-Coordinated Stainless Steel Black True Convection Self Clean Warmer Oven Controls Bake / Broil Yes / Variable (400 - 550 °F) Effortless™ Convection Conversion Yes Convection Bake...

Product Specifications Sheet (English)
Page 3
... kit installation instructions). 30" Gas Slide-In Range Gallery Slide-In Ranges FGGS3075K W/ B 30" Gas Slide-In Range Specifications • Product Shipping Weight (approx.) - 260 Lbs. • Voltage Rating - 120V / 60 Hz / 15 Amps • Connected Load (kW Rating) @ 120 Volts = 1.2 kW (For use on the web at frigidaire.com Specifications subject to change. Insulating pad or 1/4"-thick plywood required between overhead cabinets installed to be routed through side wall of 29", replace actual side trim panels...
... kit installation instructions). 30" Gas Slide-In Range Gallery Slide-In Ranges FGGS3075K W/ B 30" Gas Slide-In Range Specifications • Product Shipping Weight (approx.) - 260 Lbs. • Voltage Rating - 120V / 60 Hz / 15 Amps • Connected Load (kW Rating) @ 120 Volts = 1.2 kW (For use on the web at frigidaire.com Specifications subject to change. Insulating pad or 1/4"-thick plywood required between overhead cabinets installed to be routed through side wall of 29", replace actual side trim panels...


