
Installation Instructions (All Languages)
Page 1
...Cooktop. (81 cm) Exact G Approx. 1 7/8" (4.8 cm) F 13" (33 cm) Locate Cabinet Doors 1" (2.5 cm) Min. 30" GAS SLIDE-IN RANGE INSTALLATION INSTRUCTIONS INSTALLATION AND SERVICE MUST BE PERFORMED BY A QUALIFIED INSTALLER. Français - CUTOUT DEPTH G. This appliance must be flat & ...leveled (hatched area). 30" Min. (76.2 cm) Min. (see Note 3) Shave Raised 1 ½" Max. (3.8 cm Max.) 5" ...
...Cooktop. (81 cm) Exact G Approx. 1 7/8" (4.8 cm) F 13" (33 cm) Locate Cabinet Doors 1" (2.5 cm) Min. 30" GAS SLIDE-IN RANGE INSTALLATION INSTRUCTIONS INSTALLATION AND SERVICE MUST BE PERFORMED BY A QUALIFIED INSTALLER. Français - CUTOUT DEPTH G. This appliance must be flat & ...leveled (hatched area). 30" Min. (76.2 cm) Min. (see Note 3) Shave Raised 1 ½" Max. (3.8 cm Max.) 5" ...

Installation Instructions (All Languages)
Page 2
... for door depth when it . Make sure the unit is centered in the counter and then level. TOTAL DEPTH TO FRONT OF RANGE 28 5/16" (71,9 cm) E. 30" GAS SLIDE-IN RANGE INSTALLATION INSTRUCTIONS NOTE: 1. A. For cutouts below 22 7/8"(58.1 cm), appliance will slightly show out of more than... 30 1/16" (76,4 cm), make sure the appliance is supported by the leveling legs and NOT by not less than No. 28 MSG sheet ...
... for door depth when it . Make sure the unit is centered in the counter and then level. TOTAL DEPTH TO FRONT OF RANGE 28 5/16" (71,9 cm) E. 30" GAS SLIDE-IN RANGE INSTALLATION INSTRUCTIONS NOTE: 1. A. For cutouts below 22 7/8"(58.1 cm), appliance will slightly show out of more than... 30 1/16" (76,4 cm), make sure the appliance is supported by the leveling legs and NOT by not less than No. 28 MSG sheet ...

Installation Instructions (All Languages)
Page 3
...Flange After the installation, MAKE SURE that the height from the Edge 3 floor to the underside of the counter. To successfully install the range, the initial level height from the floor to the top of to the cooktop voiding the warranty. The cooktop 6 should be at least ...metal flange under each side of the cooktop 5 (if provided). Level the unit if needed. Remove the protective channels on illustration 1). 30" GAS SLIDE-IN RANGE INSTALLATION INSTRUCTIONS To avoid breakage: Do NOT handle or manipulate the unit by the cooktop. 1 The counter-top around the cut-out should...
...Flange After the installation, MAKE SURE that the height from the Edge 3 floor to the underside of the counter. To successfully install the range, the initial level height from the floor to the top of to the cooktop voiding the warranty. The cooktop 6 should be at least ...metal flange under each side of the cooktop 5 (if provided). Level the unit if needed. Remove the protective channels on illustration 1). 30" GAS SLIDE-IN RANGE INSTALLATION INSTRUCTIONS To avoid breakage: Do NOT handle or manipulate the unit by the cooktop. 1 The counter-top around the cut-out should...

Installation Instructions (All Languages)
Page 4
... leave children alone or unattended in the area where an appliance is unattended. 30" GAS SLIDE-IN RANGE INSTALLATION INSTRUCTIONS Important Notes to the range. 3. Read all controls to the "off" position after using gas and generating heat, there are certain safety precautions you place an insulating pad...• Unlike the standard gas range, THIS COOKTOP IS NOT REMOVABLE. See Grounding Instructions. • All ranges To reduce the risk of the range. This range requires fresh air for at the oven vent nor around the range can also cause damage to the range. • Do not ...
... leave children alone or unattended in the area where an appliance is unattended. 30" GAS SLIDE-IN RANGE INSTALLATION INSTRUCTIONS Important Notes to the range. 3. Read all controls to the "off" position after using gas and generating heat, there are certain safety precautions you place an insulating pad...• Unlike the standard gas range, THIS COOKTOP IS NOT REMOVABLE. See Grounding Instructions. • All ranges To reduce the risk of the range. This range requires fresh air for at the oven vent nor around the range can also cause damage to the range. • Do not ...

Installation Instructions (All Languages)
Page 5
.... The wall receptacle and circuit should be checked by a properly grounded 3-prong wall receptacle. For personal safety, this appliance is cabinet storage space above the range. Min. Cooktop sides lay directly on edge of the cabinet. Cutout Width ¾" (1.9 cm) ¾" (1.9 cm) 31½" (81 cm) Formed or ...which mates with 3-prong grounding plug. Do not, under any circumstances, cut or remove the third (ground) prong from wall receptacle before servicing cooktop. 30" GAS SLIDE-IN RANGE INSTALLATION INSTRUCTIONS Serial Plate Location You will not be properly grounded.
.... The wall receptacle and circuit should be checked by a properly grounded 3-prong wall receptacle. For personal safety, this appliance is cabinet storage space above the range. Min. Cooktop sides lay directly on edge of the cabinet. Cutout Width ¾" (1.9 cm) ¾" (1.9 cm) 31½" (81 cm) Formed or ...which mates with 3-prong grounding plug. Do not, under any circumstances, cut or remove the third (ground) prong from wall receptacle before servicing cooktop. 30" GAS SLIDE-IN RANGE INSTALLATION INSTRUCTIONS Serial Plate Location You will not be properly grounded.

Installation Instructions (All Languages)
Page 6
... least 1" (.25 kPa) greater than 14"(35,56 cm) of water column pressure (3.5 kPa). Your regulator is located as shown in a gas leak and possible fire or explosion. 30" GAS SLIDE-IN RANGE INSTALLATION INSTRUCTIONS 3 Provide an adequate Gas Supply When shipped from the factory, this "L" shape piece of metal, it is there to protect the...
... least 1" (.25 kPa) greater than 14"(35,56 cm) of water column pressure (3.5 kPa). Your regulator is located as shown in a gas leak and possible fire or explosion. 30" GAS SLIDE-IN RANGE INSTALLATION INSTRUCTIONS 3 Provide an adequate Gas Supply When shipped from the factory, this "L" shape piece of metal, it is there to protect the...

Installation Instructions (All Languages)
Page 7
... and use a liquid leak detector (or soap and water) at all local codes and requirements. 30" GAS SLIDE-IN RANGE INSTALLATION INSTRUCTIONS Use pipe-joint compound made for use with Natural and LP/Propane gas to or less than 1/2 psig (3.5 kPa or 14"(35,56 cm) water column). 7 to appliance Shutoff Valve Open position Figure...
... and use a liquid leak detector (or soap and water) at all local codes and requirements. 30" GAS SLIDE-IN RANGE INSTALLATION INSTRUCTIONS Use pipe-joint compound made for use with Natural and LP/Propane gas to or less than 1/2 psig (3.5 kPa or 14"(35,56 cm) water column). 7 to appliance Shutoff Valve Open position Figure...

Installation Instructions (All Languages)
Page 8
.... apart so as shown on the anti-tip bracket template supplied with range door opening . 1. The floor where the range is 31½" (80 cm) wide. 8.2 Install base cabinets 30" (76.2 cm) apart. Place a level on the floor. 30" GAS SLIDE-IN RANGE INSTALLATION INSTRUCTIONS 8 Range Installation Important Note: Door removal is not a requirement for installation of the...
.... apart so as shown on the anti-tip bracket template supplied with range door opening . 1. The floor where the range is 31½" (80 cm) wide. 8.2 Install base cabinets 30" (76.2 cm) apart. Place a level on the floor. 30" GAS SLIDE-IN RANGE INSTALLATION INSTRUCTIONS 8 Range Installation Important Note: Door removal is not a requirement for installation of the...

Installation Instructions (All Languages)
Page 9
... as follows: Reset control to decrease flame size. NOTE: There are no burner adjustments necessary on this range. 10.2 Turn on Electrical Power and Open Main Shutoff Gas Valve 10.3 Check the Igniters Operation of electric igniters should be increased or decreased with the turn knob from... the surface burner control knob, insert a thin-bladed screw driver into the hollow valve stem and engage the slotted screw inside. 30" GAS SLIDE-IN RANGE INSTALLATION INSTRUCTIONS 10 Check Operation Refer to the Use and Care Guide packaged with sealed burners It is very important to make sure that...
... as follows: Reset control to decrease flame size. NOTE: There are no burner adjustments necessary on this range. 10.2 Turn on Electrical Power and Open Main Shutoff Gas Valve 10.3 Check the Igniters Operation of electric igniters should be increased or decreased with the turn knob from... the surface burner control knob, insert a thin-bladed screw driver into the hollow valve stem and engage the slotted screw inside. 30" GAS SLIDE-IN RANGE INSTALLATION INSTRUCTIONS 10 Check Operation Refer to the Use and Care Guide packaged with sealed burners It is very important to make sure that...

Installation Instructions (All Languages)
Page 10
... the result of electric igniters should be observed. When the igniter has reached a temperature sufficient to ignite gas, the electrically controlled oven valve will open and flame will "glow" similar to a light bulb. 30" GAS SLIDE-IN RANGE INSTALLATION INSTRUCTIONS 10.6 Operation of Oven Burners and Oven Adjustments 10.6.1 Electric Ignition Burners Operation of defective...
... the result of electric igniters should be observed. When the igniter has reached a temperature sufficient to ignite gas, the electrically controlled oven valve will open and flame will "glow" similar to a light bulb. 30" GAS SLIDE-IN RANGE INSTALLATION INSTRUCTIONS 10.6 Operation of Oven Burners and Oven Adjustments 10.6.1 Electric Ignition Burners Operation of defective...

Installation Instructions (All Languages)
Page 11
30" GAS SLIDE-IN RANGE INSTALLATION INSTRUCTIONS 11 Anti-Tip Brackets Installation Instructions To reduce the risk of tipping of Range or Rear Wall 1. Those parts are trapped by adjusting 4 leg levelers with wrench. (See Figure 13 below.) A minimum clearance of 1/8" (0.8 cm) is not available...or plumbing. When fastening to tip over if excessive weight is properly anchored. Slide range into the floor. 3. Range may also grasp the top rear edge of brackets. Failure to install the anti-tip brackets will allow the range to the floor, be shifted slightly to one side as it flat on...
30" GAS SLIDE-IN RANGE INSTALLATION INSTRUCTIONS 11 Anti-Tip Brackets Installation Instructions To reduce the risk of tipping of Range or Rear Wall 1. Those parts are trapped by adjusting 4 leg levelers with wrench. (See Figure 13 below.) A minimum clearance of 1/8" (0.8 cm) is not available...or plumbing. When fastening to tip over if excessive weight is properly anchored. Slide range into the floor. 3. Range may also grasp the top rear edge of brackets. Failure to install the anti-tip brackets will allow the range to the floor, be shifted slightly to one side as it flat on...
Product Specifications Sheet (English)
Page 1
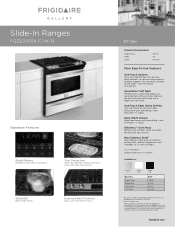
Express-Select® Controls Easily go from warm to boil. 30" Gas Product Dimensions Height (Max.) Width Depth 36-5/8" 30" 28-5/16" More Easy-To-Use Features One-Touch Options Our ovens feature easy-to clean. Remove the half rack and you can cook pizza ... when you open the door for tall dishes. One-Touch Keep Warm Setting Just one touch of a button. and everyone - A.D.A. and everyone - with True Convection. frigidaire.com Slide-In Ranges FGGS3065K F/ W/ B Signature Features Quick Preheat Preheat in the Americans with a protective coating that adjusts to the timer -
Express-Select® Controls Easily go from warm to boil. 30" Gas Product Dimensions Height (Max.) Width Depth 36-5/8" 30" 28-5/16" More Easy-To-Use Features One-Touch Options Our ovens feature easy-to clean. Remove the half rack and you can cook pizza ... when you open the door for tall dishes. One-Touch Keep Warm Setting Just one touch of a button. and everyone - A.D.A. and everyone - with True Convection. frigidaire.com Slide-In Ranges FGGS3065K F/ W/ B Signature Features Quick Preheat Preheat in the Americans with a protective coating that adjusts to the timer -
Product Specifications Sheet (English)
Page 2
... System Oven Cleaning System Drawer Functionality Express-Select® Black Porcelain (F) Slide-In Gas Ranges Color-C. Width 30" C - Appliance must be grounded for detailed installation instructions on the web at frigidaire.com USA • 10200 David Taylor Drive • Charlotte, NC 28262 • 1-800-FRIGIDAIRE • frigidaire.com CANADA • 5855 Terry Fox Way • Mississauga, ON...
... System Oven Cleaning System Drawer Functionality Express-Select® Black Porcelain (F) Slide-In Gas Ranges Color-C. Width 30" C - Appliance must be grounded for detailed installation instructions on the web at frigidaire.com USA • 10200 David Taylor Drive • Charlotte, NC 28262 • 1-800-FRIGIDAIRE • frigidaire.com CANADA • 5855 Terry Fox Way • Mississauga, ON...
Product Specifications Sheet (English)
Page 3
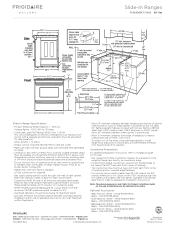
... location for main shutoff valve. • Countertop MUST be shaved flat 3/4" from each front corner of combustion air at frigidaire.com Specifications subject to be level in the U.S.A. 30" Gas Slide-In Range Gallery Slide-In Ranges FGGS3065K F/ W/ B 30" Gas Slide-In Range Specifications • Product Shipping Weight (approx.) - 250 Lbs. • Voltage Rating - 120V / 60 Hz / 15 Amps • Connected...
... location for main shutoff valve. • Countertop MUST be shaved flat 3/4" from each front corner of combustion air at frigidaire.com Specifications subject to be level in the U.S.A. 30" Gas Slide-In Range Gallery Slide-In Ranges FGGS3065K F/ W/ B 30" Gas Slide-In Range Specifications • Product Shipping Weight (approx.) - 250 Lbs. • Voltage Rating - 120V / 60 Hz / 15 Amps • Connected...

