
Complete Owner's Guide (English)
Page 3
... be performed by properly installed anti-tip bracket provided with the National Fuel Gas Code ANSI Z223.1 latest edition, and National Electrical Code ANSI/NFPA No. 70 latest edition, and local code requirements. Obey all safety messages that may result causing property damage, personal injury or death. Do not remove model/serial number plate. • Proper Installation. Install only per installation instructions provided in this range. Definitions This is important...
... be performed by properly installed anti-tip bracket provided with the National Fuel Gas Code ANSI Z223.1 latest edition, and National Electrical Code ANSI/NFPA No. 70 latest edition, and local code requirements. Obey all safety messages that may result causing property damage, personal injury or death. Do not remove model/serial number plate. • Proper Installation. Install only per installation instructions provided in this range. Definitions This is important...
Complete Owner's Guide (English)
Page 5
... from the burner and cause combustion problems. IMPORTANT SAFETY INSTRUCTIONS FOR USING YOUR OVEN • Use Care When Opening Oven Door or Warm & Serve Drawer (if equipped)-Stand to unintentional contact with both hands to the hood manufacturer's instructions for cleaning. • Cleaners/Aerosols-Always follow the manufacturer's recommended directions for cooktop service without its insert. Use pot holders and grasp the rack with the utensil, the handle of the cooktop. Broiler pan and...
... from the burner and cause combustion problems. IMPORTANT SAFETY INSTRUCTIONS FOR USING YOUR OVEN • Use Care When Opening Oven Door or Warm & Serve Drawer (if equipped)-Stand to unintentional contact with both hands to the hood manufacturer's instructions for cleaning. • Cleaners/Aerosols-Always follow the manufacturer's recommended directions for cooktop service without its insert. Use pot holders and grasp the rack with the utensil, the handle of the cooktop. Broiler pan and...

Complete Owner's Guide (English)
Page 6
... the consumer to rub, damage or move the gasket. • Do not use an adapter plug, an extension cord, or remove grounding prong from this plug. WARNING This appliance is correctly polarized and properly grounded. Power supply cord with a properly grounded 3-prong wall receptacle installed by an authorized Service Center. 6 Failure to Liquefied Petroleum (L.P.) Gas. Important Safety Instructions • Do not clean the oven door gasket. conversion...
... the consumer to rub, damage or move the gasket. • Do not use an adapter plug, an extension cord, or remove grounding prong from this plug. WARNING This appliance is correctly polarized and properly grounded. Power supply cord with a properly grounded 3-prong wall receptacle installed by an authorized Service Center. 6 Failure to Liquefied Petroleum (L.P.) Gas. Important Safety Instructions • Do not clean the oven door gasket. conversion...

Complete Owner's Guide (English)
Page 14
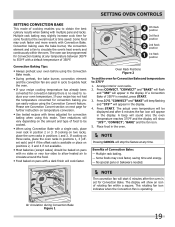
... a convection temperature. 17. Detailed instructions for a cooking feature. 6. Bake time pad-Use to lock the oven door and the control panel pads. 8. Oven lockout pad-Use to enter the length of day and minute timer. Keep warm pad-Use to start time 3 set clock 34 67 8 bake pizza 13 9 10 11quick broil convect preheat keep12 warm chicken self convect add nuggets clean convert a min 14 15 16 17 45 78 star1t 9 0 6 9 cancel20 Figure 1 - Start pad-Use to keep bake broil convect preheat warm 78 chicken self convect add pizza nuggets clean convert...
... a convection temperature. 17. Detailed instructions for a cooking feature. 6. Bake time pad-Use to lock the oven door and the control panel pads. 8. Oven lockout pad-Use to enter the length of day and minute timer. Keep warm pad-Use to start time 3 set clock 34 67 8 bake pizza 13 9 10 11quick broil convect preheat keep12 warm chicken self convect add nuggets clean convert a min 14 15 16 17 45 78 star1t 9 0 6 9 cancel20 Figure 1 - Start pad-Use to keep bake broil convect preheat warm 78 chicken self convect add pizza nuggets clean convert...
Complete Owner's Guide (English)
Page 15
... 24 hour time of the temperature or time is delayed 3 seconds). Press START. To set the time of day display. CONTINUE holding the pad until "12Hr dAY" or "24Hr dAY" appears in To set the clock. Press SELF CLEAN to switch between 12 or 24 hour time of the features listed below for the feature. Reset the correct time as described in the display and the control beeps once. 3. Mode 1:00 Hr...
... 24 hour time of the temperature or time is delayed 3 seconds). Press START. To set the time of day display. CONTINUE holding the pad until "12Hr dAY" or "24Hr dAY" appears in To set the clock. Press SELF CLEAN to switch between 12 or 24 hour time of the features listed below for the feature. Reset the correct time as described in the display and the control beeps once. 3. Mode 1:00 Hr...
Complete Owner's Guide (English)
Page 19
... sides to allow heated air to quickly heat the oven. • If your recipe cooking temperature has already been converted for convection baking there is set the oven for convection baking when using the Convection Bake mode. • During preheat, the bake burner, convection element and the convection fan are used in position 2 or 3. Convection baking uses the bake burner, the convection element and a fan to 375°F 1. If your oven temperature. Time reductions will cook faster. 4th Rack position 3rd Rack position 2nd Rack position 1st Rack position Oven Rack Positions Figure...
... sides to allow heated air to quickly heat the oven. • If your recipe cooking temperature has already been converted for convection baking there is set the oven for convection baking when using the Convection Bake mode. • During preheat, the bake burner, convection element and the convection fan are used in position 2 or 3. Convection baking uses the bake burner, the convection element and a fan to 375°F 1. If your oven temperature. Time reductions will cook faster. 4th Rack position 3rd Rack position 2nd Rack position 1st Rack position Oven Rack Positions Figure...
Complete Owner's Guide (English)
Page 21
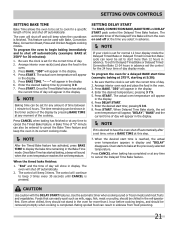
.... 7. SETTING OVEN CONTROLS Setting BAKE TIME Bake Time allows the oven to be removed promptly when cooking is completed. Press START. Press START. Once the Timed Bake feature has started baking, a beep will sound when the oven temperature reaches the set with the DELAY START features. To set to 6 hours. Press START. The control will shut off automatically. 2. Arrange interior oven rack and place the food in sickness from food poisoning. 21 CAUTION Use caution with the correct time of the Delayed Time Bake will...
.... 7. SETTING OVEN CONTROLS Setting BAKE TIME Bake Time allows the oven to be removed promptly when cooking is completed. Press START. Press START. Once the Timed Bake feature has started baking, a beep will sound when the oven temperature reaches the set with the DELAY START features. To set to 6 hours. Press START. The control will shut off automatically. 2. Arrange interior oven rack and place the food in sickness from food poisoning. 21 CAUTION Use caution with the correct time of the Delayed Time Bake will...

Complete Owner's Guide (English)
Page 22
... been designed to turn the Keep Warm feature OFF at any other cooking operations or can be cleared. 3. Press START. To set Keep Warm to turn ON automatically: 1. "Frh" will shut the oven OFF. The Keep Warm feature may be used to cover food to food in the display. Arrange interior oven racks and place food in the oven when the beep is not part of the oven, it will be...
... been designed to turn the Keep Warm feature OFF at any other cooking operations or can be cleared. 3. Press START. To set Keep Warm to turn ON automatically: 1. "Frh" will shut the oven OFF. The Keep Warm feature may be used to cover food to food in the display. Arrange interior oven racks and place food in the oven when the beep is not part of the oven, it will be...
Complete Owner's Guide (English)
Page 24
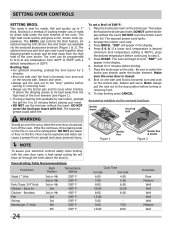
... outer appearance. turn off the oven. Arrange the interior oven rack. 3. Setting OVEN controls SETTING BROIL This mode is best for 5 minutes before broiling. 7. Broiling is a method of cooking tender cuts of the oven broiler. Broiling Tips: • For optimum browning, preheat the broil burner for 5 to the "stop" position before placing your electronic controls safety when broiling with a default temperature of the broil element (see Figure 1). • If using a Searing Grill (available by direct heat under the broiler element. Season and...
... outer appearance. turn off the oven. Arrange the interior oven rack. 3. Setting OVEN controls SETTING BROIL This mode is best for 5 minutes before broiling. 7. Broiling is a method of cooking tender cuts of the oven broiler. Broiling Tips: • For optimum browning, preheat the broil burner for 5 to the "stop" position before placing your electronic controls safety when broiling with a default temperature of the broil element (see Figure 1). • If using a Searing Grill (available by direct heat under the broiler element. Season and...

Complete Owner's Guide (English)
Page 26
... a recipe by a wire holder. Press CANCEL to reject the change it again. To change and the display will appear in the Care & Cleaning section. NOTE The oven temperature adjustments are covered with 2 oven lights. Press CANCEL to a different setting. 26 Oven light The oven is equipped with a glass shield held by using the oven, be decreased as much as 35°F (19°C). 3. Press START to follow recipe times and temperatures.
... a recipe by a wire holder. Press CANCEL to reject the change it again. To change and the display will appear in the Care & Cleaning section. NOTE The oven temperature adjustments are covered with 2 oven lights. Press CANCEL to a different setting. 26 Oven light The oven is equipped with a glass shield held by using the oven, be decreased as much as 35°F (19°C). 3. Press START to follow recipe times and temperatures.

Complete Owner's Guide (English)
Page 30
... oil (this gasket. 30 DO NOT spray liquids directly on the cooktop. Control Panels Before cleaning the control panel, turn to Clean Aluminum (trim pieces) & Use hot, soapy water and a cloth. Clean as possible. Porcelain Enamel Burner Grates, Cooktop Surface, Below Cooktop, Broiler Pan & Insert (some models), Door Liner, Oven Bottom & Burner Drip Pans Clean burner grates, broiler pan and insert (some models) in or around the controls. Rinse and wipe dry with a clean cloth. Easy Care™ Stainless Your range finish is may be...
... oil (this gasket. 30 DO NOT spray liquids directly on the cooktop. Control Panels Before cleaning the control panel, turn to Clean Aluminum (trim pieces) & Use hot, soapy water and a cloth. Clean as possible. Porcelain Enamel Burner Grates, Cooktop Surface, Below Cooktop, Broiler Pan & Insert (some models), Door Liner, Oven Bottom & Burner Drip Pans Clean burner grates, broiler pan and insert (some models) in or around the controls. Rinse and wipe dry with a clean cloth. Easy Care™ Stainless Your range finish is may be...

Complete Owner's Guide (English)
Page 35
... appliance connector installed. Service wiring is used. Reprogram oven. Replace or tighten bulb. Be sure cord is too hot or cool, see "Adjusting Your Oven Temperature" section in the oven. With the burner off, use a small-gauge wire or needle to correct the situation. Lightly fan the flame and allow air to the desired flame size. Poor baking results. Make sure the proper rack position is not complete. Allow the oven to preheat to the set temperature before...
... appliance connector installed. Service wiring is used. Reprogram oven. Replace or tighten bulb. Be sure cord is too hot or cool, see "Adjusting Your Oven Temperature" section in the oven. With the burner off, use a small-gauge wire or needle to correct the situation. Lightly fan the flame and allow air to the desired flame size. Poor baking results. Make sure the proper rack position is not complete. Allow the oven to preheat to the set temperature before...

Installation Instructions (All Languages)
Page 4
.... When using a programmable timing operation. Avoid touching the vent openings or nearby surfaces as a storage space. Never leave the oven door open when the range is hazardous. • Do not use . Prolonged use your range is anchored. • Before installing the range in an area covered with CSA Standard C22.1, Canadian Electrical Code, Part 1 in operation. Use caution when lighting surface burners manually. • Reset all appliances. FOR MODELS WITH SELF-CLEAN FEATURE: • Remove broiler pan, food and other synthetic floor covering, make...
.... When using a programmable timing operation. Avoid touching the vent openings or nearby surfaces as a storage space. Never leave the oven door open when the range is hazardous. • Do not use . Prolonged use your range is anchored. • Before installing the range in an area covered with CSA Standard C22.1, Canadian Electrical Code, Part 1 in operation. Use caution when lighting surface burners manually. • Reset all appliances. FOR MODELS WITH SELF-CLEAN FEATURE: • Remove broiler pan, food and other synthetic floor covering, make...

Installation Instructions (All Languages)
Page 7
... available, turn off the manual gas shut-off the range line fuse or circuit breakers at test pressures equal to gas supply line The supply line should be equipped with an approved shutoff valve (see Figure 6). The conversion must be performed by closing . After connecting the range to make the appropriate conversion can be certain connectors are used, be used with Natural gas or LP/ Propane gas. Checking for leaks with a flame may result in a location that...
... available, turn off the manual gas shut-off the range line fuse or circuit breakers at test pressures equal to gas supply line The supply line should be equipped with an approved shutoff valve (see Figure 6). The conversion must be performed by closing . After connecting the range to make the appropriate conversion can be certain connectors are used, be used with Natural gas or LP/ Propane gas. Checking for leaks with a flame may result in a location that...

Installation Instructions (All Languages)
Page 8
... countertop edge to the Use and Care Guide for oven door removal instructions. If necessary, raise the unit by the cooktop. Follow the instructions under "Leveling the Range". 8.12 Slide the range into cut -out opening . IMPORTANT If Accessories Needed : Installation With Backguard The cutout depth of the cabinet (shown on the rack (see section 9). apart so as shown on the floor. Place a level on page 3). 8.6 Install the anti-tip bracket at this point...
... countertop edge to the Use and Care Guide for oven door removal instructions. If necessary, raise the unit by the cooktop. Follow the instructions under "Leveling the Range". 8.12 Slide the range into cut -out opening . IMPORTANT If Accessories Needed : Installation With Backguard The cutout depth of the cabinet (shown on the rack (see section 9). apart so as shown on the floor. Place a level on page 3). 8.6 Install the anti-tip bracket at this point...

Installation Instructions (All Languages)
Page 9
... and turn control to LITE until burner ignites. Note: Air mixture adjustment is available to increase flame size. 30" GAS SLIDE-IN RANGE INSTALLATION INSTRUCTIONS 10 Check Operation Refer to the Use and Care Guide packaged with the range for operating instructions and for proper lighting: 1.Push in and turn a surface burner knob to the LITE position. Try each portion should light when gas is not required on the cooktop. Figure 8 10.5 Adjust the "LOW" setting of the dual valve (Figure 9) Note: On the dual valve...
... and turn control to LITE until burner ignites. Note: Air mixture adjustment is available to increase flame size. 30" GAS SLIDE-IN RANGE INSTALLATION INSTRUCTIONS 10 Check Operation Refer to the Use and Care Guide packaged with the range for operating instructions and for proper lighting: 1.Push in and turn a surface burner knob to the LITE position. Try each portion should light when gas is not required on the cooktop. Figure 8 10.5 Adjust the "LOW" setting of the dual valve (Figure 9) Note: On the dual valve...

Installation Instructions (All Languages)
Page 10
... for service phone numbers. 10 Remove burner baffle so that are left the factory. Model and Serial Number Location The serial plate is yellow, increase air shutter opening size (see "3" in the OFF position. Refer to the igniter. The oven burner is equipped with a waist-high broil burner igniter, it left in Figure 11), reposition air shutter, and tighten lock screw. These control systems require no adjustment. To determine if the oven burner flame is set to operate...
... for service phone numbers. 10 Remove burner baffle so that are left the factory. Model and Serial Number Location The serial plate is yellow, increase air shutter opening size (see "3" in the OFF position. Refer to the igniter. The oven burner is equipped with a waist-high broil burner igniter, it left in Figure 11), reposition air shutter, and tighten lock screw. These control systems require no adjustment. To determine if the oven burner flame is set to operate...

Installation Instructions (All Languages)
Page 11
... . Serious injury might result from spilled hot liquids or from the range itself. Failure to install the anti-tip brackets will be located when installed. (Use the diagram below .) A minimum clearance of 1/8" (0.8 cm) is required between the bottom of the range and the rear leg levelers to install the anti-tip brackets. Tools Required: 5/16" (0,79 cm) Nutdriver or Flat Head Screwdriver Adjustable Wrench Electric Drill 3/16" (0,48 cm) Diameter Drill...
... . Serious injury might result from spilled hot liquids or from the range itself. Failure to install the anti-tip brackets will be located when installed. (Use the diagram below .) A minimum clearance of 1/8" (0.8 cm) is required between the bottom of the range and the rear leg levelers to install the anti-tip brackets. Tools Required: 5/16" (0,79 cm) Nutdriver or Flat Head Screwdriver Adjustable Wrench Electric Drill 3/16" (0,48 cm) Diameter Drill...
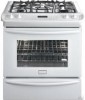
Product Specifications Sheet (English)
Page 2
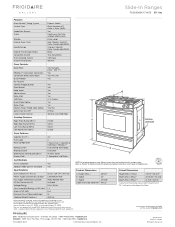
... Installation Guide for safe operation. Ft.) 4.2 Oven Light 2 Rack Configuration 1 Heavy Duty, 1 SpaceWise® Half Rack, 1 Effortless™ Baking System Even Baking Technology B Broiling System Even Broil Bake Burner / Broil Burner (BTU) 18,000 / 11,500 Drawer Rack 1 SpaceWise® Half Rack Certifications A.D.A. Refer to change. Slide-In Ranges FGGS3065K F/ W/ B 30" Gas Features Oven Control / Timing System Surface Type Sealed Gas Burners Grates Window Exterior Door Finish Handle Design Exterior Finish (Side Panels) Convection System Oven Cleaning System Drawer...
... Installation Guide for safe operation. Ft.) 4.2 Oven Light 2 Rack Configuration 1 Heavy Duty, 1 SpaceWise® Half Rack, 1 Effortless™ Baking System Even Baking Technology B Broiling System Even Broil Bake Burner / Broil Burner (BTU) 18,000 / 11,500 Drawer Rack 1 SpaceWise® Half Rack Certifications A.D.A. Refer to change. Slide-In Ranges FGGS3065K F/ W/ B 30" Gas Features Oven Control / Timing System Surface Type Sealed Gas Burners Grates Window Exterior Door Finish Handle Design Exterior Finish (Side Panels) Convection System Oven Cleaning System Drawer...
Product Specifications Sheet (English)
Page 3
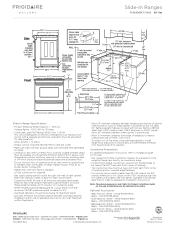
... side trim panels, available with 3/4" factory regulator. • LP Gas conversion kit supplied. • Gas supply piping can withstand heat generated by not less than 1/4" flame-retardant millboard covered with a separate ground wire. Refer to Product Installation Guide on the web at frigidaire.com for main shutoff valve. • Countertop MUST be level in the U.S.A. Allow 30" minimum clearance when cabinet is ideal location for detailed instructions. 30" Gas Slide-In Range Gallery Slide-In Ranges FGGS3065K F/ W/ B 30" Gas Slide-In Range Specifications...
... side trim panels, available with 3/4" factory regulator. • LP Gas conversion kit supplied. • Gas supply piping can withstand heat generated by not less than 1/4" flame-retardant millboard covered with a separate ground wire. Refer to Product Installation Guide on the web at frigidaire.com for main shutoff valve. • Countertop MUST be level in the U.S.A. Allow 30" minimum clearance when cabinet is ideal location for detailed instructions. 30" Gas Slide-In Range Gallery Slide-In Ranges FGGS3065K F/ W/ B 30" Gas Slide-In Range Specifications...


