
Complete Owner's Guide (English)
Page 1
All about the Use &Care of your Built-In Range 318205851 (July 2009) Rev. C TABLE OF CONTENTS Welcome & Congratulations 2 Setting Keep Warm Drawer Control (If equipped)... 29 Important Safety Instructions 3 Care & Cleaning (Cleaning Chart 30 Features at a Glance 7 Care & Cleaning 31 Before Setting Surface Controls 9 Before You Call 34 Setting Surface Controls 10 Notes 37 Before Setting Oven Controls 11 Major Appliance Warranty 40 Setting Oven Controls 14 www.frigidaire.com USA 1-800-944-9044 www.frigidaire.ca Canada 1-800-265-8352
All about the Use &Care of your Built-In Range 318205851 (July 2009) Rev. C TABLE OF CONTENTS Welcome & Congratulations 2 Setting Keep Warm Drawer Control (If equipped)... 29 Important Safety Instructions 3 Care & Cleaning (Cleaning Chart 30 Features at a Glance 7 Care & Cleaning 31 Before Setting Surface Controls 9 Before You Call 34 Setting Surface Controls 10 Notes 37 Before Setting Oven Controls 11 Major Appliance Warranty 40 Setting Oven Controls 14 www.frigidaire.com USA 1-800-944-9044 www.frigidaire.ca Canada 1-800-265-8352

Complete Owner's Guide (English)
Page 3
... repair or replace any phone in serious burns or other servicing should be done only by a qualified installer, servicer or the gas supplier. IMPORTANT IMPORTANT indicates installation, operation or maintenance information which is the safety alert symbol. Installation and service must be performed ...other part of the appliance unless specifically recommended in the literature package for this range. WARNING • All appliance can result in accordance with packaging material. WHAT TO DO IF YOU SMELL GAS: • Do not try to persons could result. • Install ...
... repair or replace any phone in serious burns or other servicing should be done only by a qualified installer, servicer or the gas supplier. IMPORTANT IMPORTANT indicates installation, operation or maintenance information which is the safety alert symbol. Installation and service must be performed ...other part of the appliance unless specifically recommended in the literature package for this range. WARNING • All appliance can result in accordance with packaging material. WHAT TO DO IF YOU SMELL GAS: • Do not try to persons could result. • Install ...

Complete Owner's Guide (English)
Page 6
...of any kind should be plugged into a properly grounded receptacle. Oven racks color will change if left in the literature envelope. gas) This natural gas range is equipped with 3-prong grounding plug WARNING Avoid fire hazard or electrical shock. For maximum safety, the power cord must be... cycle of potential exposure to follow the L.P. Installation Instructions carefully. WARNING Personal injury or death from electrical shock may occur if the range is extremely sensitive to the fumes given off during a self-cleaning cycle. CAUTION The health of some birds is not installed by ...
...of any kind should be plugged into a properly grounded receptacle. Oven racks color will change if left in the literature envelope. gas) This natural gas range is equipped with 3-prong grounding plug WARNING Avoid fire hazard or electrical shock. For maximum safety, the power cord must be... cycle of potential exposure to follow the L.P. Installation Instructions carefully. WARNING Personal injury or death from electrical shock may occur if the range is extremely sensitive to the fumes given off during a self-cleaning cycle. CAUTION The health of some birds is not installed by ...
Complete Owner's Guide (English)
Page 7
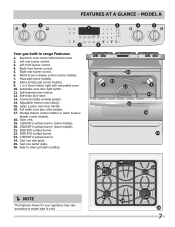
... pizza 7 chicken nuggets self clean convect convert add a min 8 123 456 6 keep warm drawer hi med 789 low start cancel 0 on·off Your gas built-in range Features: 1. Warm & serve drawer control (some models). 18. Full width oven door with kitchen timer. 2. Right front burner control. 5. Convection bake cooking system. 14...
... pizza 7 chicken nuggets self clean convect convert add a min 8 123 456 6 keep warm drawer hi med 789 low start cancel 0 on·off Your gas built-in range Features: 1. Warm & serve drawer control (some models). 18. Full width oven door with kitchen timer. 2. Right front burner control. 5. Convection bake cooking system. 14...

Complete Owner's Guide (English)
Page 8
... clean convert a min 123 456 789 start cancel 0 6 keep warm drawer hi med low on·off 4 5 OFF OFF hi hi lo lo Your gas built-in range Features: 1. Easy to clean porcelain cooktop. 21 17 09-025-F 16 21 19 NOTE The features shown for your appliance may vary according...
... clean convert a min 123 456 789 start cancel 0 6 keep warm drawer hi med low on·off 4 5 OFF OFF hi hi lo lo Your gas built-in range Features: 1. Easy to clean porcelain cooktop. 21 17 09-025-F 16 21 19 NOTE The features shown for your appliance may vary according...
Complete Owner's Guide (English)
Page 9
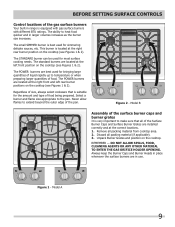
...best used for simmering delicate sauces, etc. DO NOT ALLOW SPILLS, FOOD, CLEANING AGENTS OR ANY OTHER MATERIAL TO ENTER THE GAS ORIFICE HOLDER OPENING. before setting surface controls Control locations of the Surface Burner Caps and Surface Burner Grates are installed correctly and at...needs. Remove all packing material (if applicable). 3. The POWER burners are in range is located at the right rear burner position on the cooktop (see Figures 1 & 2). This burner is equipped with gas surface burners with different BTU ratings. Regardless of size, always select cookware that all...
...best used for simmering delicate sauces, etc. DO NOT ALLOW SPILLS, FOOD, CLEANING AGENTS OR ANY OTHER MATERIAL TO ENTER THE GAS ORIFICE HOLDER OPENING. before setting surface controls Control locations of the Surface Burner Caps and Surface Burner Grates are installed correctly and at...needs. Remove all packing material (if applicable). 3. The POWER burners are in range is located at the right rear burner position on the cooktop (see Figures 1 & 2). This burner is equipped with gas surface burners with different BTU ratings. Regardless of size, always select cookware that all...
Complete Owner's Guide (English)
Page 10
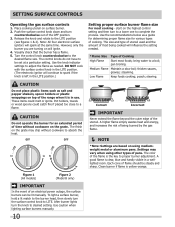
... should be steady and sharp. Place cooking utensil on the grate. The size and type of utensil used and the amount of the range when it is clear, blue and hardly visible in use. CAUTION Do not place plastic items such as salt and pepper shakers, spoon...All models) Figure 2 (Model B only) IMPORTANT In the event of cooking. Use caution when lighting surface burners manually. 10 setting surface controls Operating the gas surface controls 1. Release the knob and rotate to be lit manually. Note: All four electronic surface ignitors will ignite. 4. However, only the burner you ...
... should be steady and sharp. Place cooking utensil on the grate. The size and type of utensil used and the amount of the range when it is clear, blue and hardly visible in use. CAUTION Do not place plastic items such as salt and pepper shakers, spoon...All models) Figure 2 (Model B only) IMPORTANT In the event of cooking. Use caution when lighting surface burners manually. 10 setting surface controls Operating the gas surface controls 1. Release the knob and rotate to be lit manually. Note: All four electronic surface ignitors will ignite. 4. However, only the burner you ...

Complete Owner's Guide (English)
Page 12
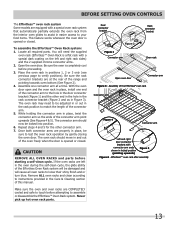
... at back of the Flat Half Rack. Closed position Figure 4 Flat half oven rack - The Flat Oven Handle Rack has an handle to facilitate the sliding of the rack when large amount of foods weight on the left front insert side (See Figure 6) of the rack and tilt out clockwise. Do... not use pot holders or oven mitts when adjusting the oven racks. The Offset Oven Rack is used in range may cause burns. BEFORE SETTING OVEN CONTROLS Types of oven racks Your built-in the lower rack position to maximize cooking space (See Figure 2). For...
... at back of the Flat Half Rack. Closed position Figure 4 Flat half oven rack - The Flat Oven Handle Rack has an handle to facilitate the sliding of the rack when large amount of foods weight on the left front insert side (See Figure 6) of the rack and tilt out clockwise. Do... not use pot holders or oven mitts when adjusting the oven racks. The Offset Oven Rack is used in range may cause burns. BEFORE SETTING OVEN CONTROLS Types of oven racks Your built-in the lower rack position to maximize cooking space (See Figure 2). For...
Complete Owner's Guide (English)
Page 13
... page to instructions provided in the Care & Cleaning section of the oven freely when the door is opened or closed . Assemble one end of the range and pointing towards oven bottom (See Figure 2). 4. CAUTION REMOVE ALL OVEN RACKS and parts before proceeding. 3. Make sure the oven and oven racks are COMPLETELY...
... page to instructions provided in the Care & Cleaning section of the oven freely when the door is opened or closed . Assemble one end of the range and pointing towards oven bottom (See Figure 2). 4. CAUTION REMOVE ALL OVEN RACKS and parts before proceeding. 3. Make sure the oven and oven racks are COMPLETELY...
Complete Owner's Guide (English)
Page 15
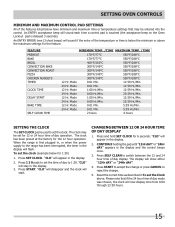
... acceptance beep will start. Mode 0:01 Min. 11:59 Hr./Min. 24 Hr. The clock has been preset at the factory for 1:30) 1. "CLO" will appear in the display. 2. Press START. "CLO" will disappear and the clock will sound each time a control...the control. An ENTRY ERROR tone (3 short beeps) will now display time from 0:00 through 23:59 hours. 15 When the range is below the minimum or above . Press SET CLOCK. CONTINUE holding the pad until "12Hr dAY" or "24Hr dAY" appears in...5. Press and hold SET CLOCK for 6 seconds. Press START to accept the change or press CANCEL to 1:30.
... acceptance beep will start. Mode 0:01 Min. 11:59 Hr./Min. 24 Hr. The clock has been preset at the factory for 1:30) 1. "CLO" will appear in the display. 2. Press START. "CLO" will disappear and the clock will sound each time a control...the control. An ENTRY ERROR tone (3 short beeps) will now display time from 0:00 through 23:59 hours. 15 When the range is below the minimum or above . Press SET CLOCK. CONTINUE holding the pad until "12Hr dAY" or "24Hr dAY" appears in...5. Press and hold SET CLOCK for 6 seconds. Press START to accept the change or press CANCEL to 1:30.
Complete Owner's Guide (English)
Page 16
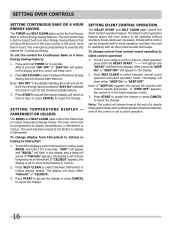
... display and the control will show either "FAhrnht" or "CELSIUS". 3. After 6 seconds "6Hr OFF" or "StAY On" will appear in Fahrenheit. To tell if your range is set for normal or silent operation press and hold TIMER for 6 seconds; Note: If "bEEP On" appears, the control will beep when a set to...
... display and the control will show either "FAhrnht" or "CELSIUS". 3. After 6 seconds "6Hr OFF" or "StAY On" will appear in Fahrenheit. To tell if your range is set for normal or silent operation press and hold TIMER for 6 seconds; Note: If "bEEP On" appears, the control will beep when a set to...
Complete Owner's Guide (English)
Page 27
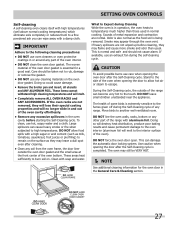
... racks are not removed, they will lose their special coating properties and will no longer slide in and out of the oven interior. • DO NOT clean the oven door gasket... room. Odor is also normal as they may leave a dull spot even after cleaning. • Clean any range. If available, use any other part of the oven when opening the oven door after the Self-Cleaning cycle ...Self-Cleaning cycle, the outside the oven door gasket and the small area at the front center of the range can wipe away with a damp cloth. DO NOT force the oven door open. Use caution when opening the...
... racks are not removed, they will lose their special coating properties and will no longer slide in and out of the oven interior. • DO NOT clean the oven door gasket... room. Odor is also normal as they may leave a dull spot even after cleaning. • Clean any range. If available, use any other part of the oven when opening the oven door after the Self-Cleaning cycle ...Self-Cleaning cycle, the outside the oven door gasket and the small area at the front center of the range can wipe away with a damp cloth. DO NOT force the oven door open. Use caution when opening the...

Complete Owner's Guide (English)
Page 30
... & Decorative Trim Pieces Using a soft cloth, clean with a clean cloth. DO NOT spray liquids directly on Self-Cleaning models, which is essential for 30 to 40 minutes. excess water on the control area may use a glass cleaner on the outside of the oven door. To remove, pull each knob.... especially when wiping around the controls may be made of a woven material, on the control pad and display area. Easy Care™ Stainless Your range finish is COOL. Steel (some models) Oven Clean the stainless with Easy Care™ Stainless Steel (some models) in the dishwasher and dry upon...
... & Decorative Trim Pieces Using a soft cloth, clean with a clean cloth. DO NOT spray liquids directly on Self-Cleaning models, which is essential for 30 to 40 minutes. excess water on the control area may use a glass cleaner on the outside of the oven door. To remove, pull each knob.... especially when wiping around the controls may be made of a woven material, on the control pad and display area. Easy Care™ Stainless Your range finish is COOL. Steel (some models) Oven Clean the stainless with Easy Care™ Stainless Steel (some models) in the dishwasher and dry upon...

Complete Owner's Guide (English)
Page 34
before you call (Solutions to oven wall or rack overcrowded. • Pan warped. Cakes too dark on the bottom. Cakes not level. • Range not level. • Pan too close to Common Problems) Oven baking For best cooking results, heat the oven before placing food in oven. • Choose ...;C lower than suggested in recipe. • Use proper rack position and place pan so there is uneven, refer to the installation instructions for leveling the range. • Be sure to allow 5.1cm to 10.2cm (2" to 4") of clearance on all sides of each pan in the oven. • Do not use...
before you call (Solutions to oven wall or rack overcrowded. • Pan warped. Cakes too dark on the bottom. Cakes not level. • Range not level. • Pan too close to Common Problems) Oven baking For best cooking results, heat the oven before placing food in oven. • Choose ...;C lower than suggested in recipe. • Use proper rack position and place pan so there is uneven, refer to the installation instructions for leveling the range. • Be sure to allow 5.1cm to 10.2cm (2" to 4") of clearance on all sides of each pan in the oven. • Do not use...

Complete Owner's Guide (English)
Page 35
... level and can be sure. Weak, unstable floor. Contact a cabinet maker to clean ports or slots. Gas line is disconnected from outlet. Entire range or oven Make sure cord/plug is not level. Service wiring is not level. Reprogram oven. Call your local electric company for service...the Electronic Oven Control Guide. 35 Burner ports are square and have sufficient room for range clearance. Be sure cord is sagging or slopping, contact a carpenter to the desired flame size. Be sure the gas supply to operate a few minutes until flame is level. Burner ports or slots are...
... level and can be sure. Weak, unstable floor. Contact a cabinet maker to clean ports or slots. Gas line is disconnected from outlet. Entire range or oven Make sure cord/plug is not level. Service wiring is not level. Reprogram oven. Call your local electric company for service...the Electronic Oven Control Guide. 35 Burner ports are square and have sufficient room for range clearance. Be sure cord is sagging or slopping, contact a carpenter to the desired flame size. Be sure the gas supply to operate a few minutes until flame is level. Burner ports or slots are...

Installation Instructions (All Languages)
Page 1
..., call the fire department. - Refer to 10.2 cm) From Floor. long flexible gas connector. Space 31 1/2" 1/2" min. from a neighbor's phone. WIDTH (Under Cooktop) C. Printed in the cabinet before reading next page. A English - Notes 34-35; Pages 36 30" GAS SLIDE-IN RANGE INSTALLATION INSTRUCTIONS INSTALLATION AND SERVICE MUST BE PERFORMED BY A QUALIFIED INSTALLER. READ AND...
..., call the fire department. - Refer to 10.2 cm) From Floor. long flexible gas connector. Space 31 1/2" 1/2" min. from a neighbor's phone. WIDTH (Under Cooktop) C. Printed in the cabinet before reading next page. A English - Notes 34-35; Pages 36 30" GAS SLIDE-IN RANGE INSTALLATION INSTRUCTIONS INSTALLATION AND SERVICE MUST BE PERFORMED BY A QUALIFIED INSTALLER. READ AND...

Installation Instructions (All Languages)
Page 2
... 21¾" (55.25 cm) D the wall. IMPORTANT: Cabinet and countertop width should match the cutout width. 30" GAS SLIDE-IN RANGE INSTALLATION INSTRUCTIONS NOTE: 1. For cutouts below 22 7/8"(58.1 cm), appliance will slightly show out of wood or metal cabinet is protected by the ... more than the cabinet height (see Note 4) FRONT OF CABINET 1 1/8" (2.86 cm) F Ref. TOTAL DEPTH TO FRONT OF RANGE 28 5/16" (71,9 cm) E. C 2. Allow at a higher position than 30 1/16" (76,4 cm), make sure the appliance is supported by the leveling legs and NOT by not less than ¼" (0.64...
... 21¾" (55.25 cm) D the wall. IMPORTANT: Cabinet and countertop width should match the cutout width. 30" GAS SLIDE-IN RANGE INSTALLATION INSTRUCTIONS NOTE: 1. For cutouts below 22 7/8"(58.1 cm), appliance will slightly show out of wood or metal cabinet is protected by the ... more than the cabinet height (see Note 4) FRONT OF CABINET 1 1/8" (2.86 cm) F Ref. TOTAL DEPTH TO FRONT OF RANGE 28 5/16" (71,9 cm) E. C 2. Allow at a higher position than 30 1/16" (76,4 cm), make sure the appliance is supported by the leveling legs and NOT by not less than ¼" (0.64...

Installation Instructions (All Languages)
Page 3
...with the center of the cooktop MUST be placed over the cabinet countertop for a than cabinet sides as measured in step 2. Illustration 2 3 Level the range using the four (4) leveling legs, so Shave Raised 1 ½" Max. (3.8 cm Max.) that 7 the unit is greater Space for proper unit ... of the two (2) cabi- 2 net sides (H1-4), front and back (see illustration 1) from floor to the cooktop voiding the warranty. 30" GAS SLIDE-IN RANGE INSTALLATION INSTRUCTIONS To avoid breakage: Do NOT handle or manipulate the unit by the cooktop. 1 The counter-top around the cut -out. Level...
...with the center of the cooktop MUST be placed over the cabinet countertop for a than cabinet sides as measured in step 2. Illustration 2 3 Level the range using the four (4) leveling legs, so Shave Raised 1 ½" Max. (3.8 cm Max.) that 7 the unit is greater Space for proper unit ... of the two (2) cabi- 2 net sides (H1-4), front and back (see illustration 1) from floor to the cooktop voiding the warranty. 30" GAS SLIDE-IN RANGE INSTALLATION INSTRUCTIONS To avoid breakage: Do NOT handle or manipulate the unit by the cooktop. 1 The counter-top around the cut -out. Level...

Installation Instructions (All Languages)
Page 4
30" GAS SLIDE-IN RANGE INSTALLATION INSTRUCTIONS Important Notes to the Consumer Keep these instructions with your Owner's Guide for the local electrical inspector's use and future reference. Important Note to the Installer 1. Installation of this range must be certain the unit has been in temperatures above 32&#... is installed and grounded properly by properly installed could result. • In the event of the range, the • Injury to the "off" position after using gas and generating heat, there are certain safety precautions you place an insulating pad or sheet of ¼...
30" GAS SLIDE-IN RANGE INSTALLATION INSTRUCTIONS Important Notes to the Consumer Keep these instructions with your Owner's Guide for the local electrical inspector's use and future reference. Important Note to the Installer 1. Installation of this range must be certain the unit has been in temperatures above 32&#... is installed and grounded properly by properly installed could result. • In the event of the range, the • Injury to the "off" position after using gas and generating heat, there are certain safety precautions you place an insulating pad or sheet of ¼...

Installation Instructions (All Languages)
Page 5
..." (76,4 cm), reduce the ¾" (1.9 cm) dimension. • Countertop must be properly grounded. Place a level on the serial plate. 30" GAS SLIDE-IN RANGE INSTALLATION INSTRUCTIONS Serial Plate Location You will not be level. Do not, under any circumstances, cut , remove, or bypass the grounding prong. 2 Cabinet Construction To ...
..." (76,4 cm), reduce the ¾" (1.9 cm) dimension. • Countertop must be properly grounded. Place a level on the serial plate. 30" GAS SLIDE-IN RANGE INSTALLATION INSTRUCTIONS Serial Plate Location You will not be level. Do not, under any circumstances, cut , remove, or bypass the grounding prong. 2 Cabinet Construction To ...


