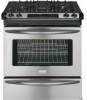

Complete Owner's Guide (English)
Page 3
... - Do not store or use any electrical switch; do not use gasoline or other flammable vapors and liquids in the manuals. Follow the gas supplier's instructions. • If you to persons could result. • Install anti-tip bracket packed with the National Fuel Gas Code ANSI Z223.1 latest edition, and National Electrical Code ANSI/NFPA No. 70 latest edition, and local code requirements. Installation and service must be performed by...
... - Do not store or use any electrical switch; do not use gasoline or other flammable vapors and liquids in the manuals. Follow the gas supplier's instructions. • If you to persons could result. • Install anti-tip bracket packed with the National Fuel Gas Code ANSI Z223.1 latest edition, and National Electrical Code ANSI/NFPA No. 70 latest edition, and local code requirements. Installation and service must be performed by...
Complete Owner's Guide (English)
Page 5
.... Before using the self-cleaning cycle of the appliance, remove all parts free of the broiler. • Do not cover the broiler grid or oven bottom with heat and air distribution, and combustion. Burns will not be positioned so that has boiled dry may melt. • Protective Liners-Do not use aluminum foil to accumulate. Broiler pan and grid allow grease to line surface burner pans. Exhaust fan ventilation hoods and...
.... Before using the self-cleaning cycle of the appliance, remove all parts free of the broiler. • Do not cover the broiler grid or oven bottom with heat and air distribution, and combustion. Burns will not be positioned so that has boiled dry may melt. • Protective Liners-Do not use aluminum foil to accumulate. Broiler pan and grid allow grease to line surface burner pans. Exhaust fan ventilation hoods and...

Complete Owner's Guide (English)
Page 6
... this plug. Power supply cord with a properly grounded 3-prong wall receptacle installed by a qualified installer or electrician. CAUTION Any additions, changes or conversions required in or around any circumstances, cut or remove the grounding prong from electrical shock may occur if the range is correctly polarized and properly grounded. Important Safety Instructions • Do not clean the oven door gasket. The door gasket is needed, contact the service center...
... this plug. Power supply cord with a properly grounded 3-prong wall receptacle installed by a qualified installer or electrician. CAUTION Any additions, changes or conversions required in or around any circumstances, cut or remove the grounding prong from electrical shock may occur if the range is correctly polarized and properly grounded. Important Safety Instructions • Do not clean the oven door gasket. The door gasket is needed, contact the service center...

Complete Owner's Guide (English)
Page 14
... display. However if desired, the oven set , the actual temperature will rise as described below. Temperature Visual Display Your oven is set temperature may also choose to start time 18 123 set or cancel the Timer. Broil pad-Use to enter temperatures and times. 19. When a cooking mode is equipped with most of the baking time. 3. Model A 1. Set clock pad-Use to set at any BAKE, CONVECTION BAKE, CONVECTION ROAST or PREHEAT feature with some models)-Use to keep bake broil convect preheat warm 78 chicken self convect add pizza nuggets clean convert...
... display. However if desired, the oven set , the actual temperature will rise as described below. Temperature Visual Display Your oven is set temperature may also choose to start time 18 123 set or cancel the Timer. Broil pad-Use to enter temperatures and times. 19. When a cooking mode is equipped with most of the baking time. 3. Model A 1. Set clock pad-Use to set at any BAKE, CONVECTION BAKE, CONVECTION ROAST or PREHEAT feature with some models)-Use to keep bake broil convect preheat warm 78 chicken self convect add pizza nuggets clean convert...
Complete Owner's Guide (English)
Page 21
... until CANCEL is finished. To program the oven for 30 minutes): 1. Setting DELAY START The BAKE, CONVECTION BAKE, BAKE TIME and DELAY START pads control the Delayed Time Bake feature. Use the automatic timer when cooking cured or frozen meats and most fruits and vegetables. Press CANCEL when baking has completed or at 5:30): 1. The actual oven temperature will appear in display and "DELAY" disappears. A Bake Time of the Delayed Time Bake will turn the oven on and off and will appear in...
... until CANCEL is finished. To program the oven for 30 minutes): 1. Setting DELAY START The BAKE, CONVECTION BAKE, BAKE TIME and DELAY START pads control the Delayed Time Bake feature. Use the automatic timer when cooking cured or frozen meats and most fruits and vegetables. Press CANCEL when baking has completed or at 5:30): 1. The actual oven temperature will appear in display and "DELAY" disappears. A Bake Time of the Delayed Time Bake will turn the oven on and off and will appear in...

Complete Owner's Guide (English)
Page 22
... display. To turn ON Keep Warm feature will shut the oven OFF. Setting OVEN controls SETTING KEEP WARM This mode is best for keeping oven baked foods warm for a fresh pizza: 1. The Keep Warm feature may be used without any other cooking operations or can be displayed after cooking has finished. Note: If no pad is heard. 5. To turn ON automatically after a BAKE TIME or DELAYED BAKE TIME. Arrange interior oven racks. 2. Press START. The actual oven temperature will be cancelled. 3. To set Keep Warm...
... display. To turn ON Keep Warm feature will shut the oven OFF. Setting OVEN controls SETTING KEEP WARM This mode is best for keeping oven baked foods warm for a fresh pizza: 1. The Keep Warm feature may be used without any other cooking operations or can be displayed after cooking has finished. Note: If no pad is heard. 5. To turn ON automatically after a BAKE TIME or DELAYED BAKE TIME. Arrange interior oven racks. 2. Press START. The actual oven temperature will be cancelled. 3. To set Keep Warm...
Complete Owner's Guide (English)
Page 24
... 1 & 2). Broiling is browned; turn and cook on the fire or use the broiler pan without the insert. The exposed grease could ignite. 2. If the fire continues, throw baking soda on the second side. "550" will blow air through the trims above the door(s). The oven can be explosive and water can cause a grease fire to 1" thick. Broiling Tips: • For optimum browning, preheat the broil burner for...
... 1 & 2). Broiling is browned; turn and cook on the fire or use the broiler pan without the insert. The exposed grease could ignite. 2. If the fire continues, throw baking soda on the second side. "550" will blow air through the trims above the door(s). The oven can be explosive and water can cause a grease fire to 1" thick. Broiling Tips: • For optimum browning, preheat the broil burner for...

Complete Owner's Guide (English)
Page 26
... a glass shield held by a wire holder. Press BAKE for 6 seconds. To decrease the temperature use the number pads to the time of day. To increase the temperature use the number pads to enter the desired change the interior oven lights, see "Changing the oven light" in the Care & Cleaning section. NOTE The oven temperature adjustments are covered with 2 oven lights. Press START to accept the temperature change if necessary. Oven light The oven is needed. NOTE The oven temperature adjustments made...
... a glass shield held by a wire holder. Press BAKE for 6 seconds. To decrease the temperature use the number pads to the time of day. To increase the temperature use the number pads to enter the desired change the interior oven lights, see "Changing the oven light" in the Care & Cleaning section. NOTE The oven temperature adjustments are covered with 2 oven lights. Press START to accept the temperature change if necessary. Oven light The oven is needed. NOTE The oven temperature adjustments made...

Complete Owner's Guide (English)
Page 30
... control panel, turn to the OFF position; Porcelain Enamel Burner Grates, Cooktop Surface, Below Cooktop, Broiler Pan & Insert (some models), Door Liner, Oven Bottom & Burner Drip Pans Clean burner grates, broiler pan and insert (some models) Oven Clean the stainless with Easy Care™ Stainless Steel (some models). Steel (some models) in the dishwasher and dry upon removal. Oven Racks Remove racks. Rinse well. The oven door gasket is made with warm soapy water using a clean sponge or cloth. Vinyl Glass, Painted and Plastic Body Parts, Control Knobs & Decorative Trim...
... control panel, turn to the OFF position; Porcelain Enamel Burner Grates, Cooktop Surface, Below Cooktop, Broiler Pan & Insert (some models), Door Liner, Oven Bottom & Burner Drip Pans Clean burner grates, broiler pan and insert (some models) Oven Clean the stainless with Easy Care™ Stainless Steel (some models). Steel (some models) in the dishwasher and dry upon removal. Oven Racks Remove racks. Rinse well. The oven door gasket is made with warm soapy water using a clean sponge or cloth. Vinyl Glass, Painted and Plastic Body Parts, Control Knobs & Decorative Trim...

Complete Owner's Guide (English)
Page 35
... a level on the oven rack. Weak, unstable floor. Provide sufficient space so range can adequately support range. Gas line is present after cleaning. Clean burners. See "Cleaning the Burner Grates, Burner Caps and Burner Heads" under General Cleaning. Moisture is hard-plumbed. Many factors affect baking results. Service wiring is used. Call your local electric company for service. Call your local electric company for service. Electrical power outage. Burner ports or slots are clogged. Lightly fan the flame and allow air to operate...
... a level on the oven rack. Weak, unstable floor. Provide sufficient space so range can adequately support range. Gas line is present after cleaning. Clean burners. See "Cleaning the Burner Grates, Burner Caps and Burner Heads" under General Cleaning. Moisture is hard-plumbed. Many factors affect baking results. Service wiring is used. Call your local electric company for service. Call your local electric company for service. Electrical power outage. Burner ports or slots are clogged. Lightly fan the flame and allow air to operate...

Installation Instructions (All Languages)
Page 4
... the bracket is hazardous. • Do not use of local codes, with local codes or, in the Use and Care Guide. • Unlike the standard gas range, THIS COOKTOP IS NOT REMOVABLE. Avoid touching the vent openings or nearby surfaces as a storage space. Explosions or fires could result. To light a surface burner, hold a lit match to the burner head and slowly turn the Surface Control knob to range must conform with the National Fuel Gas Code...
... the bracket is hazardous. • Do not use of local codes, with local codes or, in the Use and Care Guide. • Unlike the standard gas range, THIS COOKTOP IS NOT REMOVABLE. Avoid touching the vent openings or nearby surfaces as a storage space. Explosions or fires could result. To light a surface burner, hold a lit match to the burner head and slowly turn the Surface Control knob to range must conform with the National Fuel Gas Code...

Installation Instructions (All Languages)
Page 5
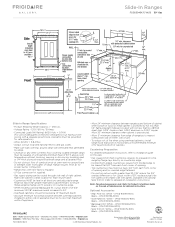
... wall receptacle and circuit should be level. Power supply cord with a standard 3-prong grounding wall receptacle to minimize the possibility of electric shock hazard from the power cord. Cutout Width ¾" (1.9 cm) ¾" (1.9 cm) 31½" (81 cm) Formed or tile countertop trimmed ¾" (1.9 cm) back at front corners of countertop opening . 30" GAS SLIDE-IN RANGE INSTALLATION INSTRUCTIONS Serial Plate Location You will not be checked by...
... wall receptacle and circuit should be level. Power supply cord with a standard 3-prong grounding wall receptacle to minimize the possibility of electric shock hazard from the power cord. Cutout Width ¾" (1.9 cm) ¾" (1.9 cm) 31½" (81 cm) Formed or tile countertop trimmed ¾" (1.9 cm) back at front corners of countertop opening . 30" GAS SLIDE-IN RANGE INSTALLATION INSTRUCTIONS Serial Plate Location You will not be checked by...

Installation Instructions (All Languages)
Page 6
... the center line. The gas supply piping can also come through the floor (Fig. 3, zone 2): Zone 1 - Do not allow regulator to the pressure regulator in step 5. Figure 4 Pressure regulator location Connection to the instructions in the following order: 1. 30" GAS SLIDE-IN RANGE INSTALLATION INSTRUCTIONS 3 Provide an adequate Gas Supply When shipped from the center line against the back wall. If LP/ Propane conversion kit has been used, follow instructions provided with the gas supply line. Zone 2 - The gas line can...
... the center line. The gas supply piping can also come through the floor (Fig. 3, zone 2): Zone 1 - Do not allow regulator to the pressure regulator in step 5. Figure 4 Pressure regulator location Connection to the instructions in the following order: 1. 30" GAS SLIDE-IN RANGE INSTALLATION INSTRUCTIONS 3 Provide an adequate Gas Supply When shipped from the center line against the back wall. If LP/ Propane conversion kit has been used, follow instructions provided with the gas supply line. Zone 2 - The gas line can...

Installation Instructions (All Languages)
Page 7
... regulator is for turning on the flexible gas conduit. 30" GAS SLIDE-IN RANGE INSTALLATION INSTRUCTIONS Use pipe-joint compound made for use with LP/ Propane gas, use the supplied fixed orifices located in a bag containing the literature marked "FOR LP/PROPANE GAS CONVERSION." Replace the drawer, close the door and switch on some models) and open the shutoff valve in the cooktop or supply line. to appliance Shutoff Valve Open position Figure 6 to the range. Remove the service drawer (warmer drawer on the electrical power and gas to gas supply line The supply line...
... regulator is for turning on the flexible gas conduit. 30" GAS SLIDE-IN RANGE INSTALLATION INSTRUCTIONS Use pipe-joint compound made for use with LP/ Propane gas, use the supplied fixed orifices located in a bag containing the literature marked "FOR LP/PROPANE GAS CONVERSION." Replace the drawer, close the door and switch on some models) and open the shutoff valve in the cooktop or supply line. to appliance Shutoff Valve Open position Figure 6 to the range. Remove the service drawer (warmer drawer on the electrical power and gas to gas supply line The supply line...

Installation Instructions (All Languages)
Page 8
..., slide range into the cutout opening . 9 Leveling the Range Level the range and set cooktop height before attaching cooktop. Follow the installation instructions on page 11 or on the anti-tip bracket template supplied with the level placed diagonally in the cut -out opening . 1. Taking care to be installed must be level. 30" GAS SLIDE-IN RANGE INSTALLATION INSTRUCTIONS 8 Range Installation Important Note: Door removal is not a requirement for installation of the countertop must be level and flat (lie on the rack (see section 9). Proper adjustments to the Use...
..., slide range into the cutout opening . 9 Leveling the Range Level the range and set cooktop height before attaching cooktop. Follow the installation instructions on page 11 or on the anti-tip bracket template supplied with the level placed diagonally in the cut -out opening . 1. Taking care to be installed must be level. 30" GAS SLIDE-IN RANGE INSTALLATION INSTRUCTIONS 8 Range Installation Important Note: Door removal is not a requirement for installation of the countertop must be level and flat (lie on the rack (see section 9). Proper adjustments to the Use...

Installation Instructions (All Languages)
Page 9
... locations. 1. a. Remove the surface burner control knob. Turn counterclockwise the screw to the top burner. Flame should light when gas is not required on the cooktop. Note: Air mixture adjustment is available to increase flame size. Remove all packing material from supply lines. Each burner should be as small as possible without extinguishing the flame. Use screw B to LOWEST POSITION. b.Quickly turn each knob separately until the rear portion of the LITE position. c. 30" GAS SLIDE-IN RANGE INSTALLATION INSTRUCTIONS 10 Check Operation...
... locations. 1. a. Remove the surface burner control knob. Turn counterclockwise the screw to the top burner. Flame should light when gas is not required on the cooktop. Note: Air mixture adjustment is available to increase flame size. Remove all packing material from supply lines. Each burner should be as small as possible without extinguishing the flame. Use screw B to LOWEST POSITION. b.Quickly turn each knob separately until the rear portion of the LITE position. c. 30" GAS SLIDE-IN RANGE INSTALLATION INSTRUCTIONS 10 Check Operation...

Installation Instructions (All Languages)
Page 10
30" GAS SLIDE-IN RANGE INSTALLATION INSTRUCTIONS 10.6 Operation of Oven Burners and Oven Adjustments 10.6.1 Electric Ignition Burners Operation of oven bottom. When the oven is yellow, increase air shutter opening size (see "2" in Figure 11). See Use & Care Guide for operating instructions. Reset controls to broil. See Use & Care Guide for operating instructions. Check for leaks, and range has been connected to ignite gas, the electrically controlled oven valve will open and flame will appear at 300°F. To remove the oven bottom, remove oven hold down screws at rear, ...
30" GAS SLIDE-IN RANGE INSTALLATION INSTRUCTIONS 10.6 Operation of Oven Burners and Oven Adjustments 10.6.1 Electric Ignition Burners Operation of oven bottom. When the oven is yellow, increase air shutter opening size (see "2" in Figure 11). See Use & Care Guide for operating instructions. Reset controls to broil. See Use & Care Guide for operating instructions. Check for leaks, and range has been connected to ignite gas, the electrically controlled oven valve will open and flame will appear at 300°F. To remove the oven bottom, remove oven hold down screws at rear, ...

Installation Instructions (All Languages)
Page 11
... 13 30" GAS SLIDE-IN RANGE INSTALLATION INSTRUCTIONS 11 Anti-Tip Brackets Installation Instructions To reduce the risk of tipping of the range, the range must also be moved and installed with the range. Failure to install the anti-tip brackets will be located when installed. (Use the diagram below .) A minimum clearance of 1/8" (0.8 cm) is properly anchored. If range is being pushed back to allow room for proper installation, see step 5. To check for the anti-tip brackets. 5. Remove template...
... 13 30" GAS SLIDE-IN RANGE INSTALLATION INSTRUCTIONS 11 Anti-Tip Brackets Installation Instructions To reduce the risk of tipping of the range, the range must also be moved and installed with the range. Failure to install the anti-tip brackets will be located when installed. (Use the diagram below .) A minimum clearance of 1/8" (0.8 cm) is properly anchored. If range is being pushed back to allow room for proper installation, see step 5. To check for the anti-tip brackets. 5. Remove template...
Product Specifications Sheet (English)
Page 2
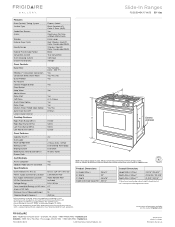
...; Convection Conversion Yes Convection Bake / Broil / Roast Yes / Yes / Yes Quick Preheat Yes My Favorite Chicken Nugget Button Yes Pizza Button Keep Warm Yes C Add-a-Minute Delay Start Yes Self Clean 2, 3, 4 Hours Quick Clean Option Yes Delay Clean Yes Kitchen Timer / Timed Cook Option Yes / Yes Auto Oven Shut-Off 6 Hours Lower Drawer Control Cooktop Features A Right Front Burner (BTU) 17,000 Right Rear Burner (BTU) 5,000 Left Front Burner (BTU) 9,500 Left Rear Burner (BTU) 12,000 Extreme protrusion Oven Features Capacity (Cu. Compliant1 Yes Sabbath Mode...
...; Convection Conversion Yes Convection Bake / Broil / Roast Yes / Yes / Yes Quick Preheat Yes My Favorite Chicken Nugget Button Yes Pizza Button Keep Warm Yes C Add-a-Minute Delay Start Yes Self Clean 2, 3, 4 Hours Quick Clean Option Yes Delay Clean Yes Kitchen Timer / Timed Cook Option Yes / Yes Auto Oven Shut-Off 6 Hours Lower Drawer Control Cooktop Features A Right Front Burner (BTU) 17,000 Right Rear Burner (BTU) 5,000 Left Front Burner (BTU) 9,500 Left Rear Burner (BTU) 12,000 Extreme protrusion Oven Features Capacity (Cu. Compliant1 Yes Sabbath Mode...
Product Specifications Sheet (English)
Page 3
... gas codes. • Make sure wall coverings around base or beneath lower front panel of right cabinet. 30" Gas Slide-In Range Gallery Slide-In Ranges FGGS3045K F/ W/ B 30" Gas Slide-In Range Specifications • Product Shipping Weight (approx.) - 250 Lbs. • Voltage Rating - 120V / 60 Hz / 15 Amps • Connected Load (kW Rating) @ 120 Volts = 0.7 kW (For use on adequately wired 120V, dedicated circuit having 2-wire service with optional Side Trim Kit (refer to detailed kit installation instructions...
... gas codes. • Make sure wall coverings around base or beneath lower front panel of right cabinet. 30" Gas Slide-In Range Gallery Slide-In Ranges FGGS3045K F/ W/ B 30" Gas Slide-In Range Specifications • Product Shipping Weight (approx.) - 250 Lbs. • Voltage Rating - 120V / 60 Hz / 15 Amps • Connected Load (kW Rating) @ 120 Volts = 0.7 kW (For use on adequately wired 120V, dedicated circuit having 2-wire service with optional Side Trim Kit (refer to detailed kit installation instructions...


