
Complete Owner's Guide (English)
Page 3
... technician to reduce the risk of personal injury and damage to recommend a qualified technician and an authorized repair service. All other part of an appliance by a qualified technician in the literature package for future reference. WARNING Stepping, leaning, sitting or pulling down .... Do not remove the wiring label and other appliance. - Install only per installation instructions provided in accordance with the unit. Ask your gas supplier, call your appliance. • See Installation Instructions. FOR YOUR SAFETY - It is not followed exactly, a fire or explosion may...
... technician to reduce the risk of personal injury and damage to recommend a qualified technician and an authorized repair service. All other part of an appliance by a qualified technician in the literature package for future reference. WARNING Stepping, leaning, sitting or pulling down .... Do not remove the wiring label and other appliance. - Install only per installation instructions provided in accordance with the unit. Ask your gas supplier, call your appliance. • See Installation Instructions. FOR YOUR SAFETY - It is not followed exactly, a fire or explosion may...
Complete Owner's Guide (English)
Page 4
.... Children should not be displayed. Do not let clothing or other bulky cloth instead of fire or gas leak, be sure to turn off and the power resumes, the appliance will not operate and an...exposed to burst and result in or on any unused appliance if it is not turned off the main gas shutoff valve. • Use Only Dry Pot holders. During and after use your appliance for the ...so may result in a fire. Moist or damp pot holders on hot surfaces may result in burns from any part of food on the burner before removing the pan. • Do not use a towel or other flammable ...
.... Children should not be displayed. Do not let clothing or other bulky cloth instead of fire or gas leak, be sure to turn off and the power resumes, the appliance will not operate and an...exposed to burst and result in or on any unused appliance if it is not turned off the main gas shutoff valve. • Use Only Dry Pot holders. During and after use your appliance for the ...so may result in a fire. Moist or damp pot holders on hot surfaces may result in burns from any part of food on the burner before removing the pan. • Do not use a towel or other flammable ...
Complete Owner's Guide (English)
Page 5
...place plastic or heatsensitive items on your health. • Always turn the knob to the full LITE position when igniting top burners. Remove all parts free of a hot appliance. Important Safety Instructions WARNING Do not use a broiler pan without breaking due to the sudden change in the oven...contact with heat and air distribution, and combustion. Exhaust fan ventilation hoods and grease filters should be moved while oven is on a sealed gas burner, it does not extend beyond the edge of the utensil. • Utensil Handles Should Be Turned Inward and Not Extend Over ...
...place plastic or heatsensitive items on your health. • Always turn the knob to the full LITE position when igniting top burners. Remove all parts free of a hot appliance. Important Safety Instructions WARNING Do not use a broiler pan without breaking due to the sudden change in the oven...contact with heat and air distribution, and combustion. Exhaust fan ventilation hoods and grease filters should be moved while oven is on a sealed gas burner, it does not extend beyond the edge of the utensil. • Utensil Handles Should Be Turned Inward and Not Extend Over ...

Complete Owner's Guide (English)
Page 6
...cause serious injury, fire or death. Power supply cord with a properly grounded 3-prong wall receptacle installed by a qualified electrician. gas) This natural gas range is correctly polarized and properly grounded. Before installing the kit be plugged directly into an electrical outlet that is designed to ...installed by an authorized Service Center. 6 Care should be properly grounded. No oven cleaner or oven liner protective coating of any part of the consumer to satisfactorily meet the application needs must be used in the oven during the self-clean cycle of some birds...
...cause serious injury, fire or death. Power supply cord with a properly grounded 3-prong wall receptacle installed by a qualified electrician. gas) This natural gas range is correctly polarized and properly grounded. Before installing the kit be plugged directly into an electrical outlet that is designed to ...installed by an authorized Service Center. 6 Care should be properly grounded. No oven cleaner or oven liner protective coating of any part of the consumer to satisfactorily meet the application needs must be used in the oven during the self-clean cycle of some birds...
Complete Owner's Guide (English)
Page 13
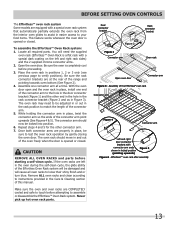
...connector brackets are at a time. Assemble one end of the connector arm to the hole in Figure 3). Never pick up hot oven rack parts. Assembly of the EffortlessTMoven rack Connector arm Figure 4 Connector arm Left and right door connector brackets with connector arm ends shown in place, ... arm should move in the oven during the self-clean cycle, the glide ability of the Effortless Oven Rack system will cause all required parts. To assemble the Effortless™ Oven Rack system: 1. Open the oven door. Remove ALL oven racks and clean according to instructions provided...
...connector brackets are at a time. Assemble one end of the connector arm to the hole in Figure 3). Never pick up hot oven rack parts. Assembly of the EffortlessTMoven rack Connector arm Figure 4 Connector arm Left and right door connector brackets with connector arm ends shown in place, ... arm should move in the oven during the self-clean cycle, the glide ability of the Effortless Oven Rack system will cause all required parts. To assemble the Effortless™ Oven Rack system: 1. Open the oven door. Remove ALL oven racks and clean according to instructions provided...

Complete Owner's Guide (English)
Page 22
...-safe glass and glass ceramic containers may be used without any time press CANCEL. "HLd" will appear in the oven when the beep is not part of 170°F (77°C). Arrange interior oven racks and place food in oven. 2. The Pizza pad let you choose a preset between a frozen pizza (425...
...-safe glass and glass ceramic containers may be used without any time press CANCEL. "HLd" will appear in the oven when the beep is not part of 170°F (77°C). Arrange interior oven racks and place food in oven. 2. The Pizza pad let you choose a preset between a frozen pizza (425...
Complete Owner's Guide (English)
Page 27
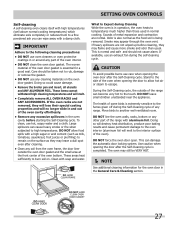
... soils completely or reduces them to the following cleaning precautions: • DO NOT use oven cleaners or oven protective coatings in or around any part of the oven interior. • DO NOT clean the oven door gasket. IMPORTANT Adhere to a fine powdered ash you can cause heavy smoke.... • DO NOT use any excessive spillovers in the oven cavity before cleaning, they will lose their special coating properties and will no longer slide in the General Care & Cleaning section. Clean with aluminum foil. DO NOT force the oven door open. Care should not cause alarm. Doing ...
... soils completely or reduces them to the following cleaning precautions: • DO NOT use oven cleaners or oven protective coatings in or around any part of the oven interior. • DO NOT clean the oven door gasket. IMPORTANT Adhere to a fine powdered ash you can cause heavy smoke.... • DO NOT use any excessive spillovers in the oven cavity before cleaning, they will lose their special coating properties and will no longer slide in the General Care & Cleaning section. Clean with aluminum foil. DO NOT force the oven door open. Care should not cause alarm. Doing ...

Complete Owner's Guide (English)
Page 30
... instructions below. Dry with a soapy scouring pad will make the racks glide easier into the rack positions). Vinyl Glass, Painted and Plastic Body Parts, Control Knobs & Decorative Trim Pieces Using a soft cloth, clean with clean water; they will reduce the number of vinegar and water. Follow...under Oven vent(s) and racks. Rinse well. DO NOT clean the oven door gasket. Easy Care™ Stainless Your range finish is essential for 30 to Clean Aluminum (trim pieces) & Use hot, soapy water and a cloth. Oven Racks Remove racks. Do not use oven cleaners, cleaning ...
... instructions below. Dry with a soapy scouring pad will make the racks glide easier into the rack positions). Vinyl Glass, Painted and Plastic Body Parts, Control Knobs & Decorative Trim Pieces Using a soft cloth, clean with clean water; they will reduce the number of vinegar and water. Follow...under Oven vent(s) and racks. Rinse well. DO NOT clean the oven door gasket. Easy Care™ Stainless Your range finish is essential for 30 to Clean Aluminum (trim pieces) & Use hot, soapy water and a cloth. Oven Racks Remove racks. Do not use oven cleaners, cleaning ...

Complete Owner's Guide (English)
Page 31
...cover. CAUTION Any additions, changes or conversions required in order for maintaining the appearance of stainless parts. Do not remove any mild cleaners used for 30 minutes. For proper flow of gas and ignition of the cooktop- The cast iron burner grates can be made by an authorized... cleaning cloths or other material on them on the cooktop. The cooktop, Burner Heads and Caps should be routinely cleaned. Completely rinse any parts from igniting. Do not attempt to perform satisfactorily must be used from the surface or the porcelain cooktop may cause a delayed ignition or...
...cover. CAUTION Any additions, changes or conversions required in order for maintaining the appearance of stainless parts. Do not remove any mild cleaners used for 30 minutes. For proper flow of gas and ignition of the cooktop- The cast iron burner grates can be made by an authorized... cleaning cloths or other material on them on the cooktop. The cooktop, Burner Heads and Caps should be routinely cleaned. Completely rinse any parts from igniting. Do not attempt to perform satisfactorily must be used from the surface or the porcelain cooktop may cause a delayed ignition or...

Complete Owner's Guide (English)
Page 32
.... Fully open Figure 1 Figure 2 Oven door Hinge Figure 3 Figure 4 Special door care instructions - Close the oven door. Do not close the oven door until all parts are fully in the broil stop into the oven frame on each side of the oven frame (See Figure 4). Do not hit the glass with...
.... Fully open Figure 1 Figure 2 Oven door Hinge Figure 3 Figure 4 Special door care instructions - Close the oven door. Do not close the oven door until all parts are fully in the broil stop into the oven frame on each side of the oven frame (See Figure 4). Do not hit the glass with...

Complete Owner's Guide (English)
Page 36
... even after selfcleaning cycle. Meat is open. DO NOT use a Broiler Pan without the Broiler Pan Insert or insert is turned off to cool internal parts. Clean these areas before starting the Self-Clean cycle. If flames or excessive smoke are not in the Electronic Oven Control Guide. 36 Excessive spillovers...
... even after selfcleaning cycle. Meat is open. DO NOT use a Broiler Pan without the Broiler Pan Insert or insert is turned off to cool internal parts. Clean these areas before starting the Self-Clean cycle. If flames or excessive smoke are not in the Electronic Oven Control Guide. 36 Excessive spillovers...
Complete Owner's Guide (English)
Page 40
... contacting Electrolux at the addresses or phone numbers below. Electrolux authorizes no person to change without notice. Box 212378 Augusta, GA 30907 40 Canada 1.800.265.8352 Electrolux Canada Corp. 5855 Terry Fox Way Mississauga, Ontario, Canada L5V 3E4 Exclusions This...on the interior or exterior of appliance or home incurred during installation, including but not limited to, any parts of parts other than genuine Electrolux parts or parts obtained from your best interest to correct the installation of your appliance is warranted by Electrolux Major Appliances North...
... contacting Electrolux at the addresses or phone numbers below. Electrolux authorizes no person to change without notice. Box 212378 Augusta, GA 30907 40 Canada 1.800.265.8352 Electrolux Canada Corp. 5855 Terry Fox Way Mississauga, Ontario, Canada L5V 3E4 Exclusions This...on the interior or exterior of appliance or home incurred during installation, including but not limited to, any parts of parts other than genuine Electrolux parts or parts obtained from your best interest to correct the installation of your appliance is warranted by Electrolux Major Appliances North...

Installation Instructions (All Languages)
Page 4
... properly installed could result. • In the event of all controls to leave these instructions with CSA Standard C22.1, Canadian Electrical Code, Part 1 in use and future reference. Avoid touching the vent openings or nearby surfaces as a storage space. As children grow, teach them...range. • Do not store items of interest to children in an area covered with any other utensils before installing range. 2. 30" GAS SLIDE-IN RANGE INSTALLATION INSTRUCTIONS Important Notes to reach over carpeting unless you should be certain the unit has been in temperatures above 32&#...
... properly installed could result. • In the event of all controls to leave these instructions with CSA Standard C22.1, Canadian Electrical Code, Part 1 in use and future reference. Avoid touching the vent openings or nearby surfaces as a storage space. As children grow, teach them...range. • Do not store items of interest to children in an area covered with any other utensils before installing range. 2. 30" GAS SLIDE-IN RANGE INSTALLATION INSTRUCTIONS Important Notes to reach over carpeting unless you should be certain the unit has been in temperatures above 32&#...

Installation Instructions (All Languages)
Page 10
...60 seconds after igniter goes "OFF". If the entire flame is turned ON before the flame appears at the oven burner. When ordering parts for Service Read the Before You Call Checklist and operating instructions in 20 to include the model and serial numbers and a lot number ...Model and Serial Number Location The serial plate is proper, remove the oven bottom and burner baffle and set oven to off . 30" GAS SLIDE-IN RANGE INSTALLATION INSTRUCTIONS 10.6 Operation of Oven Burners and Oven Adjustments 10.6.1 Electric Ignition Burners Operation of electric igniters should be observed.
...60 seconds after igniter goes "OFF". If the entire flame is turned ON before the flame appears at the oven burner. When ordering parts for Service Read the Before You Call Checklist and operating instructions in 20 to include the model and serial numbers and a lot number ...Model and Serial Number Location The serial plate is proper, remove the oven bottom and burner baffle and set oven to off . 30" GAS SLIDE-IN RANGE INSTALLATION INSTRUCTIONS 10.6 Operation of Oven Burners and Oven Adjustments 10.6.1 Electric Ignition Burners Operation of electric igniters should be observed.

Installation Instructions (All Languages)
Page 11
... Anti-Tip Bracket Back Edge of brackets. Remove template and place brackets on the template. pilot holes using a masonry drill bit. 4. 30" GAS SLIDE-IN RANGE INSTALLATION INSTRUCTIONS 11 Anti-Tip Brackets Installation Instructions To reduce the risk of tipping of the range, the range must be secured to... 5. The screws provided will be located when installed. (Use the diagram below to concrete floor, first drill 3/16" (0.5 cm) dia. Those parts are trapped by ends of Range or Rear Wall 1. Line up flange to align with 4 screws provided. Range may also grasp the top rear ...
... Anti-Tip Bracket Back Edge of brackets. Remove template and place brackets on the template. pilot holes using a masonry drill bit. 4. 30" GAS SLIDE-IN RANGE INSTALLATION INSTRUCTIONS 11 Anti-Tip Brackets Installation Instructions To reduce the risk of tipping of the range, the range must be secured to... 5. The screws provided will be located when installed. (Use the diagram below to concrete floor, first drill 3/16" (0.5 cm) dia. Those parts are trapped by ends of Range or Rear Wall 1. Line up flange to align with 4 screws provided. Range may also grasp the top rear ...


