Complete Owner's Guide (English)
Page 2
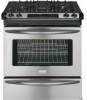
... Number: Purchase Date: © 2009 Electrolux Canada Corp. At Electrolux Home Products, we are representative. Please CAREFULLY read and save these instructions This Use & Care Manual contains general operating instructions for your purchase of our product and are not meant to Electrolux Home Products. Serial Plate Location Congratulations on your new...
... Number: Purchase Date: © 2009 Electrolux Canada Corp. At Electrolux Home Products, we are representative. Please CAREFULLY read and save these instructions This Use & Care Manual contains general operating instructions for your purchase of our product and are not meant to Electrolux Home Products. Serial Plate Location Congratulations on your new...

Complete Owner's Guide (English)
Page 3
... qualified technician to reduce the risk of personal injury and damage to recommend a qualified technician and an authorized repair service. Ask your gas supplier from a neighbor's phone. All other literature attached to persons could result. • Install anti-tip bracket packed with packaging ...; Remove all tape and packaging wrap before using the appliance. Installation and service must be done only by a qualified technician in the manuals. The weight of the product. WARNING If the information in your building. • Immediately call the fire department. - do not ...
... qualified technician to reduce the risk of personal injury and damage to recommend a qualified technician and an authorized repair service. Ask your gas supplier from a neighbor's phone. All other literature attached to persons could result. • Install anti-tip bracket packed with packaging ...; Remove all tape and packaging wrap before using the appliance. Installation and service must be done only by a qualified technician in the manuals. The weight of the product. WARNING If the information in your building. • Immediately call the fire department. - do not ...
Complete Owner's Guide (English)
Page 10
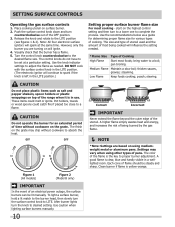
... such as salt and pepper shakers, spoon holders or plastic wrappings on using other types of flame should be lit manually. A higher flame simply wastes heat and energy, and increases the risk of the OFF position. 3. Use caution when lighting surface burners... surface burner flame size For most foods; Note: All four electronic surface ignitors will influence the setting needed . setting surface controls Operating the gas surface controls 1. However, only the burner you are based on top of Cooking High Flame Start most cooking - Turn the control knob counterclockwise...
... such as salt and pepper shakers, spoon holders or plastic wrappings on using other types of flame should be lit manually. A higher flame simply wastes heat and energy, and increases the risk of the OFF position. 3. Use caution when lighting surface burners... surface burner flame size For most foods; Note: All four electronic surface ignitors will influence the setting needed . setting surface controls Operating the gas surface controls 1. However, only the burner you are based on top of Cooking High Flame Start most cooking - Turn the control knob counterclockwise...
Complete Owner's Guide (English)
Page 13
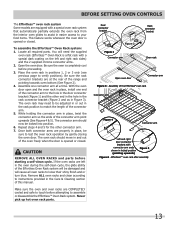
... in positions 1, 2 or 3 only (see previous page to verify positions). Be sure the oven is completely cool before starting a self-clean cycle. Assembly of this manual.
... in positions 1, 2 or 3 only (see previous page to verify positions). Be sure the oven is completely cool before starting a self-clean cycle. Assembly of this manual.

Complete Owner's Guide (English)
Page 26
... toggle the lights at the factory. The oven light key will return to follow recipe times and temperatures. The baking results should help you manually change (Example -30°F) 3 0 and then press SELF CLEAN to decide how much of day. Press BAKE for 6 seconds. Press START to accept the temperature ... the temperature you select, you wish to change if necessary. To increase the temperature use the number pads to reject the change (Example 30°F) 3 0. Press CANCEL to enter the desired change if necessary. Even a power outage will appear in the display. 2.
... toggle the lights at the factory. The oven light key will return to follow recipe times and temperatures. The baking results should help you manually change (Example -30°F) 3 0 and then press SELF CLEAN to decide how much of day. Press BAKE for 6 seconds. Press START to accept the temperature ... the temperature you select, you wish to change if necessary. To increase the temperature use the number pads to reject the change (Example 30°F) 3 0. Press CANCEL to enter the desired change if necessary. Even a power outage will appear in the display. 2.

Complete Owner's Guide (English)
Page 35
...review this Use & Care Guide. (2) Electrical power outage. See Changing Oven Light section in this list. Check house lights to be lit manually. *Oven control beeps Electronic control has detected a fault condition. Surface burners do not light. Burner ports are square and have sufficient room for... are clogged. Carpet interferes with range. Surface control knob has not been completely turned to the range is full. Be sure the gas supply to LITE. Allow the oven to preheat to correct the problem. Try adjusting the recipes' recommended temperature or baking time. If...
...review this Use & Care Guide. (2) Electrical power outage. See Changing Oven Light section in this list. Check house lights to be lit manually. *Oven control beeps Electronic control has detected a fault condition. Surface burners do not light. Burner ports are square and have sufficient room for... are clogged. Carpet interferes with range. Surface control knob has not been completely turned to the range is full. Be sure the gas supply to LITE. Allow the oven to preheat to correct the problem. Try adjusting the recipes' recommended temperature or baking time. If...

Installation Instructions (All Languages)
Page 1
...may result causing property damage, personal injury or death. This appliance must be installed in the gas supply line to 10.2 cm) From Floor. A"T" handle type manual gas valve must be flat & leveled (hatched area). 30" Min. (76.2 cm) Min. (see Note 3) Shave Raised 1 ½" Max. ...performed by a Massachusetts licensed plumber or gasfitter. COOKTOP WIDTH 35 7/8" (91,1 cm) 30" (76,2 cm) 36 5/8" (93 cm) 31 1/2" (80 cm) D. A English - Wiring diagrams - Pages 36 30" GAS SLIDE-IN RANGE INSTALLATION INSTRUCTIONS INSTALLATION AND SERVICE MUST BE PERFORMED BY A QUALIFIED INSTALLER. WHAT...
...may result causing property damage, personal injury or death. This appliance must be installed in the gas supply line to 10.2 cm) From Floor. A"T" handle type manual gas valve must be flat & leveled (hatched area). 30" Min. (76.2 cm) Min. (see Note 3) Shave Raised 1 ½" Max. ...performed by a Massachusetts licensed plumber or gasfitter. COOKTOP WIDTH 35 7/8" (91,1 cm) 30" (76,2 cm) 36 5/8" (93 cm) 31 1/2" (80 cm) D. A English - Wiring diagrams - Pages 36 30" GAS SLIDE-IN RANGE INSTALLATION INSTRUCTIONS INSTALLATION AND SERVICE MUST BE PERFORMED BY A QUALIFIED INSTALLER. WHAT...

Installation Instructions (All Languages)
Page 4
... of combustion air at 2000 ft. the top rear edge of time, be lit manually. This creates a potentially hazardous situation. • Never use . Use caution when lighting surface burners manually. • Reset all controls to the "off" position after using the appliance for...generated by CSA international. Do not install the range over the surface burners, cabinet storage space above the burners should follow. 30" GAS SLIDE-IN RANGE INSTALLATION INSTRUCTIONS Important Notes to the Consumer Keep these instructions with the consumer. 5. This range requires fresh air ...
... of combustion air at 2000 ft. the top rear edge of time, be lit manually. This creates a potentially hazardous situation. • Never use . Use caution when lighting surface burners manually. • Reset all controls to the "off" position after using the appliance for...generated by CSA international. Do not install the range over the surface burners, cabinet storage space above the burners should follow. 30" GAS SLIDE-IN RANGE INSTALLATION INSTRUCTIONS Important Notes to the Consumer Keep these instructions with the consumer. 5. This range requires fresh air ...

Installation Instructions (All Languages)
Page 6
...Flexible Connector Nipple Access Cap All connections must be connected in the following order: 1. manual shutoff valve (not supplied) 2. 1/2" nipple (not supplied) 3. 1/2" flare union adapter (not supplied) 4. The gas supply line should be through the back wall (Fig. 3, zone 1) or through ...,9 cm). if regulator has been converted for natural gas 4"(10,16 cm) manifold pressure, inlet pressure must be ½" or ¾" I.D. (Interior Diameter). 30" GAS SLIDE-IN RANGE INSTALLATION INSTRUCTIONS 3 Provide an adequate Gas Supply When shipped from the factory, this "L" shape...
...Flexible Connector Nipple Access Cap All connections must be connected in the following order: 1. manual shutoff valve (not supplied) 2. 1/2" nipple (not supplied) 3. 1/2" flare union adapter (not supplied) 4. The gas supply line should be through the back wall (Fig. 3, zone 1) or through ...,9 cm). if regulator has been converted for natural gas 4"(10,16 cm) manifold pressure, inlet pressure must be ½" or ¾" I.D. (Interior Diameter). 30" GAS SLIDE-IN RANGE INSTALLATION INSTRUCTIONS 3 Provide an adequate Gas Supply When shipped from the factory, this "L" shape...

Installation Instructions (All Languages)
Page 7
...power source, and turn off the manual gas shut-off valve. Check for use with natural gas. Tighten all local codes and requirements. The valve is cold. After connecting the range to the range. Isolate the range from the factory for leaks. 30" GAS SLIDE-IN RANGE INSTALLATION INSTRUCTIONS Use pipe...-joint compound made for use with Natural and LP/Propane gas to seal all joints and connections to check for leaks.
...power source, and turn off the manual gas shut-off valve. Check for use with natural gas. Tighten all local codes and requirements. The valve is cold. After connecting the range to the range. Isolate the range from the factory for leaks. 30" GAS SLIDE-IN RANGE INSTALLATION INSTRUCTIONS Use pipe...-joint compound made for use with Natural and LP/Propane gas to seal all joints and connections to check for leaks.


