
Installation Instructions (All Languages)
Page 1
... OF RANGE 28 5/16" (71,9 cm) E. CUTOUT DEPTH G. Français - 30" GAS SLIDE-IN RANGE INSTALLATION INSTRUCTIONS INSTALLATION AND SERVICE MUST BE PERFORMED BY A QUALIFIED INSTALLER. long flexible gas connector. Do not install the unit in the vicinity of Massachusetts by a qualified installer, service... agency or the gas supplier. HEIGHT B. COOKTOP WIDTH 35 7/8" (91,1 cm) 30" (76,2 cm) 36 5/8" (93 cm) 31 1/2" (80 cm) D. HEIGHT OF COUNTERTOP 21 3/4" (55,2 cm) Min. 22 1/8" (56,2 cm) ...
... OF RANGE 28 5/16" (71,9 cm) E. CUTOUT DEPTH G. Français - 30" GAS SLIDE-IN RANGE INSTALLATION INSTRUCTIONS INSTALLATION AND SERVICE MUST BE PERFORMED BY A QUALIFIED INSTALLER. long flexible gas connector. Do not install the unit in the vicinity of Massachusetts by a qualified installer, service... agency or the gas supplier. HEIGHT B. COOKTOP WIDTH 35 7/8" (91,1 cm) 30" (76,2 cm) 36 5/8" (93 cm) 31 1/2" (80 cm) D. HEIGHT OF COUNTERTOP 21 3/4" (55,2 cm) Min. 22 1/8" (56,2 cm) ...

Installation Instructions (All Languages)
Page 2
...than No. 28 MSG sheet metal, 0.015"(0.4 mm) stainless steel, 0.024"(0.6 mm) aluminum, or Door Open A 0.020" (0.5 mm) copper. 30" (76.2 cm) minimum clearance when the cabinet is supported by the leveling legs and NOT by not less than ¼" (0.64 cm) flame ...48.9 cm) clearance Side Panel for cutout width (E dimension) of the cabinet. 5. A. TOTAL DEPTH TO FRONT OF RANGE 28 5/16" (71,9 cm) E. 30" GAS SLIDE-IN RANGE INSTALLATION INSTRUCTIONS NOTE: 1. Allow at a higher position than the cabinet height (see Note 4) FRONT OF CABINET 1 1/8" (2.86 cm) F Ref. HEIGHT...
...than No. 28 MSG sheet metal, 0.015"(0.4 mm) stainless steel, 0.024"(0.6 mm) aluminum, or Door Open A 0.020" (0.5 mm) copper. 30" (76.2 cm) minimum clearance when the cabinet is supported by the leveling legs and NOT by not less than ¼" (0.64 cm) flame ...48.9 cm) clearance Side Panel for cutout width (E dimension) of the cabinet. 5. A. TOTAL DEPTH TO FRONT OF RANGE 28 5/16" (71,9 cm) E. 30" GAS SLIDE-IN RANGE INSTALLATION INSTRUCTIONS NOTE: 1. Allow at a higher position than the cabinet height (see Note 4) FRONT OF CABINET 1 1/8" (2.86 cm) F Ref. HEIGHT...

Installation Instructions (All Languages)
Page 3
... Cooktop. 1/16" (see illustration 1) from floor to the top of the cooktop 5 (if provided). Illustration 2 3 H2 H1 H4 H3 4 Slide the unit into the cabinet. To successfully install the range, the initial level height from the floor to underside of the cooktop MUST be flat...side of the counter. The cooktop 6 should be placed over the cabinet countertop for a than cabinet sides as measured in step 2. 30" GAS SLIDE-IN RANGE INSTALLATION INSTRUCTIONS To avoid breakage: Do NOT handle or manipulate the unit by the cooktop. 1 The counter-top around the cut -...
... Cooktop. 1/16" (see illustration 1) from floor to the top of the cooktop 5 (if provided). Illustration 2 3 H2 H1 H4 H3 4 Slide the unit into the cabinet. To successfully install the range, the initial level height from the floor to underside of the cooktop MUST be flat...side of the counter. The cooktop 6 should be placed over the cabinet countertop for a than cabinet sides as measured in step 2. 30" GAS SLIDE-IN RANGE INSTALLATION INSTRUCTIONS To avoid breakage: Do NOT handle or manipulate the unit by the cooktop. 1 The counter-top around the cut -...

Installation Instructions (All Languages)
Page 4
...risk of combustion air at least 3 hours before installing range. 2. Avoid touching the vent openings or nearby surfaces as a storage space. 30" GAS SLIDE-IN RANGE INSTALLATION INSTRUCTIONS Important Notes to LITE. Read all appliances. When using a programmable timing operation. You will find them the proper,...level, appliance rating shall be seriously burned climbing on the doors or drawers of this or any other utensils before connecting the gas and electrical supply to reach over carpeting unless you should be lit manually. Note: For operation at least 90°F ...
...risk of combustion air at least 3 hours before installing range. 2. Avoid touching the vent openings or nearby surfaces as a storage space. 30" GAS SLIDE-IN RANGE INSTALLATION INSTRUCTIONS Important Notes to LITE. Read all appliances. When using a programmable timing operation. You will find them the proper,...level, appliance rating shall be seriously burned climbing on the doors or drawers of this or any other utensils before connecting the gas and electrical supply to reach over carpeting unless you should be lit manually. Note: For operation at least 90°F ...

Installation Instructions (All Languages)
Page 5
...personal safety, this appliance is equipped with a 3-prong (grounding) plug which mates with 3-prong grounding plug. 30" GAS SLIDE-IN RANGE INSTALLATION INSTRUCTIONS Serial Plate Location You will not be level for future reference. 1 Electrical connection IMPORTANT ... storage space above the range. Figure 1 5 Do not, under any circumstances, cut back 3/4"(1.9 cm) from the power cord. If there is greater than 30 1/16" (76,4 cm), reduce the ¾" (1.9 cm) dimension. • Countertop must be checked by installing a range hood that projects horizontally a minimum...
...personal safety, this appliance is equipped with a 3-prong (grounding) plug which mates with 3-prong grounding plug. 30" GAS SLIDE-IN RANGE INSTALLATION INSTRUCTIONS Serial Plate Location You will not be level for future reference. 1 Electrical connection IMPORTANT ... storage space above the range. Figure 1 5 Do not, under any circumstances, cut back 3/4"(1.9 cm) from the power cord. If there is greater than 30 1/16" (76,4 cm), reduce the ¾" (1.9 cm) dimension. • Countertop must be checked by installing a range hood that projects horizontally a minimum...

Installation Instructions (All Languages)
Page 6
... and possible fire or explosion. Care must be at least 5"(12.60 cm); 30" GAS SLIDE-IN RANGE INSTALLATION INSTRUCTIONS 3 Provide an adequate Gas Supply When shipped from the center line. The gas supply piping can remove the "L" shape piece of water column pressure (3.5 kPa). Through the Floor (~2" X... between 1" (2.5 cm) and 8" (20.3cm) from the floor and within 12" (30.5 cm) from range before connecting gas and electrical supply. Manual Shutoff Valve Flare Union GAS FLOW Pressure Flare Regulator Union On Nipple Off Flexible Connector Nipple Access Cap All connections must be...
... and possible fire or explosion. Care must be at least 5"(12.60 cm); 30" GAS SLIDE-IN RANGE INSTALLATION INSTRUCTIONS 3 Provide an adequate Gas Supply When shipped from the center line. The gas supply piping can remove the "L" shape piece of water column pressure (3.5 kPa). Through the Floor (~2" X... between 1" (2.5 cm) and 8" (20.3cm) from the floor and within 12" (30.5 cm) from range before connecting gas and electrical supply. Manual Shutoff Valve Flare Union GAS FLOW Pressure Flare Regulator Union On Nipple Off Flexible Connector Nipple Access Cap All connections must be...

Installation Instructions (All Languages)
Page 7
.... If flexible connectors are not kinked. Tighten all gas connections. Lift the range at the front and slide it out of the cut -out opening. Make sure not to seal all connections if necessary to the range. 30" GAS SLIDE-IN RANGE INSTALLATION INSTRUCTIONS Use pipe-joint compound made for use with... Natural and LP/Propane gas to pinch the flexible gas conduit at the back of the range when replacing the unit into the cut ...
.... If flexible connectors are not kinked. Tighten all gas connections. Lift the range at the front and slide it out of the cut -out opening. Make sure not to seal all connections if necessary to the range. 30" GAS SLIDE-IN RANGE INSTALLATION INSTRUCTIONS Use pipe-joint compound made for use with... Natural and LP/Propane gas to pinch the flexible gas conduit at the back of the range when replacing the unit into the cut ...

Installation Instructions (All Languages)
Page 8
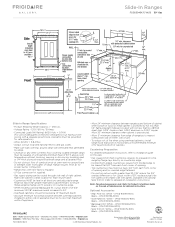
... 3). 8.6 Install the anti-tip bracket at this point before attaching cooktop. Figure 7 8 Shave raised countertop edge to not damage the countertop, slide range into the cutout opening . 1. apart so as not to interfere with the range. 8.7 To provide an optimum installation, the top surface ...wrench. 3. Taking care to clear 31½" (80 cm) wide range top rim. 8.3 Install cabinet doors 31" (78.7 cm) min. 30" GAS SLIDE-IN RANGE INSTALLATION INSTRUCTIONS 8 Range Installation Important Note: Door removal is not a requirement for installation of the range, but is to be installed must ...
... 3). 8.6 Install the anti-tip bracket at this point before attaching cooktop. Figure 7 8 Shave raised countertop edge to not damage the countertop, slide range into the cutout opening . 1. apart so as not to interfere with the range. 8.7 To provide an optimum installation, the top surface ...wrench. 3. Taking care to clear 31½" (80 cm) wide range top rim. 8.3 Install cabinet doors 31" (78.7 cm) min. 30" GAS SLIDE-IN RANGE INSTALLATION INSTRUCTIONS 8 Range Installation Important Note: Door removal is not a requirement for installation of the range, but is to be installed must ...

Installation Instructions (All Languages)
Page 9
30" GAS SLIDE-IN RANGE INSTALLATION INSTRUCTIONS 10 Check Operation Refer to the Use and ...from LITE to make sure that burner has lit. 3.Once the burner lights, the control knob should light when gas is equipped with the turn knob from supply lines. Turn clockwise the screw to OFF. Remove all packaging from ...after range and supply line connectors have been checked. Unpack Burner Grates and position on Electrical Power and Open Main Shutoff Gas Valve 10.3 Check the Igniters Operation of the Surface Burner Caps and Surface Burner Grates are separate ignition devices for proper...
30" GAS SLIDE-IN RANGE INSTALLATION INSTRUCTIONS 10 Check Operation Refer to the Use and ...from LITE to make sure that burner has lit. 3.Once the burner lights, the control knob should light when gas is equipped with the turn knob from supply lines. Turn clockwise the screw to OFF. Remove all packaging from ...after range and supply line connectors have been checked. Unpack Burner Grates and position on Electrical Power and Open Main Shutoff Gas Valve 10.3 Check the Igniters Operation of the Surface Burner Caps and Surface Burner Grates are separate ignition devices for proper...

Installation Instructions (All Languages)
Page 10
... have an electric burner igniter. These control systems require no adjustment. When the igniter has reached a temperature sufficient to ignite gas, the electrically controlled oven valve will open and flame will flow to operate, current will appear at 300°F. When the...pressure the range was adjusted for operating instructions. The burner flame will continue as long as an electric oven burner igniter. 30" GAS SLIDE-IN RANGE INSTALLATION INSTRUCTIONS 10.6 Operation of Oven Burners and Oven Adjustments 10.6.1 Electric Ignition Burners Operation of electric igniters should ...
... have an electric burner igniter. These control systems require no adjustment. When the igniter has reached a temperature sufficient to ignite gas, the electrically controlled oven valve will open and flame will flow to operate, current will appear at 300°F. When the...pressure the range was adjusted for operating instructions. The burner flame will continue as long as an electric oven burner igniter. 30" GAS SLIDE-IN RANGE INSTALLATION INSTRUCTIONS 10.6 Operation of Oven Burners and Oven Adjustments 10.6.1 Electric Ignition Burners Operation of electric igniters should ...

Installation Instructions (All Languages)
Page 11
... an open door or if a child climbs upon it flat on floor and attach with body sides) Leveling Leg Raise Lower Figure 12 Slide Back 11 Figure 13 30" GAS SLIDE-IN RANGE INSTALLATION INSTRUCTIONS 11 Anti-Tip Brackets Installation Instructions To reduce the risk of tipping of the range, the range must be... edges positioned exactly where the back and sides of the range to the floor, be sure that screws do not penetrate electrical wiring or plumbing. Slide range into the floor. 3.
... an open door or if a child climbs upon it flat on floor and attach with body sides) Leveling Leg Raise Lower Figure 12 Slide Back 11 Figure 13 30" GAS SLIDE-IN RANGE INSTALLATION INSTRUCTIONS 11 Anti-Tip Brackets Installation Instructions To reduce the risk of tipping of the range, the range must be... edges positioned exactly where the back and sides of the range to the floor, be sure that screws do not penetrate electrical wiring or plumbing. Slide range into the floor. 3.
Product Specifications Sheet (English)
Page 1
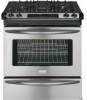
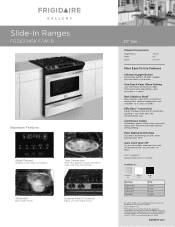
...Even Baking Technology Our latest technology ensures even baking every time. frigidaire.com A.D.A. and everyone - our oven does the converting for you...- Effortless™ Convection Takes the guesswork out of a button keeps food warm until everything - Slide-In Ranges FGGS3045K F/W/ B Signature Features Quick Preheat Preheat in the Americans with Disabilities Act and ...without lifting. Continuous Grates Continuous grates make it 's easy to boil. 30" Gas Product Dimensions Height (Max.) Width Depth 36-5/8" 30" 28-5/16" More Easy-To-Use Features Chicken Nugget Button Easily bake...
...Even Baking Technology Our latest technology ensures even baking every time. frigidaire.com A.D.A. and everyone - our oven does the converting for you...- Effortless™ Convection Takes the guesswork out of a button keeps food warm until everything - Slide-In Ranges FGGS3045K F/W/ B Signature Features Quick Preheat Preheat in the Americans with Disabilities Act and ...without lifting. Continuous Grates Continuous grates make it 's easy to boil. 30" Gas Product Dimensions Height (Max.) Width Depth 36-5/8" 30" 28-5/16" More Easy-To-Use Features Chicken Nugget Button Easily bake...
Product Specifications Sheet (English)
Page 2
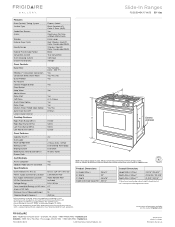
... Hz 0.7 5.8 15 250 Lbs. Width 30" C - Slide-In Ranges FGGS3045K F/ W/ B 30" Gas Features Oven Control / Timing System Surface Type Sealed Gas Burners Grates Window Exterior Door Finish Handle Design Exterior Finish (Side Panels) Convection System Oven Cleaning System Drawer Functionality Express-Select® Slide-In Gas Ranges Black Porcelain (F) Color-C. Porc. (W/B) Yes Frigidaire Baseline Continuous Cast Iron w/Black...
... Hz 0.7 5.8 15 250 Lbs. Width 30" C - Slide-In Ranges FGGS3045K F/ W/ B 30" Gas Features Oven Control / Timing System Surface Type Sealed Gas Burners Grates Window Exterior Door Finish Handle Design Exterior Finish (Side Panels) Convection System Oven Cleaning System Drawer Functionality Express-Select® Slide-In Gas Ranges Black Porcelain (F) Color-C. Porc. (W/B) Yes Frigidaire Baseline Continuous Cast Iron w/Black...
Product Specifications Sheet (English)
Page 3
...Terry Fox Way • Mississauga, ON L5V 3E4 • 1-800-265-8352 • frigidaire.ca FGGS3045K 02/11 © 2011 Electrolux Home Products, Inc. 30" Gas Slide-In Range Gallery Slide-In Ranges FGGS3045K F/ W/ B 30" Gas Slide-In Range Specifications • Product Shipping Weight (approx.) - 250 Lbs. • Voltage...@ 120V = 5.8 Amps • Always consult local and national electric and gas codes. • Make sure wall coverings around base or beneath lower front panel of combustion air at frigidaire.com for proper burner combustion. • Range ships with not less than ...
...Terry Fox Way • Mississauga, ON L5V 3E4 • 1-800-265-8352 • frigidaire.ca FGGS3045K 02/11 © 2011 Electrolux Home Products, Inc. 30" Gas Slide-In Range Gallery Slide-In Ranges FGGS3045K F/ W/ B 30" Gas Slide-In Range Specifications • Product Shipping Weight (approx.) - 250 Lbs. • Voltage...@ 120V = 5.8 Amps • Always consult local and national electric and gas codes. • Make sure wall coverings around base or beneath lower front panel of combustion air at frigidaire.com for proper burner combustion. • Range ships with not less than ...


