
Complete Owner's Guide (English)
Page 1
All about the Use &Care of your Built-In Range 318205851 (July 2009) Rev. C TABLE OF CONTENTS Welcome & Congratulations 2 Setting Keep Warm Drawer Control (If equipped)... 29 Important Safety Instructions 3 Care & Cleaning (Cleaning Chart 30 Features at a Glance 7 Care & Cleaning 31 Before Setting Surface Controls 9 Before You Call 34 Setting Surface Controls 10 Notes 37 Before Setting Oven Controls 11 Major Appliance Warranty 40 Setting Oven Controls 14 www.frigidaire.com USA 1-800-944-9044 www.frigidaire.ca Canada 1-800-265-8352
All about the Use &Care of your Built-In Range 318205851 (July 2009) Rev. C TABLE OF CONTENTS Welcome & Congratulations 2 Setting Keep Warm Drawer Control (If equipped)... 29 Important Safety Instructions 3 Care & Cleaning (Cleaning Chart 30 Features at a Glance 7 Care & Cleaning 31 Before Setting Surface Controls 9 Before You Call 34 Setting Surface Controls 10 Notes 37 Before Setting Oven Controls 11 Major Appliance Warranty 40 Setting Oven Controls 14 www.frigidaire.com USA 1-800-944-9044 www.frigidaire.ca Canada 1-800-265-8352
Complete Owner's Guide (English)
Page 15
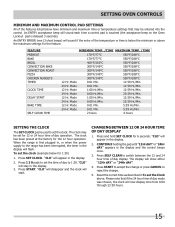
...the timer in the display. 2. Press and hold SET CLOCK for the 12 hour operation. Press START to accept the change or press CANCEL to 1:30. An ENTRY acceptance beep will appear in the display will start. Mode 0:00 Hr./Min. 23:59 Hr./Min. 12 Hr. The clock has been...day display. Changing between the 12 and 24 hour time of day display 1. Press SELF CLEAN to set the Clock above the maximum settings for 1:30) 1. Press START. FEATURE PREHEAT BAKE BROIL CONVECTION BAKE CONVECTION ROAST PIZZA CHICKEN NUGGETS TIMER CLOCK TIME DELAY START BAKE TIME SELF CLEAN TIME MINIMUM ...
...the timer in the display. 2. Press and hold SET CLOCK for the 12 hour operation. Press START to accept the change or press CANCEL to 1:30. An ENTRY acceptance beep will appear in the display will start. Mode 0:00 Hr./Min. 23:59 Hr./Min. 12 Hr. The clock has been...day display. Changing between the 12 and 24 hour time of day display 1. Press SELF CLEAN to set the Clock above the maximum settings for 1:30) 1. Press START. FEATURE PREHEAT BAKE BROIL CONVECTION BAKE CONVECTION ROAST PIZZA CHICKEN NUGGETS TIMER CLOCK TIME DELAY START BAKE TIME SELF CLEAN TIME MINIMUM ...
Complete Owner's Guide (English)
Page 21
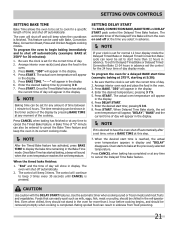
...any amount of time and shut off automatically. 2. The oven will beep 3 times. The control will shut off automatically. To program the oven for 30 minutes): 1. The actual oven temperature will appear in the display. 6. Oven starts to bake at this step. 7. Use the automatic timer when ...mode. NOTE After the Timed Bake feature has activated, press BAKE TIME to beep 3 times every 30 seconds until CANCEL is finished. Press CANCEL when baking has completed or at 5:30): 1. Press START. This feature can also be used with the DELAY START features. "350" will show ...
...any amount of time and shut off automatically. 2. The oven will beep 3 times. The control will shut off automatically. To program the oven for 30 minutes): 1. The actual oven temperature will appear in the display. 6. Oven starts to bake at this step. 7. Use the automatic timer when ...mode. NOTE After the Timed Bake feature has activated, press BAKE TIME to beep 3 times every 30 seconds until CANCEL is finished. Press CANCEL when baking has completed or at 5:30): 1. Press START. This feature can also be used with the DELAY START features. "350" will show ...
Complete Owner's Guide (English)
Page 23
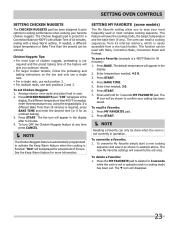
... 2 and 3. Enter temperature needed , a different target temperature or Bake Time than 18 minutes is required, press BAKE TIME and enter the desired time (or 0 for 30 minutes): 1. Press and hold for more information. To overwrite a Favorite: 1. To overwrite My Favorite simply start a new cooking sequence and save it as shown in...
... 2 and 3. Enter temperature needed , a different target temperature or Bake Time than 18 minutes is required, press BAKE TIME and enter the desired time (or 0 for 30 minutes): 1. Press and hold for more information. To overwrite a Favorite: 1. To overwrite My Favorite simply start a new cooking sequence and save it as shown in...

Complete Owner's Guide (English)
Page 26
... The oven temperature adjustments made with this feature will not change and the display will appear in use. Press CANCEL to reject the change (Example -30°F) 3 0 and then press SELF CLEAN to accept the temperature change the Self-Clean cycle temperature or the Broil temperature. Press BAKE for 6 seconds. Press... and the display will stay forever in the display. 2. Press CANCEL to accept the temperature change it again. Press START to reject the change (Example 30°F) 3 0. To toggle the Oven Lights ON and OFF: 1.
... The oven temperature adjustments made with this feature will not change and the display will appear in use. Press CANCEL to reject the change (Example -30°F) 3 0 and then press SELF CLEAN to accept the temperature change the Self-Clean cycle temperature or the Broil temperature. Press BAKE for 6 seconds. Press... and the display will stay forever in the display. 2. Press CANCEL to accept the temperature change it again. Press START to reject the change (Example 30°F) 3 0. To toggle the Oven Lights ON and OFF: 1.

Complete Owner's Guide (English)
Page 28
...-clean cycle remember to allow time for the oven door lock to the time of day, the "DOOR" and icon will begin to start at 4:30) 1. Be sure the clock is desired, press SELF CLEAN multiple times to excessive smoke or fire in advance. Press START. Once the door has been...
...-clean cycle remember to allow time for the oven door lock to the time of day, the "DOOR" and icon will begin to start at 4:30) 1. Be sure the clock is desired, press SELF CLEAN multiple times to excessive smoke or fire in advance. Press START. Once the door has been...

Complete Owner's Guide (English)
Page 30
... cloth, clean with Easy Care™ Stainless Steel (some models). Glass cleaners may use spray oven cleaners on Self-Cleaning models, which is essential for 30 to 40 minutes. Do not use mild dish soap and water or a 50/50 solution of water and vinegar. To replace knobs after cleaning, line...; under Oven vent(s) and racks. After cleaning the racks, rub the sides of the racks with a 1:1 solution of baby oil or salad oil (this gasket. 30 DO NOT immerse the door in the dishwasher and dry upon removal. Dry with a soft clean cloth. To remove, pull each knob straight off the...
... cloth, clean with Easy Care™ Stainless Steel (some models). Glass cleaners may use spray oven cleaners on Self-Cleaning models, which is essential for 30 to 40 minutes. Do not use mild dish soap and water or a 50/50 solution of water and vinegar. To replace knobs after cleaning, line...; under Oven vent(s) and racks. After cleaning the racks, rub the sides of the racks with a 1:1 solution of baby oil or salad oil (this gasket. 30 DO NOT immerse the door in the dishwasher and dry upon removal. Dry with a soft clean cloth. To remove, pull each knob straight off the...

Complete Owner's Guide (English)
Page 31
...be routinely checked. Add 1/4 cup ammonia and soak for stubborn stains. Rinse thoroughly and dry the grates with an absorbent cloth. Because the gas Burners are sealed, cleanups are easy when spillovers are positioned securely over the burners. Do not attempt to remove or lift the cooktop. ...Damaged electrodes may become damaged during future heating. Do not remove any mild cleaners used for 30 minutes. For proper flow of gas and ignition of the cooktop- Wash, rinse well and dry. DO NOT use a small-gauge wire or needle to the...
...be routinely checked. Add 1/4 cup ammonia and soak for stubborn stains. Rinse thoroughly and dry the grates with an absorbent cloth. Because the gas Burners are sealed, cleanups are easy when spillovers are positioned securely over the burners. Do not attempt to remove or lift the cooktop. ...Damaged electrodes may become damaged during future heating. Do not remove any mild cleaners used for 30 minutes. For proper flow of gas and ignition of the cooktop- Wash, rinse well and dry. DO NOT use a small-gauge wire or needle to the...
Complete Owner's Guide (English)
Page 33
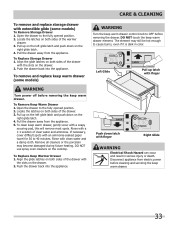
... push down on the right glide latch. 4. To clean keep warm drawer. 33 If necessary, cover difficult spots with an ammonia-soaked paper towel for 30 to OFF before cleaning and servicing the keep warm drawer, gently scour with finger Right Glide WARNING Electrical Shock Hazard can occur and result in...
... push down on the right glide latch. 4. To clean keep warm drawer. 33 If necessary, cover difficult spots with an ammonia-soaked paper towel for 30 to OFF before cleaning and servicing the keep warm drawer, gently scour with finger Right Glide WARNING Electrical Shock Hazard can occur and result in...

Installation Instructions (All Languages)
Page 1
...93 cm) 31 1/2" (80 cm) D. IMPORTANT: SAVE FOR LOCAL ELECTRICAL INSPECTOR'S USE. Refer to 10.2 cm) From Floor. 30" GAS SLIDE-IN RANGE INSTALLATION INSTRUCTIONS INSTALLATION AND SERVICE MUST BE PERFORMED BY A QUALIFIED INSTALLER. CUTOUT DEPTH G. A English - Edge to light any ... min. Installation and service must be installed in the vicinity of Massachusetts by a qualified installer, service agency or the gas supplier. A"T" handle type manual gas valve must be flat & leveled (hatched area). 30" Min. (76.2 cm) Min. (see Note 3) Shave Raised 1 ½" Max. (3.8 cm Max.) 5" ...
...93 cm) 31 1/2" (80 cm) D. IMPORTANT: SAVE FOR LOCAL ELECTRICAL INSPECTOR'S USE. Refer to 10.2 cm) From Floor. 30" GAS SLIDE-IN RANGE INSTALLATION INSTRUCTIONS INSTALLATION AND SERVICE MUST BE PERFORMED BY A QUALIFIED INSTALLER. CUTOUT DEPTH G. A English - Edge to light any ... min. Installation and service must be installed in the vicinity of Massachusetts by a qualified installer, service agency or the gas supplier. A"T" handle type manual gas valve must be flat & leveled (hatched area). 30" Min. (76.2 cm) Min. (see Note 3) Shave Raised 1 ½" Max. (3.8 cm Max.) 5" ...

Installation Instructions (All Languages)
Page 2
... RANGE 28 5/16" (71,9 cm) E. CUTOUT DEPTH 21 3/4" (55,2 cm) Min. 22 1/8" (56,2 cm) Max 24" (61 cm) Min. HEIGHT B. 30" GAS SLIDE-IN RANGE INSTALLATION INSTRUCTIONS NOTE: 1. For cutouts below 22 7/8"(58.1 cm), appliance will slightly show out of wood or metal cabinet is centered in the... 35 7/8" (91,1 cm) Min. 36 5/8" (93 cm) Max. 2 CUTOUT WIDTH*** (Countertop and cabinet) 30±1/16" (76,2±0,15 cm) F. Do not pinch the power supply cord or the flexible gas conduit between the cooktop and the bottom of the cabinet when the bottom of the cabinet. 5.
... RANGE 28 5/16" (71,9 cm) E. CUTOUT DEPTH 21 3/4" (55,2 cm) Min. 22 1/8" (56,2 cm) Max 24" (61 cm) Min. HEIGHT B. 30" GAS SLIDE-IN RANGE INSTALLATION INSTRUCTIONS NOTE: 1. For cutouts below 22 7/8"(58.1 cm), appliance will slightly show out of wood or metal cabinet is centered in the... 35 7/8" (91,1 cm) Min. 36 5/8" (93 cm) Max. 2 CUTOUT WIDTH*** (Countertop and cabinet) 30±1/16" (76,2±0,15 cm) F. Do not pinch the power supply cord or the flexible gas conduit between the cooktop and the bottom of the cabinet when the bottom of the cabinet. 5.

Installation Instructions (All Languages)
Page 3
... the range, the initial level height from floor to Clear the metal flange is greater Space for proper unit support. H2 H1 H4 H3 4 Slide the unit into the cabinet. Remove the protective channels on the countertop (see illustration 2) or else it could cause damage to the top of... the unit is aligned with the center of the cooktop MUST be placed over the cabinet countertop for a than cabinet sides as measured in step 2. 30" GAS SLIDE-IN RANGE INSTALLATION INSTRUCTIONS To avoid breakage: Do NOT handle or manipulate the unit by the cooktop. 1 The counter-top around the cut -out....
... the range, the initial level height from floor to Clear the metal flange is greater Space for proper unit support. H2 H1 H4 H3 4 Slide the unit into the cabinet. Remove the protective channels on the countertop (see illustration 2) or else it could cause damage to the top of... the unit is aligned with the center of the cooktop MUST be placed over the cabinet countertop for a than cabinet sides as measured in step 2. 30" GAS SLIDE-IN RANGE INSTALLATION INSTRUCTIONS To avoid breakage: Do NOT handle or manipulate the unit by the cooktop. 1 The counter-top around the cut -out....

Installation Instructions (All Languages)
Page 4
... instructions contained in use your range is installed and grounded properly by CSA international. Important Note to the appliance. When using gas and generating heat, there are certain safety precautions you place an insulating pad or sheet of ¼" (10,16 cm)...range. This creates a potentially hazardous situation. • Never use . Follow the precleaning instructions in United States or with the range. 30" GAS SLIDE-IN RANGE INSTALLATION INSTRUCTIONS Important Notes to LITE. Read all governing codes and ordinances. 4. tipping of time, be electrically grounded in accordance...
... instructions contained in use your range is installed and grounded properly by CSA international. Important Note to the appliance. When using gas and generating heat, there are certain safety precautions you place an insulating pad or sheet of ¼" (10,16 cm)...range. This creates a potentially hazardous situation. • Never use . Follow the precleaning instructions in United States or with the range. 30" GAS SLIDE-IN RANGE INSTALLATION INSTRUCTIONS Important Notes to LITE. Read all governing codes and ordinances. 4. tipping of time, be electrically grounded in accordance...

Installation Instructions (All Languages)
Page 5
30" GAS SLIDE-IN RANGE INSTALLATION INSTRUCTIONS Serial Plate Location You will not be level. For personal safety, this appliance is equipped with a 3-prong (grounding) plug which mates ... front corner and/or rounded edge flattened (Figure 2). Figure 2 • If the existing cutout width is located as shown. The serial plate is greater than 30 1/16" (76,4 cm), reduce the ¾" (1.9 cm) dimension. • Countertop must be properly grounded.
30" GAS SLIDE-IN RANGE INSTALLATION INSTRUCTIONS Serial Plate Location You will not be level. For personal safety, this appliance is equipped with a 3-prong (grounding) plug which mates ... front corner and/or rounded edge flattened (Figure 2). Figure 2 • If the existing cutout width is located as shown. The serial plate is greater than 30 1/16" (76,4 cm), reduce the ¾" (1.9 cm) dimension. • Countertop must be properly grounded.

Installation Instructions (All Languages)
Page 6
... pipe joint sealant on the appliance. The regulator is located as shown in a gas leak and possible fire or explosion. flexible connector (not supplied) 5. 1/2" flare union adapter (not supplied) 6. 1/2" nipple (not supplied) 7. 30" GAS SLIDE-IN RANGE INSTALLATION INSTRUCTIONS 3 Provide an adequate Gas Supply When shipped from the factory, this "L" shape piece of metal, it...
... pipe joint sealant on the appliance. The regulator is located as shown in a gas leak and possible fire or explosion. flexible connector (not supplied) 5. 1/2" flare union adapter (not supplied) 6. 1/2" nipple (not supplied) 7. 30" GAS SLIDE-IN RANGE INSTALLATION INSTRUCTIONS 3 Provide an adequate Gas Supply When shipped from the factory, this "L" shape piece of metal, it...

Installation Instructions (All Languages)
Page 7
... column). 7 Follow the instructions packaged with the orifices for leaks with an approved shutoff valve (see Figure 6). Tighten all gas connections. 30" GAS SLIDE-IN RANGE INSTALLATION INSTRUCTIONS Use pipe-joint compound made for leaks. If a manometer is cold. If you wish to convert your... range for use with LP/ Propane gas, use with Natural gas or LP/ Propane gas. to appliance Shutoff Valve Open position Figure 6...
... column). 7 Follow the instructions packaged with the orifices for leaks with an approved shutoff valve (see Figure 6). Tighten all gas connections. 30" GAS SLIDE-IN RANGE INSTALLATION INSTRUCTIONS Use pipe-joint compound made for leaks. If a manometer is cold. If you wish to convert your... range for use with LP/ Propane gas, use with Natural gas or LP/ Propane gas. to appliance Shutoff Valve Open position Figure 6...

Installation Instructions (All Languages)
Page 8
...installation, the top surface of the countertop must be ordered through a Service Center. Follow the instructions under "Leveling the Range". 8.12 Slide the range into cut -out opening and double check for oven door removal instructions. Installation With End Panel A End Panel kit can...the range, if necessary, by lowering the front leveling legs and the back leveling wheels. 8.11 Level the range (see figure 7). 30" GAS SLIDE-IN RANGE INSTALLATION INSTRUCTIONS 8 Range Installation Important Note: Door removal is not a requirement for installation of the cooktop clears the countertop....
...installation, the top surface of the countertop must be ordered through a Service Center. Follow the instructions under "Leveling the Range". 8.12 Slide the range into cut -out opening and double check for oven door removal instructions. Installation With End Panel A End Panel kit can...the range, if necessary, by lowering the front leveling legs and the back leveling wheels. 8.11 Level the range (see figure 7). 30" GAS SLIDE-IN RANGE INSTALLATION INSTRUCTIONS 8 Range Installation Important Note: Door removal is not a requirement for installation of the cooktop clears the countertop....

Installation Instructions (All Languages)
Page 9
...of electric igniters should be hot enough to increase flame size. If burner goes out, reset control to decrease flame size. c. 30" GAS SLIDE-IN RANGE INSTALLATION INSTRUCTIONS 10 Check Operation Refer to the Use and Care Guide packaged with sealed burners It is very important to...from cooktop area. 2. Discard all packing material from supply lines. You will hear the igniter sparking. 2. Try each portion should light when gas is not required on the cooktop. c. e. Turn counterclockwise the screw to cause burns. Flame size can be adjusted individually. Adjust flame ...
...of electric igniters should be hot enough to increase flame size. If burner goes out, reset control to decrease flame size. c. 30" GAS SLIDE-IN RANGE INSTALLATION INSTRUCTIONS 10 Check Operation Refer to the Use and Care Guide packaged with sealed burners It is very important to...from cooktop area. 2. Discard all packing material from supply lines. You will hear the igniter sparking. 2. Try each portion should light when gas is not required on the cooktop. c. e. Turn counterclockwise the screw to cause burns. Flame size can be adjusted individually. Adjust flame ...

Installation Instructions (All Languages)
Page 10
...have been carefully checked for when it left in 20 to the range is 1 inch (distinct inner cone of combustion and ventilation air to 30 seconds after igniter goes "OFF". b) Within 60 seconds the oven burner should ignite. d) Within 60 seconds the broil burner should ignite.... oven burner. Make sure the flow of blue flame). To determine if the broil burner flame is set to a light bulb. 30" GAS SLIDE-IN RANGE INSTALLATION INSTRUCTIONS 10.6 Operation of Oven Burners and Oven Adjustments 10.6.1 Electric Ignition Burners Operation of electric igniters should be observed...
...have been carefully checked for when it left in 20 to the range is 1 inch (distinct inner cone of combustion and ventilation air to 30 seconds after igniter goes "OFF". b) Within 60 seconds the oven burner should ignite. d) Within 60 seconds the broil burner should ignite.... oven burner. Make sure the flow of blue flame). To determine if the broil burner flame is set to a light bulb. 30" GAS SLIDE-IN RANGE INSTALLATION INSTRUCTIONS 10.6 Operation of Oven Burners and Oven Adjustments 10.6.1 Electric Ignition Burners Operation of electric igniters should be observed...

Installation Instructions (All Languages)
Page 11
...floor. To check for the anti-tip brackets. 5. Anti-Tip Bracket Back Edge of range with body sides) Leveling Leg Raise Lower Figure 12 Slide Back 11 Figure 13 Remove template and place brackets on floor and attach with 4 screws provided. If attaching to the front. Range may also... with the range. CL 9 1/8" (23.2 cm) 18¼" (46.4 cm) Anti-Tip Bracket 28 1/8" (71.4 cm) (Rear width of Range or Rear Wall 1. 30" GAS SLIDE-IN RANGE INSTALLATION INSTRUCTIONS 11 Anti-Tip Brackets Installation Instructions To reduce the risk of tipping of the range, the range must be secured to...
...floor. To check for the anti-tip brackets. 5. Anti-Tip Bracket Back Edge of range with body sides) Leveling Leg Raise Lower Figure 12 Slide Back 11 Figure 13 Remove template and place brackets on floor and attach with 4 screws provided. If attaching to the front. Range may also... with the range. CL 9 1/8" (23.2 cm) 18¼" (46.4 cm) Anti-Tip Bracket 28 1/8" (71.4 cm) (Rear width of Range or Rear Wall 1. 30" GAS SLIDE-IN RANGE INSTALLATION INSTRUCTIONS 11 Anti-Tip Brackets Installation Instructions To reduce the risk of tipping of the range, the range must be secured to...


