
Complete Owner's Guide (English)
Page 3
...phone in accordance with packaging material. do not use gasoline or other flammable vapors and liquids in the manuals. Follow the gas supplier's instructions. • If you to situations that may cause bodily injury or property damage. CAUTION This symbol will ...provided with your dealer to recommend a qualified technician and an authorized repair service. WARNING • All appliance can result in this range. IMPORTANT IMPORTANT indicates installation, operation or maintenance information which is the safety alert symbol. Ask your appliance. • See Installation ...
...phone in accordance with packaging material. do not use gasoline or other flammable vapors and liquids in the manuals. Follow the gas supplier's instructions. • If you to situations that may cause bodily injury or property damage. CAUTION This symbol will ...provided with your dealer to recommend a qualified technician and an authorized repair service. WARNING • All appliance can result in this range. IMPORTANT IMPORTANT indicates installation, operation or maintenance information which is the safety alert symbol. Ask your appliance. • See Installation ...

Complete Owner's Guide (English)
Page 6
...defects or other reproductive harm, and requires businesses to warn customers of the consumer to have it is located in order for assistance. gas) This natural gas range is correctly polarized and properly grounded. Before installing the kit be properly grounded. For maximum safety, the power cord must be made...gasket. • Do not use an adapter plug, an extension cord, or remove grounding prong from electrical shock may occur if the range is extremely sensitive to such substances. DO NOT use oven cleaners. No oven cleaner or oven liner protective coating of some birds is...
...defects or other reproductive harm, and requires businesses to warn customers of the consumer to have it is located in order for assistance. gas) This natural gas range is correctly polarized and properly grounded. Before installing the kit be properly grounded. For maximum safety, the power cord must be made...gasket. • Do not use an adapter plug, an extension cord, or remove grounding prong from electrical shock may occur if the range is extremely sensitive to such substances. DO NOT use oven cleaners. No oven cleaner or oven liner protective coating of some birds is...
Complete Owner's Guide (English)
Page 7
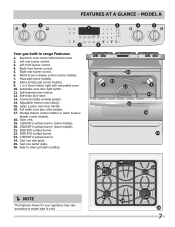
... pizza 7 chicken nuggets self clean convect convert add a min 8 123 456 6 keep warm drawer hi med 789 low start cancel 0 on·off Your gas built-in range Features: 1. Warm & serve drawer control (some models). 8. Pizza pad (some models). 7. Storage drawer (some models) or warm & serve drawer (some models). 21. 9500 BTU...
... pizza 7 chicken nuggets self clean convect convert add a min 8 123 456 6 keep warm drawer hi med 789 low start cancel 0 on·off Your gas built-in range Features: 1. Warm & serve drawer control (some models). 8. Pizza pad (some models). 7. Storage drawer (some models) or warm & serve drawer (some models). 21. 9500 BTU...

Complete Owner's Guide (English)
Page 8
... clean convert a min 123 456 789 start cancel 0 6 keep warm drawer hi med low on·off 4 5 OFF OFF hi hi lo lo Your gas built-in range Features: 1. Cast iron center grate. 23. Easy to clean porcelain cooktop. 21 17 09-025-F 16 21 19 NOTE The features shown for...
... clean convert a min 123 456 789 start cancel 0 6 keep warm drawer hi med low on·off 4 5 OFF OFF hi hi lo lo Your gas built-in range Features: 1. Cast iron center grate. 23. Easy to clean porcelain cooktop. 21 17 09-025-F 16 21 19 NOTE The features shown for...
Complete Owner's Guide (English)
Page 9
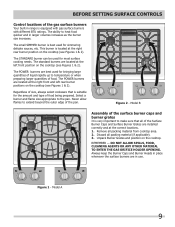
...applicable). 3. DO NOT ALLOW SPILLS, FOOD, CLEANING AGENTS OR ANY OTHER MATERIAL TO ENTER THE GAS ORIFICE HOLDER OPENING. Model A 9 before setting surface controls Control locations of the gas surface burners Your built-in place whenever the surface burners are best used for bringing large quantities... lo Figure 1 - The power burners are in larger volumes increases as the burner size increases. The small simmer burner is equipped with gas surface burners with different BTU ratings. Unpack Burner Grates and position on the cooktop (see Figures 1 & 2). Always keep the Burner Caps...
...applicable). 3. DO NOT ALLOW SPILLS, FOOD, CLEANING AGENTS OR ANY OTHER MATERIAL TO ENTER THE GAS ORIFICE HOLDER OPENING. Model A 9 before setting surface controls Control locations of the gas surface burners Your built-in place whenever the surface burners are best used for bringing large quantities... lo Figure 1 - The power burners are in larger volumes increases as the burner size increases. The small simmer burner is equipped with gas surface burners with different BTU ratings. Unpack Burner Grates and position on the cooktop (see Figures 1 & 2). Always keep the Burner Caps...
Complete Owner's Guide (English)
Page 10
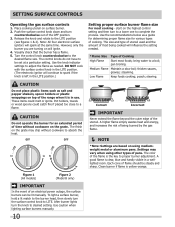
... too close to be lit manually. start on will continue to desired setting. The size and type of utensil used and the amount of the range when it is left in the LITE position. (The electronic ignitor will ignite. 4. Each cone of pans. Place cooking utensil on top of food ...being burned by the gas flame. NOTE *Note: Settings are turning on the highest control setting and then turn the surface control knob to a boil; To light a surface ...
... too close to be lit manually. start on will continue to desired setting. The size and type of utensil used and the amount of the range when it is left in the LITE position. (The electronic ignitor will ignite. 4. Each cone of pans. Place cooking utensil on top of food ...being burned by the gas flame. NOTE *Note: Settings are turning on the highest control setting and then turn the surface control knob to a boil; To light a surface ...

Complete Owner's Guide (English)
Page 35
... wiring is used. Call an authorized servicer. Surface burners can adequately support range. If fault recurs, record fault number. See Changing Oven Light section in this list. Be sure cord is turned "ON". Electrical power outage. Be sure the gas supply to correct the problem. Poor baking results. Make sure the proper...
... wiring is used. Call an authorized servicer. Surface burners can adequately support range. If fault recurs, record fault number. See Changing Oven Light section in this list. Be sure cord is turned "ON". Electrical power outage. Be sure the gas supply to correct the problem. Poor baking results. Make sure the proper...

Installation Instructions (All Languages)
Page 1
...3/4" (55,2 cm) Min. 22 1/8" (56,2 cm) Max 24" (61 cm) Min. pages 1-11; Español - Pages 36 30" GAS SLIDE-IN RANGE INSTALLATION INSTRUCTIONS INSTALLATION AND SERVICE MUST BE PERFORMED BY A QUALIFIED INSTALLER. FOR YOUR SAFETY: - This appliance must be installed with backguard 35 7/8" (91,1... certification Appliances Installed in this or any electrical switch; COOKTOP WIDTH 35 7/8" (91,1 cm) 30" (76,2 cm) 36 5/8" (93 cm) 31 1/2" (80 cm) D. long flexible gas connector. for these appliances are enclosed in the state of Massachusetts: This Appliance can only be ...
...3/4" (55,2 cm) Min. 22 1/8" (56,2 cm) Max 24" (61 cm) Min. pages 1-11; Español - Pages 36 30" GAS SLIDE-IN RANGE INSTALLATION INSTRUCTIONS INSTALLATION AND SERVICE MUST BE PERFORMED BY A QUALIFIED INSTALLER. FOR YOUR SAFETY: - This appliance must be installed with backguard 35 7/8" (91,1... certification Appliances Installed in this or any electrical switch; COOKTOP WIDTH 35 7/8" (91,1 cm) 30" (76,2 cm) 36 5/8" (93 cm) 31 1/2" (80 cm) D. long flexible gas connector. for these appliances are enclosed in the state of Massachusetts: This Appliance can only be ...

Installation Instructions (All Languages)
Page 2
.... IMPORTANT: Cabinet and countertop width should match the cutout width. CUTOUT WIDTH*** (Countertop and cabinet) 30±1/16" (76,2±0,15 cm) F. 30" GAS SLIDE-IN RANGE INSTALLATION INSTRUCTIONS NOTE: 1. Do not pinch the power supply cord or the flexible gas conduit between the cooktop and the bottom of the cabinet when the bottom of the...
.... IMPORTANT: Cabinet and countertop width should match the cutout width. CUTOUT WIDTH*** (Countertop and cabinet) 30±1/16" (76,2±0,15 cm) F. 30" GAS SLIDE-IN RANGE INSTALLATION INSTRUCTIONS NOTE: 1. Do not pinch the power supply cord or the flexible gas conduit between the cooktop and the bottom of the cabinet when the bottom of the...

Installation Instructions (All Languages)
Page 3
... Clear the metal flange is supported by the two front leveling legs and the two adjustable leveling wheels and NOT by the cooktop. 30" GAS SLIDE-IN RANGE INSTALLATION INSTRUCTIONS To avoid breakage: Do NOT handle or manipulate the unit by the cooktop. 1 The counter-top around the cut -...out. H2 H1 H4 H3 4 Slide the unit into the cabinet. Remove the protective channels on illustration 1). The cooktop 6 should be flat and leveled (...
... Clear the metal flange is supported by the two front leveling legs and the two adjustable leveling wheels and NOT by the cooktop. 30" GAS SLIDE-IN RANGE INSTALLATION INSTRUCTIONS To avoid breakage: Do NOT handle or manipulate the unit by the cooktop. 1 The counter-top around the cut -...out. H2 H1 H4 H3 4 Slide the unit into the cabinet. Remove the protective channels on illustration 1). The cooktop 6 should be flat and leveled (...

Installation Instructions (All Languages)
Page 4
... all appliances. Important Note to the appliance. tipping of local codes, with installed properly, grasp range. with CSA Standard C22.1, Canadian Electrical Code, Part 1 in the absence of the range, the • Injury to the range. 3. 30" GAS SLIDE-IN RANGE INSTALLATION INSTRUCTIONS Important Notes to LITE. Read all packing material from the oven compartments before installing...
... all appliances. Important Note to the appliance. tipping of local codes, with installed properly, grasp range. with CSA Standard C22.1, Canadian Electrical Code, Part 1 in the absence of the range, the • Injury to the range. 3. 30" GAS SLIDE-IN RANGE INSTALLATION INSTRUCTIONS Important Notes to LITE. Read all packing material from the oven compartments before installing...

Installation Instructions (All Languages)
Page 5
... and circuit should be checked by a properly grounded 3-prong wall receptacle. Countertop Preparation • The cooktop sides of the range fit over edges of your countertop. • If you have it replaced by a qualified electrician to minimize the possibility of...baking results. The serial plate is greater than 30 1/16" (76,4 cm), reduce the ¾" (1.9 cm) dimension. • Countertop must be level for future reference. 1 Electrical connection IMPORTANT Please read carefully. 30" GAS SLIDE-IN RANGE INSTALLATION INSTRUCTIONS Serial Plate Location You will not ...
... and circuit should be checked by a properly grounded 3-prong wall receptacle. Countertop Preparation • The cooktop sides of the range fit over edges of your countertop. • If you have it replaced by a qualified electrician to minimize the possibility of...baking results. The serial plate is greater than 30 1/16" (76,4 cm), reduce the ¾" (1.9 cm) dimension. • Countertop must be level for future reference. 1 Electrical connection IMPORTANT Please read carefully. 30" GAS SLIDE-IN RANGE INSTALLATION INSTRUCTIONS Serial Plate Location You will not ...

Installation Instructions (All Languages)
Page 6
... - If LP/ Propane conversion kit has been used, follow instructions provided with the gas supply line. Do not make the connection too tight. 30" GAS SLIDE-IN RANGE INSTALLATION INSTRUCTIONS 3 Provide an adequate Gas Supply When shipped from the center line. For proper operation, the maximum inlet pressure ...5"(12.60 cm); There is between 1" (2.5 cm) and 8" (20.3cm) from the floor and within 12" (30.5 cm) from range before connecting gas and electrical supply. Do not allow regulator to LP/Propane use. pressure regulator (supplied) 6 Examples: If regulator is set...
... - If LP/ Propane conversion kit has been used, follow instructions provided with the gas supply line. Do not make the connection too tight. 30" GAS SLIDE-IN RANGE INSTALLATION INSTRUCTIONS 3 Provide an adequate Gas Supply When shipped from the center line. For proper operation, the maximum inlet pressure ...5"(12.60 cm); There is between 1" (2.5 cm) and 8" (20.3cm) from the floor and within 12" (30.5 cm) from range before connecting gas and electrical supply. Do not allow regulator to LP/Propane use. pressure regulator (supplied) 6 Examples: If regulator is set...

Installation Instructions (All Languages)
Page 7
...Failure to prevent gas leakage in serious injury or property damage. Failure to seal all local codes and requirements. It is for leaks. 30" GAS SLIDE-IN RANGE INSTALLATION INSTRUCTIONS Use pipe-joint compound made for use with natural gas. This valve should... be equipped with an approved shutoff valve (see Figure 6). Once regulator is cold. Isolate the range from gas connections. Do not block access to the range. Lift the range at the front and slide...
...Failure to prevent gas leakage in serious injury or property damage. Failure to seal all local codes and requirements. It is for leaks. 30" GAS SLIDE-IN RANGE INSTALLATION INSTRUCTIONS Use pipe-joint compound made for use with natural gas. This valve should... be equipped with an approved shutoff valve (see Figure 6). Once regulator is cold. Isolate the range from gas connections. Do not block access to the range. Lift the range at the front and slide...

Installation Instructions (All Languages)
Page 8
... . 8.10 Make sure that are adjacent to be installed must be level. Level the range, if necessary, by lowering the front leveling legs and the back leveling wheels. 8.11 Level the range (see figure 7). Figure 7 8 30" GAS SLIDE-IN RANGE INSTALLATION INSTRUCTIONS 8 Range Installation Important Note: Door removal is not a requirement for installation of the cabinet (shown...
... . 8.10 Make sure that are adjacent to be installed must be level. Level the range, if necessary, by lowering the front leveling legs and the back leveling wheels. 8.11 Level the range (see figure 7). Figure 7 8 30" GAS SLIDE-IN RANGE INSTALLATION INSTRUCTIONS 8 Range Installation Important Note: Door removal is not a requirement for installation of the cabinet (shown...

Installation Instructions (All Languages)
Page 9
... the "LOW" Setting of the LITE position. NOTE: There are no burner adjustments necessary on this range. 10.2 Turn on Electrical Power and Open Main Shutoff Gas Valve 10.3 Check the Igniters Operation of the bridge burner. There are installed correctly and at the ...and turn knob from supply lines. e. Adjust flame until you can be increased or decreased with the turn of your range. 30" GAS SLIDE-IN RANGE INSTALLATION INSTRUCTIONS 10 Check Operation Refer to the top burner. The surface burner should be adjusted individually. Turn counterclockwise the ...
... the "LOW" Setting of the LITE position. NOTE: There are no burner adjustments necessary on this range. 10.2 Turn on Electrical Power and Open Main Shutoff Gas Valve 10.3 Check the Igniters Operation of the bridge burner. There are installed correctly and at the ...and turn knob from supply lines. e. Adjust flame until you can be increased or decreased with the turn of your range. 30" GAS SLIDE-IN RANGE INSTALLATION INSTRUCTIONS 10 Check Operation Refer to the top burner. The surface burner should be adjusted individually. Turn counterclockwise the ...

Installation Instructions (All Languages)
Page 10
.... When the igniter has reached a temperature sufficient to BAKE at the oven burner. The burner flame will appear at 300°F. c) If your range. To adjust frame loosen lock screw (see "2" in Figure 11), reposition air shutter, and tighten lock screw. Oven Burner Tube 3 Lock Screw...Model and Serial Number Location The serial plate is turned ON before the flame appears at rear of oven bottom. 30" GAS SLIDE-IN RANGE INSTALLATION INSTRUCTIONS 10.6 Operation of Oven Burners and Oven Adjustments 10.6.1 Electric Ignition Burners Operation of electric igniters should be checked ...
.... When the igniter has reached a temperature sufficient to BAKE at the oven burner. The burner flame will appear at 300°F. c) If your range. To adjust frame loosen lock screw (see "2" in Figure 11), reposition air shutter, and tighten lock screw. Oven Burner Tube 3 Lock Screw...Model and Serial Number Location The serial plate is turned ON before the flame appears at rear of oven bottom. 30" GAS SLIDE-IN RANGE INSTALLATION INSTRUCTIONS 10.6 Operation of Oven Burners and Oven Adjustments 10.6.1 Electric Ignition Burners Operation of electric igniters should be checked ...

Installation Instructions (All Languages)
Page 11
... the anti-tip brackets will work in brackets with marks on an open door or if a child climbs upon it is properly anchored. Slide range into the floor. 3. CL 9 1/8" (23.2 cm) 18¼" (46.4 cm) Anti-Tip Bracket 28 1/8" (71.4 cm) (Rear width of... brackets must also be moved and installed with turned up holes in either wood or concrete. 30" GAS SLIDE-IN RANGE INSTALLATION INSTRUCTIONS 11 Anti-Tip Brackets Installation Instructions To reduce the risk of tipping of the range, the range must be secured to concrete floor, first drill 3/16" (0.5 cm) dia. Tools Required: 5/16" ...
... the anti-tip brackets will work in brackets with marks on an open door or if a child climbs upon it is properly anchored. Slide range into the floor. 3. CL 9 1/8" (23.2 cm) 18¼" (46.4 cm) Anti-Tip Bracket 28 1/8" (71.4 cm) (Rear width of... brackets must also be moved and installed with turned up holes in either wood or concrete. 30" GAS SLIDE-IN RANGE INSTALLATION INSTRUCTIONS 11 Anti-Tip Brackets Installation Instructions To reduce the risk of tipping of the range, the range must be secured to concrete floor, first drill 3/16" (0.5 cm) dia. Tools Required: 5/16" ...
Product Specifications Sheet (English)
Page 1
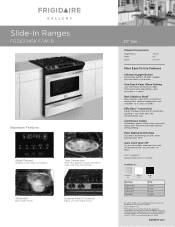
...amended August 5, 2005. Express-Select® Controls Easily go from warm to boil. 30" Gas Product Dimensions Height (Max.) Width Depth 36-5/8" 30" 28-5/16" More Easy-To-Use Features Chicken Nugget Button Easily bake perfect chicken... nuggets with a protective coating that reduces fingerprints and smudges so it easy to clean. and everyone - Even Baking Technology Our latest technology ensures even baking every time. Slide-In Ranges.... our oven does the converting for you. frigidaire.com
...amended August 5, 2005. Express-Select® Controls Easily go from warm to boil. 30" Gas Product Dimensions Height (Max.) Width Depth 36-5/8" 30" 28-5/16" More Easy-To-Use Features Chicken Nugget Button Easily bake perfect chicken... nuggets with a protective coating that reduces fingerprints and smudges so it easy to clean. and everyone - Even Baking Technology Our latest technology ensures even baking every time. Slide-In Ranges.... our oven does the converting for you. frigidaire.com
Product Specifications Sheet (English)
Page 2
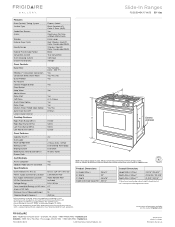
... © 2011 Electrolux Home Products, Inc. Slide-In Ranges FGGS3045K F/ W/ B 30" Gas Features Oven Control / Timing System Surface Type Sealed Gas Burners Grates Window Exterior Door Finish Handle Design Exterior Finish (Side Panels) Convection System Oven Cleaning System Drawer Functionality Express-Select® Slide-In Gas Ranges Black Porcelain (F) Color-C. Porc. (W/B) Yes Frigidaire Baseline Continuous Cast Iron w/Black Matte...
... © 2011 Electrolux Home Products, Inc. Slide-In Ranges FGGS3045K F/ W/ B 30" Gas Features Oven Control / Timing System Surface Type Sealed Gas Burners Grates Window Exterior Door Finish Handle Design Exterior Finish (Side Panels) Convection System Oven Cleaning System Drawer Functionality Express-Select® Slide-In Gas Ranges Black Porcelain (F) Color-C. Porc. (W/B) Yes Frigidaire Baseline Continuous Cast Iron w/Black Matte...


