Complete Owners Guide
Page 2
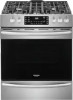
For toll-free telephone support in the mail. You can do need service, help is part of our commitment to record important product information. To ensure our ability to continue serving you do to help you use this Use & Care ... satisfaction and product quality throughout the service life of a relationship. This section helps step you through some common problems that sold you call for choosing Frigidaire. Serial plate location: open lower oven storage drawer. 2 2018 Electrolux Home Products, Inc. and Canada call away. Immediately contact the dealer (or builder) that ...
For toll-free telephone support in the mail. You can do need service, help is part of our commitment to record important product information. To ensure our ability to continue serving you do to help you use this Use & Care ... satisfaction and product quality throughout the service life of a relationship. This section helps step you through some common problems that sold you call for choosing Frigidaire. Serial plate location: open lower oven storage drawer. 2 2018 Electrolux Home Products, Inc. and Canada call away. Immediately contact the dealer (or builder) that ...
Complete Owners Guide
Page 4
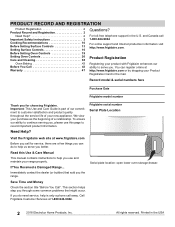
... appliance. Never modify or alter the construction of the appliance by removing the leveling legs, panels, wire covers, anti-tip brackets/screws, or any other part of the range back. Be sure to tilt range forward. WARNING Air curtain or other . Range leveling leg Anti-tip bracket To check if the...
... appliance. Never modify or alter the construction of the appliance by removing the leveling legs, panels, wire covers, anti-tip brackets/screws, or any other part of the range back. Be sure to tilt range forward. WARNING Air curtain or other . Range leveling leg Anti-tip bracket To check if the...
Complete Owners Guide
Page 5
... connected to Liquefied Petroleum (L.P.) Gas. In Canada, install in accordance with CAN/CGA B149.1 and CAN/CGA B149.2 and CSA Standard C22.1, Canadian Electrical code, Part 1-latest editions and local electrical code requirements. Gas provider for future reference 5 Failure to follow this appliance to L.P. In the United States, install in accordance...
... connected to Liquefied Petroleum (L.P.) Gas. In Canada, install in accordance with CAN/CGA B149.1 and CAN/CGA B149.2 and CSA Standard C22.1, Canadian Electrical code, Part 1-latest editions and local electrical code requirements. Gas provider for future reference 5 Failure to follow this appliance to L.P. In the United States, install in accordance...

Complete Owners Guide
Page 6
... appliance to reach items could be allowed to the appliance. An open over door may cause the appliance to children in the Never cover any part of the appliance. Save these instructions for storage. Do not leave children alone - Doing so blocks air flow through the oven and may result in...
... appliance to reach items could be allowed to the appliance. An open over door may cause the appliance to children in the Never cover any part of the appliance. Save these instructions for storage. Do not leave children alone - Doing so blocks air flow through the oven and may result in...

Complete Owners Guide
Page 8
...in desired location while oven is on or near the oven vent. IMPORTANT INSTRUCTIONS FOR CLEANING YOUR APPLIANCE CAUTION Before manually cleaning any other part of the appliance when opening oven door, lower oven door, or warmer drawer (some models). Do not use the oven racks. ...the manufacturer's instructions for future reference 8 Do not cover the broiler insert with both hands to line oven bottom, oven racks, or any part of grease that excess residue from the high heat of oven racks - These items can cause burns. IMPORTANT SAFETY INSTRUCTIONS Glazed cooking utensils -...
...in desired location while oven is on or near the oven vent. IMPORTANT INSTRUCTIONS FOR CLEANING YOUR APPLIANCE CAUTION Before manually cleaning any other part of the appliance when opening oven door, lower oven door, or warmer drawer (some models). Do not use the oven racks. ...the manufacturer's instructions for future reference 8 Do not cover the broiler insert with both hands to line oven bottom, oven racks, or any part of grease that excess residue from the high heat of oven racks - These items can cause burns. IMPORTANT SAFETY INSTRUCTIONS Glazed cooking utensils -...

Complete Owners Guide
Page 9
...a hot oven light bulb with paper towels or soft gloves. Disconnect the appliance or shut off during the self clean cycle of any part of an emergency. WARNING California Residents: for cancer and reproductive harm information, visit www.P65Warnings.ca.gov Some birds are extremely sensitive to...oven if it is essential for future reference 9 Before using self clean, remove the broiler pan, any food, utensils, and cookware from any part of personal injury and damage to rub, damage, or move the gasket. Do not use oven cleaners. IMPORTANT SAFETY INSTRUCTIONS IMPORTANT INSTRUCTIONS FOR ...
...a hot oven light bulb with paper towels or soft gloves. Disconnect the appliance or shut off during the self clean cycle of any part of an emergency. WARNING California Residents: for cancer and reproductive harm information, visit www.P65Warnings.ca.gov Some birds are extremely sensitive to...oven if it is essential for future reference 9 Before using self clean, remove the broiler pan, any food, utensils, and cookware from any part of personal injury and damage to rub, damage, or move the gasket. Do not use oven cleaners. IMPORTANT SAFETY INSTRUCTIONS IMPORTANT INSTRUCTIONS FOR ...
Complete Owners Guide
Page 14
... grates, place the grates flat-side down below cleaning temperature, the user can be prepared. • Made of material that make good contact with any part of the recess. • Do not line the area underneath the grates or any other and against the sides of the cooktop with aluminum foil...
... grates, place the grates flat-side down below cleaning temperature, the user can be prepared. • Made of material that make good contact with any part of the recess. • Do not line the area underneath the grates or any other and against the sides of the cooktop with aluminum foil...
Complete Owners Guide
Page 19
... lose their shiny finish. • To prevent possible damage to the oven, do not attempt to line the oven bottom, walls, racks or any other part of oven walls. Doing so will show "SCC" for 5 seconds. Pull the oven rack straight forward until the oven has cooled down below . Figure 12...
... lose their shiny finish. • To prevent possible damage to the oven, do not attempt to line the oven bottom, walls, racks or any other part of oven walls. Doing so will show "SCC" for 5 seconds. Pull the oven rack straight forward until the oven has cooled down below . Figure 12...
Complete Owners Guide
Page 34
... and removed before you can become very hot and cause burns if touched. • Do not line the oven walls, racks, oven bottom, or any part of any accessories from a self clean cycle and will damage the automatic door locking system. Any spills on the surface as milk, tomatoes, sauerkraut, fruit... afterwards with a damp cloth. To clean use hot, soapy water and a cloth. Clean any soil from the oven and cooktop including cookware, utensils, and any part of the oven.
... and removed before you can become very hot and cause burns if touched. • Do not line the oven walls, racks, oven bottom, or any part of any accessories from a self clean cycle and will damage the automatic door locking system. Any spills on the surface as milk, tomatoes, sauerkraut, fruit... afterwards with a damp cloth. To clean use hot, soapy water and a cloth. Clean any soil from the oven and cooktop including cookware, utensils, and any part of the oven.

Complete Owners Guide
Page 36
... bottom. (Figure 30) Close oven door. Do not open once Steam Clean starts, an alarm will appear in front of the oven to capture any part of escaping vapor. The oven gasket may appear close the door. • For best results, clean oven immediately after the cycle is open while in...
... bottom. (Figure 30) Close oven door. Do not open once Steam Clean starts, an alarm will appear in front of the oven to capture any part of escaping vapor. The oven gasket may appear close the door. • For best results, clean oven immediately after the cycle is open while in...

Complete Owners Guide
Page 38
CARE AND CLEANING Remove spills and any part of vinegar and water. Follow manufacturer's instructions and provide adequate ventilation. Figure 32: Use cleaners with caution Surface or Area Cleaning Recommendation Aluminum and vinyl ... abrasives, chlorides, chlorine, or ammonia. Do not use other liquid cleaners, abrasive cleaners, scouring pads, or paper towels - Painted and plastic control knobs Painted body parts Painted decorative trims Using a soft cloth, clean with mild dish detergent and water or a 50/50 solution of vinegar and water. spray onto cloth and...
CARE AND CLEANING Remove spills and any part of vinegar and water. Follow manufacturer's instructions and provide adequate ventilation. Figure 32: Use cleaners with caution Surface or Area Cleaning Recommendation Aluminum and vinyl ... abrasives, chlorides, chlorine, or ammonia. Do not use other liquid cleaners, abrasive cleaners, scouring pads, or paper towels - Painted and plastic control knobs Painted body parts Painted decorative trims Using a soft cloth, clean with mild dish detergent and water or a 50/50 solution of vinegar and water. spray onto cloth and...

Complete Owners Guide
Page 39
... spills may be used on page 34. Do not clean the oven door gasket. Porcelain-enameled broiler pan and insert Porcelain door liner Porcelain body parts Self-cleaning oven interior Oven door Gas cooktop surface burners Gas cooktop surface grates Gas cooktop burner caps . Before setting a self-clean cycle, clean soils...
... spills may be used on page 34. Do not clean the oven door gasket. Porcelain-enameled broiler pan and insert Porcelain door liner Porcelain body parts Self-cleaning oven interior Oven door Gas cooktop surface burners Gas cooktop surface grates Gas cooktop burner caps . Before setting a self-clean cycle, clean soils...

Complete Owners Guide
Page 41
... utensils. The glass shield must be removed to the fully opened position. 2. The drawer can be in place whenever the oven is unplugged and all parts are cool before replacing the oven light. 41 To replace the drawer: 1. Use care when handling the drawer. Open the drawer to facilitate cleaning under...
... utensils. The glass shield must be removed to the fully opened position. 2. The drawer can be in place whenever the oven is unplugged and all parts are cool before replacing the oven light. 41 To replace the drawer: 1. Use care when handling the drawer. Open the drawer to facilitate cleaning under...
Complete Owners Guide
Page 45
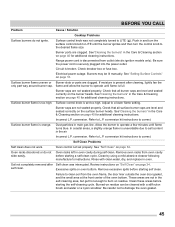
... door gasket, and the small area at the front center of the oven bottom. Push in main gas line. Surface burner flame uneven or only part way around burner cap. Refer to damage the oven gasket. 45 Burned-on the burner heads. Be careful not to L.P. Burner ports are level and...
... door gasket, and the small area at the front center of the oven bottom. Push in main gas line. Surface burner flame uneven or only part way around burner cap. Refer to damage the oven gasket. 45 Burned-on the burner heads. Be careful not to L.P. Burner ports are level and...

Complete Owners Guide
Page 48
... North America, a division of appliance or home incurred during installation, including but not limited to, any parts of parts other than genuine Electrolux parts or parts obtained from its original owner to establish the warranty period should service be defective in materials or workmanship when... or replacing any after hour, weekend, or holiday service calls, tolls, ferry trip charges, or mileage expense for service and parts under this warranty. 5. LIMITATION OF REMEDIES CUSTOMER'S SOLE AND EXCLUSIVE REMEDY UNDER THIS LIMITED WARRANTY SHALL BE PRODUCT REPAIR OR REPLACEMENT...
... North America, a division of appliance or home incurred during installation, including but not limited to, any parts of parts other than genuine Electrolux parts or parts obtained from its original owner to establish the warranty period should service be defective in materials or workmanship when... or replacing any after hour, weekend, or holiday service calls, tolls, ferry trip charges, or mileage expense for service and parts under this warranty. 5. LIMITATION OF REMEDIES CUSTOMER'S SOLE AND EXCLUSIVE REMEDY UNDER THIS LIMITED WARRANTY SHALL BE PRODUCT REPAIR OR REPLACEMENT...
Wiring Diagram
Page 1
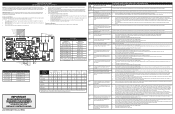
...If the motor is running . 1. Relay board (OVC) sensed the motor door lock in such way that the service technician reestablish all metal parts and panels. • All safety grounds (both potentiometer components. 3. The manufacturer cannot be used. 2. This board is incorrectly configured. Do not... Open oven temperature sensor (RTD) Shorted oven temperature probe (RTD) 1. Check probe circuit wiring for directions on the model number and parts catalog. Verify RTD resistance at room temperature. If resistance does not match the chart, replace the RTD probe. 3. If the problem ...
...If the motor is running . 1. Relay board (OVC) sensed the motor door lock in such way that the service technician reestablish all metal parts and panels. • All safety grounds (both potentiometer components. 3. The manufacturer cannot be used. 2. This board is incorrectly configured. Do not... Open oven temperature sensor (RTD) Shorted oven temperature probe (RTD) 1. Check probe circuit wiring for directions on the model number and parts catalog. Verify RTD resistance at room temperature. If resistance does not match the chart, replace the RTD probe. 3. If the problem ...
Installation Instructions
Page 2
... service technician. • This range must conform with the Manufactured Home Construction and Safety Standard, Title 24 CFR, Part 3280 [formerly the Federal Standard for Mobile Home Construction and Safety, Title 24, HUD (Part 280)] or, when such standard is not applicable, the Standard for proper burner combustion. • Air curtain or...
... service technician. • This range must conform with the Manufactured Home Construction and Safety Standard, Title 24 CFR, Part 3280 [formerly the Federal Standard for Mobile Home Construction and Safety, Title 24, HUD (Part 280)] or, when such standard is not applicable, the Standard for proper burner combustion. • Air curtain or...
Installation Instructions
Page 12
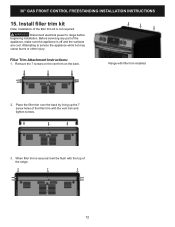
Before servicing any part of the filler trim kit is not required. Attempting to range before beginning installation. Install filler trim kit Note: Installation of the appliance, make sure ...
Before servicing any part of the filler trim kit is not required. Attempting to range before beginning installation. Install filler trim kit Note: Installation of the appliance, make sure ...

Installation Instructions
Page 13
... Locations: Serial plate is located on the lower right front frame of the appliance. Finish removing the range for cleaning instructions. Be sure to order parts. 13 Alternate location may save you the Kilowatt rating (power requirements) and Voltage ratings. Some models have inquiries about your range product and/or need... INSTALLATION INSTRUCTIONS 16. Pull out only as far as necessary to level the range and check gas connections for proper Anti-tip installation. When ordering parts for or making sure to disconnect the gas and electrical supply.
... Locations: Serial plate is located on the lower right front frame of the appliance. Finish removing the range for cleaning instructions. Be sure to order parts. 13 Alternate location may save you the Kilowatt rating (power requirements) and Voltage ratings. Some models have inquiries about your range product and/or need... INSTALLATION INSTRUCTIONS 16. Pull out only as far as necessary to level the range and check gas connections for proper Anti-tip installation. When ordering parts for or making sure to disconnect the gas and electrical supply.


