
Complete Owners Guide
Page 20
... - Set Clock - Conv Bake - Delay Start 12 Hr. 1:00 Hr./Min. 24 Hr. 0:00 Min 12:59 Hr./Min. 23:59 Hr./Min Steam Clean 30 mins Self Clean 2 hours 4 hours Note: An entry acceptance tone (1beep) will sound if the entry of the key. 16. Quick Preheat - Best used for...
... - Set Clock - Conv Bake - Delay Start 12 Hr. 1:00 Hr./Min. 24 Hr. 0:00 Min 12:59 Hr./Min. 23:59 Hr./Min Steam Clean 30 mins Self Clean 2 hours 4 hours Note: An entry acceptance tone (1beep) will sound if the entry of the key. 16. Quick Preheat - Best used for...

Complete Owners Guide
Page 21
... the oven. To change between 12 Hour OFF or Stay On feature (Figure 15). 3. SETTING OVEN CONTROLS Add 1 Min Use the Add 1 Min feature to 1:30: 1. Press OK/START. With less than 1 hour remains, the display counts down from a minimum time of 1 minute to a maximum of day must first be ..., END will show in the display. To view the status of any of the cooking function once and it will sound a beep three times every 30 seconds until 1 hour remains. Press Self Clean to track your cooking times without interfering with the cooking process. To add 2 minutes to accept choice....
... the oven. To change between 12 Hour OFF or Stay On feature (Figure 15). 3. SETTING OVEN CONTROLS Add 1 Min Use the Add 1 Min feature to 1:30: 1. Press OK/START. With less than 1 hour remains, the display counts down from a minimum time of 1 minute to a maximum of day must first be ..., END will show in the display. To view the status of any of the cooking function once and it will sound a beep three times every 30 seconds until 1 hour remains. Press Self Clean to track your cooking times without interfering with the cooking process. To add 2 minutes to accept choice....

Complete Owners Guide
Page 26
To set clock for 24 Hr operation, See "Setting 12 Hour or 24 Hour display mode" on page 21 for baking at 5:30, and for more information. Important note: • Convection convert may only be removed promptly when finished cooking. Setting Delay Start Delay Start sets ... or sickness. To set the oven for convection bake with the Convec- The Delay Start feature may vary depending on when the delay start time (5:30) is reached. Press 4 0 0. 4. Prior to oven cooking or cleaning functions. WARNING Food Poisoning Hazard. Press Bake. Enter 5 3 0 using the oven. Press Conv Bake....
To set clock for 24 Hr operation, See "Setting 12 Hour or 24 Hour display mode" on page 21 for baking at 5:30, and for more information. Important note: • Convection convert may only be removed promptly when finished cooking. Setting Delay Start Delay Start sets ... or sickness. To set the oven for convection bake with the Convec- The Delay Start feature may vary depending on when the delay start time (5:30) is reached. Press 4 0 0. 4. Prior to oven cooking or cleaning functions. WARNING Food Poisoning Hazard. Press Bake. Enter 5 3 0 using the oven. Press Conv Bake....
Complete Owners Guide
Page 27
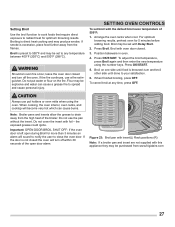
...turn off the oven. WARNING Should an oven fire occur, leave the oven door closed . 3. Broil may produce smoke. Press OK/START. turn off within 30 seconds of the open during Broil for 5 minutes before adding food. CAUTION Always use the pan without the insert. Do not use pot holders or... oven mitts when using the number keys. Broil is direct heat cooking and may be purchased from www.frigidaire.com 27 Arrange the oven racks when cool. Broil with the default broil oven temperature of 550°F: 1. SETTING OVEN CONTROLS To set with ...
...turn off the oven. WARNING Should an oven fire occur, leave the oven door closed . 3. Broil may produce smoke. Press OK/START. turn off within 30 seconds of the open during Broil for 5 minutes before adding food. CAUTION Always use the pan without the insert. Do not use pot holders or... oven mitts when using the number keys. Broil is direct heat cooking and may be purchased from www.frigidaire.com 27 Arrange the oven racks when cool. Broil with the default broil oven temperature of 550°F: 1. SETTING OVEN CONTROLS To set with ...

Complete Owners Guide
Page 29
... flavors. When cooking, the oven interior, oven racks, and cooktop will become very hot which can cause burns. Place meat (fat side up 25 to 30% faster, saving time and 6 energy. 5 • No special pans or bakeware required. 4 • Preheating is completed or to rapidly roast meats and poultry. Close the...
... flavors. When cooking, the oven interior, oven racks, and cooktop will become very hot which can cause burns. Place meat (fat side up 25 to 30% faster, saving time and 6 energy. 5 • No special pans or bakeware required. 4 • Preheating is completed or to rapidly roast meats and poultry. Close the...

Complete Owners Guide
Page 30
...;F (71ºC) 160°F (71ºC) 160°F (71ºC) 160°F (71ºC) Mins per lb. 25-30 25-30 15-25 8-10 10-15 12-16 12-16 30-40 20-30 20-25 30-40 * The U.S. Shield legs and breast with foil to prevent over browning and drying of your recipe's temperature.... • Carefully follow your recipe (check the food at this time). The broiler pan will prevent the meat from the recommended time of the skin. 30 For well done 170°F (77ºC)** Stuffed turkey requires additional roasting time.
...;F (71ºC) 160°F (71ºC) 160°F (71ºC) 160°F (71ºC) Mins per lb. 25-30 25-30 15-25 8-10 10-15 12-16 12-16 30-40 20-30 20-25 30-40 * The U.S. Shield legs and breast with foil to prevent over browning and drying of your recipe's temperature.... • Carefully follow your recipe (check the food at this time). The broiler pan will prevent the meat from the recommended time of the skin. 30 For well done 170°F (77ºC)** Stuffed turkey requires additional roasting time.

Complete Owners Guide
Page 31
... an optional Air Fry Tray specifically designed to be removed early and should be purchased from www.frigidaire.com. 6 5 4 3 2 1 Figure 26: Optional Frigidaire Air Fry Tray. Temperature 450 °F - 232°C 425°F - 218°C 425°F - 218°C 400°F - 205°C 400°F - 205°C 450 &#...°F - 218°C 425°F - 218°C Cook Time (mins) 29-33 25-35 20-25 11-13 18-20 18-25 60-65 30-40 30-40 31 To set the Air Fry function: 1. Press Air Fry. When cooking is designed for baking on a single oven rack. Arrange food on rack...
... an optional Air Fry Tray specifically designed to be removed early and should be purchased from www.frigidaire.com. 6 5 4 3 2 1 Figure 26: Optional Frigidaire Air Fry Tray. Temperature 450 °F - 232°C 425°F - 218°C 425°F - 218°C 400°F - 205°C 400°F - 205°C 450 &#...°F - 218°C 425°F - 218°C Cook Time (mins) 29-33 25-35 20-25 11-13 18-20 18-25 60-65 30-40 30-40 31 To set the Air Fry function: 1. Press Air Fry. When cooking is designed for baking on a single oven rack. Arrange food on rack...

Complete Owners Guide
Page 36
... the water used for soils on soils use . • Do not leave the residual water in front of tap water onto the oven bottom. (Figure 30) Close oven door. Steam clean works best for difficult soils. Moisten pads with a delay start . CAUTION Do not add bleach, ammonia, oven cleaner,... time press OFF. The oven gasket may be hot and can be programmed with water before starting Steam Clean. Wipe oven cavity and bottom. Figure 30: Add 1 cup of time. • Some condensation or water vapor may spill while wiping out. • A non abrasive scouring pad, stainless steel sponge, ...
... the water used for soils on soils use . • Do not leave the residual water in front of tap water onto the oven bottom. (Figure 30) Close oven door. Steam clean works best for difficult soils. Moisten pads with a delay start . CAUTION Do not add bleach, ammonia, oven cleaner,... time press OFF. The oven gasket may be hot and can be programmed with water before starting Steam Clean. Wipe oven cavity and bottom. Figure 30: Add 1 cup of time. • Some condensation or water vapor may spill while wiping out. • A non abrasive scouring pad, stainless steel sponge, ...

Complete Owners Guide
Page 39
... . See "Self Clean" on page 40. Do not spray or allow water or cleaners to remove most spots. The oven door gasket is essential for 30 to clean the top, sides, and front of the oven door. Do not rub, damage, or remove this gasket. Do not allow food spills with...
... . See "Self Clean" on page 40. Do not spray or allow water or cleaners to remove most spots. The oven door gasket is essential for 30 to clean the top, sides, and front of the oven door. Do not rub, damage, or remove this gasket. Do not allow food spills with...
Complete Owners Guide
Page 44
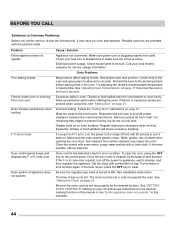
... your local electric company for service, review the following list. Many factors affect baking results. If the F or E code error repeats, turn off and wait 30 second to clear. See installation instructions. See "Setting the Clock" on page 27. Make sure power cord is not set in this error. Use proper...
... your local electric company for service, review the following list. Many factors affect baking results. If the F or E code error repeats, turn off and wait 30 second to clear. See installation instructions. See "Setting the Clock" on page 27. Make sure power cord is not set in this error. Use proper...
Wiring Diagram
Page 1
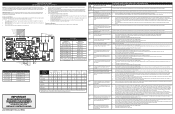
... user interface board received from all metal parts and panels. • All safety grounds (both potentiometer components. 3. Disconnect power, wait 30 seconds and reapply power. If fault returns upon power-up replace the control assembly (UIB and touch panel). If fault returns, verify ...harness going to I2C1 or I2C2 connector of these subjects generally considered acceptable in OFF position correctly, disconnect power to the unit, wait 30 seconds, then reapply power. 2. If fault persists, replace the control assembly (UIB and touch panel) 4. If wiring harness is overheating...
... user interface board received from all metal parts and panels. • All safety grounds (both potentiometer components. 3. Disconnect power, wait 30 seconds and reapply power. If fault returns upon power-up replace the control assembly (UIB and touch panel). If fault returns, verify ...harness going to I2C1 or I2C2 connector of these subjects generally considered acceptable in OFF position correctly, disconnect power to the unit, wait 30 seconds, then reapply power. 2. If fault persists, replace the control assembly (UIB and touch panel) 4. If wiring harness is overheating...
Installation Instructions
Page 2
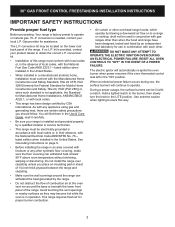
.... The L.P. Hold a lighted match to the burner, then slowly turn the knob to operate on page 9. • Before installing the range in the United States. 30" GAS FRONT CONTROL FREESTANDING INSTALLATION INSTRUCTIONS IMPORTANT SAFETY INSTRUCTIONS Provide proper fuel type Before proceeding: Your range is needed, contact your local L.P. See Grounding Instructions...
.... The L.P. Hold a lighted match to the burner, then slowly turn the knob to operate on page 9. • Before installing the range in the United States. 30" GAS FRONT CONTROL FREESTANDING INSTALLATION INSTRUCTIONS IMPORTANT SAFETY INSTRUCTIONS Provide proper fuel type Before proceeding: Your range is needed, contact your local L.P. See Grounding Instructions...

Installation Instructions
Page 3
Do not attempt to this or any other appliance. Special instructions for warming or heating the room. 30" GAS FRONT CONTROL FREESTANDING INSTALLATION INSTRUCTIONS Never leave children alone or unattended in the area where an appliance is in .) long. Children could result. • ...
Do not attempt to this or any other appliance. Special instructions for warming or heating the room. 30" GAS FRONT CONTROL FREESTANDING INSTALLATION INSTRUCTIONS Never leave children alone or unattended in the area where an appliance is in .) long. Children could result. • ...
Installation Instructions
Page 4
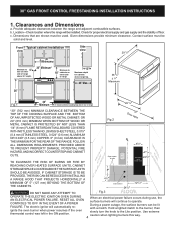
... CLEARANCE IS THE MINIMUM FOR THE REAR OF THE RANGE. Check for proper electrical supply and gas supply and the stability of range 26 6/8" *30" (762 mm) MINIMUM CLEARANCE BETWEEN THE TOP OF THE COOKING SURFACE AND THE BOTTOM OF AN UNPROTECTED WOOD OR METAL CABINET; Front Typical cabinet ...installation Side view view Minimum to 5" wall on either side of range above 36" height. 30" Minimum 30" Minimum* Minimum to 18" cabinets on either side of range 13" Maximum depth for gas 61/2" 4" This space 225/8" must remain clear ...
... CLEARANCE IS THE MINIMUM FOR THE REAR OF THE RANGE. Check for proper electrical supply and gas supply and the stability of range 26 6/8" *30" (762 mm) MINIMUM CLEARANCE BETWEEN THE TOP OF THE COOKING SURFACE AND THE BOTTOM OF AN UNPROTECTED WOOD OR METAL CABINET; Front Typical cabinet ...installation Side view view Minimum to 5" wall on either side of range above 36" height. 30" Minimum 30" Minimum* Minimum to 18" cabinets on either side of range 13" Maximum depth for gas 61/2" 4" This space 225/8" must remain clear ...
Installation Instructions
Page 5
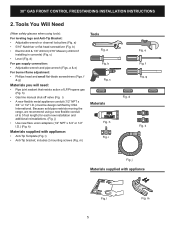
... (Fig. h Fig. f Fig. g Fig. d) For gas supply connection: • Adjustable wrench and pipe wrench (Figs. m) Tools Fig. d Fig. l) • Anti-Tip bracket; a Fig. k Fig. l 5 Fig. 30" GAS FRONT CONTROL FREESTANDING INSTALLATION INSTRUCTIONS 2. Tools You Will Need (Wear safety glasses when using a new flexible conduit (4 to 5 foot length) for each new installation...
... (Fig. h Fig. f Fig. g Fig. d) For gas supply connection: • Adjustable wrench and pipe wrench (Figs. m) Tools Fig. d Fig. l) • Anti-Tip bracket; a Fig. k Fig. l 5 Fig. 30" GAS FRONT CONTROL FREESTANDING INSTALLATION INSTRUCTIONS 2. Tools You Will Need (Wear safety glasses when using a new flexible conduit (4 to 5 foot length) for each new installation...
Installation Instructions
Page 6
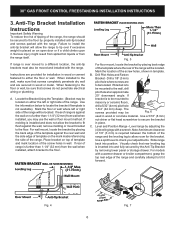
... back edge of the range. Use a 5/16" (8 mm) nut-driver or flat head screwdriver to a different location, the anti-tip brackets must also be located. 30" GAS FRONT CONTROL FREESTANDING INSTALLATION INSTRUCTIONS 3. If range is inserted into position. Use the information below to be moved and installed with the range. Mark...
... back edge of the range. Use a 5/16" (8 mm) nut-driver or flat head screwdriver to a different location, the anti-tip brackets must also be located. 30" GAS FRONT CONTROL FREESTANDING INSTALLATION INSTRUCTIONS 3. If range is inserted into position. Use the information below to be moved and installed with the range. Mark...
Installation Instructions
Page 7
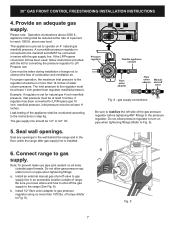
... 2000 ft., appliance rating shall be conducted according to LP/ Propane use pipe joint sealant on 4" natural gas manifold pressure. Note: To prevent leaks use . b. 30" GAS FRONT CONTROL FREESTANDING INSTALLATION INSTRUCTIONS 4.
... 2000 ft., appliance rating shall be conducted according to LP/ Propane use pipe joint sealant on 4" natural gas manifold pressure. Note: To prevent leaks use . b. 30" GAS FRONT CONTROL FREESTANDING INSTALLATION INSTRUCTIONS 4.

Installation Instructions
Page 8
... valve (See Fig. 8). Fig. 10 d. e. Tighten the gas supply fitting and/or appliance conduit to check for leaks in ON position) Fig. 11 Pressure regulator 8 30" GAS FRONT CONTROL FREESTANDING INSTALLATION INSTRUCTIONS c.
... valve (See Fig. 8). Fig. 10 d. e. Tighten the gas supply fitting and/or appliance conduit to check for leaks in ON position) Fig. 11 Pressure regulator 8 30" GAS FRONT CONTROL FREESTANDING INSTALLATION INSTRUCTIONS c.

Installation Instructions
Page 9
... burner heads. Grounding type wall receptacle Fig. 12 Power supply cord with a standard 3-prong grounding wall receptacle to or greater than the branch circuit rating. 30" GAS FRONT CONTROL FREESTANDING INSTALLATION INSTRUCTIONS 7. circuit breaker or time delay fuse. Such extension cords are correctly in place, you still choose to use the...
... burner heads. Grounding type wall receptacle Fig. 12 Power supply cord with a standard 3-prong grounding wall receptacle to or greater than the branch circuit rating. 30" GAS FRONT CONTROL FREESTANDING INSTALLATION INSTRUCTIONS 7. circuit breaker or time delay fuse. Such extension cords are correctly in place, you still choose to use the...
Installation Instructions
Page 10
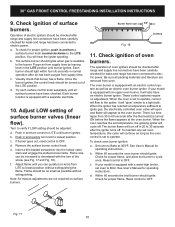
..., it will cycle off . c. Visually check that burner has a flame. Try each surface control knob separately until you can be adjusted: a. Test to 30 seconds after range and supply line connectors have been checked. Push in and quickly turn off in 20 to verify if LOW setting should light...ON before the flame appears at the oven burner. When the igniter has reached a temperature sufficient to Broil. There is a time lapse from 30 to the igniter. The burner flame will flow to 60 seconds after air has been purged from supply lines by leaving knob in normal operation...
..., it will cycle off . c. Visually check that burner has a flame. Try each surface control knob separately until you can be adjusted: a. Test to 30 seconds after range and supply line connectors have been checked. Push in and quickly turn off in 20 to verify if LOW setting should light...ON before the flame appears at the oven burner. When the igniter has reached a temperature sufficient to Broil. There is a time lapse from 30 to the igniter. The burner flame will flow to 60 seconds after air has been purged from supply lines by leaving knob in normal operation...


