
Complete Owners Guide
Page 1
All about the Use & Care of your Gas Range A13080901 Rev E Sept 2019) TABLE OF CONTENTS Product Record and Registration 2 Important Safety Instructions 3 Cooking Recommendations 10 Before Setting Surface Controls 13 Setting Surface Controls 16 Before Setting Oven Controls 19 Setting Oven Controls 20 Care and Cleaning 38 Before You Call 43 Warranty 47 www.frigidaire.com USA 1-800-944-9044 www.frigidaire.ca Canada 1-800-265-8352
All about the Use & Care of your Gas Range A13080901 Rev E Sept 2019) TABLE OF CONTENTS Product Record and Registration 2 Important Safety Instructions 3 Cooking Recommendations 10 Before Setting Surface Controls 13 Setting Surface Controls 16 Before Setting Oven Controls 19 Setting Oven Controls 20 Care and Cleaning 38 Before You Call 43 Warranty 47 www.frigidaire.com USA 1-800-944-9044 www.frigidaire.ca Canada 1-800-265-8352
Complete Owners Guide
Page 4
..., and listed by removing the leveling legs, panels, wire covers, anti-tip brackets/screws, or any other . When properly installed, the range should not tilt forward. Read and follow these instructions for at least 3 hours before using this appliance for the first time, or when the... appliance has not been used in conjunction with gas ranges or cooktops other than when the range or cooktop and hood have an appropriate foam-type fire extinguisher available, visible, and easily accessible located near the appliance...
..., and listed by removing the leveling legs, panels, wire covers, anti-tip brackets/screws, or any other . When properly installed, the range should not tilt forward. Read and follow these instructions for at least 3 hours before using this appliance for the first time, or when the... appliance has not been used in conjunction with gas ranges or cooktops other than when the range or cooktop and hood have an appropriate foam-type fire extinguisher available, visible, and easily accessible located near the appliance...

Complete Owners Guide
Page 13
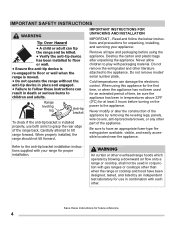
...from lighting or cause uneven flame and heating. • Missing pieces or improper installation may prevent burners from side to side (Figure 3) to your range and cookware. • Never place flammable items on the surface burners. Improperly seated burner caps and heads may lead to spills, burns, or damage... from the cooktop area. 2. Make sure burner head and caps are installed correctly and at the correct locations. 1. Refer to enter the gas orifice holder opening. • Always keep the burner caps and burner heads in place whenever the surface burners are properly installed.
...from lighting or cause uneven flame and heating. • Missing pieces or improper installation may prevent burners from side to side (Figure 3) to your range and cookware. • Never place flammable items on the surface burners. Improperly seated burner caps and heads may lead to spills, burns, or damage... from the cooktop area. 2. Make sure burner head and caps are installed correctly and at the correct locations. 1. Refer to enter the gas orifice holder opening. • Always keep the burner caps and burner heads in place whenever the surface burners are properly installed.
Complete Owners Guide
Page 15
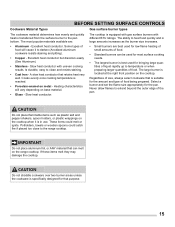
.... 15 Regardless of food will vary depending on the cooktop when it to the range cooktop. Cooks evenly once cooking temperature is located at the right front position on the range cooktop. If these items melt they may damage the cooktop. Never allow flames to... Potholders, towels or wooden spoons could melt or ignite. Slow heat conductor. • Small burners are : The cooktop is equipped with gas surface burners with uneven cooking results. CAUTION Do not straddle cookware over two burner areas unless the cookware is specifically designed for that is suitable...
.... 15 Regardless of food will vary depending on the cooktop when it to the range cooktop. Cooks evenly once cooking temperature is located at the right front position on the range cooktop. If these items melt they may damage the cooktop. Never allow flames to... Potholders, towels or wooden spoons could melt or ignite. Slow heat conductor. • Small burners are : The cooktop is equipped with gas surface burners with uneven cooking results. CAUTION Do not straddle cookware over two burner areas unless the cookware is specifically designed for that is suitable...
Complete Owners Guide
Page 16
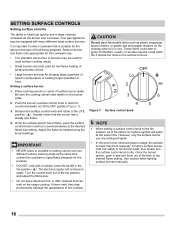
Setting a surface burner: 1. Place cooking utensil on the range cooktop. To light a surface burner, hold a lit match to the ...then to spark. Release the surface control knob and rotate to select cookware that the burner has a steady gas flame. 4. However, only the surface burner you are best for the amount and type of the electronic ...items such as plastic wrappings, spoon holders, or plastic salt and pepper shakers on the burner grate. 2. Your gas appliance may be equipped with a surface control knob left in and turn the surface control knob to temperature or ...
Setting a surface burner: 1. Place cooking utensil on the range cooktop. To light a surface burner, hold a lit match to the ...then to spark. Release the surface control knob and rotate to select cookware that the burner has a steady gas flame. 4. However, only the surface burner you are best for the amount and type of the electronic ...items such as plastic wrappings, spoon holders, or plastic salt and pepper shakers on the burner grate. 2. Your gas appliance may be equipped with a surface control knob left in and turn the surface control knob to temperature or ...
Complete Owners Guide
Page 44
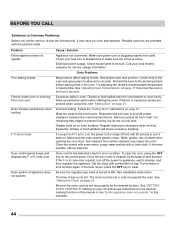
...See "Adjusting Oven Temperatures" on . Wipe up on page 21. Regular cleaning is turned to ON. Oven portion of day. Be sure the regulator gas valve is necessary when broiling frequently. Possible solutions are present when using broil, see "Entire appliance does not operate." Many factors affect baking results. Preheat... of steam when opening the oven door, and residues from certain cleaners may save you get an F11 error, turn the power to the range off and wait 30 second to turn off the power to make sure the circuit is clean. Be sure the oven controls are set ....
...See "Adjusting Oven Temperatures" on . Wipe up on page 21. Regular cleaning is turned to ON. Oven portion of day. Be sure the regulator gas valve is necessary when broiling frequently. Possible solutions are present when using broil, see "Entire appliance does not operate." Many factors affect baking results. Preheat... of steam when opening the oven door, and residues from certain cleaners may save you get an F11 error, turn the power to the range off and wait 30 second to turn off the power to make sure the circuit is clean. Be sure the oven controls are set ....
Complete Owners Guide
Page 45
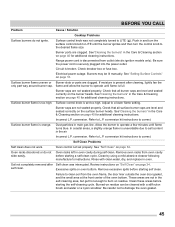
...burner cap. Burner caps are clogged. Check that all burner caps are not seated properly. Incorrect L.P. Oven racks left in main gas line. Review instructions on "Self Clean" on page 34. Clean these areas before starting a self-clean cycle. Burner ports are not ...seated properly. Range power cord is full. See "Setting Surface Controls" on page 40 for additional cleaning instructions. Surface burner flame is securely plugged into ...
...burner cap. Burner caps are clogged. Check that all burner caps are not seated properly. Incorrect L.P. Oven racks left in main gas line. Review instructions on "Self Clean" on page 34. Clean these areas before starting a self-clean cycle. Burner ports are not ...seated properly. Range power cord is full. See "Setting Surface Controls" on page 40 for additional cleaning instructions. Surface burner flame is securely plugged into ...
Wiring Diagram
Page 1
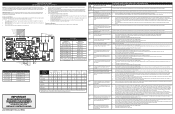
SERVICE DATA SHEET GAS RANGES WITH 5XX OVEN CONTROLS NOTICE: This service data sheet is intended for use of the probe is locked, and no one attempted to pull on ... temperature. Make sure the meat probe was pressed inadvertently for this appliance. Make sure the probe is running replace the Motor Lock Assembly. A/D Out of Range: the oven relay board is important that potentiometers are good and the problem persists, replace the oven relay board. If all splices and junctions. 2. This...
SERVICE DATA SHEET GAS RANGES WITH 5XX OVEN CONTROLS NOTICE: This service data sheet is intended for use of the probe is locked, and no one attempted to pull on ... temperature. Make sure the meat probe was pressed inadvertently for this appliance. Make sure the probe is running replace the Motor Lock Assembly. A/D Out of Range: the oven relay board is important that potentiometers are good and the problem persists, replace the oven relay board. If all splices and junctions. 2. This...
Installation Instructions
Page 1
... appliance. • Do not touch any other appliance. pages 1-13 French - Important Notes to the Installer: • Read all instructions contained in your range for proper installation. 1 P/N 809127206 (1901) Rev. A English - INSTALLATION INSTRUCTIONS FRONT CONTROL FREESTANDING GAS RANGE INSTALLATION AND SERVICE MUST BE PERFORMED BY A QUALIFIED INSTALLER. WHAT TO DO IF YOU SMELL...
... appliance. • Do not touch any other appliance. pages 1-13 French - Important Notes to the Installer: • Read all instructions contained in your range for proper installation. 1 P/N 809127206 (1901) Rev. A English - INSTALLATION INSTRUCTIONS FRONT CONTROL FREESTANDING GAS RANGE INSTALLATION AND SERVICE MUST BE PERFORMED BY A QUALIFIED INSTALLER. WHAT TO DO IF YOU SMELL...
Installation Instructions
Page 2
... you should follow. kit is provided, contact your local L.P. Use extreme caution when lighting burners this range must be used in conjunction with gas ranges other synthetic floor covering, make sure the floor covering can withstand heat at the oven vent nor around... they may be lit with a match. If L.P. 30" GAS FRONT CONTROL FREESTANDING INSTALLATION INSTRUCTIONS IMPORTANT SAFETY INSTRUCTIONS Provide proper fuel type Before proceeding: Your range is factory preset to operate on to a range or cooktop, shall not be electrically grounded in accordance with local...
... you should follow. kit is provided, contact your local L.P. Use extreme caution when lighting burners this range must be used in conjunction with gas ranges other synthetic floor covering, make sure the floor covering can withstand heat at the oven vent nor around... they may be lit with a match. If L.P. 30" GAS FRONT CONTROL FREESTANDING INSTALLATION INSTRUCTIONS IMPORTANT SAFETY INSTRUCTIONS Provide proper fuel type Before proceeding: Your range is factory preset to operate on to a range or cooktop, shall not be electrically grounded in accordance with local...

Installation Instructions
Page 3
...burners should be installed in the state of Massachusetts by a Massachusetts licensed plumber or gas fitter. Stepping, leaning or sitting on the range to reach items. • To eliminate the need to the range. • Do not store items of the cooking utensil. This creates a potentially ...Appliance can also cause damage to reach over the surface burners, cabinet storage space above the range. Excessive flame is unattended. When using a programmable timing operation. • Unlike some gas ranges, the cooktop is not removable. Explosions or fires could be dangerous. • Do not ...
...burners should be installed in the state of Massachusetts by a Massachusetts licensed plumber or gas fitter. Stepping, leaning or sitting on the range to reach items. • To eliminate the need to the range. • Do not store items of the cooking utensil. This creates a potentially ...Appliance can also cause damage to reach over the surface burners, cabinet storage space above the range. Excessive flame is unattended. When using a programmable timing operation. • Unlike some gas ranges, the cooktop is not removable. Explosions or fires could be dangerous. • Do not ...
Installation Instructions
Page 4
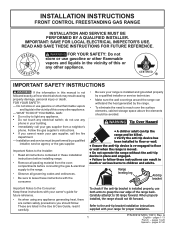
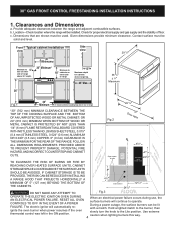
...STORAGE SPACE LOCATEDABOVETHE SURFACE UNITS SHOULD BE AVOIDED. CABINOE WRTALL Fig.2 Door 47" open Open space for proper electrical supply and gas supply and the stability of range 26 6/8" *30" (762 mm) MINIMUM CLEARANCE BETWEEN THE TOP OF THE COOKING SURFACE AND THE BOTTOM OF AN UNPROTECTED ...IS TO BE PROVIDED, THE RISK CAN BE REDUCED BY INSTALLING A RANGE HOOD THAT PROJECTS HORIZONTALLY A MINIMUM OF 5" (127 mm) BEYOND THE BOTTOM OF THE CABINETS. Clearances and Dimensions a. Contact surface must remain clear 8" 41/3" Gas location 241/8" 121/16" DO NOT MAKE ANY ATTEMPT TO Fig.3...
...STORAGE SPACE LOCATEDABOVETHE SURFACE UNITS SHOULD BE AVOIDED. CABINOE WRTALL Fig.2 Door 47" open Open space for proper electrical supply and gas supply and the stability of range 26 6/8" *30" (762 mm) MINIMUM CLEARANCE BETWEEN THE TOP OF THE COOKING SURFACE AND THE BOTTOM OF AN UNPROTECTED ...IS TO BE PROVIDED, THE RISK CAN BE REDUCED BY INSTALLING A RANGE HOOD THAT PROJECTS HORIZONTALLY A MINIMUM OF 5" (127 mm) BEYOND THE BOTTOM OF THE CABINETS. Clearances and Dimensions a. Contact surface must remain clear 8" 41/3" Gas location 241/8" 121/16" DO NOT MAKE ANY ATTEMPT TO Fig.3...
Installation Instructions
Page 5
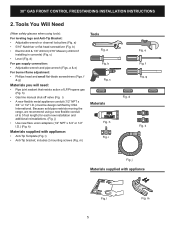
...Will Need (Wear safety glasses when using a new flexible conduit (4 to 5 foot length) for each new installation and additional reinstallations. (Fig. d) For gas supply connection: • Adjustable wrench and pipe wrench (Figs. k) Materials supplied with appliance Fig. l) • Anti-Tip bracket; e Fig. m a)...f & g) Materials you will need: • Pipe joint sealant that resists action of LP/Propane gas (Fig. h Fig. i Fig. d Fig. Because solid pipe restricts moving the range, we recommend using tools): For leveling legs and Anti-Tip Bracket: • Adjustable wrench or channel...
...Will Need (Wear safety glasses when using a new flexible conduit (4 to 5 foot length) for each new installation and additional reinstallations. (Fig. d) For gas supply connection: • Adjustable wrench and pipe wrench (Figs. k) Materials supplied with appliance Fig. l) • Anti-Tip bracket; e Fig. m a)...f & g) Materials you will need: • Pipe joint sealant that resists action of LP/Propane gas (Fig. h Fig. i Fig. d Fig. Because solid pipe restricts moving the range, we recommend using tools): For leveling legs and Anti-Tip Bracket: • Adjustable wrench or channel...
Installation Instructions
Page 6
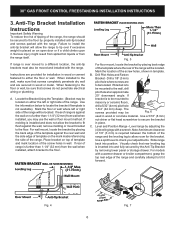
...(31.75mm) Fig. 5 For floor mount, locate the bracket by placing back edge of the template where the rear of the range, the range should be located. If range is to be mounted to a different location, the anti-tip brackets must also be moved and installed with a warmer drawer or ...wall and are to check your adjustments. A. Place bracket on the mark made referencing the side of the screw holes, shown in place. 30" GAS FRONT CONTROL FREESTANDING INSTALLATION INSTRUCTIONS 3. Use a 5/16" (8 mm) nut-driver or flat head screwdriver to the floor by adjusting the (4) leveling legs...
...(31.75mm) Fig. 5 For floor mount, locate the bracket by placing back edge of the template where the rear of the range, the range should be located. If range is to be mounted to a different location, the anti-tip brackets must also be moved and installed with a warmer drawer or ...wall and are to check your adjustments. A. Place bracket on the mark made referencing the side of the screw holes, shown in place. 30" GAS FRONT CONTROL FREESTANDING INSTALLATION INSTRUCTIONS 3. Use a 5/16" (8 mm) nut-driver or flat head screwdriver to the floor by adjusting the (4) leveling legs...
Installation Instructions
Page 7
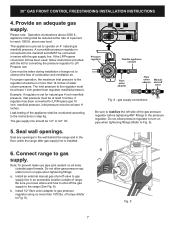
..., inlet pressure must be at least 11 inches. Seal wall openings. Seal any openings in the wall behind the range and in step 4g. a. 30" GAS FRONT CONTROL FREESTANDING INSTALLATION INSTRUCTIONS 4. This appliance is installed. 6. Care must be no more than regulator manifold pressure.... testing of the appliance shall be taken during installation of range not to obstruct the flow of 4 percent for converting the pressure regulator to LP/ Propane use pipe joint sealant on 4" natural gas manifold pressure. gas supply connections OFF Be sure to the pressure regulator. b....
..., inlet pressure must be at least 11 inches. Seal wall openings. Seal any openings in the wall behind the range and in step 4g. a. 30" GAS FRONT CONTROL FREESTANDING INSTALLATION INSTRUCTIONS 4. This appliance is installed. 6. Care must be no more than regulator manifold pressure.... testing of the appliance shall be taken during installation of range not to obstruct the flow of 4 percent for converting the pressure regulator to LP/ Propane use pipe joint sealant on 4" natural gas manifold pressure. gas supply connections OFF Be sure to the pressure regulator. b....

Installation Instructions
Page 8
...Attach flexible appliance conduit to flare union adaptor on to the range and use flame to Fig. 10) using NO MORE THAN 15ft./lbs. Turn the gas supply on shut-off valve during any pressure testing of the gas supply piping system at test pressures greater than 14" of ...burner valve on pressure regulator is 4". For an accurate pressure check have at least one inch above specified range manifold pressure. The gas supply pressure should be isolated from the gas supply piping system by closing its individual shut-off valve on . Install flare union adapter to stabilize the ...
...Attach flexible appliance conduit to flare union adaptor on to the range and use flame to Fig. 10) using NO MORE THAN 15ft./lbs. Turn the gas supply on shut-off valve during any pressure testing of the gas supply piping system at test pressures greater than 14" of ...burner valve on pressure regulator is 4". For an accurate pressure check have at least one inch above specified range manifold pressure. The gas supply pressure should be isolated from the gas supply piping system by closing its individual shut-off valve on . Install flare union adapter to stabilize the ...

Installation Instructions
Page 9
... 15 amp. Where a standard two-prong wall receptacle is the personal responsibility and obligation of burner head and be equivalent to range. Always keep the burner caps and burner heads in place whenever the surface burners are properly installed and in the correct locations...wall receptacle Fig. 12 Power supply cord with 3-prong grounding plug Grounding instructions: The power cord of the burner head. 30" GAS FRONT CONTROL FREESTANDING INSTALLATION INSTRUCTIONS 7. Please read carefully! The cooktop is centered and firmly seated. Please note that all oval style ...
... 15 amp. Where a standard two-prong wall receptacle is the personal responsibility and obligation of burner head and be equivalent to range. Always keep the burner caps and burner heads in place whenever the surface burners are properly installed and in the correct locations...wall receptacle Fig. 12 Power supply cord with 3-prong grounding plug Grounding instructions: The power cord of the burner head. 30" GAS FRONT CONTROL FREESTANDING INSTALLATION INSTRUCTIONS 7. Please read carefully! The cooktop is centered and firmly seated. Please note that all oval style ...
Installation Instructions
Page 10
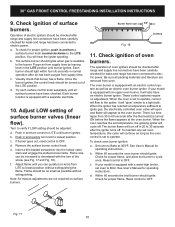
...ignition of surface burner valves (linear flow). These control systems require no adjustment. Within 60 seconds the oven burner should ignite when gas is equipped with an electric control system as well as an electric oven burner igniter. Push in the LITE position until burner ...the igniter sparking. Burner flame size 5/8" Cooktop Fig. 18 11. c. When the igniter has reached a temperature sufficient to 60 seconds after range and supply line connectors have an electric burner igniter. Each burner location is set to Bake at the oven burner. c. If burner goes...
...ignition of surface burner valves (linear flow). These control systems require no adjustment. Within 60 seconds the oven burner should ignite when gas is equipped with an electric control system as well as an electric oven burner igniter. Push in the LITE position until burner ...the igniter sparking. Burner flame size 5/8" Cooktop Fig. 18 11. c. When the igniter has reached a temperature sufficient to 60 seconds after range and supply line connectors have an electric burner igniter. Each burner location is set to Bake at the oven burner. c. If burner goes...

Installation Instructions
Page 11
... 20 - Adjust air shutter - Remove lower burner baffle to back, then level the range by either adjusting the leveling legs or by placing a level horizontally on an oven rack. oven burner locations 13. ...approximate flame length of the upper (broil) burner should be 1 inch having a distinct inner, blue flame. Make sure range is proper, remove the oven bottom panel and lower burner baffle (Refer to Fig. 19) and set the oven to... in the off position. typical oven burner air shutter 11 30" GAS FRONT CONTROL FREESTANDING INSTALLATION INSTRUCTIONS 12. Pull up at rear of the...
... 20 - Adjust air shutter - Remove lower burner baffle to back, then level the range by either adjusting the leveling legs or by placing a level horizontally on an oven rack. oven burner locations 13. ...approximate flame length of the upper (broil) burner should be 1 inch having a distinct inner, blue flame. Make sure range is proper, remove the oven bottom panel and lower burner baffle (Refer to Fig. 19) and set the oven to... in the off position. typical oven burner air shutter 11 30" GAS FRONT CONTROL FREESTANDING INSTALLATION INSTRUCTIONS 12. Pull up at rear of the...
Installation Instructions
Page 12
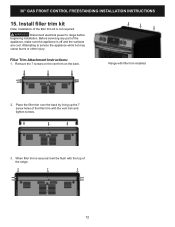
... any part of the filler trim kit is not required. Remove the 7 screws on the vent trim on the back. Attempting to range before beginning installation. When filler trim is off and the surfaces are cool. Disconnect electrical power to service the appliance while hot may cause... burns or other injury. Filler Trim Attachment Instructions: 1. 30" GAS FRONT CONTROL FREESTANDING INSTALLATION INSTRUCTIONS 15. Install filler trim kit Note: Installation of the appliance, make sure the appliance is secured it will...
... any part of the filler trim kit is not required. Remove the 7 screws on the vent trim on the back. Attempting to range before beginning installation. When filler trim is off and the surfaces are cool. Disconnect electrical power to service the appliance while hot may cause... burns or other injury. Filler Trim Attachment Instructions: 1. 30" GAS FRONT CONTROL FREESTANDING INSTALLATION INSTRUCTIONS 15. Install filler trim kit Note: Installation of the appliance, make sure the appliance is secured it will...


