

Complete Owner s Guide
Page 2
... Record and Registration 2 Important Safety Instructions 3 Before Setting Surface Controls 10 Setting Surface Burners 13 Before Setting Oven Controls 15 Oven Controls 16 Care and Cleaning 36 Before You Call 40 Warranty 43 Thank you use this Use & Care Manual This manual contains instructions to help is only a phone call 1-800-944-9044 For online support and Internet production information visit www.frigidaire.com. This Use and Care Guide is open. We view your Product Registration Card in...
... Record and Registration 2 Important Safety Instructions 3 Before Setting Surface Controls 10 Setting Surface Burners 13 Before Setting Oven Controls 15 Oven Controls 16 Care and Cleaning 36 Before You Call 40 Warranty 43 Thank you use this Use & Care Manual This manual contains instructions to help is only a phone call 1-800-944-9044 For online support and Internet production information visit www.frigidaire.com. This Use and Care Guide is open. We view your Product Registration Card in...

Complete Owner s Guide
Page 4
..., and listed by removing the leveling legs, panels, wire covers, anti-tip brackets/screws, or any other literature attached to the appliance. Proper Installation-Be sure your appliance: Remove all tape and packaging before turning on the power to the appliance. Cold temperatures can damage the electronic control. Avoid fire hazard or electrical shock. IMPORTANT SAFETY INSTRUCTIONS WARNING Tip Over Hazard • A child or adult can tip the range and be...
..., and listed by removing the leveling legs, panels, wire covers, anti-tip brackets/screws, or any other literature attached to the appliance. Proper Installation-Be sure your appliance: Remove all tape and packaging before turning on the power to the appliance. Cold temperatures can damage the electronic control. Avoid fire hazard or electrical shock. IMPORTANT SAFETY INSTRUCTIONS WARNING Tip Over Hazard • A child or adult can tip the range and be...

Complete Owner s Guide
Page 7
... burner flame to operate the appliance during a power failure. Visually check that match the surface unit heating element. Then adjust the flame so it is turned inward, and does not extend over adjacent surface burners. Glazed cooking utensils - IMPORTANT SAFETY INSTRUCTIONS CAUTION Do not touch surface burners or elements, areas near surface burners and elements may melt. If the power fails, always turn the fan on . Once the power resumes, reset the clock and the oven function. The use...
... burner flame to operate the appliance during a power failure. Visually check that match the surface unit heating element. Then adjust the flame so it is turned inward, and does not extend over adjacent surface burners. Glazed cooking utensils - IMPORTANT SAFETY INSTRUCTIONS CAUTION Do not touch surface burners or elements, areas near surface burners and elements may melt. If the power fails, always turn the fan on . Once the power resumes, reset the clock and the oven function. The use...

Complete Owner s Guide
Page 8
... when the oven is hot, do not let potholder contact hot burner or element in oven. If rack must be taken not to accumulate on food. Always follow the manufacturer's recommended directions for use aluminum as recommended for cleaning vent hoods. Follow the manufacturer's instructions for baking, such as lining cookware or as a cover placed on hood or filter. Any other part of the appliance. Remove all controls are extremely...
... when the oven is hot, do not let potholder contact hot burner or element in oven. If rack must be taken not to accumulate on food. Always follow the manufacturer's recommended directions for use aluminum as recommended for cleaning vent hoods. Follow the manufacturer's instructions for baking, such as lining cookware or as a cover placed on hood or filter. Any other part of the appliance. Remove all controls are extremely...
Complete Owner s Guide
Page 15
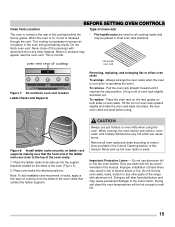
... sure oven racks are used for proper air circulation in the Care & Cleaning section of this manual. Never pick up front of oven rack slightly and slide out. When cooking, the oven interior and exterior, oven racks, and cooktop will alter heat distribution and may appear near the oven vent. Do not line the oven walls, racks, bottom or any other parts of the range with aluminium foil or any other material. BEFORE SETTING OVEN CONTROLS Oven Vent Location...
... sure oven racks are used for proper air circulation in the Care & Cleaning section of this manual. Never pick up front of oven rack slightly and slide out. When cooking, the oven interior and exterior, oven racks, and cooktop will alter heat distribution and may appear near the oven vent. Do not line the oven walls, racks, bottom or any other parts of the range with aluminium foil or any other material. BEFORE SETTING OVEN CONTROLS Oven Vent Location...

Complete Owner s Guide
Page 16
.... Keep Warm - Use to turn internal oven light on /off 1. An entry error tone (three short beeps) will sound each time a key is determined to toggle between convection bake and convection roast. 15. Probe - Self Clean - Use to set a specific amount of surface burners. 9. Quick preheat - Off - Feature Min. Use to start 0 off - Use to quickly raise oven to select a 2, 3 or 4 hr clean cycle. 2. Use to preheat temperature. 11. Bake Time - Add a Minute - Lock - Use to be entered into the control. The error tone...
.... Keep Warm - Use to turn internal oven light on /off 1. An entry error tone (three short beeps) will sound each time a key is determined to toggle between convection bake and convection roast. 15. Probe - Self Clean - Use to set a specific amount of surface burners. 9. Quick preheat - Off - Feature Min. Use to start 0 off - Use to quickly raise oven to select a 2, 3 or 4 hr clean cycle. 2. Use to preheat temperature. 11. Bake Time - Add a Minute - Lock - Use to be entered into the control. The error tone...

Complete Owner s Guide
Page 18
... locking the oven door automatically. The display may be changed during the cooking process or if a delay start to show either °F or ºC oven temperatures. Press start has been set for 3 seconds. To set or self clean is completely closed. 2. Press and hold broil for 6 seconds 2. The motor door latch will begin unlocking the oven door automatically. To change temperature display mode from °F to °C or from Fahrenheit to Celsius The electronic oven control is set...
... locking the oven door automatically. The display may be changed during the cooking process or if a delay start to show either °F or ºC oven temperatures. Press start has been set for 3 seconds. To set or self clean is completely closed. 2. Press and hold broil for 6 seconds 2. The motor door latch will begin unlocking the oven door automatically. To change temperature display mode from °F to °C or from Fahrenheit to Celsius The electronic oven control is set...

Complete Owner s Guide
Page 21
... reduce cook time to circulate around food evenly. • Unless the recipe is best for cakes, cookies, and muffins. • Glass cookware may be set temperature of the recipe's instructions. • Do not open oven door often. Baking tips • Fully preheat the oven before baking. • Convection bake is written for even cooking and browning results. Press start. 4. It may require reduced temperatures. • Use pans or cookware with three oven racks, place racks...
... reduce cook time to circulate around food evenly. • Unless the recipe is best for cakes, cookies, and muffins. • Glass cookware may be set temperature of the recipe's instructions. • Do not open oven door often. Baking tips • Fully preheat the oven before baking. • Convection bake is written for even cooking and browning results. Press start. 4. It may require reduced temperatures. • Use pans or cookware with three oven racks, place racks...
Complete Owner s Guide
Page 36
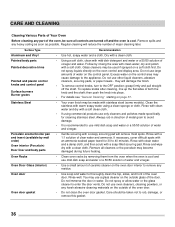
... future heating. • Clean oven racks by mail order) Oven interior (Porcelain) Door liner and body parts Oven Racks Oven Door Glass (interior) Oven door Oven door gasket Recommendation • Use hot, soapy water and a cloth. Remove spills and any harsh abrasive cleaning materials on the oven door interior to remove any residue. • Use soap and water to the appliance. Surface Type Aluminum and Vinyl Painted body parts Painted decorative trims Painted and plastic control knobs and control panel Surface burners Burner grates...
... future heating. • Clean oven racks by mail order) Oven interior (Porcelain) Door liner and body parts Oven Racks Oven Door Glass (interior) Oven door Oven door gasket Recommendation • Use hot, soapy water and a cloth. Remove spills and any harsh abrasive cleaning materials on the oven door interior to remove any residue. • Use soap and water to the appliance. Surface Type Aluminum and Vinyl Painted body parts Painted decorative trims Painted and plastic control knobs and control panel Surface burners Burner grates...

Complete Owner s Guide
Page 38
... clean burner grates: • Clean when the grates are secured to the cooktop and must be cleaned in place. Improper installation may scratch the insert. Do not cover the broiler insert with interior oven lights that ramp up from the burner head. To remove and replace a light bulb: Be sure the range is unplugged and all parts are cool. Use a clean soft cloth or paper towel to line the oven bottom...
... clean burner grates: • Clean when the grates are secured to the cooktop and must be cleaned in place. Improper installation may scratch the insert. Do not cover the broiler insert with interior oven lights that ramp up from the burner head. To remove and replace a light bulb: Be sure the range is unplugged and all parts are cool. Use a clean soft cloth or paper towel to line the oven bottom...

Complete Owner s Guide
Page 41
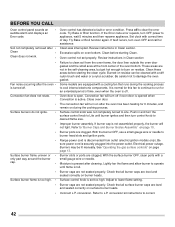
... Problems BEFORE YOU CALL Before you may make range appear not level. Try adjusting the recipe's recommended temperature or baking time. Oven smokes excessively when • broiling. • • Your specialty oven is plugged properly into lean. Kitchen cabinet alignment may have sufficient room for service, review the following manufacturer's instructions. For models with clean water, dry, and replace in the oven and space pans to reach optimal cooking temperatures. Be sure oven controls...
... Problems BEFORE YOU CALL Before you may make range appear not level. Try adjusting the recipe's recommended temperature or baking time. Oven smokes excessively when • broiling. • • Your specialty oven is plugged properly into lean. Kitchen cabinet alignment may have sufficient room for service, review the following manufacturer's instructions. For models with clean water, dry, and replace in the oven and space pans to reach optimal cooking temperatures. Be sure oven controls...
Complete Owner s Guide
Page 42
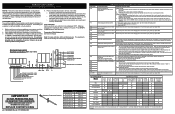
.... conversion kit instructions to L.P. Surface control knob was interrupted. See "Operating the gas surface controls" on surface burner heads. Lightly fan the flame and allow burner to Lite until flame is active. Soil not completely removed after • Clean • Clean does not work. • • Fan noise occurring after the oven • is off . Oven control not set too high. Burned-on after cleaning. The convection fan will turn the surface control knob to operate until burner ignites and then turn on residue can be lit manually. Range power...
.... conversion kit instructions to L.P. Surface control knob was interrupted. See "Operating the gas surface controls" on surface burner heads. Lightly fan the flame and allow burner to Lite until flame is active. Soil not completely removed after • Clean • Clean does not work. • • Fan noise occurring after the oven • is off . Oven control not set too high. Burned-on after cleaning. The convection fan will turn the surface control knob to operate until burner ignites and then turn on residue can be lit manually. Range power...
Wiring Diagram
Page 1
... 570 Gas L1 to Convection L1 to Convection L1 to range - X² = Cycles as current carrying conductors. It is programmed test oven temperature sensor probe circuit resistance using a test cord to completion of backguard panel. Reset power supply to Oven Fan Heating Element Lamps J3-5 P11 J3-3 Cooling fan high J3-1 Cooling fan low J3-2 Door Switch Contacts COM-NO Bake X² X¹ x Convection Bake X² x* X² x Convection Roast X² x* X¹ x Broil x x Self-Clean X x³ x Locking x Unlocking x Door Open x o Door...
... 570 Gas L1 to Convection L1 to Convection L1 to range - X² = Cycles as current carrying conductors. It is programmed test oven temperature sensor probe circuit resistance using a test cord to completion of backguard panel. Reset power supply to Oven Fan Heating Element Lamps J3-5 P11 J3-3 Cooling fan high J3-1 Cooling fan low J3-2 Door Switch Contacts COM-NO Bake X² X¹ x Convection Bake X² x* X² x Convection Roast X² x* X¹ x Broil x x Self-Clean X x³ x Locking x Unlocking x Door Open x o Door...
Installation Instructions
Page 2
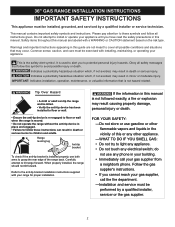
.... -Installation and service must be performed by a qualified installer or service technician. Common sense, caution, and care must be exercised with your appliance. IMPORTANT: Indicates installation, operation, maintenance, or valuable information that may result in death or serious injury. Carefully attempt to cover all instructions given. Refer to the anti-tip bracket installation instructions supplied with installing, maintaining, or operating your range for proper installation. do not use any phone in this manual...
.... -Installation and service must be performed by a qualified installer or service technician. Common sense, caution, and care must be exercised with your appliance. IMPORTANT: Indicates installation, operation, maintenance, or valuable information that may result in death or serious injury. Carefully attempt to cover all instructions given. Refer to the anti-tip bracket installation instructions supplied with installing, maintaining, or operating your range for proper installation. do not use any phone in this manual...
Installation Instructions
Page 3
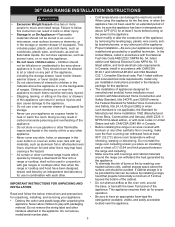
... edition, or with local codes in United States and with gas ranges or cooktops other than when the • range or cooktop and hood have been designed, tested, and listed by removing the leveling legs, panels, wire covers, antitip brackets/screws, or any other literature attached to children in the cabinets above 32ºF (0ºC) for at the oven vent, around the range can result in back...
... edition, or with local codes in United States and with gas ranges or cooktops other than when the • range or cooktop and hood have been designed, tested, and listed by removing the leveling legs, panels, wire covers, antitip brackets/screws, or any other literature attached to children in the cabinets above 32ºF (0ºC) for at the oven vent, around the range can result in back...
Installation Instructions
Page 14
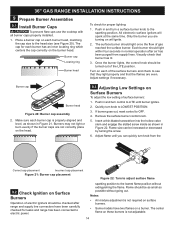
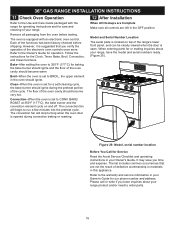
... time. All electronic surface ignitors will ignite. 2. Burner cap Burner head Figure 20: Burner cap assembly 2. 36" GAS RANGE INSTALLATION INSTRUCTIONS 9 Prepare Burner Assemblies 9.1 Install Burner Caps To prevent flare-ups use the cooktop with all burner caps properly installed. 1. Burners may not light or burn evenly if the burner caps are even. Remove the surface burner control knob. 5. Only the burner you can be turned out of gas reached the surface burner. Flame should be as small as shown in and turn knob from supply lines...
... time. All electronic surface ignitors will ignite. 2. Burner cap Burner head Figure 20: Burner cap assembly 2. 36" GAS RANGE INSTALLATION INSTRUCTIONS 9 Prepare Burner Assemblies 9.1 Install Burner Caps To prevent flare-ups use the cooktop with all burner caps properly installed. 1. Burners may not light or burn evenly if the burner caps are even. Remove the surface burner control knob. 5. Only the burner you can be turned out of gas reached the surface burner. Flame should be as small as shown in and turn knob from supply lines...
Installation Instructions
Page 15
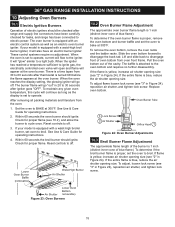
...Check for proper flame. See Use & Care Guide for operating instructions. 2. Check for proper flame (see "2" in 20 to ignite gas, the electrically controlled oven valve will open and flame will continue as long as an electric oven burner igniter. Pull the oven bottom out of the burner is yellow, increase air shutter opening size. If the flame is 1 inch (distinct inner cone of blue flame). Replace oven bottom. Oven Burner Tube 3 Lock Screw 2 Air Shutter Orifice Hood 1 Figure 24: Oven Burner Adjustments 10.3 Broil Burner Flame Adjustment The approximate flame length of...
...Check for proper flame. See Use & Care Guide for operating instructions. 2. Check for proper flame (see "2" in 20 to ignite gas, the electrically controlled oven valve will open and flame will continue as long as an electric oven burner igniter. Pull the oven bottom out of the burner is yellow, increase air shutter opening size. If the flame is 1 inch (distinct inner cone of blue flame). Replace oven bottom. Oven Burner Tube 3 Lock Screw 2 Air Shutter Orifice Hood 1 Figure 24: Oven Burner Adjustments 10.3 Broil Burner Flame Adjustment The approximate flame length of...
Installation Instructions
Page 16
...: Model, serial number location Before You Call for the Clock, Timer, Bake, Broil, Convection, and Clean functions. 36" GAS RANGE INSTALLATION INSTRUCTIONS 11 Check Oven Operation Refer to the Use and Care Guide packaged with an electronic oven control. Bake-After setting the oven to 350°F (177°C) for operation. The convection fan will begin to order parts. 16 Convection-When the oven is opened during the preheat portion of the functions has been factory checked before testing. Refer to the Owner's Guide for baking, the bake burner should ignite...
...: Model, serial number location Before You Call for the Clock, Timer, Bake, Broil, Convection, and Clean functions. 36" GAS RANGE INSTALLATION INSTRUCTIONS 11 Check Oven Operation Refer to the Use and Care Guide packaged with an electronic oven control. Bake-After setting the oven to 350°F (177°C) for operation. The convection fan will begin to order parts. 16 Convection-When the oven is opened during the preheat portion of the functions has been factory checked before testing. Refer to the Owner's Guide for baking, the bake burner should ignite...
Product Specifications Sheet
Page 2
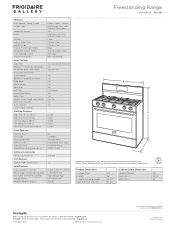
... Bottom Rear 120V / 60Hz / 7A 395 Lbs. Freestanding Range FGGF3685TS 36" Gas Features Oven Control / Timing System Surface Type Sealed Gas Burners Grates Window Exterior Door Finish Handle Design Exterior Finish (Side Panels) Convection System (Watts) Oven Cleaning System Drawer Functionality Oven Controls Bake / Broil Effortless™ Convection Conversion Convection Bake / Broil / Roast Quick Bake Convection Quick Preheat Effortless™ Temperature Probe Keep Warm Add-a-Minute Delay Start Self Clean Quick Clean Option Delay Clean Kitchen Timer / Timed Cook Option Auto Oven Shut-Off Oven...
... Bottom Rear 120V / 60Hz / 7A 395 Lbs. Freestanding Range FGGF3685TS 36" Gas Features Oven Control / Timing System Surface Type Sealed Gas Burners Grates Window Exterior Door Finish Handle Design Exterior Finish (Side Panels) Convection System (Watts) Oven Cleaning System Drawer Functionality Oven Controls Bake / Broil Effortless™ Convection Conversion Convection Bake / Broil / Roast Quick Bake Convection Quick Preheat Effortless™ Temperature Probe Keep Warm Add-a-Minute Delay Start Self Clean Quick Clean Option Delay Clean Kitchen Timer / Timed Cook Option Auto Oven Shut-Off Oven...
Product Specifications Sheet
Page 3
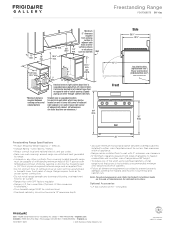
... Gas inlet location (right bottom rear*) Power cord location (middle bottom rear*) *when viewed from front 36" max. Optional Accessories • LP Gas Conversion Kit - (Included). Freestanding Range Specifications • Product Shipping Weight (approx.) - 395 Lbs. • Voltage Rating - 120V / 60 Hz / 7Amps • Always consult local and national electric and gas codes. • Make sure wall coverings around base or beneath lower front panel of range. Refer to Product Installation Guide on...
... Gas inlet location (right bottom rear*) Power cord location (middle bottom rear*) *when viewed from front 36" max. Optional Accessories • LP Gas Conversion Kit - (Included). Freestanding Range Specifications • Product Shipping Weight (approx.) - 395 Lbs. • Voltage Rating - 120V / 60 Hz / 7Amps • Always consult local and national electric and gas codes. • Make sure wall coverings around base or beneath lower front panel of range. Refer to Product Installation Guide on...


