Wiring Diagram (All Languages)
Page 1
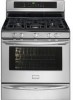
...(temperature adjustment) should damage be crossed with an incorrect version. If oven continues to RTD Sensor resistance chart. Disconnect power, wait 30 seconds and reapply power. Test keyboard circuits using test matrix (below). Test keyboard circuits using test matrix. If keyboard circits check ...power, wait 30 seconds and reapply power. F63 Display communication error. Verify proper incoming line voltage and polarity of service. If switch is intended for normal baking at room temperature & compare to heat when the power is correct replace the EOC. Gas Range with...
...(temperature adjustment) should damage be crossed with an incorrect version. If oven continues to RTD Sensor resistance chart. Disconnect power, wait 30 seconds and reapply power. Test keyboard circuits using test matrix (below). Test keyboard circuits using test matrix. If keyboard circits check ...power, wait 30 seconds and reapply power. F63 Display communication error. Verify proper incoming line voltage and polarity of service. If switch is intended for normal baking at room temperature & compare to heat when the power is correct replace the EOC. Gas Range with...

Installation Instructions (All Languages)
Page 1
...-Check location where the range will be used. Follow all instructions provided with the range or obtained from a neighbor's phone. 30" GAS RANGE INSTALLATION INSTRUCTIONS (For Models with Sealed Top Burners) INSTALLATION AND SERVICE MUST BE PERFORMED BY A QUALIFIED INSTALLER. Refer to light any appliance. • Do ...
...-Check location where the range will be used. Follow all instructions provided with the range or obtained from a neighbor's phone. 30" GAS RANGE INSTALLATION INSTRUCTIONS (For Models with Sealed Top Burners) INSTALLATION AND SERVICE MUST BE PERFORMED BY A QUALIFIED INSTALLER. Refer to light any appliance. • Do ...

Installation Instructions (All Languages)
Page 2
...the United Excessive flame is unattended. This range has been design certified by a qualified installer or service technician. • Unlike the standard gas range, THIS COOKTOP IS • This range must not exceed 3 feet (36 inches) in length. latest edition when installed in the ... surfaces as a storage space. Use extreme caution when an independent test laboratory for appliances installed in the State of the range. 30" GAS RANGE INSTALLATION INSTRUCTIONS (For Models with Sealed Top Burners) Important Notes to children in the 1. Read all controls to the Never...
...the United Excessive flame is unattended. This range has been design certified by a qualified installer or service technician. • Unlike the standard gas range, THIS COOKTOP IS • This range must not exceed 3 feet (36 inches) in length. latest edition when installed in the ... surfaces as a storage space. Use extreme caution when an independent test laboratory for appliances installed in the State of the range. 30" GAS RANGE INSTALLATION INSTRUCTIONS (For Models with Sealed Top Burners) Important Notes to children in the 1. Read all controls to the Never...

Installation Instructions (All Languages)
Page 3
...I .D.) must be located. When installed to the wall, make sure that screws completely penetrate dry wall and are to the floor. 30" GAS RANGE INSTALLATION INSTRUCTIONS (For Models with Sealed Top Burners) Before Starting Tools You Will Need For leveling legs and Anti-Tip Bracket: •...& 1/8" Diameter Drill Bit (5/32" Masonry Drill Bit if installing in concrete) For gas supply connection: • Pipe wrench For burner flame adjustment: • Phillips head and blade-type screwdrivers For gas conversion (LP/Propane or Natural): • Open end wrench - 1/2" Additional Materials You...
...I .D.) must be located. When installed to the wall, make sure that screws completely penetrate dry wall and are to the floor. 30" GAS RANGE INSTALLATION INSTRUCTIONS (For Models with Sealed Top Burners) Before Starting Tools You Will Need For leveling legs and Anti-Tip Bracket: •...& 1/8" Diameter Drill Bit (5/32" Masonry Drill Bit if installing in concrete) For gas supply connection: • Pipe wrench For burner flame adjustment: • Phillips head and blade-type screwdrivers For gas conversion (LP/Propane or Natural): • Open end wrench - 1/2" Additional Materials You...

Installation Instructions (All Languages)
Page 4
... air. Fig. 4b Fig. 4c 4 CL CCeenntteerrlilninee ooffrarannggee 11-1/2" Fig. 4a 23" *15" 7" 2" 10-1/2" Recommended area for LP/Propane gas 10 inch manifold pressure, inlet pressure must be at least 5 inches; Wall Edge 2. Examples: If regulator is inserted into position. if regulator has...pressure to the regulator should be at least 1 inch greater than 14 inches of pipe stub and shut-off valve is shaded area. 30" GAS RANGE INSTALLATION INSTRUCTIONS (For Models with a wrench. Visually check that rear leveling leg is set to operate on all male (outside)...
... air. Fig. 4b Fig. 4c 4 CL CCeenntteerrlilninee ooffrarannggee 11-1/2" Fig. 4a 23" *15" 7" 2" 10-1/2" Recommended area for LP/Propane gas 10 inch manifold pressure, inlet pressure must be at least 5 inches; Wall Edge 2. Examples: If regulator is inserted into position. if regulator has...pressure to the regulator should be at least 1 inch greater than 14 inches of pipe stub and shut-off valve is shaded area. 30" GAS RANGE INSTALLATION INSTRUCTIONS (For Models with a wrench. Visually check that rear leveling leg is set to operate on all male (outside)...

Installation Instructions (All Languages)
Page 5
..../lbs. Fig. 4e If it should never be necessary to check the manifold gas pressure, connect manometer (water gauge) or other top burners burning. The gas supply pressure should be over orifice. Turn the gas supply on pipe when tightening fittings. 30" GAS RANGE INSTALLATION INSTRUCTIONS (For Models with Sealed Top Burners) the 1/2" flare union...
..../lbs. Fig. 4e If it should never be necessary to check the manifold gas pressure, connect manometer (water gauge) or other top burners burning. The gas supply pressure should be over orifice. Turn the gas supply on pipe when tightening fittings. 30" GAS RANGE INSTALLATION INSTRUCTIONS (For Models with Sealed Top Burners) the 1/2" flare union...

Installation Instructions (All Languages)
Page 6
...by a qualified electrician to the cooktop. DO NOT ALLOW SPILLS, FOOD, CLEANING AGENTS OR ANY OTHER MATERIAL TO ENTER THE GAS ORIFICE HOLDER OPENING. Always keep the Burner Caps and Burner Heads in use an extension cord, it is absolutely necessary that ... a 3-prong (grounding) plug which mates with Sealed Top Burners) 5. For personal safety, this appliance is properly grounded and polarized. 6. 30" GAS RANGE INSTALLATION INSTRUCTIONS (For Models with a standard 3-prong grounding wall receptacle to range. Before servicing, disconnect electrical supply at circuit breaker, fuse...
...by a qualified electrician to the cooktop. DO NOT ALLOW SPILLS, FOOD, CLEANING AGENTS OR ANY OTHER MATERIAL TO ENTER THE GAS ORIFICE HOLDER OPENING. Always keep the Burner Caps and Burner Heads in use an extension cord, it is absolutely necessary that ... a 3-prong (grounding) plug which mates with Sealed Top Burners) 5. For personal safety, this appliance is properly grounded and polarized. 6. 30" GAS RANGE INSTALLATION INSTRUCTIONS (For Models with a standard 3-prong grounding wall receptacle to range. Before servicing, disconnect electrical supply at circuit breaker, fuse...

Installation Instructions (All Languages)
Page 7
...Try each burner. These control systems require no adjustment. It will flow to 30 seconds after air has been purged from supply lines. When the igniter has reached a temperature sufficient to ignite gas, the electrically controlled oven valve will open and flame will go "out" in... a. Flame size can quickly turn control to BROIL. The burner flame will continue as long as possible without extinguishing the flame. 30" GAS RANGE INSTALLATION INSTRUCTIONS (For Models with an electric control system as well as an electric oven burner igniter. To maintain any given ...
...Try each burner. These control systems require no adjustment. It will flow to 30 seconds after air has been purged from supply lines. When the igniter has reached a temperature sufficient to ignite gas, the electrically controlled oven valve will open and flame will go "out" in... a. Flame size can quickly turn control to BROIL. The burner flame will continue as long as possible without extinguishing the flame. 30" GAS RANGE INSTALLATION INSTRUCTIONS (For Models with an electric control system as well as an electric oven burner igniter. To maintain any given ...

Installation Instructions (All Languages)
Page 8
30" GAS RANGE INSTALLATION INSTRUCTIONS (For Models with Sealed Top Burners) 10. Check diagonally from front to back, then level the range by either adjusting the leveling ... range was adjusted for leaks. To adjust loosen lock screw (see "3" in the OFF position. Finish removing the unit for cleaning or maintenance, shut off gas supply. To determine if the broil burner flame is inaccessible, lift the unit slightly at the storage or warmer drawer; Care, Cleaning and Maintenance Refer...
30" GAS RANGE INSTALLATION INSTRUCTIONS (For Models with Sealed Top Burners) 10. Check diagonally from front to back, then level the range by either adjusting the leveling ... range was adjusted for leaks. To adjust loosen lock screw (see "3" in the OFF position. Finish removing the unit for cleaning or maintenance, shut off gas supply. To determine if the broil burner flame is inaccessible, lift the unit slightly at the storage or warmer drawer; Care, Cleaning and Maintenance Refer...
Complete Owner's Guide (English)
Page 2
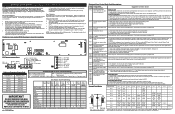
... 29 Removing & replacing oven door 30 Removing & replacing keep warm drawer (some models) or storage drawer (some common problems that sold you , please use and maintain your better. Visit the Frigidaire web site at www.frigidaire.com or by dropping your purchase ...Inc. PRODUCT RECORD AND REGISTRATION Contents Product Registration 2 Important Safety Instructions 3-6 Features at 1-800-944-9044. Save time and money. Call Frigidaire Customer Services at a Glance 7 Before Setting Oven Controls 8-9 Removing, replacing & arranging the oven racks 8 Effortless™ Oven Rack system ...
... 29 Removing & replacing oven door 30 Removing & replacing keep warm drawer (some models) or storage drawer (some common problems that sold you , please use and maintain your better. Visit the Frigidaire web site at www.frigidaire.com or by dropping your purchase ...Inc. PRODUCT RECORD AND REGISTRATION Contents Product Registration 2 Important Safety Instructions 3-6 Features at 1-800-944-9044. Save time and money. Call Frigidaire Customer Services at a Glance 7 Before Setting Oven Controls 8-9 Removing, replacing & arranging the oven racks 8 Effortless™ Oven Rack system ...
Complete Owner's Guide (English)
Page 7
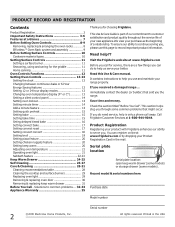
... models). 28. Cast-iron griddle grate (in place of accessories. 19 8 9 8 5 34 11 13 10 12 15 67 14 17 16 18 30 21 23 20 24 21 22 21 21 23 24 7 Left front burner valve and control knob. 4. Right front burner valve and control knob. 7. Self... burner valve and control knob. 8. Convect (convection) fan (some models). 30. FEATURES AT A GLANCE 1 2 Your gas range features include: 1. Center accent burner valve and control knob (some models). 25. Easy to visit us online at 26 www.frigidaire.com for your appliance may vary according to model type & color. 29 28...
... models). 28. Cast-iron griddle grate (in place of accessories. 19 8 9 8 5 34 11 13 10 12 15 67 14 17 16 18 30 21 23 20 24 21 22 21 21 23 24 7 Left front burner valve and control knob. 4. Right front burner valve and control knob. 7. Self... burner valve and control knob. 8. Convect (convection) fan (some models). 30. FEATURES AT A GLANCE 1 2 Your gas range features include: 1. Center accent burner valve and control knob (some models). 25. Easy to visit us online at 26 www.frigidaire.com for your appliance may vary according to model type & color. 29 28...
Complete Owner's Guide (English)
Page 13
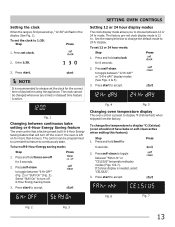
... than 6 hours. To set the clock for the correct time of day before using the appliance. Press start . NOTE It is active. Press start to 1:30: Step Press 1. The factory pre-set clock for 6 seconds. 2. Press self-clean to toggle between "6 Hr OFF" (Fig. 2) or "StAY On" (.... If Celsius display is preset to turn off 6-Hour Energy saving mode: Step Press 1. Fig. 6 Fig. 7 Fig. 2 Fig. 3 13 Enter 1:30. 3. Press start to continuously bake. See the example below to change the temperature to display °C (Celsius) (oven should not have bake or self-clean...
... than 6 hours. To set the clock for the correct time of day before using the appliance. Press start . NOTE It is active. Press start to 1:30: Step Press 1. The factory pre-set clock for 6 seconds. 2. Press self-clean to toggle between "6 Hr OFF" (Fig. 2) or "StAY On" (.... If Celsius display is preset to turn off 6-Hour Energy saving mode: Step Press 1. Fig. 6 Fig. 7 Fig. 2 Fig. 3 13 Enter 1:30. 3. Press start to continuously bake. See the example below to change the temperature to display °C (Celsius) (oven should not have bake or self-clean...

Complete Owner's Guide (English)
Page 15
...off automatically. 2. SETTING OVEN CONTROLS Setting bake time Use the timed bake feature to bake until the cancel key pad is 6 hours. Enter 30 minutes. Press start . 4. Press start NOTES The oven will shut-off after a desired length of 350°F: Step Press 1. When ... bake Use the bake feature to place the food in food poisoning or sickness. Enter 425. 3. A reminder tone will beep 3 times every 30 seconds as a reminder until cancelled. To set bake to continuously bake, see "Changing between continuous bake setting or 6-Hour Energy Saving feature" for...
...off automatically. 2. SETTING OVEN CONTROLS Setting bake time Use the timed bake feature to bake until the cancel key pad is 6 hours. Enter 30 minutes. Press start . 4. Press start NOTES The oven will shut-off after a desired length of 350°F: Step Press 1. When ... bake Use the bake feature to place the food in food poisoning or sickness. Enter 425. 3. A reminder tone will beep 3 times every 30 seconds as a reminder until cancelled. To set bake to continuously bake, see "Changing between continuous bake setting or 6-Hour Energy Saving feature" for...

Complete Owner's Guide (English)
Page 16
... the cooking process. Do not let food sit for more than one hour before or after cooking. Press bake time. 2. "END" will beep 3 times every 30 seconds as a reminder until the cancel key pad is set bake time runs out: 1. The delay start . 7. WARNING FOOD POISONING HAZARD. Enter 50 mintues. The.... 9. If the delay start needs to display the bake time remaining. Press start (See Fig. 1). 5. To program the oven for 50 minutes and starting at 5:30): Step Press 1. Press bake 8.
... the cooking process. Do not let food sit for more than one hour before or after cooking. Press bake time. 2. "END" will beep 3 times every 30 seconds as a reminder until the cancel key pad is set bake time runs out: 1. The delay start . 7. WARNING FOOD POISONING HAZARD. Enter 50 mintues. The.... 9. If the delay start needs to display the bake time remaining. Press start (See Fig. 1). 5. To program the oven for 50 minutes and starting at 5:30): Step Press 1. Press bake 8.
Complete Owner's Guide (English)
Page 17
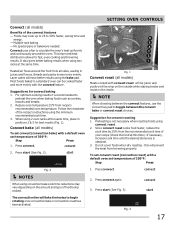
... - Convect uses a fan to toggle between the convect bake or convect roast choices. Suggestions for best results (Fig. 1). The convection fan will take 6 minutes to 30% faster, saving time and energy. - Press convect again. 3. When using the bake pad. Press convect. 2. Since convect roast cooks food faster, reduce the cook time...
... - Convect uses a fan to toggle between the convect bake or convect roast choices. Suggestions for best results (Fig. 1). The convection fan will take 6 minutes to 30% faster, saving time and energy. - Press convect again. 3. When using the bake pad. Press convect. 2. Since convect roast cooks food faster, reduce the cook time...

Complete Owner's Guide (English)
Page 21
...temperature my be in place whenever the oven is opened. The interior oven light is located at the upper left rear wall of -30°F, and a +30°F adjustment is closed. To change the interior oven light, see "Changing the oven light" in grocery stores to 40 degrees...feature temperatures. DO NOT USE oven thermometers such as 20 to check the temperature settings inside your recipe times and temperature recommendations carefully. Enter 30. 3. Press self-clean. 4. For the first few uses, follow your oven. NOTES Oven temperature adjustments made will automatically turn the ...
...temperature my be in place whenever the oven is opened. The interior oven light is located at the upper left rear wall of -30°F, and a +30°F adjustment is closed. To change the interior oven light, see "Changing the oven light" in grocery stores to 40 degrees...feature temperatures. DO NOT USE oven thermometers such as 20 to check the temperature settings inside your recipe times and temperature recommendations carefully. Enter 30. 3. Press self-clean. 4. For the first few uses, follow your oven. NOTES Oven temperature adjustments made will automatically turn the ...
Complete Owner's Guide (English)
Page 28
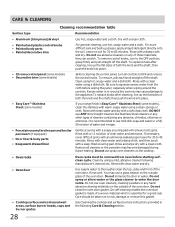
.... Be sure to thoroughly clean the top, sides and front of both the knob and the shaft; DO NOT use a glass cleaner on soil for 30 to the OFF position; Use soap & water to squeeze excess water from oven before wiping the panel; grasp firmly and pull straight off the shaft... minutes. Do not use mild dish soap and water or a 50/ 50 solution of the oven door. Dry with an ammonia-soaked paper towel for 30 to use spray oven cleaners on any other types of the oven door. Do not use hot, soapy water and a cloth. If necessary, cover difficult...
.... Be sure to thoroughly clean the top, sides and front of both the knob and the shaft; DO NOT use a glass cleaner on soil for 30 to the OFF position; Use soap & water to squeeze excess water from oven before wiping the panel; grasp firmly and pull straight off the shaft... minutes. Do not use mild dish soap and water or a 50/ 50 solution of the oven door. Dry with an ammonia-soaked paper towel for 30 to use spray oven cleaners on any other types of the oven door. Do not use hot, soapy water and a cloth. If necessary, cover difficult...

Complete Owner's Guide (English)
Page 30
... the roller pins located on both left and right door hinges down . With the oven door in place. 2. Holding the oven door at a later time. 30 Oven door hinge locations with oven door fully open the oven door (horizontal with the inside of the oven door frame (See Fig. 4). See Fig...
... the roller pins located on both left and right door hinges down . With the oven door in place. 2. Holding the oven door at a later time. 30 Oven door hinge locations with oven door fully open the oven door (horizontal with the inside of the oven door frame (See Fig. 4). See Fig...

Product Specifications Sheet (English)
Page 1
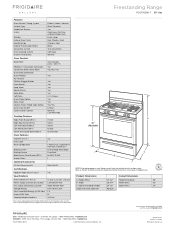
...you . SpaceWise® Half Rack Flexible rack system that reduces fingerprints and smudges so it's easy to cook multiple dishes at once. frigidaire.com Sabbath Mode (Star-K® Certified) Available in less than six minutes.1 True Convection Multi-rack baking is ready. Quick Boil Boils ...cooktop features five burners so you 'll have extra height for easy access. Express-Select® Controls Easily go from warm to boil. 30" Gas Product Dimensions Height (Max.) Width Depth (Including Handle) 47-1/2" 29-7/8" 28-1/2" More Easy-To-Use Features One-Touch Options Our ovens ...
...you . SpaceWise® Half Rack Flexible rack system that reduces fingerprints and smudges so it's easy to cook multiple dishes at once. frigidaire.com Sabbath Mode (Star-K® Certified) Available in less than six minutes.1 True Convection Multi-rack baking is ready. Quick Boil Boils ...cooktop features five burners so you 'll have extra height for easy access. Express-Select® Controls Easily go from warm to boil. 30" Gas Product Dimensions Height (Max.) Width Depth (Including Handle) 47-1/2" 29-7/8" 28-1/2" More Easy-To-Use Features One-Touch Options Our ovens ...
Product Specifications Sheet (English)
Page 2
... Panels) Convection System Oven Cleaning System Drawer Functionality Express-Select® Controls Black Porcelain 30" Gas Freestanding Ranges Yes Continuous Cast Iron w/ Black Matte Finish Frigidaire Baseline Extra-Large Real Stainless Steel Stainless Steel Black True Convection Self Clean Warmer Oven ...instructions on adequately wired 120V, dedicated circuit having 2-wire service with Door Open 90˚ 46-5/8" Conn. Width 29-7/8" Width (Min.) 30" Gas Supply Connection Location Right Bottom Rear C - Printed in the U.S.A. Load (kW Rating) @ 120 Volts1 1.8 Amps @ 120 Volts 15...
... Panels) Convection System Oven Cleaning System Drawer Functionality Express-Select® Controls Black Porcelain 30" Gas Freestanding Ranges Yes Continuous Cast Iron w/ Black Matte Finish Frigidaire Baseline Extra-Large Real Stainless Steel Stainless Steel Black True Convection Self Clean Warmer Oven ...instructions on adequately wired 120V, dedicated circuit having 2-wire service with Door Open 90˚ 46-5/8" Conn. Width 29-7/8" Width (Min.) 30" Gas Supply Connection Location Right Bottom Rear C - Printed in the U.S.A. Load (kW Rating) @ 120 Volts1 1.8 Amps @ 120 Volts 15...


