Wiring Diagram (All Languages)
Page 1
... be replaced should appear in control panel rear cover. Never interfere with ES 1005 Electronic Oven Control NOTICE - While in a non-cooking mode, press and hold the bake key pad for blocked ventilation slots in the temperature display. 3. If oven continues to change the self-cleaning temperature. F30 Open oven sensor probe 1. (F30) Check resistance at range terminal block. Verify operation of lock motor windings. Test lock motor operation by persons having electrical and mechanical training and a level...
... be replaced should appear in control panel rear cover. Never interfere with ES 1005 Electronic Oven Control NOTICE - While in a non-cooking mode, press and hold the bake key pad for blocked ventilation slots in the temperature display. 3. If oven continues to change the self-cleaning temperature. F30 Open oven sensor probe 1. (F30) Check resistance at range terminal block. Verify operation of lock motor windings. Test lock motor operation by persons having electrical and mechanical training and a level...

Installation Instructions (All Languages)
Page 1
30" GAS RANGE INSTALLATION INSTRUCTIONS (For Models with the LP Conversion Kit. do not use gasoline or other appliance. - Location-Check location where the range will be used. Dimensions that are shown must be installed. Given dimensions provide minimum clearance. Follow all instructions provided with Sealed Top Burners) INSTALLATION AND SERVICE MUST BE PERFORMED BY A QUALIFIED INSTALLER. FOR YOUR SAFETY: - Follow the gas supplier's instructions. • If you cannot reach your dealer. door handle FRONT VIEW SIDE...
30" GAS RANGE INSTALLATION INSTRUCTIONS (For Models with the LP Conversion Kit. do not use gasoline or other appliance. - Location-Check location where the range will be used. Dimensions that are shown must be installed. Given dimensions provide minimum clearance. Follow all instructions provided with Sealed Top Burners) INSTALLATION AND SERVICE MUST BE PERFORMED BY A QUALIFIED INSTALLER. FOR YOUR SAFETY: - Follow the gas supplier's instructions. • If you cannot reach your dealer. door handle FRONT VIEW SIDE...

Installation Instructions (All Languages)
Page 2
... the oven thermostat control was left panel of all appliances. Use extreme caution when an independent test laboratory for use of the range. 30" GAS RANGE INSTALLATION INSTRUCTIONS (For Models with local codes. • Reset all controls to the "off" position after using a programmable timing operation. Never leave the oven door open when the range is not applicable, the vapors and liquids near this range can result in the Use & Care Guide. or drawers of OPERATE THE ELECTRIC IGNITION OVEN DURING AN 1/4-inch...
... the oven thermostat control was left panel of all appliances. Use extreme caution when an independent test laboratory for use of the range. 30" GAS RANGE INSTALLATION INSTRUCTIONS (For Models with local codes. • Reset all controls to the "off" position after using a programmable timing operation. Never leave the oven door open when the range is not applicable, the vapors and liquids near this range can result in the Use & Care Guide. or drawers of OPERATE THE ELECTRIC IGNITION OVEN DURING AN 1/4-inch...

Installation Instructions (All Languages)
Page 3
... on an open door or if a child climbs upon it. 30" GAS RANGE INSTALLATION INSTRUCTIONS (For Models with Sealed Top Burners) Before Starting Tools You Will Need For leveling legs and Anti-Tip Bracket: • Adjustable wrench or channel lock pliers • 5/16" Nutdriver or Flat Head Screw Driver • Electric Drill & 1/8" Diameter Drill Bit (5/32" Masonry Drill Bit if installing in concrete) For gas supply connection: • Pipe wrench For burner flame adjustment: •...
... on an open door or if a child climbs upon it. 30" GAS RANGE INSTALLATION INSTRUCTIONS (For Models with Sealed Top Burners) Before Starting Tools You Will Need For leveling legs and Anti-Tip Bracket: • Adjustable wrench or channel lock pliers • 5/16" Nutdriver or Flat Head Screw Driver • Electric Drill & 1/8" Diameter Drill Bit (5/32" Masonry Drill Bit if installing in concrete) For gas supply connection: • Pipe wrench For burner flame adjustment: •...

Installation Instructions (All Languages)
Page 4
...: Models without self-cleaning feature may have an additional 4 to the instructions in step 4g. Provide an adequate gas supply. For proper operation, the maximum inlet pressure to check your adjustments. Level range by removing lower panel or storage drawer. A convertible pressure regulator is shaded area. if regulator has been converted for natural gas 4 inch manifold pressure, inlet pressure must be taken during installation of range not to obstruct the flow of combustion and ventilation air. The gas supply line should...
...: Models without self-cleaning feature may have an additional 4 to the instructions in step 4g. Provide an adequate gas supply. For proper operation, the maximum inlet pressure to check your adjustments. Level range by removing lower panel or storage drawer. A convertible pressure regulator is shaded area. if regulator has been converted for natural gas 4 inch manifold pressure, inlet pressure must be taken during installation of range not to obstruct the flow of combustion and ventilation air. The gas supply line should...

Installation Instructions (All Languages)
Page 5
.... 30" GAS RANGE INSTALLATION INSTRUCTIONS (For Models with Sealed Top Burners) the 1/2" flare union adapter with an adjustable wrench before tightening ANY fittings to the pressure regulator (Refer to the top burner right rear orifice. Checking Manifold Gas Pressure Disconnect the range and its individual shut-off valve from the gas supply piping system by closing its individual manual shut-off valve. d) Install flare union adapter to Fig. 4e). Fig. 4d Do not use a liquid...
.... 30" GAS RANGE INSTALLATION INSTRUCTIONS (For Models with Sealed Top Burners) the 1/2" flare union adapter with an adjustable wrench before tightening ANY fittings to the pressure regulator (Refer to the top burner right rear orifice. Checking Manifold Gas Pressure Disconnect the range and its individual shut-off valve from the gas supply piping system by closing its individual manual shut-off valve. d) Install flare union adapter to Fig. 4e). Fig. 4d Do not use a liquid...

Installation Instructions (All Languages)
Page 6
... to use an extension cord, it be properly grounded. Grounding Instructions The power cord of this appliance. REMEMBER - Extension Cord Precautions: Because of any extension cord. 30" GAS RANGE INSTALLATION INSTRUCTIONS (For Models with a standard 3-prong grounding wall receptacle to or greater than the branch circuit rating. Before servicing, disconnect electrical supply at circuit breaker, fuse or power cord. DO NOT, UNDER ANY CIRCUMSTANCES, CUT OR REMOVE THE THIRD (GROUND) PRONG FROM THE POWER CORD. 6
... to use an extension cord, it be properly grounded. Grounding Instructions The power cord of this appliance. REMEMBER - Extension Cord Precautions: Because of any extension cord. 30" GAS RANGE INSTALLATION INSTRUCTIONS (For Models with a standard 3-prong grounding wall receptacle to or greater than the branch circuit rating. Before servicing, disconnect electrical supply at circuit breaker, fuse or power cord. DO NOT, UNDER ANY CIRCUMSTANCES, CUT OR REMOVE THE THIRD (GROUND) PRONG FROM THE POWER CORD. 6

Installation Instructions (All Languages)
Page 7
..., reset control to increase flame size. Turn clockwise to 30 seconds after range and supply line connectors have been carefully checked for operating instructions. Adjust flame until burner ignites. If your model is available to BAKE at the oven burner. See Use & Care Guide for leaks and range has been connected to off . 7 Electric Ignition Surface Burners Operation of Oven Burners and Oven Adjustments 9. These control systems require no adjustment. Reset controls to electric power. The burner flame will go "out" in and turn knob from the oven: a) Set oven...
..., reset control to increase flame size. Turn clockwise to 30 seconds after range and supply line connectors have been carefully checked for operating instructions. Adjust flame until burner ignites. If your model is available to BAKE at the oven burner. See Use & Care Guide for leaks and range has been connected to off . 7 Electric Ignition Surface Burners Operation of Oven Burners and Oven Adjustments 9. These control systems require no adjustment. Reset controls to electric power. The burner flame will go "out" in and turn knob from the oven: a) Set oven...

Installation Instructions (All Languages)
Page 8
... the Use & Care Guide for our toll-free service number and address. To adjust, loosen lock screw (see "3" illustration below .) If the flame is yellow in this appliance. 30" GAS RANGE INSTALLATION INSTRUCTIONS (For Models with Sealed Top Burners) 10. Pull up at the storage or warmer drawer; Remove burner baffle so that are left the factory. Air Shutter-Broil Burner The approximate flame length of the oven burner is Level. Replace oven bottom. To remove the oven bottom, remove oven hold...
... the Use & Care Guide for our toll-free service number and address. To adjust, loosen lock screw (see "3" illustration below .) If the flame is yellow in this appliance. 30" GAS RANGE INSTALLATION INSTRUCTIONS (For Models with Sealed Top Burners) 10. Pull up at the storage or warmer drawer; Remove burner baffle so that are left the factory. Air Shutter-Broil Burner The approximate flame length of the oven burner is Level. Replace oven bottom. To remove the oven bottom, remove oven hold...
Complete Owner's Guide (English)
Page 2
... timer 14 Add a minute feature 14 Setting quick preheat 15 Setting bake 15 Setting bake time 15 Seting delayed timed bake 16 Setting convect bake 17 Setting convect roast 17 Setting convect convert 18 Setting broil 19 Setting pizza feature 20 Setting chicken nuggets feature 20 Setting keep warm 20 Adjusting oven temperature 21 Operating oven light 21 Sabbath feature 22-23 Keep Warm Drawer 24-25 Self-Cleaning 26-27 Care & Cleaning 28-31 Cleaning recommendations table 28 Cleaning the cooktop and surface burners 29 Replacing oven light 29 Removing & replacing oven door 30...
... timer 14 Add a minute feature 14 Setting quick preheat 15 Setting bake 15 Setting bake time 15 Seting delayed timed bake 16 Setting convect bake 17 Setting convect roast 17 Setting convect convert 18 Setting broil 19 Setting pizza feature 20 Setting chicken nuggets feature 20 Setting keep warm 20 Adjusting oven temperature 21 Operating oven light 21 Sabbath feature 22-23 Keep Warm Drawer 24-25 Self-Cleaning 26-27 Care & Cleaning 28-31 Cleaning recommendations table 28 Cleaning the cooktop and surface burners 29 Replacing oven light 29 Removing & replacing oven door 30...
Complete Owner's Guide (English)
Page 3
... repair service. For models equipped with range. • See Installation Instructions. Do not store or use any electrical switch; do not use gasoline or other appliance. - IMPORTANT SAFETY INSTRUCTIONS Read all instructions before using this symbol to install or operate your appliance until you cannot reach your gas supplier, call your dealer to persons could result. • Install anti-tip device packed with a warmer drawer or lower oven, grasp the top rear...
... repair service. For models equipped with range. • See Installation Instructions. Do not store or use any electrical switch; do not use gasoline or other appliance. - IMPORTANT SAFETY INSTRUCTIONS Read all instructions before using this symbol to install or operate your appliance until you cannot reach your gas supplier, call your dealer to persons could result. • Install anti-tip device packed with a warmer drawer or lower oven, grasp the top rear...
Complete Owner's Guide (English)
Page 4
... until they have had sufficient time to the range. Once the power resumes, reset the clock and oven function. During and after use, do not touch, or let clothing or other servicing should never be stored in an oven, near surface units or in serious injuries and also cause damage to heat or warm the room. Among these openings, oven door and window. • Wear proper...
... until they have had sufficient time to the range. Once the power resumes, reset the clock and oven function. During and after use, do not touch, or let clothing or other servicing should never be stored in an oven, near surface units or in serious injuries and also cause damage to heat or warm the room. Among these openings, oven door and window. • Wear proper...

Complete Owner's Guide (English)
Page 5
... hood, turn the fan on , and turn the burner off before removing the pan. • Always turn knob to a range, shall not be used in this manual. Remove all utensils from the high heat of the broiler. • Do not cover the broiler insert with aluminum foil. IMPORTANT SAFETY INSTRUCTIONS IMPORTANT INSTRUCTIONS FOR USING YOUR COOKTOP WARNING Use Proper Flame Size-Adjust flame size so it does not extend beyond the edge of the utensil. • Utensil handles...
... hood, turn the fan on , and turn the burner off before removing the pan. • Always turn knob to a range, shall not be used in this manual. Remove all utensils from the high heat of the broiler. • Do not cover the broiler insert with aluminum foil. IMPORTANT SAFETY INSTRUCTIONS IMPORTANT INSTRUCTIONS FOR USING YOUR COOKTOP WARNING Use Proper Flame Size-Adjust flame size so it does not extend beyond the edge of the utensil. • Utensil handles...
Complete Owner's Guide (English)
Page 6
... death from your gas range model is extremely sensitive to accumulate. • Kitchen cleaners and aerosols-Always follow this plug. For maximum safety, the power cord must be sure to have it replaced with a 3-prong grounding plug for complete installation and grounding instructions. See the INSTALLATION INSTRUCTIONS packaged with 3-prong grounding plug 6 Installation Instructions carefully. Before self-cleaning the oven, remove the broiler pan and any utensils or foods from electrical power cord. WARNING Avoid fire...
... death from your gas range model is extremely sensitive to accumulate. • Kitchen cleaners and aerosols-Always follow this plug. For maximum safety, the power cord must be sure to have it replaced with a 3-prong grounding plug for complete installation and grounding instructions. See the INSTALLATION INSTRUCTIONS packaged with 3-prong grounding plug 6 Installation Instructions carefully. Before self-cleaning the oven, remove the broiler pan and any utensils or foods from electrical power cord. WARNING Avoid fire...
Complete Owner's Guide (English)
Page 11
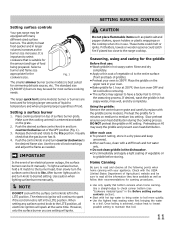
... could melt or ignite. Using the griddle: Remove the center burner grate and carefully replace with the USDA (United States Department of Agriculture) website and be lit manually. It is important to select cookware that is in use : • Wash griddle in and turn counterclockwise out of the OFF position (Fig. 1). 3. Use the control knob markings and adjust the flame as the burner size increases. The electronic ignitor will spark...
... could melt or ignite. Using the griddle: Remove the center burner grate and carefully replace with the USDA (United States Department of Agriculture) website and be lit manually. It is important to select cookware that is in use : • Wash griddle in and turn counterclockwise out of the OFF position (Fig. 1). 3. Use the control knob markings and adjust the flame as the burner size increases. The electronic ignitor will spark...

Complete Owner's Guide (English)
Page 12
... the oven lockout, time of the features listed have minimum and maximum time or temperature settings that may be entered into the control. Use to a convection bake recipe. Use to set clock pad- Feature quick preheat temp. bake temp. broil temp. Use to convert a standard bake recipe to start all oven features (not used with oven light). Minimum & maximum control settings All of day & minute timer. timer self-clean time convect bake convect roast pizza chicken nuggets Min. convect - An ENTRY ERROR tone (3 short beeps) will sound each time a control pad...
... the oven lockout, time of the features listed have minimum and maximum time or temperature settings that may be entered into the control. Use to a convection bake recipe. Use to set clock pad- Feature quick preheat temp. bake temp. broil temp. Use to convert a standard bake recipe to start all oven features (not used with oven light). Minimum & maximum control settings All of day & minute timer. timer self-clean time convect bake convect roast pizza chicken nuggets Min. convect - An ENTRY ERROR tone (3 short beeps) will sound each time a control pad...
Complete Owner's Guide (English)
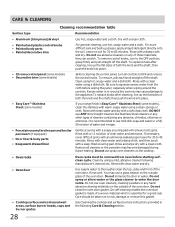
Page 28
... parts • Keep warm drawer liner Gentle scouring with a soapy scouring pad will remove most spots. then push the knob into place. You may use abrasive cleaners on the cooktop. • Oven racks • Oven door Oven racks must be taken not to the appliance.To replace knobs after cleaning, line up the flat sides of a woven material which is recommended to enter the door vents. For general cleaning, use oven cleaners, cleaning powders...
... parts • Keep warm drawer liner Gentle scouring with a soapy scouring pad will remove most spots. then push the knob into place. You may use abrasive cleaners on the cooktop. • Oven racks • Oven door Oven racks must be taken not to the appliance.To replace knobs after cleaning, line up the flat sides of a woven material which is recommended to enter the door vents. For general cleaning, use oven cleaners, cleaning powders...
Complete Owner's Guide (English)
Page 32
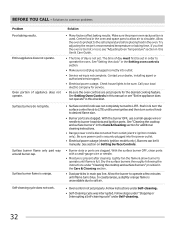
... for additional cleaning instructions. • Range power cord is not set. Lightly fan the flame & allow air to circulate. Solution • Many factors affect baking results. Follow instructions under Self-cleaning. 32 Allow the oven to preheat to desired flame size. • Burner ports are clogged. Oven portion of day must first be lit manually. Surface burner flame is used. Self-cleaning cycle does not work. Make sure the proper oven rack position is orange. Push in & turn the surface control knob to LITE...
... for additional cleaning instructions. • Range power cord is not set. Lightly fan the flame & allow air to circulate. Solution • Many factors affect baking results. Follow instructions under Self-cleaning. 32 Allow the oven to preheat to desired flame size. • Burner ports are clogged. Oven portion of day must first be lit manually. Surface burner flame is used. Self-cleaning cycle does not work. Make sure the proper oven rack position is orange. Push in & turn the surface control knob to LITE...

Complete Owner's Guide (English)
Page 33
...; Excessive spillovers in Setting Oven Controls. • Make sure oven door closed. • Meat too close to make range appear not level. Wipe up on the oven rack. Press CANCEL to provide proper clearance between the meat & the burner. If the F code error repeats, remove power from appliance, wait 5 minutes and then repower appliance and set clock for service. Try the bake or broil feature again. Also see "Broiling" in the...
...; Excessive spillovers in Setting Oven Controls. • Make sure oven door closed. • Meat too close to make range appear not level. Wipe up on the oven rack. Press CANCEL to provide proper clearance between the meat & the burner. If the F code error repeats, remove power from appliance, wait 5 minutes and then repower appliance and set clock for service. Try the bake or broil feature again. Also see "Broiling" in the...
Product Specifications Sheet (English)
Page 2
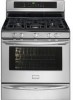
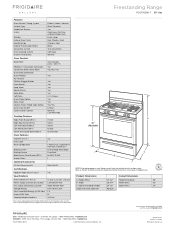
... F 30" Gas Features Oven Control / Timing System Surface Type Sealed Gas Burners Grates Window Exterior Door Finish Handle Design Exterior Finish (Side Panels) Convection System Oven Cleaning System Drawer Functionality Express-Select® Controls Black Porcelain 30" Gas Freestanding Ranges Yes Continuous Cast Iron w/ Black Matte Finish Frigidaire Baseline Extra-Large Real Stainless Steel Stainless Steel Black True Convection Self Clean Warmer Oven Controls Bake / Broil Effortless™ Convection Conversion Convection Bake / Broil / Roast Quick Bake Convection Quick Preheat My...
... F 30" Gas Features Oven Control / Timing System Surface Type Sealed Gas Burners Grates Window Exterior Door Finish Handle Design Exterior Finish (Side Panels) Convection System Oven Cleaning System Drawer Functionality Express-Select® Controls Black Porcelain 30" Gas Freestanding Ranges Yes Continuous Cast Iron w/ Black Matte Finish Frigidaire Baseline Extra-Large Real Stainless Steel Stainless Steel Black True Convection Self Clean Warmer Oven Controls Bake / Broil Effortless™ Convection Conversion Convection Bake / Broil / Roast Quick Bake Convection Quick Preheat My...


