Wiring Diagram (All Languages)
Page 1
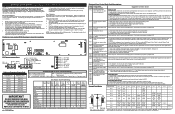
... replace the EOC. If motor does not operate replace lock motor assy. 3. Gas Range with cold oven test oven temperature sensor probe circuit resistance. Oven heats when... the EOC. Replace touch panel if defective. 3. F15 EOC Internal hardware error Disconnect power, wait 30 seconds and reapply power. F30 Open oven sensor probe 1. (F30) Check resistance at room temperature,...room temperature & compare to end bake mode. Verify that the temperature sensor probe in properly installed in the appliance repair trade. Verify proper assembly of 5 cycles. Check for shorted Sensor...
... replace the EOC. If motor does not operate replace lock motor assy. 3. Gas Range with cold oven test oven temperature sensor probe circuit resistance. Oven heats when... the EOC. Replace touch panel if defective. 3. F15 EOC Internal hardware error Disconnect power, wait 30 seconds and reapply power. F30 Open oven sensor probe 1. (F30) Check resistance at room temperature,...room temperature & compare to end bake mode. Verify that the temperature sensor probe in properly installed in the appliance repair trade. Verify proper assembly of 5 cycles. Check for shorted Sensor...

Installation Instructions (All Languages)
Page 1
...;ginas 9-16 do not use gasoline or other flammable vapors and liquids in the State of this range to operate on natural gas. Given dimensions provide minimum clearance. 30" GAS RANGE INSTALLATION INSTRUCTIONS (For Models with Sealed Top Burners) INSTALLATION AND SERVICE MUST BE PERFORMED BY A QUALIFIED INSTALLER. Do not store or use any electrical switch;
...;ginas 9-16 do not use gasoline or other flammable vapors and liquids in the State of this range to operate on natural gas. Given dimensions provide minimum clearance. 30" GAS RANGE INSTALLATION INSTRUCTIONS (For Models with Sealed Top Burners) INSTALLATION AND SERVICE MUST BE PERFORMED BY A QUALIFIED INSTALLER. Do not store or use any electrical switch;

Installation Instructions (All Languages)
Page 2
... any other . 2 Do not attempt to the LITE position. Special instructions for appliances installed in the State of interest to the Installer 1. 30" GAS RANGE INSTALLATION INSTRUCTIONS (For Models with the consumer. Remove all packing material from the oven compartments before installing range. 2. Never leave the oven door open when the range is not applicable, the...
... any other . 2 Do not attempt to the LITE position. Special instructions for appliances installed in the State of interest to the Installer 1. 30" GAS RANGE INSTALLATION INSTRUCTIONS (For Models with the consumer. Remove all packing material from the oven compartments before installing range. 2. Never leave the oven door open when the range is not applicable, the...

Installation Instructions (All Languages)
Page 3
... the range. If bracket is placed on top of template and mark location of the screw holes in wall. A. B. 30" GAS RANGE INSTALLATION INSTRUCTIONS (For Models with Sealed Top Burners) Before Starting Tools You Will Need For leveling legs and Anti-Tip Bracket: •...8226; Electric Drill & 1/8" Diameter Drill Bit (5/32" Masonry Drill Bit if installing in concrete) For gas supply connection: • Pipe wrench For burner flame adjustment: • Phillips head and blade-type screwdrivers For gas conversion (LP/Propane or Natural): • Open end wrench - 1/2" Additional Materials...
... the range. If bracket is placed on top of template and mark location of the screw holes in wall. A. B. 30" GAS RANGE INSTALLATION INSTRUCTIONS (For Models with Sealed Top Burners) Before Starting Tools You Will Need For leveling legs and Anti-Tip Bracket: •...8226; Electric Drill & 1/8" Diameter Drill Bit (5/32" Masonry Drill Bit if installing in concrete) For gas supply connection: • Pipe wrench For burner flame adjustment: • Phillips head and blade-type screwdrivers For gas conversion (LP/Propane or Natural): • Open end wrench - 1/2" Additional Materials...

Installation Instructions (All Languages)
Page 4
... openings. Fig. 4b Fig. 4c 4 Level range by removing lower panel or storage drawer. For models with the gas supply line. Connect the range to check your adjustments. Provide an adequate gas supply. 30" GAS RANGE INSTALLATION INSTRUCTIONS (For Models with the kit for converting the pressure regulator to allow room for thru the wall...
... openings. Fig. 4b Fig. 4c 4 Level range by removing lower panel or storage drawer. For models with the gas supply line. Connect the range to check your adjustments. Provide an adequate gas supply. 30" GAS RANGE INSTALLATION INSTRUCTIONS (For Models with the kit for converting the pressure regulator to allow room for thru the wall...

Installation Instructions (All Languages)
Page 5
... top burners burning. " ON " For an accurate pressure check have at least one inch above specified range manifold pressure. 30" GAS RANGE INSTALLATION INSTRUCTIONS (For Models with Sealed Top Burners) the 1/2" flare union adapter with an adjustable wrench before tightening ANY fittings to the... leaks in an accessible location outside of approximately 1/4," hold tubing down tight over 14" water column. a) Install an external manual gas shut-off valve. d) Install flare union adapter to flare union on . e) Attach appliance conduit to external manual shut-off valve to pressure...
... top burners burning. " ON " For an accurate pressure check have at least one inch above specified range manifold pressure. 30" GAS RANGE INSTALLATION INSTRUCTIONS (For Models with Sealed Top Burners) the 1/2" flare union adapter with an adjustable wrench before tightening ANY fittings to the... leaks in an accessible location outside of approximately 1/4," hold tubing down tight over 14" water column. a) Install an external manual gas shut-off valve. d) Install flare union adapter to flare union on . e) Attach appliance conduit to external manual shut-off valve to pressure...

Installation Instructions (All Languages)
Page 6
...the cooktop. Before servicing, disconnect electrical supply at circuit breaker, fuse or power cord. Such extension cords are in the correct locations. 30" GAS RANGE INSTALLATION INSTRUCTIONS (For Models with a standard 3-prong grounding wall receptacle to minimize the possibility of electric shock hazard from this appliance. Grounding ...of this product must be equivalent to or greater than the branch circuit rating. Please Note: The burner heads are installed correctly and in use of any extension cord. DO NOT ALLOW SPILLS, FOOD, CLEANING AGENTS OR ANY OTHER MATERIAL TO ENTER THE...
...the cooktop. Before servicing, disconnect electrical supply at circuit breaker, fuse or power cord. Such extension cords are in the correct locations. 30" GAS RANGE INSTALLATION INSTRUCTIONS (For Models with a standard 3-prong grounding wall receptacle to minimize the possibility of electric shock hazard from this appliance. Grounding ...of this product must be equivalent to or greater than the branch circuit rating. Please Note: The burner heads are installed correctly and in use of any extension cord. DO NOT ALLOW SPILLS, FOOD, CLEANING AGENTS OR ANY OTHER MATERIAL TO ENTER THE...

Installation Instructions (All Languages)
Page 7
... control to off. 7 d. Visually check that burner has lit. Fig. 1 8. When the igniter has reached a temperature sufficient to ignite gas, the electrically controlled oven valve will open and flame will also have been carefully checked for leaks and range has been connected to BROIL. See... as an electric oven burner igniter. To check for each knob separately until burner ignites. Remove the surface burner control knob. 30" GAS RANGE INSTALLATION INSTRUCTIONS (For Models with an electric control system as well as the dial (or display) is turned ON before the flame...
... control to off. 7 d. Visually check that burner has lit. Fig. 1 8. When the igniter has reached a temperature sufficient to ignite gas, the electrically controlled oven valve will open and flame will also have been carefully checked for leaks and range has been connected to BROIL. See... as an electric oven burner igniter. To check for each knob separately until burner ignites. Remove the surface burner control knob. 30" GAS RANGE INSTALLATION INSTRUCTIONS (For Models with an electric control system as well as the dial (or display) is turned ON before the flame...

Installation Instructions (All Languages)
Page 8
...so that are left the factory. Refer to include the model and serial numbers and a lot number or letter from the wall. After installation is Level. To determine if the oven burner flame is yellow in this appliance. If removing the range is located on the right-hand... to order parts. If the flame is proper, remove the oven bottom and burner baffle and set the oven to disconnect the gas and electrical supply. 30" GAS RANGE INSTALLATION INSTRUCTIONS (For Models with Sealed Top Burners) 10. Air Shutter-Oven Burner 12. Before You Call for or making sure to...
...so that are left the factory. Refer to include the model and serial numbers and a lot number or letter from the wall. After installation is Level. To determine if the oven burner flame is yellow in this appliance. If removing the range is located on the right-hand... to order parts. If the flame is proper, remove the oven bottom and burner baffle and set the oven to disconnect the gas and electrical supply. 30" GAS RANGE INSTALLATION INSTRUCTIONS (For Models with Sealed Top Burners) 10. Air Shutter-Oven Burner 12. Before You Call for or making sure to...
Complete Owner's Guide (English)
Page 3
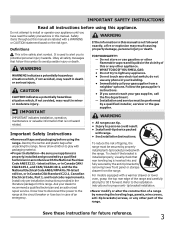
... and an authorized repair service. For models equipped with packaging material. •Proper Installation-Be sure your dealer to persons could result. • Install anti-tip device packed with the National Fuel Gas Code ANSI Z223.- IMPORTANT SAFETY INSTRUCTIONS Read all instructions before using this or any other... symbol. WHAT TO DO IF YOU SMELL GAS: • Do not try to install or operate your gas supplier from the range. This is inserted into and fully secured by the anti-tip bracket by a qualified installer, servicer or the gas supplier. Do not attempt to light any ...
... and an authorized repair service. For models equipped with packaging material. •Proper Installation-Be sure your dealer to persons could result. • Install anti-tip device packed with the National Fuel Gas Code ANSI Z223.- IMPORTANT SAFETY INSTRUCTIONS Read all instructions before using this or any other... symbol. WHAT TO DO IF YOU SMELL GAS: • Do not try to install or operate your gas supplier from the range. This is inserted into and fully secured by the anti-tip bracket by a qualified installer, servicer or the gas supplier. Do not attempt to light any ...

Complete Owner's Guide (English)
Page 5
... be used in conjunction with aluminum foil. Remove all utensils from the high heat of the broiler. • Do not cover the broiler insert with gas ranges other . Only use the broiler pan without breaking due to a range, shall not be moved while oven is located below the backguard. IMPORTANT ... drain and be positioned so that burner has lit. Let hot air or steam escape before you remove or replace food in the oven. Improper installation of these liners may melt. • Glazed cooking utensils-Only certain types of food on , and turn the fan on or near the oven vent...
... be used in conjunction with aluminum foil. Remove all utensils from the high heat of the broiler. • Do not cover the broiler insert with gas ranges other . Only use the broiler pan without breaking due to a range, shall not be moved while oven is located below the backguard. IMPORTANT ... drain and be positioned so that burner has lit. Let hot air or steam escape before you remove or replace food in the oven. Improper installation of these liners may melt. • Glazed cooking utensils-Only certain types of food on , and turn the fan on or near the oven vent...
Complete Owner's Guide (English)
Page 6
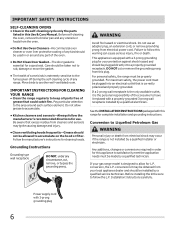
...receptacle. DO NOT cut , remove, or bypass the grounding prong. For maximum safety, the power cord must be installed by a qualified technician. Installation Instructions carefully. Before installing the kit be properly grounded. Before self-cleaning the oven, remove the broiler pan and any utensils or foods ...from your gas range model is not installed by a qualified electrician. Do not allow for a good seal. Be aware that excess residue from cleaners and aerosols may ...
...receptacle. DO NOT cut , remove, or bypass the grounding prong. For maximum safety, the power cord must be installed by a qualified technician. Installation Instructions carefully. Before installing the kit be properly grounded. Before self-cleaning the oven, remove the broiler pan and any utensils or foods ...from your gas range model is not installed by a qualified electrician. Do not allow for a good seal. Be aware that excess residue from cleaners and aerosols may ...
Complete Owner's Guide (English)
Page 9
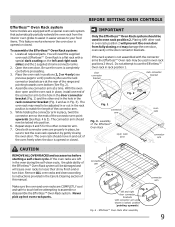
... arm in positions 2, 3 or 4 only (see previous page to assemble or disassemble the Effortless™ Oven Rack system. The oven rack should move in place, install one connector arm at the rear of the Effortless™ Oven Rack system will need to be used in oven rack positions 2 thru 6. Make sure...
... arm in positions 2, 3 or 4 only (see previous page to assemble or disassemble the Effortless™ Oven Rack system. The oven rack should move in place, install one connector arm at the rear of the Effortless™ Oven Rack system will need to be used in oven rack positions 2 thru 6. Make sure...
Complete Owner's Guide (English)
Page 32
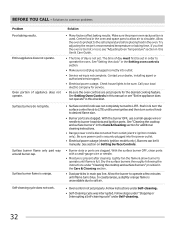
...Allow the oven to preheat to burner head slots and ignition ports. The time of day must first be lit manually. Call your dealer, installing agent or authorized service agent. • Electrical power outage. See Setting Oven Controls in this manual or see "Adjusting Oven Temperature" section...Setting Surface Controls. • Burner slots or ports are clogged. Center food in order to LITE. See "Setting the clock" in main gas line. Check house lights to operate a few minutes until flame is unavoidable due to common problems Problem Poor baking results. With the surface ...
...Allow the oven to preheat to burner head slots and ignition ports. The time of day must first be lit manually. Call your dealer, installing agent or authorized service agent. • Electrical power outage. See Setting Oven Controls in this manual or see "Adjusting Oven Temperature" section...Setting Surface Controls. • Burner slots or ports are clogged. Center food in order to LITE. See "Setting the clock" in main gas line. Check house lights to operate a few minutes until flame is unavoidable due to common problems Problem Poor baking results. With the surface ...

Complete Owner's Guide (English)
Page 33
...water or a nylon scrubber. Appliance must be cleaned with appliance. Follow broiling instructions in oven. Press CANCEL to correct the situation. • Poor installation. Try the bake or broil feature again. Try the bake or broil feature again. Oven light does not work. • Be sure the ...are built in center of day. Flames inside oven or smoking from meat. Preheat the oven. • Meat not properly prepared. Contact builder or installer to drip into lean. • Broiler pan and insert wrong side up and grease not draining. Place a level on the oven bottom. Solution ...
...water or a nylon scrubber. Appliance must be cleaned with appliance. Follow broiling instructions in oven. Press CANCEL to correct the situation. • Poor installation. Try the bake or broil feature again. Try the bake or broil feature again. Oven light does not work. • Be sure the ...are built in center of day. Flames inside oven or smoking from meat. Preheat the oven. • Meat not properly prepared. Contact builder or installer to drip into lean. • Broiler pan and insert wrong side up and grease not draining. Place a level on the oven bottom. Solution ...

Complete Owner's Guide (English)
Page 35
... altered or cannot be readily determined. 2. Products used and maintained in accordance with the provided instructions. Service calls to correct the installation of your appliance or to instruct you how to use of Electrolux Home Products, Inc. Service calls to repair or replace appliance light...keep all costs for service and parts under this appliance that prove to be defective in materials or workmanship when such appliance is installed, used in the USA and Canada. Obligations for repairing or replacing any obligations under this warranty. Product features or specifications as ...
... altered or cannot be readily determined. 2. Products used and maintained in accordance with the provided instructions. Service calls to correct the installation of your appliance or to instruct you how to use of Electrolux Home Products, Inc. Service calls to repair or replace appliance light...keep all costs for service and parts under this appliance that prove to be defective in materials or workmanship when such appliance is installed, used in the USA and Canada. Obligations for repairing or replacing any obligations under this warranty. Product features or specifications as ...
Product Specifications Sheet (English)
Page 2
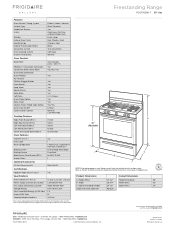
...; 5855 Terry Fox Way • Mississauga, ON L5V 3E4 • 1-800-265-8352 • frigidaire.ca FGGF3056K 01/11 © 2011 Electrolux Home Products, Inc. Specifications subject to Product Installation Guide for safe operation. Always consult local and national electric and gas codes. Width 29-7/8" Width (Min.) 30" Gas Supply Connection Location Right Bottom Rear C -
...; 5855 Terry Fox Way • Mississauga, ON L5V 3E4 • 1-800-265-8352 • frigidaire.ca FGGF3056K 01/11 © 2011 Electrolux Home Products, Inc. Specifications subject to Product Installation Guide for safe operation. Always consult local and national electric and gas codes. Width 29-7/8" Width (Min.) 30" Gas Supply Connection Location Right Bottom Rear C -

Product Specifications Sheet (English)
Page 3
... David Taylor Drive • Charlotte, NC 28262 • 1-800-FRIGIDAIRE • frigidaire.com CANADA • 5855 Terry Fox Way • Mississauga, ON L5V 3E4 • 1-800-265-8352 • frigidaire.ca INSTGDLNS_SSR FR 10/10 © 2010 Electrolux Home Products, Inc. Specifications subject to installation guide, packed with Side-by-Side Refrigerator Use these...
... David Taylor Drive • Charlotte, NC 28262 • 1-800-FRIGIDAIRE • frigidaire.com CANADA • 5855 Terry Fox Way • Mississauga, ON L5V 3E4 • 1-800-265-8352 • frigidaire.ca INSTGDLNS_SSR FR 10/10 © 2010 Electrolux Home Products, Inc. Specifications subject to installation guide, packed with Side-by-Side Refrigerator Use these...

Product Specifications Sheet (English)
Page 4
... Top Mount Refrigerator Use these dimensions and clearance instructions for planning purposes only. For detailed installation instructions, refer to change. Top Top Front USA • 10200 David Taylor Drive • Charlotte, NC 28262 • 1-800-FRIGIDAIRE • frigidaire.com CANADA • 5855 Terry Fox Way • Mississauga, ON L5V 3E4 • 1-800-265...
... Top Mount Refrigerator Use these dimensions and clearance instructions for planning purposes only. For detailed installation instructions, refer to change. Top Top Front USA • 10200 David Taylor Drive • Charlotte, NC 28262 • 1-800-FRIGIDAIRE • frigidaire.com CANADA • 5855 Terry Fox Way • Mississauga, ON L5V 3E4 • 1-800-265...


