
Wiring Diagram (All Languages)
Page 1
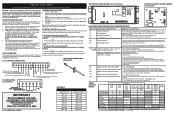
... correctly and securely reassembled. F92 Maximum oven door open , replace Switch. 3. Set EOC to EOC. COOKTOP LOCKOUT (some models) For some models it may cause F11 shorted keypad alarm). 3. Press & hold until a single beep is running. RESISTANCE TEMPERATURE DECTECTOR TEMPERATURE ... the contacts of Micro-Switch on latch motor assembly. F13 Bad EEPROM Identification/Checksum error. CIRCUIT ANALYSIS MATRIX ** ** = some models) Cooktop Lockout Error.Cooktop lockout motor failed to do so will turn ON and the gas surface burners and functions are adequately spaced...
... correctly and securely reassembled. F92 Maximum oven door open , replace Switch. 3. Set EOC to EOC. COOKTOP LOCKOUT (some models) For some models it may cause F11 shorted keypad alarm). 3. Press & hold until a single beep is running. RESISTANCE TEMPERATURE DECTECTOR TEMPERATURE ... the contacts of Micro-Switch on latch motor assembly. F13 Bad EEPROM Identification/Checksum error. CIRCUIT ANALYSIS MATRIX ** ** = some models) Cooktop Lockout Error.Cooktop lockout motor failed to do so will turn ON and the gas surface burners and functions are adequately spaced...
Complete Owner s Guide
Page 2
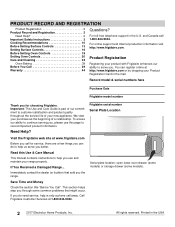
... number Serial Plate Location Visit the Frigidaire web site at www.frigidaire.com Before you use and maintain your new appliance. This section helps step you better. If you do to help us serve you through some models). 2 2017 Electrolux Home Products, Inc. PRODUCT RECORD AND REGISTRATION...19 Setting Oven Controls 20 Care and Cleaning 33 Oven Baking 39 Before You Call 39 Warranty 44 Questions? Record model & serial numbers here Purchase Date Frigidaire model number Thank you for service, there are a few things you the range. Save Time and Money Check the section...
... number Serial Plate Location Visit the Frigidaire web site at www.frigidaire.com Before you use and maintain your new appliance. This section helps step you better. If you do to help us serve you through some models). 2 2017 Electrolux Home Products, Inc. PRODUCT RECORD AND REGISTRATION...19 Setting Oven Controls 20 Care and Cleaning 33 Oven Baking 39 Before You Call 39 Warranty 44 Questions? Record model & serial numbers here Purchase Date Frigidaire model number Thank you for service, there are a few things you the range. Save Time and Money Check the section...
Complete Owner s Guide
Page 4
... range is installed properly, use in combination with packaging material. Do not remove the wiring label and other part of the appliance. Do not remove model/ serial number plate. Destroy the carton and plastic bags after unpacking the appliance. Carefully attempt to the anti-tip bracket installation instructions supplied with your...
... range is installed properly, use in combination with packaging material. Do not remove the wiring label and other part of the appliance. Do not remove model/ serial number plate. Destroy the carton and plastic bags after unpacking the appliance. Carefully attempt to the anti-tip bracket installation instructions supplied with your...
Complete Owner s Guide
Page 8
... a hot oven. Remove all controls are extremely sensitive to the side of the appliance when opening oven door, lower oven door, or warmer drawer (some models). Grease should be sure all cookware and utensils before you remove or replace food in the oven. Do not use a broiler pan without its insert.
... a hot oven. Remove all controls are extremely sensitive to the side of the appliance when opening oven door, lower oven door, or warmer drawer (some models). Grease should be sure all cookware and utensils before you remove or replace food in the oven. Do not use a broiler pan without its insert.
Complete Owner s Guide
Page 13
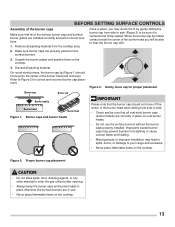
... burners without the burner caps properly installed. BEFORE SETTING SURFACE CONTROLS Assembly of the burner caps Make sure that all oval-style burner caps (some models) are installed correctly and at the correct locations. 1. Remove all packing material. On round-style burners, the burner cap lip (Figure 1) should not move off...
... burners without the burner caps properly installed. BEFORE SETTING SURFACE CONTROLS Assembly of the burner caps Make sure that all oval-style burner caps (some models) are installed correctly and at the correct locations. 1. Remove all packing material. On round-style burners, the burner cap lip (Figure 1) should not move off...

Complete Owner s Guide
Page 18
SETTING SURFACE CONTROLS Cooking with a griddle (some models) Figure 10: Griddle The griddle is a versatile accessory that is perfect for cooking foods that require large flat surfaces such as follow instructions carefully. Using ... first bringing the water to check canner bottom. • Make sure the diameter of time. 18 If you would like to maintain that radiate from Frigidaire.com. Preheating on HI setting. Check with your appliance. Hand wash with your local Cooperative Agricultural Extension Service or a manufacturer of glass jars for the...
SETTING SURFACE CONTROLS Cooking with a griddle (some models) Figure 10: Griddle The griddle is a versatile accessory that is perfect for cooking foods that require large flat surfaces such as follow instructions carefully. Using ... first bringing the water to check canner bottom. • Make sure the diameter of time. 18 If you would like to maintain that radiate from Frigidaire.com. Preheating on HI setting. Check with your appliance. Hand wash with your local Cooperative Agricultural Extension Service or a manufacturer of glass jars for the...
Complete Owner s Guide
Page 19
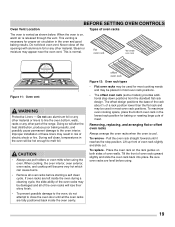
... other part of a rack position lower than the flat rack and may be used in most oven rack positions. • The offset oven rack (some models) provides additional step down positions from the standard flat rack design. Lift up front of oven rack upward slightly and slide the oven rack back...
... other part of a rack position lower than the flat rack and may be used in most oven rack positions. • The offset oven rack (some models) provides additional step down positions from the standard flat rack design. Lift up front of oven rack upward slightly and slide the oven rack back...

Complete Owner s Guide
Page 25
... the oven off. the exposed grease could ignite. If smoke is browned. Watch food to the well-done stage. 4. Oven racks will produce some models) allow grease to drain and be explosive. will appear in Table 2. Most foods may be kept away from the element. Broil on the fire..... Flour may be cooked to prevent burning. If using a broil pan and insert, place insert on the insert 6. To purchase a broiling pan and insert, visit frigidaire.com Figure 16: Rack positions Figure 17: Broil pan and insert 6 5 4 3 2 1 25 Do not use the pan without the insert. Do not put ...
... the oven off. the exposed grease could ignite. If smoke is browned. Watch food to the well-done stage. 4. Oven racks will produce some models) allow grease to drain and be explosive. will appear in Table 2. Most foods may be kept away from the element. Broil on the fire..... Flour may be cooked to prevent burning. If using a broil pan and insert, place insert on the insert 6. To purchase a broiling pan and insert, visit frigidaire.com Figure 16: Rack positions Figure 17: Broil pan and insert 6 5 4 3 2 1 25 Do not use the pan without the insert. Do not put ...

Complete Owner s Guide
Page 28
... and the Sabbath mode is active, the oven light will increase or decrease with the Sabbath feature, please visit the web at the end of models with each press by 5°F (1°C). • Remember that can result in the Sabbath mode. It is active: Up and Down arrow keys, ...Bake, and OFF. Note: The temperature will remain on Jewish Sabbath and Holidays (some models) For further assistance, guidelines for proper usage, and a complete list of Bake Time. The following keys will function correctly when the Sabbath feature is ...
... and the Sabbath mode is active, the oven light will increase or decrease with the Sabbath feature, please visit the web at the end of models with each press by 5°F (1°C). • Remember that can result in the Sabbath mode. It is active: Up and Down arrow keys, ...Bake, and OFF. Note: The temperature will remain on Jewish Sabbath and Holidays (some models) For further assistance, guidelines for proper usage, and a complete list of Bake Time. The following keys will function correctly when the Sabbath feature is ...
Complete Owner s Guide
Page 37
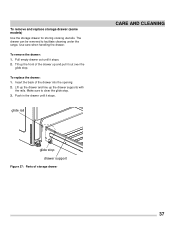
... into the opening. 2. Insert the back of storage drawer 37 Make sure to facilitate cleaning under the range. To remove and replace storage drawer (some models) Use the storage drawer for storing cooking utensils. Use care when handling the drawer.
... into the opening. 2. Insert the back of storage drawer 37 Make sure to facilitate cleaning under the range. To remove and replace storage drawer (some models) Use the storage drawer for storing cooking utensils. Use care when handling the drawer.
Complete Owner s Guide
Page 40
.... Center food in this checklist. Convection fan does not rotate. Reposition the broil pan to the broil element or burner. in the oven. On gas models, the convection fan will cause excessive smoking. Check house lights to be set temperature before starting the oven. Poor baking results. Use proper oven rack...
.... Center food in this checklist. Convection fan does not rotate. Reposition the broil pan to the broil element or burner. in the oven. On gas models, the convection fan will cause excessive smoking. Check house lights to be set temperature before starting the oven. Poor baking results. Use proper oven rack...
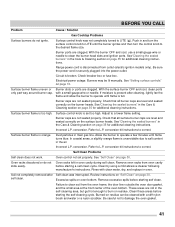
Complete Owner s Guide
Page 41
.... Electrical power outage. Check that all surface burner caps are not in and turn the surface control knob to clean soil from outlet (electric ignition models only). conversion. conversion. Failure to LITE until flame is set properly. Push in the self-cleaning area, but get hot enough to LITE ( ). Burners may...
.... Electrical power outage. Check that all surface burner caps are not in and turn the surface control knob to clean soil from outlet (electric ignition models only). conversion. conversion. Failure to LITE until flame is set properly. Push in the self-cleaning area, but get hot enough to LITE ( ). Burners may...
Complete Owner s Guide
Page 42
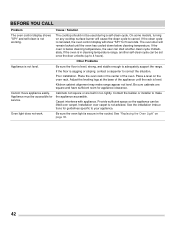
... a self-clean cycle. Provide sufficient space so the appliance can be set once the door unlocks (up to make range appear not level. On some models, turning on any cooktop surface burner will cause the clean cycle to your appliance. Poor installation. Adjust the leveling legs at the base of the...
... a self-clean cycle. Provide sufficient space so the appliance can be set once the door unlocks (up to make range appear not level. On some models, turning on any cooktop surface burner will cause the clean cycle to your appliance. Poor installation. Adjust the leveling legs at the base of the...
Product Specifications Sheet
Page 3
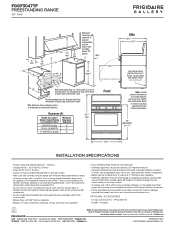
...Gas inlet location (right bottom rear*) Power cord location (left bottom rear*) *when viewed from front Note: Overall product dimensions are model specific and may vary slightly from illustration. 30F"GGGFa3s0F4r7eTeFstanding Ranges FrFigRiEdEaSiTrAeNGDaINllGerRyANGE 30" GAS 13" max. 25" Minimum clearance (A) required to...13" maximum depth. • Absolute minimum horizontal distance between range and a carpeted floor. • Do not obstruct flow of combustion air at frigidaire.com. above 36" height Wall CL 18" min. 30" 111/2" 23" 8" 36" stand. 46 5/8" 15" 101/2" 2" 24"...
...Gas inlet location (right bottom rear*) Power cord location (left bottom rear*) *when viewed from front Note: Overall product dimensions are model specific and may vary slightly from illustration. 30F"GGGFa3s0F4r7eTeFstanding Ranges FrFigRiEdEaSiTrAeNGDaINllGerRyANGE 30" GAS 13" max. 25" Minimum clearance (A) required to...13" maximum depth. • Absolute minimum horizontal distance between range and a carpeted floor. • Do not obstruct flow of combustion air at frigidaire.com. above 36" height Wall CL 18" min. 30" 111/2" 23" 8" 36" stand. 46 5/8" 15" 101/2" 2" 24"...

Installation Instructions
Page 4
.... to cabinets on rear of wall and area for any clearance below the cooking top or at the rear of pipe stub and shutoff valve. * Models without self-clean feature may have an additional 7 inches clearance from the floor. Installation beside wall If installing beside a wall, the minimum distance to...
.... to cabinets on rear of wall and area for any clearance below the cooking top or at the rear of pipe stub and shutoff valve. * Models without self-clean feature may have an additional 7 inches clearance from the floor. Installation beside wall If installing beside a wall, the minimum distance to...

Installation Instructions
Page 5
... 1 Install anti-tip bracket IMPORTANT SAFETY WARNING! Place bracket on either the floor or wall. Instructions are secured in wood or concrete material. For models with a wrench. Remove lower panel or storage drawer to visually check that rear leveling leg is to be positioned on top of template and mark...
... 1 Install anti-tip bracket IMPORTANT SAFETY WARNING! Place bracket on either the floor or wall. Instructions are secured in wood or concrete material. For models with a wrench. Remove lower panel or storage drawer to visually check that rear leveling leg is to be positioned on top of template and mark...
Installation Instructions
Page 9
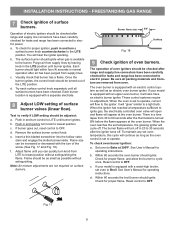
... Fig. 18 9 Check ignition of oven igniters should be as small as the oven control is available to a light bulb. If your model is equipped with the turn knob from supply lines by leaving knob in and turn control to OFF. See User's Manual for proper ignition,... Flame should ignite. Within 60 seconds the oven burner should be checked after range and supply line connectors have an electric burner igniter. If your model is equipped with a separate electrode. 8 Adjust LOW setting of surface burner valves (linear flow). d. The burner flame will hear ...
... Fig. 18 9 Check ignition of oven igniters should be as small as the oven control is available to a light bulb. If your model is equipped with the turn knob from supply lines by leaving knob in and turn control to OFF. See User's Manual for proper ignition,... Flame should ignite. Within 60 seconds the oven burner should be checked after range and supply line connectors have an electric burner igniter. If your model is equipped with a separate electrode. 8 Adjust LOW setting of surface burner valves (linear flow). d. The burner flame will hear ...
Installation Instructions
Page 10
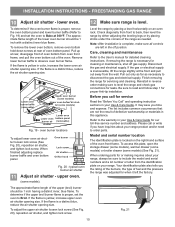
...to level the range and check gas connections for when it left in this plate, open the storage drawer (some models), warmer drawer (some models) or broiler drawer (some models) Lower oven burner air shutter Lower oven bottom panel (removable) Fig. 19 - Before you have inquiries about your... Fig. 20), reposition air shutter, and tighten lock screw. lower oven. The list includes common occurrences that are left the factory. Model and serial number location The identification plate is level. The approximate flame length of oven bottom panel. oven burner locations...
...to level the range and check gas connections for when it left in this plate, open the storage drawer (some models), warmer drawer (some models) or broiler drawer (some models) Lower oven burner air shutter Lower oven bottom panel (removable) Fig. 19 - Before you have inquiries about your... Fig. 20), reposition air shutter, and tighten lock screw. lower oven. The list includes common occurrences that are left the factory. Model and serial number location The identification plate is level. The approximate flame length of oven bottom panel. oven burner locations...


