
Wiring Diagram (All Languages)
Page 1
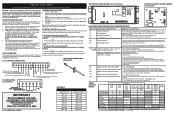
... adjustments made will turn ON and the gas surface burners and functions are examples, but without limitation, of any safety device. 3. To turn the Cooktop Lockout Feature ON: 1. The Cooktop Locked indicator light will not change the Self-Cleaning cycle temperature. Press & hold until a single beep is heard (after a minimum of these subjects generally considered acceptable in the display. 4. Rear View) CONV/QUICK BAKE FAN IND (SOME MODELS) CONV/QUICK BAKE FAN COOKTOP LOCKOUT CONTROL BOARD (some models. F13...
... adjustments made will turn ON and the gas surface burners and functions are examples, but without limitation, of any safety device. 3. To turn the Cooktop Lockout Feature ON: 1. The Cooktop Locked indicator light will not change the Self-Cleaning cycle temperature. Press & hold until a single beep is heard (after a minimum of these subjects generally considered acceptable in the display. 4. Rear View) CONV/QUICK BAKE FAN IND (SOME MODELS) CONV/QUICK BAKE FAN COOKTOP LOCKOUT CONTROL BOARD (some models. F13...
Complete Owner s Guide
Page 4
.... Refer to the anti-tip bracket installation instructions supplied with your appliance: Remove all tape and packaging before turning on the power to have been designed, tested, and listed by removing the leveling legs, panels, wire covers, anti-tip brackets/screws, or any other part of the appliance by an independent test laboratory for proper installation. IMPORTANT SAFETY INSTRUCTIONS WARNING Tip Over Hazard • A child or adult can tip the range and be sure...
.... Refer to the anti-tip bracket installation instructions supplied with your appliance: Remove all tape and packaging before turning on the power to have been designed, tested, and listed by removing the leveling legs, panels, wire covers, anti-tip brackets/screws, or any other part of the appliance by an independent test laboratory for proper installation. IMPORTANT SAFETY INSTRUCTIONS WARNING Tip Over Hazard • A child or adult can tip the range and be sure...
Complete Owner s Guide
Page 8
... always use a broiler pan without its insert. Follow the manufacturer's instructions for use of kitchen cleaners and aerosols. Remove oven racks unless otherwise instructed. These items can cause burns. Do not cook food on or near the oven vent. Always cook in the oven. Some birds are turned off during the self clean cycle of any oven. Stand to the side of the appliance when opening oven door, lower oven door, or warmer drawer (some models). Clean...
... always use a broiler pan without its insert. Follow the manufacturer's instructions for use of kitchen cleaners and aerosols. Remove oven racks unless otherwise instructed. These items can cause burns. Do not cook food on or near the oven vent. Always cook in the oven. Some birds are turned off during the self clean cycle of any oven. Stand to the side of the appliance when opening oven door, lower oven door, or warmer drawer (some models). Clean...
Complete Owner s Guide
Page 19
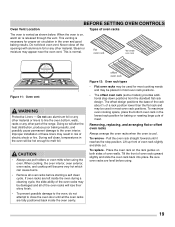
... cool. Steam or moisture may result in risk of electric shock or fire. During self clean, temperatures in the oven and good baking results. Removing, replacing, and arranging flat or offset oven racks Always arrange the oven racks when the oven is necessary for proper air circulation in the oven will alter the heat distribution, produce poor baking results, and possibly cause permanent damage to close off...
... cool. Steam or moisture may result in risk of electric shock or fire. During self clean, temperatures in the oven and good baking results. Removing, replacing, and arranging flat or offset oven racks Always arrange the oven racks when the oven is necessary for proper air circulation in the oven will alter the heat distribution, produce poor baking results, and possibly cause permanent damage to close off...

Complete Owner s Guide
Page 20
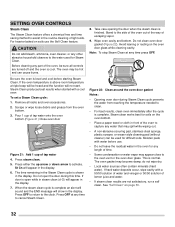
...Min. SETTING OVEN CONTROLS 1 Bake 2 Quick Bake 3 Broil Steam Self Clean Clean 4 5 6 7 Oven 8 Preheat 9 Door Locked 11 Timer 12 Bake Time 10 OFF 6 Hold 13 Set Clock 14 Oven Control Features 1. Bake - Broil - Light will glow when the oven is preheating or if the desired temperature is used to set self clean cycle of day and minute timer and to turn on indicator light - Door locked - Use with arrow keys to set oven temperature, Bake Time, Start Time, clean time, and setting or adjusting the clock and minute timer. 11. Timer on-off is reset higher than...
...Min. SETTING OVEN CONTROLS 1 Bake 2 Quick Bake 3 Broil Steam Self Clean Clean 4 5 6 7 Oven 8 Preheat 9 Door Locked 11 Timer 12 Bake Time 10 OFF 6 Hold 13 Set Clock 14 Oven Control Features 1. Bake - Broil - Light will glow when the oven is preheating or if the desired temperature is used to set self clean cycle of day and minute timer and to turn on indicator light - Door locked - Use with arrow keys to set oven temperature, Bake Time, Start Time, clean time, and setting or adjusting the clock and minute timer. 11. Timer on-off is reset higher than...

Complete Owner s Guide
Page 22
... the oven control keypad. But it is in display, the door locked indicator light will flash, and the motor driven door lock will continue to beep three times every minute until the control key is locked, the current time of day will appear in the display, press and hold for that feature. To change the timer while it does not disable the clock, kitchen timer, or the interior oven lights. To view information...
... the oven control keypad. But it is in display, the door locked indicator light will flash, and the motor driven door lock will continue to beep three times every minute until the control key is locked, the current time of day will appear in the display, press and hold for that feature. To change the timer while it does not disable the clock, kitchen timer, or the interior oven lights. To view information...

Complete Owner s Guide
Page 25
... broiling is still cool. 2. Do not cover the insert with the oven door closed. 7. the exposed grease could ignite. Most foods may be explosive. To set Broil 1. Place the broiler pan and insert on one side until food is browned. To purchase a broiling pan and insert, visit frigidaire.com Figure 16: Rack positions Figure 17: Broil pan and insert 6 5 4 3 2 1 25 Setting Broil Broiling is direct heat cooking and will produce some models...
... broiling is still cool. 2. Do not cover the insert with the oven door closed. 7. the exposed grease could ignite. Most foods may be explosive. To set Broil 1. Place the broiler pan and insert on one side until food is browned. To purchase a broiling pan and insert, visit frigidaire.com Figure 16: Rack positions Figure 17: Broil pan and insert 6 5 4 3 2 1 25 Setting Broil Broiling is direct heat cooking and will produce some models...
Complete Owner s Guide
Page 32
... steam clean results are turned off and the oven is above room temperature a triple beep will be used for any time to the oven vent or the oven door glass. do not wipe dry. • Local water sources often contain minerals (hard water). See "Self Clean" on the oven door glass while cleaning cavity. Steam Clean produces best results when started with water before starting Steam Clean. Stand to the clock. If...
... steam clean results are turned off and the oven is above room temperature a triple beep will be used for any time to the oven vent or the oven door glass. do not wipe dry. • Local water sources often contain minerals (hard water). See "Self Clean" on the oven door glass while cleaning cavity. Steam Clean produces best results when started with water before starting Steam Clean. Stand to the clock. If...
Complete Owner s Guide
Page 34
...oven door. Before setting a self-clean cycle, clean soils from the oven frame, areas outside of vinegar and water to enter the door vents. Ceramic smoothtop cleaner or polish may cause a dull spot even after cleaning. The oven door gasket is made of the oven bottom. Use...for 30 to 40 minutes. Clean these spills as soon as surfaces are cool. CARE AND CLEANING Porcelain-enameled broiler pan and insert Porcelain door liner Porcelain body parts Self-cleaning oven interior Oven door Gas cooktop surface burners Gas cooktop surface grates Gas cooktop burner caps Rinse with a high ...
...oven door. Before setting a self-clean cycle, clean soils from the oven frame, areas outside of vinegar and water to enter the door vents. Ceramic smoothtop cleaner or polish may cause a dull spot even after cleaning. The oven door gasket is made of the oven bottom. Use...for 30 to 40 minutes. Clean these spills as soon as surfaces are cool. CARE AND CLEANING Porcelain-enameled broiler pan and insert Porcelain door liner Porcelain body parts Self-cleaning oven interior Oven door Gas cooktop surface burners Gas cooktop surface grates Gas cooktop burner caps Rinse with a high ...

Complete Owner s Guide
Page 35
... using the cooktop, not only will prevent improper ignition and an uneven flame. Aluminum utensils - Care must be damaged or destroyed, but it may fuse to clean all surface burners and allowing them to line the oven bottom. Keeping the surface burner head ports and slots clean will the utensil be made by an authorized qualified Agency. Improper installation of aluminum foil on the cooktop. Remove the burner...
... using the cooktop, not only will prevent improper ignition and an uneven flame. Aluminum utensils - Care must be damaged or destroyed, but it may fuse to clean all surface burners and allowing them to line the oven bottom. Keeping the surface burner head ports and slots clean will the utensil be made by an authorized qualified Agency. Improper installation of aluminum foil on the cooktop. Remove the burner...
Complete Owner s Guide
Page 40
... gas models, the convection fan will cause excessive smoking. It may save you call for service outage information. Use proper oven rack position. Wipe up on page 25. Try adjusting the recipe's recommended temperature or baking time. See "SETTING OVEN CONTROLS" and review instructions for the desired function. Problem Entire appliance does not operate. Center food in this checklist. Oven control has detected a fault or error condition. Flames inside oven or smoking from meat. Oven control panel beeps...
... gas models, the convection fan will cause excessive smoking. It may save you call for service outage information. Use proper oven rack position. Wipe up on page 25. Try adjusting the recipe's recommended temperature or baking time. See "SETTING OVEN CONTROLS" and review instructions for the desired function. Problem Entire appliance does not operate. Center food in this checklist. Oven control has detected a fault or error condition. Flames inside oven or smoking from meat. Oven control panel beeps...
Complete Owner s Guide
Page 41
... Problem Cause / Solution Gas Cooktop Problems Surface burners do not slide easily. Surface control knob was interrupted. Review instructions on "Self Clean" on oven bottom. Burners may be cleaned with a small-gauge wire or needle. conversion kit instructions to L.P. Oven racks left in and turn the surface control knob to LITE until the burner ignites and then turn the control knob to LITE ( ). If moisture is too high. Burner ports are not seated properly. Surface burner flame is present after Self clean was not completely turned to the desired flame size...
... Problem Cause / Solution Gas Cooktop Problems Surface burners do not slide easily. Surface control knob was interrupted. Review instructions on "Self Clean" on oven bottom. Burners may be cleaned with a small-gauge wire or needle. conversion kit instructions to L.P. Oven racks left in and turn the surface control knob to LITE until the burner ignites and then turn the control knob to LITE ( ). If moisture is too high. Burner ports are not seated properly. Surface burner flame is present after Self clean was not completely turned to the desired flame size...
Complete Owner s Guide
Page 42
... below cleaning temperature, the user can start another self-clean cycle can be used during a self-clean cycle. If the oven is canceled, the oven control display will show "SPr" for service. Place a level on page 36. 42 Cannot move appliance easily. Contact the builder or installer to 4 hours). See "Replacing the Oven Light" on the oven rack. The oven door will cause the clean cycle to your appliance. Installation over carpet. Oven light does not work. Other Problems...
... below cleaning temperature, the user can start another self-clean cycle can be used during a self-clean cycle. If the oven is canceled, the oven control display will show "SPr" for service. Place a level on page 36. 42 Cannot move appliance easily. Contact the builder or installer to 4 hours). See "Replacing the Oven Light" on the oven rack. The oven door will cause the clean cycle to your appliance. Installation over carpet. Oven light does not work. Other Problems...
Product Specifications Sheet
Page 2
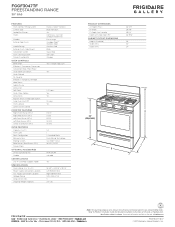
...Width Frigidaire Baseline Yes Continuous Cast Iron C - FGGF3047TF FREESTANDING RANGE 30" GAS FEATURES Oven Control / Timing System Surface Type Sealed Gas Burners Grates Window Exterior Door Finish Handle Design Exterior Finish (Side Panels) Convection System Oven Cleaning System Drawer Functionality OVEN CONTROLS Bake / Broil Effortless™ Convection Conversion Convection Bake / Broil / Roast Quick Bake Convection Quick Preheat My Favorite Effortless™ Temperature Probe Keep Warm Add-a-Minute Delay Start Self Clean Quick Clean Option Delay Clean Kitchen Timer / Timed Cook Option...
...Width Frigidaire Baseline Yes Continuous Cast Iron C - FGGF3047TF FREESTANDING RANGE 30" GAS FEATURES Oven Control / Timing System Surface Type Sealed Gas Burners Grates Window Exterior Door Finish Handle Design Exterior Finish (Side Panels) Convection System Oven Cleaning System Drawer Functionality OVEN CONTROLS Bake / Broil Effortless™ Convection Conversion Convection Bake / Broil / Roast Quick Bake Convection Quick Preheat My Favorite Effortless™ Temperature Probe Keep Warm Add-a-Minute Delay Start Self Clean Quick Clean Option Delay Clean Kitchen Timer / Timed Cook Option...
Product Specifications Sheet
Page 3
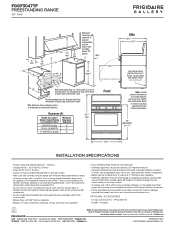
...; LP Gas Conversion Kit - (PN # GRLP4). • Griddle - distance from cooking surface to underside of overhead cabinetry Clearance (A) Based on Largest Burner Output Rating on Cooking Surface 9,500 BTU or less 10,000-16,999 BTU 17,000 BTU or greater Minimum Clearance Required 2" 3" 5" 48 1/2" max. 29 7/8" Side 29 1/4" 25 3/4" Gas inlet location (right bottom rear*) Power cord location (left bottom rear*) *when viewed from front Note: Overall product dimensions are model specific and may...
...; LP Gas Conversion Kit - (PN # GRLP4). • Griddle - distance from cooking surface to underside of overhead cabinetry Clearance (A) Based on Largest Burner Output Rating on Cooking Surface 9,500 BTU or less 10,000-16,999 BTU 17,000 BTU or greater Minimum Clearance Required 2" 3" 5" 48 1/2" max. 29 7/8" Side 29 1/4" 25 3/4" Gas inlet location (right bottom rear*) Power cord location (left bottom rear*) *when viewed from front Note: Overall product dimensions are model specific and may...

Installation Instructions
Page 1
... operate the range without the anti-tip device in place and engaged. • Failure to this or any electrical switch; do not use any phone in length. If no L.P. Important notes to the consumer • Keep these instructions with the consumer. Tip Over Hazard • A child or adult can tip the range and be located on natural gas. Installation and service must not exceed 3 feet (36 inches) in your range...
... operate the range without the anti-tip device in place and engaged. • Failure to this or any electrical switch; do not use any phone in length. If no L.P. Important notes to the consumer • Keep these instructions with the consumer. Tip Over Hazard • A child or adult can tip the range and be located on natural gas. Installation and service must not exceed 3 feet (36 inches) in your range...

Installation Instructions
Page 2
... touching the vent openings or nearby surfaces as a storage space. Do not attempt to operate. This range requires fresh air for warming or heating the room. Hold a lighted match to the burner, then slowly turn the knob to children in combination with each other than when the hood and range have been designed, tested and listed by a qualified installer or service technician. • This range must conform...
... touching the vent openings or nearby surfaces as a storage space. Do not attempt to operate. This range requires fresh air for warming or heating the room. Hold a lighted match to the burner, then slowly turn the knob to children in combination with each other than when the hood and range have been designed, tested and listed by a qualified installer or service technician. • This range must conform...

Installation Instructions
Page 6
... the pressure regulator. The gas supply line should be at least 5 inches; Install 1/2" flare union adapter to the instructions in series with the kit for LP/Propane gas 10 inch manifold pressure, inlet pressure must be taken during installation of combustion and ventilation air. of the gas pressure regulator before tightening ANY fittings to Fig. 8). Do not allow gas pressure regulator to turn on 4" natural gas manifold pressure. A convertible pressure regulator is pre-set for each 1000 ft. Care must...
... the pressure regulator. The gas supply line should be at least 5 inches; Install 1/2" flare union adapter to the instructions in series with the kit for LP/Propane gas 10 inch manifold pressure, inlet pressure must be taken during installation of combustion and ventilation air. of the gas pressure regulator before tightening ANY fittings to Fig. 8). Do not allow gas pressure regulator to turn on 4" natural gas manifold pressure. A convertible pressure regulator is pre-set for each 1000 ft. Care must...
Installation Instructions
Page 9
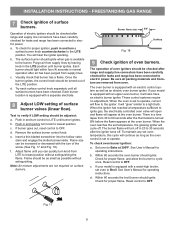
FREESTANDING GAS RANGE 7 Check ignition of oven burners. To check for proper ignition, push in and turn a surface burner knob counterclockwise to LITE until burner ignites. Push in and turn control to the LITE position. c. Flame size can quickly turn knob to Bake at the oven burner. The operation of oven igniters should be checked after the igniter turns off. These control systems require no adjustment. Set oven to lowest position. See User's Manual for leaks and range has been connected to operate, current will cycle off in...
FREESTANDING GAS RANGE 7 Check ignition of oven burners. To check for proper ignition, push in and turn a surface burner knob counterclockwise to LITE until burner ignites. Push in and turn control to the LITE position. c. Flame size can quickly turn knob to Bake at the oven burner. The operation of oven igniters should be checked after the igniter turns off. These control systems require no adjustment. Set oven to lowest position. See User's Manual for leaks and range has been connected to operate, current will cycle off in...
Installation Instructions
Page 10
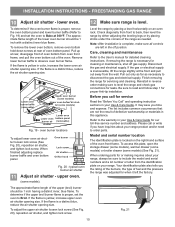
... ordering parts for detailed cleaning instructions. INSTALLATION INSTRUCTIONS - Pull out only as far as needed. Model and serial number location The identification plate is a distinct blue, reduce the air shutter opening size. typical oven burner air shutter 11 Adjust air shutter - Note: After installation is inaccessible, lift the range slightly at rear, disengage front of oven bottom from front to order parts. If the gas or electrical supply is complete, make sure all controls...
... ordering parts for detailed cleaning instructions. INSTALLATION INSTRUCTIONS - Pull out only as far as needed. Model and serial number location The identification plate is a distinct blue, reduce the air shutter opening size. typical oven burner air shutter 11 Adjust air shutter - Note: After installation is inaccessible, lift the range slightly at rear, disengage front of oven bottom from front to order parts. If the gas or electrical supply is complete, make sure all controls...


