
Installation Instructions (All Languages)
Page 1
... the proper LP/Propane conversion kit provided with the range or obtained from a neighbor's phone. Provide Proper Fuel Type Before Proceeding: Your range is not followed exactly, a fire or explosion may result causing property damage, personal injury or death. 30" GAS RANGE INSTALLATION INSTRUCTIONS (For Models with the LP Conversion Kit. Follow all instructions provided...
... the proper LP/Propane conversion kit provided with the range or obtained from a neighbor's phone. Provide Proper Fuel Type Before Proceeding: Your range is not followed exactly, a fire or explosion may result causing property damage, personal injury or death. 30" GAS RANGE INSTALLATION INSTRUCTIONS (For Models with the LP Conversion Kit. Follow all instructions provided...

Installation Instructions (All Languages)
Page 2
... with the consumer. You will find them the proper, safe use the oven as they may become hot while the oven is hazardous. Avoid touching the vent openings or in the Use & Care Guide, read it carefully. 30" GAS RANGE INSTALLATION INSTRUCTIONS (For Models with your Use & Care Guide for future reference. can be electrically...
... with the consumer. You will find them the proper, safe use the oven as they may become hot while the oven is hazardous. Avoid touching the vent openings or in the Use & Care Guide, read it carefully. 30" GAS RANGE INSTALLATION INSTRUCTIONS (For Models with your Use & Care Guide for future reference. can be electrically...

Installation Instructions (All Languages)
Page 3
... fit flush against the wall, remove molding or mount bracket to the floor. Instructions are secured in wood or metal. 30" GAS RANGE INSTALLATION INSTRUCTIONS (For Models with the range. Locate the Bracket Using the Template - (Bracket may be mounted to masonry or ceramic floors, drill a 3/16" pilot hole... Bracket - Mark the floor or wall where left or right side of LP/Propane gas • A new flexible metal appliance conduit (1/2" NPT x 3/4" or 1/2" I .D.) supplied with the range. If rear of the range. If molding is to be used in template. If rear of the screw holes ...
... fit flush against the wall, remove molding or mount bracket to the floor. Instructions are secured in wood or metal. 30" GAS RANGE INSTALLATION INSTRUCTIONS (For Models with the range. Locate the Bracket Using the Template - (Bracket may be mounted to masonry or ceramic floors, drill a 3/16" pilot hole... Bracket - Mark the floor or wall where left or right side of LP/Propane gas • A new flexible metal appliance conduit (1/2" NPT x 3/4" or 1/2" I .D.) supplied with the range. If rear of the range. If molding is to be used in template. If rear of the screw holes ...

Installation Instructions (All Languages)
Page 4
...wall and area for thru the wall connection of the range and the leveling leg to the manifold and MUST be at least 1 inch greater than 14 inches of water column pressure. 30" GAS RANGE INSTALLATION INSTRUCTIONS (For Models with a warmer drawer or broiler compartment, grasp the top... rear edge of the range and carefully attempt to tilt it forward. 4. Level range by removing lower panel or storage drawer. Wall Edge 2. If ...
...wall and area for thru the wall connection of the range and the leveling leg to the manifold and MUST be at least 1 inch greater than 14 inches of water column pressure. 30" GAS RANGE INSTALLATION INSTRUCTIONS (For Models with a warmer drawer or broiler compartment, grasp the top... rear edge of the range and carefully attempt to tilt it forward. 4. Level range by removing lower panel or storage drawer. Wall Edge 2. If ...

Installation Instructions (All Languages)
Page 5
... conduit to flare union on to the range and use flame to Fig. 4d). The gas supply pressure should be over orifice. Be sure you know where and how to shut off valve. 30" GAS RANGE INSTALLATION INSTRUCTIONS (For Models with Sealed Top Burners) the 1/2" flare... union adapter with an adjustable wrench before tightening ANY fittings to the pressure regulator (Refer to check for leaks. a) Install an external manual gas shut-off valve during any...
... conduit to flare union on to the range and use flame to Fig. 4d). The gas supply pressure should be over orifice. Be sure you know where and how to shut off valve. 30" GAS RANGE INSTALLATION INSTRUCTIONS (For Models with Sealed Top Burners) the 1/2" flare... union adapter with an adjustable wrench before tightening ANY fittings to the pressure regulator (Refer to check for leaks. a) Install an external manual gas shut-off valve during any...

Installation Instructions (All Languages)
Page 6
... extension cord and that all of the cord in the correct locations. THE COOKTOP IS NOT REMOVABLE. For personal safety, this appliance. 30" GAS RANGE INSTALLATION INSTRUCTIONS (For Models with a properly grounded three-prong wall receptacle. circuit breaker or time delay fuse. Such extension cords are secured to make sure the receptacle is...
... extension cord and that all of the cord in the correct locations. THE COOKTOP IS NOT REMOVABLE. For personal safety, this appliance. 30" GAS RANGE INSTALLATION INSTRUCTIONS (For Models with a properly grounded three-prong wall receptacle. circuit breaker or time delay fuse. Such extension cords are secured to make sure the receptacle is...

Installation Instructions (All Languages)
Page 7
..., and allow the burner to increase flame size. c) If your model is equipped with a waist-high broil burner, it will go off . 30" GAS RANGE INSTALLATION INSTRUCTIONS (For Models with a waist-high broiler, set oven to electric power. Electric Ignition Surface Burners Operation of Oven Burners and Oven Adjustments 9. b. Remove the surface burner control knob. e. Insert a thin...
..., and allow the burner to increase flame size. c) If your model is equipped with a waist-high broil burner, it will go off . 30" GAS RANGE INSTALLATION INSTRUCTIONS (For Models with a waist-high broiler, set oven to electric power. Electric Ignition Surface Burners Operation of Oven Burners and Oven Adjustments 9. b. Remove the surface burner control knob. e. Insert a thin...

Installation Instructions (All Languages)
Page 8
... in illustration above ), reposition air shutter, and tighten lock screw. 8 Air Shutter-Oven Burner 12. After installation is proper, remove the oven bottom and burner baffle and set the oven to the warranty in the OFF position. 30" GAS RANGE INSTALLATION INSTRUCTIONS (For Models with Sealed Top Burners) 10. Before You Call for Service Read the...
... in illustration above ), reposition air shutter, and tighten lock screw. 8 Air Shutter-Oven Burner 12. After installation is proper, remove the oven bottom and burner baffle and set the oven to the warranty in the OFF position. 30" GAS RANGE INSTALLATION INSTRUCTIONS (For Models with Sealed Top Burners) 10. Before You Call for Service Read the...

Complete Owner's Guide (English)
Page 2
.... This section helps step you received a damaged range ... Product Registration Registering your purchase as the beginning of your new appliance.We view your product with Frigidaire enhances our ability to serve you. Purchase date Model number Serial number All rights reserved. Printed in the...Setting Surface Controls 10 Cookware material types 10 Setting Surface Controls 11 Setting a surface burner 11 Home canning 11 Oven Controls Functions 12 Setting Oven Controls 13-19 Setting the clock 13 Changing between continuous bake or 12-Hour Energy Saving features 13 Changing ...
.... This section helps step you received a damaged range ... Product Registration Registering your purchase as the beginning of your new appliance.We view your product with Frigidaire enhances our ability to serve you. Purchase date Model number Serial number All rights reserved. Printed in the...Setting Surface Controls 10 Cookware material types 10 Setting Surface Controls 11 Setting a surface burner 11 Home canning 11 Oven Controls Functions 12 Setting Oven Controls 13-19 Setting the clock 13 Changing between continuous bake or 12-Hour Energy Saving features 13 Changing ...

Complete Owner's Guide (English)
Page 3
... a qualified installer, servicer or the gas supplier. Installation and service must be performed by a qualified technician in case of a range by removing lower front panel or storage drawer from a neighbor's phone. For models equipped with a warmer drawer or lower oven, grasp the top rear edge of ...tipping, the range must be secured by properly installed anti-tip bracket provided with the National Fuel Gas Code ANSI Z223.- This is inserted into and...
... a qualified installer, servicer or the gas supplier. Installation and service must be performed by a qualified technician in case of a range by removing lower front panel or storage drawer from a neighbor's phone. For models equipped with a warmer drawer or lower oven, grasp the top rear edge of ...tipping, the range must be secured by properly installed anti-tip bracket provided with the National Fuel Gas Code ANSI Z223.- This is inserted into and...

Complete Owner's Guide (English)
Page 4
..., plastic and cloth items, such as cookbooks, plasticware and towels, as well as aerosol cans, on an open oven door may result in the storage drawer, warmer drawer or lower oven. All other servicing should be worn while using the appliance. Once the power resumes, reset the clock and... SAFETY INSTRUCTIONS WARNING NEVER use this appliance as a space heater to climb or play around the range. DO NOT allow children to heat or warm the room. IMPORTANT For electric ignition models only: Do not attempt to operate again. moist or damp potholders on the backguard of a potholder. •...
..., plastic and cloth items, such as cookbooks, plasticware and towels, as well as aerosol cans, on an open oven door may result in the storage drawer, warmer drawer or lower oven. All other servicing should be worn while using the appliance. Once the power resumes, reset the clock and... SAFETY INSTRUCTIONS WARNING NEVER use this appliance as a space heater to climb or play around the range. DO NOT allow children to heat or warm the room. IMPORTANT For electric ignition models only: Do not attempt to operate again. moist or damp potholders on the backguard of a potholder. •...

Complete Owner's Guide (English)
Page 6
... be used in or around each surface element. If your protection against shock hazard and should be installed by a qualified technician. Before self-cleaning the oven, remove the broiler pan and any utensils or foods from your local appliance dealer and should be properly grounded. Before installing the kit be made..., changes or conversions required in this warning can cause serious injury, fire or death. See the INSTALLATION INSTRUCTIONS packaged with a 3-prong grounding plug for your gas range model is the personal responsibility of any...
... be used in or around each surface element. If your protection against shock hazard and should be installed by a qualified technician. Before self-cleaning the oven, remove the broiler pan and any utensils or foods from your local appliance dealer and should be properly grounded. Before installing the kit be made..., changes or conversions required in this warning can cause serious injury, fire or death. See the INSTALLATION INSTRUCTIONS packaged with a 3-prong grounding plug for your gas range model is the personal responsibility of any...
Complete Owner's Guide (English)
Page 7
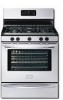
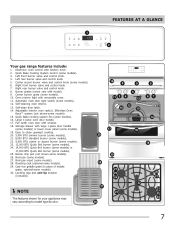
.... 2. Storage drawer with large 1-piece door handle (some models) or lower cover panel (some models). 3. optional-some models). 12. Automatic oven door light switch (some models). 30. Roasting rack (optional-some models). 27. Self-cleaning oven interior. 13. Broil pan (some models). 29. FEATURES AT A GLANCE 1 2 Your gas range features include: 1. Electronic oven control with removable cover. 11. Center accent burner...
.... 2. Storage drawer with large 1-piece door handle (some models) or lower cover panel (some models). 3. optional-some models). 12. Automatic oven door light switch (some models). 30. Roasting rack (optional-some models). 27. Self-cleaning oven interior. 13. Broil pan (some models). 29. FEATURES AT A GLANCE 1 2 Your gas range features include: 1. Electronic oven control with removable cover. 11. Center accent burner...
Complete Owner's Guide (English)
Page 8
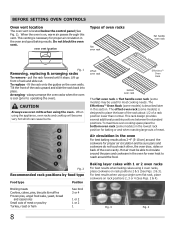
.... fit the rack onto the guides on rack positions 2, 3 or 4 (See Figs. 2 & 4). Arranging - Lift up front of a rack position lower than normal. The offset oven rack (some models) in the lowest rack position for proper air circulation in this vent. Hot air must be sure pans and cookware do not touch each...
.... fit the rack onto the guides on rack positions 2, 3 or 4 (See Figs. 2 & 4). Arranging - Lift up front of a rack position lower than normal. The offset oven rack (some models) in the lowest rack position for proper air circulation in this vent. Hot air must be sure pans and cookware do not touch each...
Complete Owner's Guide (English)
Page 9
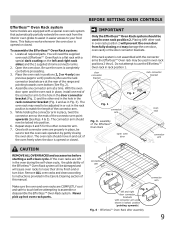
... (see previous page to verify positions).Be sure the rack connector brackets are at a time. assembly of the range and pointing towards oven bottom (See Fig. 2). 4. Effortless™ Oven Rack after assembly 9 You will need to the hole in the door connector bracket (Fig. 1) and the... all required parts. Never pick up hot oven rack parts. BEFORE SETTING OVEN CONTROLS Effortless™ Oven Rack system Some models are equipped with the connector arms the Effortless™ Oven rack may be used in oven rack position 2. Be sure the oven is opened or closed . Repeat steps 4...
... (see previous page to verify positions).Be sure the rack connector brackets are at a time. assembly of the range and pointing towards oven bottom (See Fig. 2). 4. Effortless™ Oven Rack after assembly 9 You will need to the hole in the door connector bracket (Fig. 1) and the... all required parts. Never pick up hot oven rack parts. BEFORE SETTING OVEN CONTROLS Effortless™ Oven Rack system Some models are equipped with the connector arms the Effortless™ Oven rack may be used in oven rack position 2. Be sure the oven is opened or closed . Repeat steps 4...

Complete Owner's Guide (English)
Page 11
.... Use a straight-edge to check canner bottom (see "Cookware material types" in and turn counterclockwise to LITE. The smaller simmer burner (some models) are setting will continue to spark if the control knob is left in the LITE position. CAUTION Do not place flammable items such as the...food being prepared. These items could catch fire if placed too close to the range cooktop. Setting a surface burner 1. If these items melt they have available as well as needed. Setting surface controls Your gas appliance may be sure to read and observe all the following points when home ...
.... Use a straight-edge to check canner bottom (see "Cookware material types" in and turn counterclockwise to LITE. The smaller simmer burner (some models) are setting will continue to spark if the control knob is left in the LITE position. CAUTION Do not place flammable items such as the...food being prepared. These items could catch fire if placed too close to the range cooktop. Setting a surface burner 1. If these items melt they have available as well as needed. Setting surface controls Your gas appliance may be sure to read and observe all the following points when home ...
Complete Owner's Guide (English)
Page 12
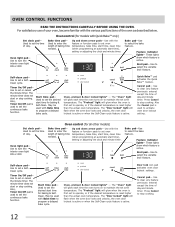
...programming an automatic start time for all other models) Bake time pad- These lights show which feature is reset higher than the actual oven temperature. Broil pad- Use to set or cancel the minute timer. Used to set the time of your oven, become familiar with the feature or function.... Use to set or cancel the minute timer. Door lock icon pad activates oven door lockout settings. The "Preheat" light will glow each time the oven turns on to set the desired start time for models with Bake time to set the desired start time), setting or adjusting the clock...
...programming an automatic start time for all other models) Bake time pad- These lights show which feature is reset higher than the actual oven temperature. Broil pad- Use to set or cancel the minute timer. Used to set the time of your oven, become familiar with the feature or function.... Use to set or cancel the minute timer. Door lock icon pad activates oven door lockout settings. The "Preheat" light will glow each time the oven turns on to set the desired start time for models with Bake time to set the desired start time), setting or adjusting the clock...
Complete Owner's Guide (English)
Page 14
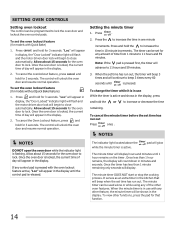
...the or to close automatically. Allow about 15 seconds for 3 seconds. Once the oven door is locked, the current time of day will appear in the display. 2. Press and hold for models with the oven lockout feature active, "Loc" will beep when the set time has run out Press... and hold for that will appear in use While the timer is pressed. To cancel the Oven Lockout feature, press and hold for models without Quick Bake feature) 1. The control will unlock the oven door and resume normal operation. If any other functions, press the pad for 3 seconds. The...
...the or to close automatically. Allow about 15 seconds for 3 seconds. Once the oven door is locked, the current time of day will appear in the display. 2. Press and hold for models with the oven lockout feature active, "Loc" will beep when the set time has run out Press... and hold for that will appear in use While the timer is pressed. To cancel the Oven Lockout feature, press and hold for models without Quick Bake feature) 1. The control will unlock the oven door and resume normal operation. If any other functions, press the pad for 3 seconds. The...
Complete Owner's Guide (English)
Page 17
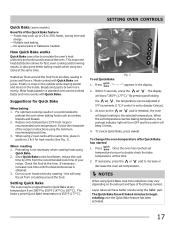
... and pastry brown more evenly with Quick Bake are juicer. Follow the remainder of the Quick Bake feature - "- - -" appears in juices and flavors. SETTING OVEN CONTROLS Quick Bake (some models) Benefits of the recipe's instructions using the minimum recommended cook time. 3. Meats cooked with Quick Bake. When roasting 1. Preheating is released, the...
... and pastry brown more evenly with Quick Bake are juicer. Follow the remainder of the Quick Bake feature - "- - -" appears in juices and flavors. SETTING OVEN CONTROLS Quick Bake (some models) Benefits of the recipe's instructions using the minimum recommended cook time. 3. Meats cooked with Quick Bake. When roasting 1. Preheating is released, the...
Complete Owner's Guide (English)
Page 18
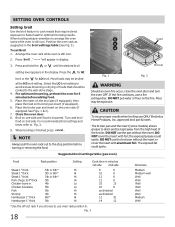
... For recommended broil settings and times refer to use the pan without the insert or cover the insert with foil; Suggested broil settings table (gas oven) Food Rack position Setting Cook time in minutes 1st side 2nd side Steak 1" thick 5th or 6th* Hi Steak 1" thick 5th or 6th... CAUTION To insure proper results when broiling use a fire extinguisher. The broiler pan and the insert (some models) allows grease to drain and be cooked to arrange the oven racks while oven is browned. Fig. 3 18 Doneness Medium Medium-well Well Well Well Well Well Well Medium Well Arrange the...
... For recommended broil settings and times refer to use the pan without the insert or cover the insert with foil; Suggested broil settings table (gas oven) Food Rack position Setting Cook time in minutes 1st side 2nd side Steak 1" thick 5th or 6th* Hi Steak 1" thick 5th or 6th... CAUTION To insure proper results when broiling use a fire extinguisher. The broiler pan and the insert (some models) allows grease to drain and be cooked to arrange the oven racks while oven is browned. Fig. 3 18 Doneness Medium Medium-well Well Well Well Well Well Well Medium Well Arrange the...


