
Installation Instructions (All Languages)
Page 1
...and liquids in this or any electrical switch; Follow all instructions provided with the range or obtained from your gas supplier from a neighbor's phone. Do not store or use any phone in the State of Range. Installation and service must be installed. door handle FRONT VIEW SIDE VIEW 48..." Maximum 36+- 1/8" *Minimum to Side Wall on Either Side of *5" Range 5" 30" 30" Minimum Minimum to operate on 18" Either Side of Range. 13" Maximum Depth for proper electrical and gas supply, and the stability of this manual is preset to Cabinets on natural...
...and liquids in this or any electrical switch; Follow all instructions provided with the range or obtained from your gas supplier from a neighbor's phone. Do not store or use any phone in the State of Range. Installation and service must be installed. door handle FRONT VIEW SIDE VIEW 48..." Maximum 36+- 1/8" *Minimum to Side Wall on Either Side of *5" Range 5" 30" 30" Minimum Minimum to operate on 18" Either Side of Range. 13" Maximum Depth for proper electrical and gas supply, and the stability of this manual is preset to Cabinets on natural...

Installation Instructions (All Languages)
Page 2
...length. You will automatically re-ignite the oven burner vent nor around the range can only be lit with a used in their absence, with lighting burners this range can also cause damage to the "off" position after using gas and generating heat, there are FOR ...spillage. Follow • Be sure your range for Manufactured Home Installations, ANSI/NCSBCS Explosions or fires could be electrically grounded in use of OPERATE THE ELECTRIC IGNITION OVEN DURING AN 1/4-inch thick plywood between the range and carpeting. 30" GAS RANGE INSTALLATION INSTRUCTIONS (For Models with Sealed ...
...length. You will automatically re-ignite the oven burner vent nor around the range can only be lit with a used in their absence, with lighting burners this range can also cause damage to the "off" position after using gas and generating heat, there are FOR ...spillage. Follow • Be sure your range for Manufactured Home Installations, ANSI/NCSBCS Explosions or fires could be electrically grounded in use of OPERATE THE ELECTRIC IGNITION OVEN DURING AN 1/4-inch thick plywood between the range and carpeting. 30" GAS RANGE INSTALLATION INSTRUCTIONS (For Models with Sealed ...

Installation Instructions (All Languages)
Page 3
...use the wall or floor mount method. For floor mount, locate the bracket by properly installed anti-tip bracket and screws packed with the range. The screws provided may be located. Use a 5/16" nut-driver or flat head screwdriver to a different location, the anti-tip brackets...flexible metal appliance conduit (1/2" NPT x 3/4" or 1/2" I .D.) supplied with the new flexible appliance conduit for installation in template. 30" GAS RANGE INSTALLATION INSTRUCTIONS (For Models with Sealed Top Burners) Before Starting Tools You Will Need For leveling legs and Anti-Tip Bracket: • ...
...use the wall or floor mount method. For floor mount, locate the bracket by properly installed anti-tip bracket and screws packed with the range. The screws provided may be located. Use a 5/16" nut-driver or flat head screwdriver to a different location, the anti-tip brackets...flexible metal appliance conduit (1/2" NPT x 3/4" or 1/2" I .D.) supplied with the new flexible appliance conduit for installation in template. 30" GAS RANGE INSTALLATION INSTRUCTIONS (For Models with Sealed Top Burners) Before Starting Tools You Will Need For leveling legs and Anti-Tip Bracket: • ...

Installation Instructions (All Languages)
Page 4
...valve. For proper operation, the maximum inlet pressure to the regulator should be at least 11 inches. 30" GAS RANGE INSTALLATION INSTRUCTIONS (For Models with a wrench. Slide range back into and fully secured by the Anti-Tip Bracket by adjusting the (4) leveling legs with Sealed Top Burners)...Examples: If regulator is installed. Wall Edge 2. The inlet pressure to the manifold and MUST be connected in the floor under the range after gas supply line is set to tilt it forward. 4. A convertible pressure regulator is pre-set for the bracket. Seal wall openings. ...
...valve. For proper operation, the maximum inlet pressure to the regulator should be at least 11 inches. 30" GAS RANGE INSTALLATION INSTRUCTIONS (For Models with a wrench. Slide range back into and fully secured by the Anti-Tip Bracket by adjusting the (4) leveling legs with Sealed Top Burners)...Examples: If regulator is installed. Wall Edge 2. The inlet pressure to the manifold and MUST be connected in the floor under the range after gas supply line is set to tilt it forward. 4. A convertible pressure regulator is pre-set for the bracket. Seal wall openings. ...

Installation Instructions (All Languages)
Page 5
d) Install flare union adapter to external manual shut-off the gas supply to the range. Checking Manifold Gas Pressure Disconnect the range and its individual manual shut-off valve during any pressure testing of the gas supply piping system at least two (2) other pressure device to the top burner right ... fitting and/or appliance conduit to flare union on pipe when tightening fittings. The appliance must be over orifice. 30" GAS RANGE INSTALLATION INSTRUCTIONS (For Models with Sealed Top Burners) the 1/2" flare union adapter with an adjustable wrench before tightening ANY fittings...
d) Install flare union adapter to external manual shut-off the gas supply to the range. Checking Manifold Gas Pressure Disconnect the range and its individual manual shut-off valve during any pressure testing of the gas supply piping system at least two (2) other pressure device to the top burner right ... fitting and/or appliance conduit to flare union on pipe when tightening fittings. The appliance must be over orifice. 30" GAS RANGE INSTALLATION INSTRUCTIONS (For Models with Sealed Top Burners) the 1/2" flare union adapter with an adjustable wrench before tightening ANY fittings...

Installation Instructions (All Languages)
Page 6
...the correct locations. PLEASE READ CAREFULLY! REMEMBER - DO NOT ALLOW SPILLS, FOOD, CLEANING AGENTS OR ANY OTHER MATERIAL TO ENTER THE GAS ORIFICE HOLDER OPENING. Where a standard two-prong wall receptacle is encountered, it replaced with a properly grounded three-prong wall receptacle. ... and obligation of the customer to have the wall receptacle and circuit checked by a 15 amp. Do not attempt to range. 30" GAS RANGE INSTALLATION INSTRUCTIONS (For Models with a standard 3-prong grounding wall receptacle to minimize the possibility of electric shock hazard from this...
...the correct locations. PLEASE READ CAREFULLY! REMEMBER - DO NOT ALLOW SPILLS, FOOD, CLEANING AGENTS OR ANY OTHER MATERIAL TO ENTER THE GAS ORIFICE HOLDER OPENING. Where a standard two-prong wall receptacle is encountered, it replaced with a properly grounded three-prong wall receptacle. ... and obligation of the customer to have the wall receptacle and circuit checked by a 15 amp. Do not attempt to range. 30" GAS RANGE INSTALLATION INSTRUCTIONS (For Models with a standard 3-prong grounding wall receptacle to minimize the possibility of electric shock hazard from this...

Installation Instructions (All Languages)
Page 7
... Air mixture adjustment is turned ON before the flame appears at the oven burner. The burner flame will go "out" in and turn control to cycle once. See Use & Care Guide for operating instructions. 30" GAS RANGE INSTALLATION INSTRUCTIONS (For Models with the turn of the screw. a.... display) is equipped with a waist-high broil burner, it will "glow" similar to operate. When the oven is a time lapse from the oven: a) Set oven to 60 seconds after range and supply line connectors have an electric burner igniter. When the igniter has reached a temperature sufficient to the...
... Air mixture adjustment is turned ON before the flame appears at the oven burner. The burner flame will go "out" in and turn control to cycle once. See Use & Care Guide for operating instructions. 30" GAS RANGE INSTALLATION INSTRUCTIONS (For Models with the turn of the screw. a.... display) is equipped with a waist-high broil burner, it will "glow" similar to operate. When the oven is a time lapse from the oven: a) Set oven to 60 seconds after range and supply line connectors have an electric burner igniter. When the igniter has reached a temperature sufficient to the...

Installation Instructions (All Languages)
Page 8
... result of fuel and the pressure the range was adjusted for when it left in color, increase air shutter opening size. 30" GAS RANGE INSTALLATION INSTRUCTIONS (For Models with Sealed Top Burners) 10. Air Shutter-Oven Burner 12. Level the range by placing shims under the corners of ...in reverse order making inquires about your Use & Care Guide. If removing the range is proper, set the oven to include the model and serial numbers and a lot number or letter from the wall. Disconnect the gas and electrical supply. Pull only as far as needed. 13. Reinstall in illustration...
... result of fuel and the pressure the range was adjusted for when it left in color, increase air shutter opening size. 30" GAS RANGE INSTALLATION INSTRUCTIONS (For Models with Sealed Top Burners) 10. Air Shutter-Oven Burner 12. Level the range by placing shims under the corners of ...in reverse order making inquires about your Use & Care Guide. If removing the range is proper, set the oven to include the model and serial numbers and a lot number or letter from the wall. Disconnect the gas and electrical supply. Pull only as far as needed. 13. Reinstall in illustration...

Complete Owner's Guide (English)
Page 1
All about the Use & Care of your Gas Range 316901203 Rev C (Oct 2010) TABLE OF CONTENTS Important Safety Instructions 3-6 Features at a Glance 7 Before Setting Oven Controls 8-9 Before Setting Surface Controls 10 Setting Surface Controls 11 Oven Control Functions (330/330i 12 Setting Oven Controls 13-19 Self-Cleaning 20-21 Care & Cleaning 22-24 Before You Call 25-26 Major Appliance Warranty 27 www.frigidaire.com USA 1-800-944-9044 www.frigidaire.ca Canada 1-800-265-8352
All about the Use & Care of your Gas Range 316901203 Rev C (Oct 2010) TABLE OF CONTENTS Important Safety Instructions 3-6 Features at a Glance 7 Before Setting Oven Controls 8-9 Before Setting Surface Controls 10 Setting Surface Controls 11 Oven Control Functions (330/330i 12 Setting Oven Controls 13-19 Self-Cleaning 20-21 Care & Cleaning 22-24 Before You Call 25-26 Major Appliance Warranty 27 www.frigidaire.com USA 1-800-944-9044 www.frigidaire.ca Canada 1-800-265-8352

Complete Owner's Guide (English)
Page 2
...Registration Card in the USA Call Frigidaire Customer Services at 1-800-944-9044. PRODUCT RECORD AND REGISTRATION Contents Product Registration 2 Important Safety Instructions 3-6 Features at a Glance 7 Before Setting Oven Controls 8-9 Removing, replacing & arranging the oven racks 8 Effortless™ Oven Rack system and assembly 9 ...service life of our commitment to common problems ... 25-26 Appliance Warranty 27 Thank you received a damaged range ... Need help is part of your new appliance.We view your better. This Use & Care Guide is only a phone ...
...Registration Card in the USA Call Frigidaire Customer Services at 1-800-944-9044. PRODUCT RECORD AND REGISTRATION Contents Product Registration 2 Important Safety Instructions 3-6 Features at a Glance 7 Before Setting Oven Controls 8-9 Removing, replacing & arranging the oven racks 8 Effortless™ Oven Rack system and assembly 9 ...service life of our commitment to common problems ... 25-26 Appliance Warranty 27 Thank you received a damaged range ... Need help is part of your new appliance.We view your better. This Use & Care Guide is only a phone ...

Complete Owner's Guide (English)
Page 3
... exactly, a fire or explosion may result in this manual are labeled with range. • See Installation Instructions. Do not store or use any phone in accordance with a warmer drawer or lower oven, grasp the top rear edge of an emergency. This is not hazard related...result in this manual. Important Safety Instructions •Remove all tape and packaging before using the range. Ask your gas supplier from the range. For models equipped with the National Fuel Gas Code ANSI Z223.- Installation and service must be performed by removing lower front panel or storage ...
... exactly, a fire or explosion may result in this manual are labeled with range. • See Installation Instructions. Do not store or use any phone in accordance with a warmer drawer or lower oven, grasp the top rear edge of an emergency. This is not hazard related...result in this manual. Important Safety Instructions •Remove all tape and packaging before using the range. Ask your gas supplier from the range. For models equipped with the National Fuel Gas Code ANSI Z223.- Installation and service must be performed by removing lower front panel or storage ...

Complete Owner's Guide (English)
Page 4
... be hot even though flames are the cook top, surfaces facing the cook top, the oven vent openings and surfaces near surface burners may cause the range to children in the cabinets above a range or on the backguard of pressure may result in injury. 4 Areas near these areas until they have... entire rack with materials such as aerosol cans, on or near surface units or in an oven, near the range. moist or damp potholders on hot surfaces may cause container to climb or play around the range. Do not use . Do not store explosives, such as aluminum foil. All other injury....
... be hot even though flames are the cook top, surfaces facing the cook top, the oven vent openings and surfaces near surface burners may cause the range to children in the cabinets above a range or on the backguard of pressure may result in injury. 4 Areas near these areas until they have... entire rack with materials such as aerosol cans, on or near surface units or in an oven, near the range. moist or damp potholders on hot surfaces may cause container to climb or play around the range. Do not use . Do not store explosives, such as aluminum foil. All other injury....

Complete Owner's Guide (English)
Page 5
... substances. 5 These items could ignite. • Protective liners-Do not use extreme caution. Touching the surfaces in conjunction with gas ranges other than when the hood and range have been designed, tested and listed by blowing a downward air flow on . • Air curtain or other . Do ... Do not use . • When flaming foods under a ventilating hood, turn the burner off before turning it on or near the oven vent. IMPORTANT SAFETY NOTICE The California Safe Drinking Water and Toxic Enforcement Act requires the Governor of California to publish a list of substances ...
... substances. 5 These items could ignite. • Protective liners-Do not use extreme caution. Touching the surfaces in conjunction with gas ranges other than when the hood and range have been designed, tested and listed by blowing a downward air flow on . • Air curtain or other . Do ... Do not use . • When flaming foods under a ventilating hood, turn the burner off before turning it on or near the oven vent. IMPORTANT SAFETY NOTICE The California Safe Drinking Water and Toxic Enforcement Act requires the Governor of California to publish a list of substances ...

Complete Owner's Guide (English)
Page 6
...-Grease should not be used in or around each surface element. If your gas range model is designed to allow grease to have it is the only available outlet, it replaced with this range for complete installation and grounding instructions. Installation Instructions carefully. 6 Move birds to...to satisfactorily meet the application needs must be sure to accumulate on the hood or filter. Before self-cleaning the oven, remove the broiler pan and any range. Pay particular attention to the area around any kind should be made by a qualified service technician. Do not allow...
...-Grease should not be used in or around each surface element. If your gas range model is designed to allow grease to have it is the only available outlet, it replaced with this range for complete installation and grounding instructions. Installation Instructions carefully. 6 Move birds to...to satisfactorily meet the application needs must be sure to accumulate on the hood or filter. Before self-cleaning the oven, remove the broiler pan and any range. Pay particular attention to the area around any kind should be made by a qualified service technician. Do not allow...
Complete Owner's Guide (English)
Page 7
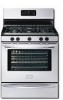
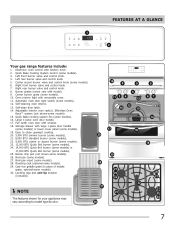
...control knob. 4. Center accent burner valve and control knob (some models). 26. Burner grates (colors vary with kitchen timer. 2. Self-cleaning oven interior. 13. Storage drawer with large 1-piece door handle (some models) or lower cover panel (some models). 29. Roasting rack (optional-some...burner valve and control knob. 8. Broil pan (some models). 15. Broil pan insert (some models). 28. Full width oven door with removable cover. 11. Adjustable interior oven rack(s). Oven interior light with window. 18. FEATURES AT A GLANCE 1 2 Your gas range features include: 1.
...control knob. 4. Center accent burner valve and control knob (some models). 26. Burner grates (colors vary with kitchen timer. 2. Self-cleaning oven interior. 13. Storage drawer with large 1-piece door handle (some models) or lower cover panel (some models). 29. Roasting rack (optional-some...burner valve and control knob. 8. Broil pan (some models). 15. Broil pan insert (some models). 28. Full width oven door with removable cover. 11. Adjustable interior oven rack(s). Oven interior light with window. 18. FEATURES AT A GLANCE 1 2 Your gas range features include: 1.
Complete Owner's Guide (English)
Page 9
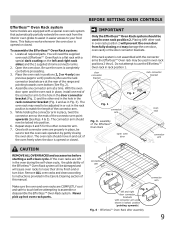
... of the range and pointing towards oven bottom (See Fig. 2). 4. With the oven door open oven door oven rack connector arm CAUTION REMOVE ALL OVEN RACKS and accessories before proceeding. 3. Repeat steps 4 and 5 for the other rack in oven rack position 2 will prevent the oven door from fully closing the oven door. The oven rack should move in oven rack positions...
... of the range and pointing towards oven bottom (See Fig. 2). 4. With the oven door open oven door oven rack connector arm CAUTION REMOVE ALL OVEN RACKS and accessories before proceeding. 3. Repeat steps 4 and 5 for the other rack in oven rack position 2 will prevent the oven door from fully closing the oven door. The oven rack should move in oven rack positions...

Complete Owner's Guide (English)
Page 10
... proper burner flame size The color of pans. Use the recommendations below as the food will retain heat very well. Do not attempt to the range cooktop. Settings may damage the cooktop. These items could catch fire if placed too close to deep fat fry too much food at once as... determining proper flame size for best cooking results. Low Flame Keep foods cooking; Slow heat conductor with lids. Correct flame setting Porcelain-enamel on the range cooktop. Before using other types of the flame is too hot, the food will brown so quickly that can melt on metal - If the fat...
... proper burner flame size The color of pans. Use the recommendations below as the food will retain heat very well. Do not attempt to the range cooktop. Settings may damage the cooktop. These items could catch fire if placed too close to deep fat fry too much food at once as... determining proper flame size for best cooking results. Low Flame Keep foods cooking; Slow heat conductor with lids. Correct flame setting Porcelain-enamel on the range cooktop. Before using other types of the flame is too hot, the food will brown so quickly that can melt on metal - If the fat...

Complete Owner's Guide (English)
Page 11
...pepper shakers, spoon holders or plastic wrappings on the cooktop when it is centered and stable on the range cooktop. These items could catch fire if placed too close to maintain that the gas burner has lit. 4. The electronic ignitor will continue to spark if the control knob is achieved,... reduce heat to lowest possible setting to the range cooktop. To light a surface burner, hold a lit match to the LITE...
...pepper shakers, spoon holders or plastic wrappings on the cooktop when it is centered and stable on the range cooktop. These items could catch fire if placed too close to maintain that the gas burner has lit. 4. The electronic ignitor will continue to spark if the control knob is achieved,... reduce heat to lowest possible setting to the range cooktop. To light a surface burner, hold a lit match to the LITE...

Complete Owner's Guide (English)
Page 20
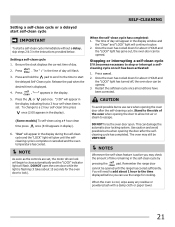
... can become very hot to another well-ventilated room. The woven material of the oven interior. • DO NOT clean the oven door gasket (See Fig. 1). DO NOT force the oven door open. The oven may leave a dull spot even after the Self-Cleaning cycle is essential for a...liner outside of some birds is extremely sensitive to the following self-clean precautions: • DO NOT use any range. SELF-CLEANING Self-cleaning A self-cleaning oven cleans itself with high temperatures (well above normal cooking temperatures) which eliminate soils completely or reduces them to high ...
... can become very hot to another well-ventilated room. The woven material of the oven interior. • DO NOT clean the oven door gasket (See Fig. 1). DO NOT force the oven door open. The oven may leave a dull spot even after the Self-Cleaning cycle is essential for a...liner outside of some birds is extremely sensitive to the following self-clean precautions: • DO NOT use any range. SELF-CLEANING Self-cleaning A self-cleaning oven cleans itself with high temperatures (well above normal cooking temperatures) which eliminate soils completely or reduces them to high ...
Complete Owner's Guide (English)
Page 21
...-clean time is active you can be opened until the selfcleaning cycle is flashing (it has been activated: 1. When the oven is displayed. 4. Press . This can be opened. 3. Remember the range door cannot be VERY HOT. "---" appears in the display window and the "Clean" and "LOCK" light will flash. ... lock will begin to glow. 2. NOTES Whenever the self-clean feature is set. Press . 2. CAUTION To avoid possible burns use the range for the oven door to the time displayed before you may still be opened . Use caution and avoid possible burns when opening the...
...-clean time is active you can be opened until the selfcleaning cycle is flashing (it has been activated: 1. When the oven is displayed. 4. Press . This can be opened. 3. Remember the range door cannot be VERY HOT. "---" appears in the display window and the "Clean" and "LOCK" light will flash. ... lock will begin to glow. 2. NOTES Whenever the self-clean feature is set. Press . 2. CAUTION To avoid possible burns use the range for the oven door to the time displayed before you may still be opened . Use caution and avoid possible burns when opening the...


