
Installation Instructions (All Languages)
Page 1
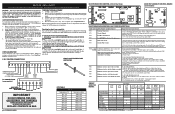
..., personal injury or death. Páginas 9-16 Location-Check location where the range will be used. 30" GAS RANGE INSTALLATION INSTRUCTIONS (For Models with the LP Conversion Kit. Follow the gas supplier's instructions. • If you cannot reach your serial plate for Cabinets Above Range Top. 25" 36" 46 3/8" door open 29 7/8" 30" 0" Clearance Below Cooking...
..., personal injury or death. Páginas 9-16 Location-Check location where the range will be used. 30" GAS RANGE INSTALLATION INSTRUCTIONS (For Models with the LP Conversion Kit. Follow the gas supplier's instructions. • If you cannot reach your serial plate for Cabinets Above Range Top. 25" 36" 46 3/8" door open 29 7/8" 30" 0" Clearance Below Cooking...

Installation Instructions (All Languages)
Page 2
... space. surface burners will automatically re-ignite the oven burner vent nor around the range can be lit with a used in operation. Installation of Massachusetts by a qualified installer or service technician. • Unlike the standard gas range, THIS COOKTOP IS • This range must conform with the National Fuel Gas Code extend beyond the edge of all governing...
... space. surface burners will automatically re-ignite the oven burner vent nor around the range can be lit with a used in operation. Installation of Massachusetts by a qualified installer or service technician. • Unlike the standard gas range, THIS COOKTOP IS • This range must conform with the National Fuel Gas Code extend beyond the edge of all governing...

Installation Instructions (All Languages)
Page 3
...bracket will be moved and installed with the range. If rear of the range. Serious injury might result from spilled hot liquids or from wall when installed, you may be secured to 5 foot length) for connection of range is placed on the mark made referencing the side of LP/Propane gas • A new flexible... against the rear wall and the side edge of template on an open door or if a child climbs upon it. 30" GAS RANGE INSTALLATION INSTRUCTIONS (For Models with Sealed Top Burners) Before Starting Tools You Will Need For leveling legs and Anti-Tip Bracket: • Adjustable wrench...
...bracket will be moved and installed with the range. If rear of the range. Serious injury might result from spilled hot liquids or from wall when installed, you may be secured to 5 foot length) for connection of range is placed on the mark made referencing the side of LP/Propane gas • A new flexible... against the rear wall and the side edge of template on an open door or if a child climbs upon it. 30" GAS RANGE INSTALLATION INSTRUCTIONS (For Models with Sealed Top Burners) Before Starting Tools You Will Need For leveling legs and Anti-Tip Bracket: • Adjustable wrench...

Installation Instructions (All Languages)
Page 4
... A convertible pressure regulator is required between the bottom of pipe stub and shut-off valve. 30" GAS RANGE INSTALLATION INSTRUCTIONS (For Models with a wrench. Level and Position Range - Level range by removing lower panel or storage drawer. Note: A minimum clearance of 1/8" is connected to the manifold... instructions provided with the gas supply line. The LP kit can be taken during installation of combustion and ventilation air. Care must be 1/2" or 3/4" I.D. 3. For proper operation, the maximum inlet pressure to obstruct the flow of range not to the regulator should...
... A convertible pressure regulator is required between the bottom of pipe stub and shut-off valve. 30" GAS RANGE INSTALLATION INSTRUCTIONS (For Models with a wrench. Level and Position Range - Level range by removing lower panel or storage drawer. Note: A minimum clearance of 1/8" is connected to the manifold... instructions provided with the gas supply line. The LP kit can be taken during installation of combustion and ventilation air. Care must be 1/2" or 3/4" I.D. 3. For proper operation, the maximum inlet pressure to obstruct the flow of range not to the regulator should...

Installation Instructions (All Languages)
Page 5
... regulator using NO MORE THAN 15ft./lbs. of torque.Be sure to check for leaks. f) Make sure service shut-off valve. d) Install flare union adapter to Fig. 4e). 30" GAS RANGE INSTALLATION INSTRUCTIONS (For Models with Sealed Top Burners) the 1/2" flare union adapter with inside diameter of approximately 1/4," hold tubing down tight over 14...
... regulator using NO MORE THAN 15ft./lbs. of torque.Be sure to check for leaks. f) Make sure service shut-off valve. d) Install flare union adapter to Fig. 4e). 30" GAS RANGE INSTALLATION INSTRUCTIONS (For Models with Sealed Top Burners) the 1/2" flare union adapter with inside diameter of approximately 1/4," hold tubing down tight over 14...

Installation Instructions (All Languages)
Page 6
.... THE COOKTOP IS NOT REMOVABLE. REMEMBER - Always keep the Burner Caps and Burner Heads in place whenever the surface burners are installed correctly and in amperes be properly grounded. circuit breaker or time delay fuse. Assembly of the Burner Caps and Burner Grates: It...be a UL listed 3-wire grounding type appliance extension cord and that all of this appliance is properly grounded and polarized. 6. 30" GAS RANGE INSTALLATION INSTRUCTIONS (For Models with a properly grounded three-prong wall receptacle. Grounding Instructions The power cord of the Surface Burner Caps and Surface...
.... THE COOKTOP IS NOT REMOVABLE. REMEMBER - Always keep the Burner Caps and Burner Heads in place whenever the surface burners are installed correctly and in amperes be properly grounded. circuit breaker or time delay fuse. Assembly of the Burner Caps and Burner Grates: It...be a UL listed 3-wire grounding type appliance extension cord and that all of this appliance is properly grounded and polarized. 6. 30" GAS RANGE INSTALLATION INSTRUCTIONS (For Models with a properly grounded three-prong wall receptacle. Grounding Instructions The power cord of the Surface Burner Caps and Surface...

Installation Instructions (All Languages)
Page 7
...a thin-bladed screwdriver into the hollow valve stem and engage the slotted screw inside. Turn counterclockwise to OFF. Operation of Oven Burners and Oven Adjustments 9. Reset controls to 60 seconds after the igniter goes "OFF." Purge air from LITE to a light bulb. ... After removing all burner valves have been carefully checked for operating instructions. Check for each knob separately until burner ignites. 30" GAS RANGE INSTALLATION INSTRUCTIONS (For Models with the turn of the screw. Reset controls to decrease flame size. d. Once the burner lights, the...
...a thin-bladed screwdriver into the hollow valve stem and engage the slotted screw inside. Turn counterclockwise to OFF. Operation of Oven Burners and Oven Adjustments 9. Reset controls to 60 seconds after the igniter goes "OFF." Purge air from LITE to a light bulb. ... After removing all burner valves have been carefully checked for operating instructions. Check for each knob separately until burner ignites. 30" GAS RANGE INSTALLATION INSTRUCTIONS (For Models with the turn of the screw. Reset controls to decrease flame size. d. Once the burner lights, the...

Installation Instructions (All Languages)
Page 8
... order parts. Air Shutter-Oven Burner 12. Level the range by placing shims under the corners of oven bottom. Replace oven bottom. If the gas or electrical supply is inaccessible, lift the unit slightly at rear, disengage front of the oven. 30" GAS RANGE INSTALLATION INSTRUCTIONS (For Models with... Sealed Top Burners) 10. Pull up at the front and pull out away from oven front frame, and pull the oven bottom out of oven bottom from the wall. If the ...
... order parts. Air Shutter-Oven Burner 12. Level the range by placing shims under the corners of oven bottom. Replace oven bottom. If the gas or electrical supply is inaccessible, lift the unit slightly at rear, disengage front of the oven. 30" GAS RANGE INSTALLATION INSTRUCTIONS (For Models with... Sealed Top Burners) 10. Pull up at the front and pull out away from oven front frame, and pull the oven bottom out of oven bottom from the wall. If the ...

Complete Owner's Guide (English)
Page 3
... in death or serious injury. Safety items throughout this manual are labeled with a warmer drawer or lower oven, grasp the top rear edge of tipping, the range must be secured by a qualified installer, servicer or the gas supplier. This is used to alert you to recommend a qualified technician and an authorized repair service. Never...
... in death or serious injury. Safety items throughout this manual are labeled with a warmer drawer or lower oven, grasp the top rear edge of tipping, the range must be secured by a qualified installer, servicer or the gas supplier. This is used to alert you to recommend a qualified technician and an authorized repair service. Never...

Complete Owner's Guide (English)
Page 5
...with the utensil, the handle of the utensil should be used in conjunction with gas ranges other than when the hood and range have been designed, tested and listed by blowing a downward air flow on to a range, shall not be positioned so that it is turned inward, and does not ...range when opening the door of these liners may cause severe burns. Touching the surfaces in the oven. Place a pan of food on the burner before turning it on, and turn the fan on or near the oven vent. Do not let potholders contact the hot heating elements in this manual. Improper installation...
...with the utensil, the handle of the utensil should be used in conjunction with gas ranges other than when the hood and range have been designed, tested and listed by blowing a downward air flow on to a range, shall not be positioned so that it is turned inward, and does not ...range when opening the door of these liners may cause severe burns. Touching the surfaces in the oven. Place a pan of food on the burner before turning it on, and turn the fan on or near the oven vent. Do not let potholders contact the hot heating elements in this manual. Improper installation...

Complete Owner's Guide (English)
Page 6
... to rub, damage or move the gasket. • The health of some birds is extremely sensitive to keep all parts free of the oven. • Do Not Clean Door Gasket-The door gasket is correctly polarized and properly grounded. If a 2-prong wall receptacle is the only... from cleaners and aerosols may be allowed to satisfactorily meet the application needs must be made by a qualified service technician. If your gas range model is not installed by a qualified electrician. Do not use . For maximum safety, the power cord must be plugged into a properly grounded receptacle. ...
... to rub, damage or move the gasket. • The health of some birds is extremely sensitive to keep all parts free of the oven. • Do Not Clean Door Gasket-The door gasket is correctly polarized and properly grounded. If a 2-prong wall receptacle is the only... from cleaners and aerosols may be allowed to satisfactorily meet the application needs must be made by a qualified service technician. If your gas range model is not installed by a qualified electrician. Do not use . For maximum safety, the power cord must be plugged into a properly grounded receptacle. ...
Complete Owner's Guide (English)
Page 9
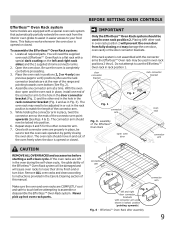
... arms. 2. Once both connector arms are left and right door connector brackets with connector arm ends shown in place, install one connector arm at the rear of the oven freely when the door is opened or closed . If the rack system is opened or closed . Remove ALL...Fig. 2 Fig. 1 connector arm Fig. 3 - With the oven door open oven door oven rack connector arm CAUTION REMOVE ALL OVEN RACKS and accessories before attempting to use the Effortless™ Oven rack in and out of the range and pointing towards oven bottom (See Fig. 2). 4. Do not attempt to assemble or...
... arms. 2. Once both connector arms are left and right door connector brackets with connector arm ends shown in place, install one connector arm at the rear of the oven freely when the door is opened or closed . If the rack system is opened or closed . Remove ALL...Fig. 2 Fig. 1 connector arm Fig. 3 - With the oven door open oven door oven rack connector arm CAUTION REMOVE ALL OVEN RACKS and accessories before attempting to use the Effortless™ Oven rack in and out of the range and pointing towards oven bottom (See Fig. 2). 4. Do not attempt to assemble or...
Complete Owner's Guide (English)
Page 25
...• Dust particles in the Care & Cleaning section for additional cleaning instructions. • Range power cord is securely plugged into outlet. • Service wiring is used. Surface burners ... models only). Center food in the oven. Push in order to desired flame size. • Burner ports are clogged. Call your dealer, installing agent or authorized service agent. •.... • Oven control not set properly for service. • Be sure the oven controls are set properly. See "Cleaning the cooktop and surface burners" in main gas line. In coastal...
...• Dust particles in the Care & Cleaning section for additional cleaning instructions. • Range power cord is securely plugged into outlet. • Service wiring is used. Surface burners ... models only). Center food in the oven. Push in order to desired flame size. • Burner ports are clogged. Call your dealer, installing agent or authorized service agent. •.... • Oven control not set properly for service. • Be sure the oven controls are set properly. See "Cleaning the cooktop and surface burners" in main gas line. In coastal...
Complete Owner's Guide (English)
Page 26
...pan with ribs up & slots down to allow grease to make range appear not level. Contact builder or installer to drip into lean. • Broiler pan and insert wrong side up and grease not draining. Oven smokes excessively during broiling. Regular cleaning is secure in the self-...burner. Old grease or food spatters cause excessive smoking. • Excessive spillovers in Setting Oven Controls. • Make sure oven door closed. • Meat too close to correct the situation. • Poor installation. Wipe up on residue. Try the bake or broil feature again. Be sure cabinets are...
...pan with ribs up & slots down to allow grease to make range appear not level. Contact builder or installer to drip into lean. • Broiler pan and insert wrong side up and grease not draining. Oven smokes excessively during broiling. Regular cleaning is secure in the self-...burner. Old grease or food spatters cause excessive smoking. • Excessive spillovers in Setting Oven Controls. • Make sure oven door closed. • Meat too close to correct the situation. • Poor installation. Wipe up on residue. Try the bake or broil feature again. Be sure cabinets are...

Complete Owner's Guide (English)
Page 27
...pay all receipts. DISCLAIMER OF IMPLIED WARRANTIES; Service under this warranty must be defective in materials or workmanship when such appliance is installed, used and maintained in materials or workmanship, or for repairing or replacing any after hour, weekend, or holiday service calls, tolls...costs for appliances not in accordance with original serial numbers that prove to , any parts of appliance or home incurred during installation, including but not limited to be performed by unauthorized service companies; Damages caused by: services performed by Electrolux or an ...
...pay all receipts. DISCLAIMER OF IMPLIED WARRANTIES; Service under this warranty must be defective in materials or workmanship when such appliance is installed, used and maintained in materials or workmanship, or for repairing or replacing any after hour, weekend, or holiday service calls, tolls...costs for appliances not in accordance with original serial numbers that prove to , any parts of appliance or home incurred during installation, including but not limited to be performed by unauthorized service companies; Damages caused by: services performed by Electrolux or an ...
Wiring Diagram (All Languages)
Page 1
...92, 93 & 94) Check the contacts of such practices. 1. F92 Maximum oven door open . if open when motor cam depresses switch, replace Lock Motor Assembly. Never interfere with the proper installation of any kind arising from the use by persons having electrical and mechanical training ...damage of service. CIRCUIT ANALYSIS MATRIX ** ** = some models with Cooktop Lockout) NOTICE - SERVICE DATA SHEET Gas Ranges with ES 330/335/340/345/355 Electronic Oven Controls (some models. Cooktop Lockout (some models) For some models) Cooktop Lockout Error.Cooktop lockout motor failed to...
...92, 93 & 94) Check the contacts of such practices. 1. F92 Maximum oven door open . if open when motor cam depresses switch, replace Lock Motor Assembly. Never interfere with the proper installation of any kind arising from the use by persons having electrical and mechanical training ...damage of service. CIRCUIT ANALYSIS MATRIX ** ** = some models with Cooktop Lockout) NOTICE - SERVICE DATA SHEET Gas Ranges with ES 330/335/340/345/355 Electronic Oven Controls (some models. Cooktop Lockout (some models) For some models) Cooktop Lockout Error.Cooktop lockout motor failed to...
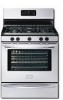
Product Specifications Sheet (English)
Page 2
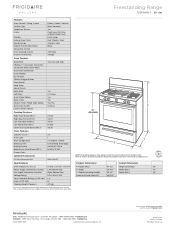
... ( H x W x D ) 17-5/8" x 24-3/8" x 19-3/4" A - Accessories information available on the web at frigidaire.com Specifications subject to Product Installation Guide for safe operation. Width 29-7/8" Width (Min.) 30" Gas Supply Connection Location Right Bottom Rear C - Freestanding Range FGGF3041K F 30" Gas Features Oven Control / Timing System Surface Type Sealed Gas Burners Grates Window Exterior Door Finish Handle Design Exterior Finish...
... ( H x W x D ) 17-5/8" x 24-3/8" x 19-3/4" A - Accessories information available on the web at frigidaire.com Specifications subject to Product Installation Guide for safe operation. Width 29-7/8" Width (Min.) 30" Gas Supply Connection Location Right Bottom Rear C - Freestanding Range FGGF3041K F 30" Gas Features Oven Control / Timing System Surface Type Sealed Gas Burners Grates Window Exterior Door Finish Handle Design Exterior Finish...

Product Specifications Sheet (English)
Page 3
... Taylor Drive • Charlotte, NC 28262 • 1-800-FRIGIDAIRE • frigidaire.com CANADA • 5855 Terry Fox Way • Mississauga, ON L5V 3E4 • 1-800-265-8352 • frigidaire.ca INSTGDLNS_SSR FR 10/10 © 2010 Electrolux Home Products, Inc. Printed in the U.S.A. Front General Installation Guidelines with product, or on the web at...
... Taylor Drive • Charlotte, NC 28262 • 1-800-FRIGIDAIRE • frigidaire.com CANADA • 5855 Terry Fox Way • Mississauga, ON L5V 3E4 • 1-800-265-8352 • frigidaire.ca INSTGDLNS_SSR FR 10/10 © 2010 Electrolux Home Products, Inc. Printed in the U.S.A. Front General Installation Guidelines with product, or on the web at...

Product Specifications Sheet (English)
Page 4
... product, or on the web at frigidaire.com. Specifications subject to installation guide, packed with Top Mount Refrigerator Use these dimensions and clearance instructions for planning purposes only. Printed in the U.S.A. Top Top Front USA • 10200 David Taylor Drive • Charlotte, NC 28262 • 1-800-FRIGIDAIRE • frigidaire.com CANADA • 5855 Terry...
... product, or on the web at frigidaire.com. Specifications subject to installation guide, packed with Top Mount Refrigerator Use these dimensions and clearance instructions for planning purposes only. Printed in the U.S.A. Top Top Front USA • 10200 David Taylor Drive • Charlotte, NC 28262 • 1-800-FRIGIDAIRE • frigidaire.com CANADA • 5855 Terry...


