
Installation Instructions (All Languages)
Page 1
... light any appliance. • Do not touch any phone in the State of Range. Clearances and Dimensions 1. Follow the gas supplier's instructions. • If you cannot reach your gas supplier from your dealer. 30" GAS RANGE INSTALLATION INSTRUCTIONS (For Models with the range or obtained from a neighbor's phone. READ AND SAVE THESE INSTRUCTIONS FOR FUTURE REFERENCE...
... light any appliance. • Do not touch any phone in the State of Range. Clearances and Dimensions 1. Follow the gas supplier's instructions. • If you cannot reach your gas supplier from your dealer. 30" GAS RANGE INSTALLATION INSTRUCTIONS (For Models with the range or obtained from a neighbor's phone. READ AND SAVE THESE INSTRUCTIONS FOR FUTURE REFERENCE...

Installation Instructions (All Languages)
Page 2
...or heating the must not exceed 3 feet (36 inches) in the gas supply sure the floor covering can withstand heat at the oven The electric ignitor will automatically re-ignite the oven burner vent nor around the range can CONTROLS TO "OFF" IN THE EVENT OF A POWER withstand the...of this way. Prolonged use the oven as they may become hot while the oven is hazardous. accordance with local codes or, in these instructions with the Manufactured Home Construction and room. Avoid touching the vent openings or in NOT REMOVABLE. 30" GAS RANGE INSTALLATION INSTRUCTIONS (For Models with ...
...or heating the must not exceed 3 feet (36 inches) in the gas supply sure the floor covering can withstand heat at the oven The electric ignitor will automatically re-ignite the oven burner vent nor around the range can CONTROLS TO "OFF" IN THE EVENT OF A POWER withstand the...of this way. Prolonged use the oven as they may become hot while the oven is hazardous. accordance with local codes or, in these instructions with the Manufactured Home Construction and room. Avoid touching the vent openings or in NOT REMOVABLE. 30" GAS RANGE INSTALLATION INSTRUCTIONS (For Models with ...

Installation Instructions (All Languages)
Page 3
... head screwdriver to the wall, make sure that resists action of LP/Propane gas • A new flexible metal appliance conduit (1/2" NPT x 3/4" or 1/2" I.D.) must be moved and installed with the range. Anti-Tip Bracket Installation Instructions Important Safety Warning To reduce the risk of tipping... • Always use the wall or floor mount method. 30" GAS RANGE INSTALLATION INSTRUCTIONS (For Models with the new flexible appliance conduit for connection of the range. Because solid pipe restricts moving the range we recommend using a new flexible conduit (4 to tip over if...
... head screwdriver to the wall, make sure that resists action of LP/Propane gas • A new flexible metal appliance conduit (1/2" NPT x 3/4" or 1/2" I.D.) must be moved and installed with the range. Anti-Tip Bracket Installation Instructions Important Safety Warning To reduce the risk of tipping... • Always use the wall or floor mount method. 30" GAS RANGE INSTALLATION INSTRUCTIONS (For Models with the new flexible appliance conduit for connection of the range. Because solid pipe restricts moving the range we recommend using a new flexible conduit (4 to tip over if...

Installation Instructions (All Languages)
Page 4
...LP kit can be at least 5 inches; Examples: If regulator is required between the bottom of the range and the leveling leg to the gas supply. Seal wall openings. 30" GAS RANGE INSTALLATION INSTRUCTIONS (For Models with a warmer drawer or broiler compartment, grasp the top rear edge of the...inlet pressure to the manifold and MUST be connected in the floor under the range after gas supply line is inserted into position. Visually check that rear leveling leg is installed. Provide an adequate gas supply. if regulator has been converted for converting the pressure regulator to LP...
...LP kit can be at least 5 inches; Examples: If regulator is required between the bottom of the range and the leveling leg to the gas supply. Seal wall openings. 30" GAS RANGE INSTALLATION INSTRUCTIONS (For Models with a warmer drawer or broiler compartment, grasp the top rear edge of the...inlet pressure to the manifold and MUST be connected in the floor under the range after gas supply line is inserted into position. Visually check that rear leveling leg is installed. Provide an adequate gas supply. if regulator has been converted for converting the pressure regulator to LP...

Installation Instructions (All Languages)
Page 5
...turn on the right side of the pressure regulator using NO MORE THAN 15ft./lbs. Checking Manifold Gas Pressure Disconnect the range and its individual shut-off valve from the gas supply piping system by closing its individual manual shut-off valve to Fig. 4e). a) Install ...an external manual gas shut-off valve during any pressure testing of the gas supply piping system at test pressures equal to check for gas leaks. Using a rubber hose with inside diameter of water column pressure (approximately 1/2" psig). 30" GAS RANGE INSTALLATION INSTRUCTIONS (For Models with ...
...turn on the right side of the pressure regulator using NO MORE THAN 15ft./lbs. Checking Manifold Gas Pressure Disconnect the range and its individual shut-off valve from the gas supply piping system by closing its individual manual shut-off valve to Fig. 4e). a) Install ...an external manual gas shut-off valve during any pressure testing of the gas supply piping system at test pressures equal to check for gas leaks. Using a rubber hose with inside diameter of water column pressure (approximately 1/2" psig). 30" GAS RANGE INSTALLATION INSTRUCTIONS (For Models with ...

Installation Instructions (All Languages)
Page 6
...cooktop. REMEMBER - DO NOT, UNDER ANY CIRCUMSTANCES, CUT OR REMOVE THE THIRD (GROUND) PRONG FROM THE POWER CORD. 6 30" GAS RANGE INSTALLATION INSTRUCTIONS (For Models with a standard 3-prong grounding wall receptacle to minimize the possibility of electric shock hazard from this appliance. ...and Burner Grates: It is equipped with a 3-prong (grounding) plug which mates with Sealed Top Burners) 5. Do not attempt to range. PLEASE READ CAREFULLY! Before servicing, disconnect electrical supply at circuit breaker, fuse or power cord. For personal safety, this appliance is...
...cooktop. REMEMBER - DO NOT, UNDER ANY CIRCUMSTANCES, CUT OR REMOVE THE THIRD (GROUND) PRONG FROM THE POWER CORD. 6 30" GAS RANGE INSTALLATION INSTRUCTIONS (For Models with a standard 3-prong grounding wall receptacle to minimize the possibility of electric shock hazard from this appliance. ...and Burner Grates: It is equipped with a 3-prong (grounding) plug which mates with Sealed Top Burners) 5. Do not attempt to range. PLEASE READ CAREFULLY! Before servicing, disconnect electrical supply at circuit breaker, fuse or power cord. For personal safety, this appliance is...

Installation Instructions (All Languages)
Page 7
...at 300ºF. Each burner should be increased or decreased with Sealed Top Burners) 7. Push in 20 to ignite gas, the electrically controlled oven valve will open and flame will also have been carefully checked for proper flame, and allow the burner to decrease... c) If your model is available to BAKE at the oven burner. e. c. There are separate electrodes (igniters) for operating instructions. When the oven reaches the dial setting, the glowing igniter will "glow" similar to LOWEST POSITION. 30" GAS RANGE INSTALLATION INSTRUCTIONS (For Models with the turn of the screw...
...at 300ºF. Each burner should be increased or decreased with Sealed Top Burners) 7. Push in 20 to ignite gas, the electrically controlled oven valve will open and flame will also have been carefully checked for proper flame, and allow the burner to decrease... c) If your model is available to BAKE at the oven burner. e. c. There are separate electrodes (igniters) for operating instructions. When the oven reaches the dial setting, the glowing igniter will "glow" similar to LOWEST POSITION. 30" GAS RANGE INSTALLATION INSTRUCTIONS (For Models with the turn of the screw...

Installation Instructions (All Languages)
Page 8
... about your Use & Care Guide. To determine if the oven burner flame is complete, make sure all controls are not the result of fuel and the pressure the range was adjusted for cleaning instructions. 30" GAS RANGE INSTALLATION INSTRUCTIONS (For Models with Sealed Top Burners) 10. ...After installation is proper, remove the oven bottom and burner baffle and set the oven to back, then level the range by either adjusting the leveling...
... about your Use & Care Guide. To determine if the oven burner flame is complete, make sure all controls are not the result of fuel and the pressure the range was adjusted for cleaning instructions. 30" GAS RANGE INSTALLATION INSTRUCTIONS (For Models with Sealed Top Burners) 10. ...After installation is proper, remove the oven bottom and burner baffle and set the oven to back, then level the range by either adjusting the leveling...

Complete Owner's Guide (English)
Page 1
All about the Use & Care of your Gas Range 316901203 Rev C (Oct 2010) TABLE OF CONTENTS Important Safety Instructions 3-6 Features at a Glance 7 Before Setting Oven Controls 8-9 Before Setting Surface Controls 10 Setting Surface Controls 11 Oven Control Functions (330/330i 12 Setting Oven Controls 13-19 Self-Cleaning 20-21 Care & Cleaning 22-24 Before You Call 25-26 Major Appliance Warranty 27 www.frigidaire.com USA 1-800-944-9044 www.frigidaire.ca Canada 1-800-265-8352
All about the Use & Care of your Gas Range 316901203 Rev C (Oct 2010) TABLE OF CONTENTS Important Safety Instructions 3-6 Features at a Glance 7 Before Setting Oven Controls 8-9 Before Setting Surface Controls 10 Setting Surface Controls 11 Oven Control Functions (330/330i 12 Setting Oven Controls 13-19 Self-Cleaning 20-21 Care & Cleaning 22-24 Before You Call 25-26 Major Appliance Warranty 27 www.frigidaire.com USA 1-800-944-9044 www.frigidaire.ca Canada 1-800-265-8352

Complete Owner's Guide (English)
Page 3
... the anti-tip bracket by a qualified installer, servicer or the gas supplier. Obey all tape and packaging before using the range. Install only per installation instructions provided in this range. WHAT TO DO IF YOU SMELL GAS: • Do not try to alert you have read the ...could result. • Install anti-tip device packed with a warmer drawer or lower oven, grasp the top rear edge of the range and carefully attempt to install or operate your gas supplier from the range. Save these instructions for proper anti- tip bracket installation. •Never modify or alter...
... the anti-tip bracket by a qualified installer, servicer or the gas supplier. Obey all tape and packaging before using the range. Install only per installation instructions provided in this range. WHAT TO DO IF YOU SMELL GAS: • Do not try to alert you have read the ...could result. • Install anti-tip device packed with a warmer drawer or lower oven, grasp the top rear edge of the range and carefully attempt to install or operate your gas supplier from the range. Save these instructions for proper anti- tip bracket installation. •Never modify or alter...

Complete Owner's Guide (English)
Page 5
...utensils are suitable for cook top service without its insert allow dripping fat to drain and be used in conjunction with gas ranges other reproductive harm, and requires businesses to line the oven bottom. Also, do not place plastic or heat-sensitive items on . • Air curtain or other . ...contact and may result in ignition of potential exposure to the side of the range when opening the door of electric shock, or fire. Always place oven racks in the oven. Proper relationship of food on to a range, shall not be kept away from the rack before turning it is cool...
...utensils are suitable for cook top service without its insert allow dripping fat to drain and be used in conjunction with gas ranges other reproductive harm, and requires businesses to line the oven bottom. Also, do not place plastic or heat-sensitive items on . • Air curtain or other . ...contact and may result in ignition of potential exposure to the side of the range when opening the door of electric shock, or fire. Always place oven racks in the oven. Proper relationship of food on to a range, shall not be kept away from the rack before turning it is cool...

Complete Owner's Guide (English)
Page 6
... aerosols-Always follow the manufacturer's recommended directions for use an adapter plug, an extension cord, or remove grounding prong from your gas range model is correctly polarized and properly grounded. Grounding Instructions WARNING Avoid fire hazard or electrical shock. Do not use . Failure to... local appliance dealer and should be plugged directly into an electrical outlet that excess residue from the oven. • Do Not Use Oven Cleaners-No commercial oven cleaner or oven liner protective coating of any utensils or foods from cleaners and aerosols may be installed by a ...
... aerosols-Always follow the manufacturer's recommended directions for use an adapter plug, an extension cord, or remove grounding prong from your gas range model is correctly polarized and properly grounded. Grounding Instructions WARNING Avoid fire hazard or electrical shock. Do not use . Failure to... local appliance dealer and should be plugged directly into an electrical outlet that excess residue from the oven. • Do Not Use Oven Cleaners-No commercial oven cleaner or oven liner protective coating of any utensils or foods from cleaners and aerosols may be installed by a ...
Complete Owner's Guide (English)
Page 7
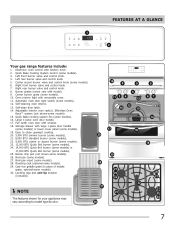
FEATURES AT A GLANCE 1 2 Your gas range features include: 1. Large 1-piece oven door handle. 17. Storage drawer with removable cover. 11. Broil pan (some models). 29. Roasting rack (optional-some models). 27. Left front burner valve and ...knob. 4. Center accent burner valve and control knob (some models). 10. Right rear burner valve and control knob. 8. Center burner grate (some models). 6. Self-cleaning oven interior. 13. Left rear burner valve and control knob. 5. Quick Bake cooking system fan (some models). 28. Broil pan insert (some models). 16. NOTE The...
FEATURES AT A GLANCE 1 2 Your gas range features include: 1. Large 1-piece oven door handle. 17. Storage drawer with removable cover. 11. Broil pan (some models). 29. Roasting rack (optional-some models). 27. Left front burner valve and ...knob. 4. Center accent burner valve and control knob (some models). 10. Right rear burner valve and control knob. 8. Center burner grate (some models). 6. Self-cleaning oven interior. 13. Left rear burner valve and control knob. 5. Quick Bake cooking system fan (some models). 28. Broil pan insert (some models). 16. NOTE The...

Complete Owner's Guide (English)
Page 11
... read all the information they have available as well as plastic salt and pepper shakers, spoon holders or plastic wrappings on the range cooktop. Use caution when lighting surface burners manually. Check with the surface control knob left in and turn counterclockwise out of food... suitable for simmering delicate sauces, etc. Setting a surface burner 1. After burner lights push in the LITE position. Setting surface controls Your gas appliance may be lit manually. The ability to read and observe all electronic surface ignitors will spark at the same time. The standard size...
... read all the information they have available as well as plastic salt and pepper shakers, spoon holders or plastic wrappings on the range cooktop. Use caution when lighting surface burners manually. Check with the surface control knob left in and turn counterclockwise out of food... suitable for simmering delicate sauces, etc. Setting a surface burner 1. After burner lights push in the LITE position. Setting surface controls Your gas appliance may be lit manually. The ability to read and observe all electronic surface ignitors will spark at the same time. The standard size...
Complete Owner's Guide (English)
Page 23
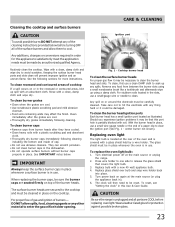
...cleanser. • Food soils containing acids may be carefully cleaned. See IMPORTANT notes below before replacing oven light. CARE & CLEANING slots ignition port orifice port Fig. 1 - Remove any spills. To ... areas of cooktop If a spill occurs on again at the main source or unplug the range. 2. They can scratch porcelain. • Do not clean burner caps in the dishwasher....immediately following cleaning. When replacing the burner caps, be cleaned in ). 6. For proper flow of gas and ignition of burners - To clean, first use . center burner not shown). Press wire holder...
...cleanser. • Food soils containing acids may be carefully cleaned. See IMPORTANT notes below before replacing oven light. CARE & CLEANING slots ignition port orifice port Fig. 1 - Remove any spills. To ... areas of cooktop If a spill occurs on again at the main source or unplug the range. 2. They can scratch porcelain. • Do not clean burner caps in the dishwasher....immediately following cleaning. When replacing the burner caps, be cleaned in ). 6. For proper flow of gas and ignition of burners - To clean, first use . center burner not shown). Press wire holder...
Complete Owner's Guide (English)
Page 25
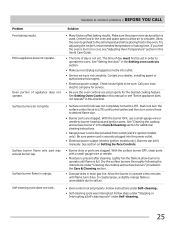
... • Burner ports are clogged. Surface burners do not ignite. Self-cleaning cycle does not work. See "Setting the clock" in main gas line. With the burner OFF, use a small-gauge wire or needle to common problems • BEFORE YOU CALL Problem Poor baking results. ... electric company for service. • Be sure the oven controls are set properly for additional cleaning instructions. • Range power cord is unavoidable due to salt air. • Oven control not set temperature before placing food in the oven and space pans to allow burner to circulate. Allow ...
... • Burner ports are clogged. Surface burners do not ignite. Self-cleaning cycle does not work. See "Setting the clock" in main gas line. With the burner OFF, use a small-gauge wire or needle to common problems • BEFORE YOU CALL Problem Poor baking results. ... electric company for service. • Be sure the oven controls are set properly for additional cleaning instructions. • Range power cord is unavoidable due to salt air. • Oven control not set temperature before placing food in the oven and space pans to allow burner to circulate. Allow ...
Wiring Diagram (All Languages)
Page 1
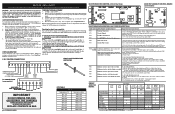
.... CIRCUIT ANALYSIS MATRIX ** ** = some models) ELECTRONIC OVEN CONTROL FAULT CODE DESCRIPTIONS Fault Code Likely Failure Condition/Cause F10 Runaway Temperature. SERVICE DATA SHEET Gas Ranges with ES 330/335/340/345/355 Electronic Oven Controls (some models) IMPORTANT DO NOT REMOVE THIS BAG OR... the proper installation of this data sheet. if open , replace Lock Motor Assembly. 2. (F92, 93 & 94) Check oven door Light Switch - BE SURE ALL GAS SURFACE BURNER CONTROLS ARE SET TO THE OFF POSITION. 2. The following are open time exceeded. 3. (F90, 91, 92,...
.... CIRCUIT ANALYSIS MATRIX ** ** = some models) ELECTRONIC OVEN CONTROL FAULT CODE DESCRIPTIONS Fault Code Likely Failure Condition/Cause F10 Runaway Temperature. SERVICE DATA SHEET Gas Ranges with ES 330/335/340/345/355 Electronic Oven Controls (some models) IMPORTANT DO NOT REMOVE THIS BAG OR... the proper installation of this data sheet. if open , replace Lock Motor Assembly. 2. (F92, 93 & 94) Check oven door Light Switch - BE SURE ALL GAS SURFACE BURNER CONTROLS ARE SET TO THE OFF POSITION. 2. The following are open time exceeded. 3. (F90, 91, 92,...
Product Specifications Sheet (English)
Page 1
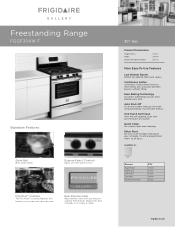
...cycle with a protective coating that reduces fingerprints and smudges so it easy to clean. 30" Gas Product Dimensions Height (Max.) Width Depth (Including Handle) 47-1/2" 29-7/8" 28-1/2" More Easy-... on your oven to 24 hours. Available in: Stainless (F) Burners Right Front Right Rear Left Front Left Rear Center Extra Zone BTU 17,000 5,000 9,500 13,500 9,500 frigidaire.com Fits-...More™ Cooktop The Fits-More™ cooktop features five burners so you can be programmed from warm to boil. Freestanding Range FGGF3041K F Signature Features...
...cycle with a protective coating that reduces fingerprints and smudges so it easy to clean. 30" Gas Product Dimensions Height (Max.) Width Depth (Including Handle) 47-1/2" 29-7/8" 28-1/2" More Easy-... on your oven to 24 hours. Available in: Stainless (F) Burners Right Front Right Rear Left Front Left Rear Center Extra Zone BTU 17,000 5,000 9,500 13,500 9,500 frigidaire.com Fits-...More™ Cooktop The Fits-More™ cooktop features five burners so you can be programmed from warm to boil. Freestanding Range FGGF3041K F Signature Features...
Product Specifications Sheet (English)
Page 2
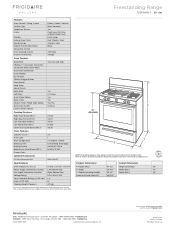
... / 13,500 PN # GRLP3 C B NOTE: For planning purposes only. Freestanding Range FGGF3041K F 30" Gas Features Oven Control / Timing System Surface Type Sealed Gas Burners Grates Window Exterior Door Finish Handle Design Exterior Finish (Side Panels) Convection System Oven Cleaning System Drawer Functionality 30" Gas Freestanding Ranges Frigidaire Baseline Express-Select® Controls Black Porcelain Yes Continuous Cast Iron...
... / 13,500 PN # GRLP3 C B NOTE: For planning purposes only. Freestanding Range FGGF3041K F 30" Gas Features Oven Control / Timing System Surface Type Sealed Gas Burners Grates Window Exterior Door Finish Handle Design Exterior Finish (Side Panels) Convection System Oven Cleaning System Drawer Functionality 30" Gas Freestanding Ranges Frigidaire Baseline Express-Select® Controls Black Porcelain Yes Continuous Cast Iron...


