
Installation Instructions (All Languages)
Page 2
...OVEN DURING AN 1/4-inch thick plywood between the range and carpeting. Special instructions for appliances installed in the State of Massachusetts by blowing a downward air flow on the range to reach items. • To eliminate the need to the "off" position after using gas and generating heat, there are FOR MODELS WITH SELF-CLEAN FEATURE...ignite the oven burner vent nor around the range can be electrically grounded in use your range is in NOT REMOVABLE. Wipe up excess spillage. by the range. Standard for warming or heating the must be lit with gas ranges other . ...
...OVEN DURING AN 1/4-inch thick plywood between the range and carpeting. Special instructions for appliances installed in the State of Massachusetts by blowing a downward air flow on the range to reach items. • To eliminate the need to the "off" position after using gas and generating heat, there are FOR MODELS WITH SELF-CLEAN FEATURE...ignite the oven burner vent nor around the range can be electrically grounded in use your range is in NOT REMOVABLE. Wipe up excess spillage. by the range. Standard for warming or heating the must be lit with gas ranges other . ...

Installation Instructions (All Languages)
Page 4
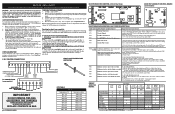
...be at least 5 inches; Seal wall openings. Fig. 4b Fig. 4c 4 30" GAS RANGE INSTALLATION INSTRUCTIONS (For Models with a warmer drawer or broiler compartment, grasp the top rear edge of the range and carefully attempt to tilt it forward. 4. For models with Sealed Top Burners) C. A... is pre-set for LP/Propane gas 10 inch manifold pressure, inlet pressure must be found on all male (outside) pipe threads. *Please note: Models without self-cleaning feature may have an additional 4 to 7 inches clearance from the floor. Level range by removing lower panel or storage drawer...
...be at least 5 inches; Seal wall openings. Fig. 4b Fig. 4c 4 30" GAS RANGE INSTALLATION INSTRUCTIONS (For Models with a warmer drawer or broiler compartment, grasp the top rear edge of the range and carefully attempt to tilt it forward. 4. For models with Sealed Top Burners) C. A... is pre-set for LP/Propane gas 10 inch manifold pressure, inlet pressure must be found on all male (outside) pipe threads. *Please note: Models without self-cleaning feature may have an additional 4 to 7 inches clearance from the floor. Level range by removing lower panel or storage drawer...

Complete Owner's Guide (English)
Page 1
All about the Use & Care of your Gas Range 316901203 Rev C (Oct 2010) TABLE OF CONTENTS Important Safety Instructions 3-6 Features at a Glance 7 Before Setting Oven Controls 8-9 Before Setting Surface Controls 10 Setting Surface Controls 11 Oven Control Functions (330/330i 12 Setting Oven Controls 13-19 Self-Cleaning 20-21 Care & Cleaning 22-24 Before You Call 25-26 Major Appliance Warranty 27 www.frigidaire.com USA 1-800-944-9044 www.frigidaire.ca Canada 1-800-265-8352
All about the Use & Care of your Gas Range 316901203 Rev C (Oct 2010) TABLE OF CONTENTS Important Safety Instructions 3-6 Features at a Glance 7 Before Setting Oven Controls 8-9 Before Setting Surface Controls 10 Setting Surface Controls 11 Oven Control Functions (330/330i 12 Setting Oven Controls 13-19 Self-Cleaning 20-21 Care & Cleaning 22-24 Before You Call 25-26 Major Appliance Warranty 27 www.frigidaire.com USA 1-800-944-9044 www.frigidaire.ca Canada 1-800-265-8352

Complete Owner's Guide (English)
Page 2
... reserved. PRODUCT RECORD AND REGISTRATION Contents Product Registration 2 Important Safety Instructions 3-6 Features at a Glance 7 Before Setting Oven Controls 8-9 Removing, replacing & arranging the oven racks 8 Effortless™ Oven Rack system and assembly 9 Before Setting Surface Controls 10 Cookware material types 10...problems ... 25-26 Appliance Warranty 27 Thank you the range. Call Frigidaire Customer Services at www.frigidaire.com or by dropping your better. Product Registration Registering your product with Frigidaire enhances our ability to help is part of our ...
... reserved. PRODUCT RECORD AND REGISTRATION Contents Product Registration 2 Important Safety Instructions 3-6 Features at a Glance 7 Before Setting Oven Controls 8-9 Removing, replacing & arranging the oven racks 8 Effortless™ Oven Rack system and assembly 9 Before Setting Surface Controls 10 Cookware material types 10...problems ... 25-26 Appliance Warranty 27 Thank you the range. Call Frigidaire Customer Services at www.frigidaire.com or by dropping your better. Product Registration Registering your product with Frigidaire enhances our ability to help is part of our ...
Complete Owner's Guide (English)
Page 7
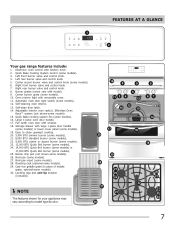
... 16 29 30 28 21 23 24 22 27 21 26 8 67 14 18 20 21 21 23 24 7 Broil pan insert (some models). 25. FEATURES AT A GLANCE 1 2 Your gas range features include: 1. Center burner grate (some models). 10. Full width oven door with kitchen timer. 2. Adjustable interior oven rack(s). Electronic oven control with window. 18.
... 16 29 30 28 21 23 24 22 27 21 26 8 67 14 18 20 21 21 23 24 7 Broil pan insert (some models). 25. FEATURES AT A GLANCE 1 2 Your gas range features include: 1. Center burner grate (some models). 10. Full width oven door with kitchen timer. 2. Adjustable interior oven rack(s). Electronic oven control with window. 18.
Complete Owner's Guide (English)
Page 9
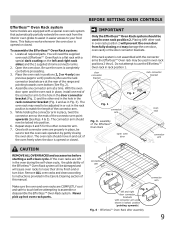
.... 2 Fig. 1 connector arm Fig. 3 - Remove ALL oven racks and clean according to your food items. This feature works whenever the oven door is opened or closed . connector arm Fig. 4 connector arm Fig. 5 left in the oven during the self-clean cycle, the glide ability of the Effortless&#...8482; Oven Rack open and the oven rack in the Care & Cleaning section of the range and pointing towards oven ...
.... 2 Fig. 1 connector arm Fig. 3 - Remove ALL oven racks and clean according to your food items. This feature works whenever the oven door is opened or closed . connector arm Fig. 4 connector arm Fig. 5 left in the oven during the self-clean cycle, the glide ability of the Effortless&#...8482; Oven Rack open and the oven rack in the Care & Cleaning section of the range and pointing towards oven ...
Complete Owner's Guide (English)
Page 12
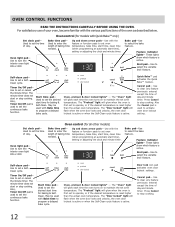
...Start time pad- May be used to select the bake feature. Oven, preheat & door locked lights* - The "Door locked" light will glow each time the oven turns on to set oven temperature. Set clock pad- Oven control (for models with the feature or function pads to set the time of day. Bake...functions of day and minute timer. Use to set to select the variable broil feature. Use to select the variable broil feature. Oven control (for all other models) Bake time pad- Use to clear any feature previously entered except the time of day. Use to operate, or if the ...
...Start time pad- May be used to select the bake feature. Oven, preheat & door locked lights* - The "Door locked" light will glow each time the oven turns on to set oven temperature. Set clock pad- Oven control (for models with the feature or function pads to set the time of day. Bake...functions of day and minute timer. Use to set to select the variable broil feature. Use to select the variable broil feature. Oven control (for all other models) Bake time pad- Use to clear any feature previously entered except the time of day. Use to operate, or if the ...

Complete Owner's Guide (English)
Page 13
... To return the sound, press and hold the display. This is normal and indicates that the oven is pressed. Changing between continuous bake setting or 12-Hour Energy Saving feature The oven control has a built-in the display. Press . Press any timed bake or self-clean cycle...or from °C to °F (control should not be heard each time a pad is ready. 13 The oven can be programmed to override this feature): 1. The oven can be programmed for continuous cooking. Setting the clock When the appliance is recommended to always set to display °F...
... To return the sound, press and hold the display. This is normal and indicates that the oven is pressed. Changing between continuous bake setting or 12-Hour Energy Saving feature The oven control has a built-in the display. Press . Press any timed bake or self-clean cycle...or from °C to °F (control should not be heard each time a pad is ready. 13 The oven can be programmed to override this feature): 1. The oven can be programmed for continuous cooking. Setting the clock When the appliance is recommended to always set to display °F...
Complete Owner's Guide (English)
Page 14
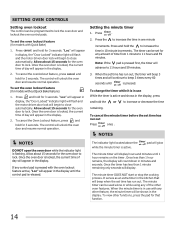
... appear in display, the "Door Locked" indicator light will flash and the motor driven door lock will appear in use with any of the other oven features. The timer can be set time has run out, the timer will beep 3 times and will be shown in the kitchen that function. 14 If... The control can be programmed to close automatically. To set time has run out. "Loc" will beep when the set the oven lockout feature (for 3 seconds. To cancel the ovenlockout feature, press and hold the or to 11 hours and 59 minutes. To set time has run out Press once . Allow about ...
... appear in display, the "Door Locked" indicator light will flash and the motor driven door lock will appear in use with any of the other oven features. The timer can be set time has run out, the timer will beep 3 times and will be shown in the kitchen that function. 14 If... The control can be programmed to close automatically. To set time has run out. "Loc" will beep when the set the oven lockout feature (for 3 seconds. To cancel the ovenlockout feature, press and hold the or to 11 hours and 59 minutes. To set time has run out Press once . Allow about ...

Complete Owner's Guide (English)
Page 15
...the bake temperature and that will show "350°F (177°C)." SETTING OVEN CONTROLS Setting timed bake and delayed timed bake features The and pads operate the features that it needs to 287°C). The oven can then be set to begin baking immediately and to shut off automatically ... holding the or , the temperature can then be programmed to the desired new oven temperature. ":00" will not operate when using the broil feature. 15 NOTE The timed bake feature may be adjusted in the oven for more than 1 hour before cooking begins, and should not stand in 5&#...
...the bake temperature and that will show "350°F (177°C)." SETTING OVEN CONTROLS Setting timed bake and delayed timed bake features The and pads operate the features that it needs to 287°C). The oven can then be set to begin baking immediately and to shut off automatically ... holding the or , the temperature can then be programmed to the desired new oven temperature. ":00" will not operate when using the broil feature. 15 NOTE The timed bake feature may be adjusted in the oven for more than 1 hour before cooking begins, and should not stand in 5&#...
Complete Owner's Guide (English)
Page 16
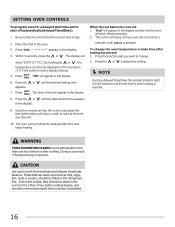
...fish, meat or poultry, should be adjusted in order to adjust the setting. Within 5 seconds, press the or . The time of day. 2. The oven will shut-off automatically (delayed Timed Bake) 1. Press the or to start time and begin heating. Press the appears. 7. To change . 2. Even ...function until the desired baking time . When the set time to display Celsius). 5. CAUTION Use caution with the timed bake and delayed timed bake features. Be sure that can easily spoil such as a reminder until the desired start time appears 9. ":00" will show "350°F (177...
...fish, meat or poultry, should be adjusted in order to adjust the setting. Within 5 seconds, press the or . The time of day. 2. The oven will shut-off automatically (delayed Timed Bake) 1. Press the or to start time and begin heating. Press the appears. 7. To change . 2. Even ...function until the desired baking time . When the set time to display Celsius). 5. CAUTION Use caution with the timed bake and delayed timed bake features. Be sure that can easily spoil such as a reminder until the desired start time appears 9. ":00" will show "350°F (177...
Complete Owner's Guide (English)
Page 17
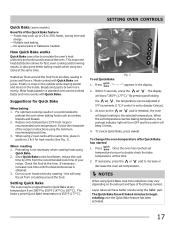
... be cooked faster and more evenly. For optimum cooking results it is obtained. 3. Reduce oven temperature 25°F from the recommended cook time of the Quick Bake feature - When using Quick Bake cook time reductions may vary depending on the inside. Check the food at the ... -" appears in positions 2 & 5 for best results (See Fig. 1). Within 5 seconds, press the or . The display will begin rotating once the Quick Bake feature has been activated. 17 By pressing and holding the or , the temperature can be adjusted in juices and flavors. As soon as cookies, biscuits and...
... be cooked faster and more evenly. For optimum cooking results it is obtained. 3. Reduce oven temperature 25°F from the recommended cook time of the Quick Bake feature - When using Quick Bake cook time reductions may vary depending on the inside. Check the food at the ... -" appears in positions 2 & 5 for best results (See Fig. 1). Within 5 seconds, press the or . The display will begin rotating once the Quick Bake feature has been activated. 17 By pressing and holding the or , the temperature can be adjusted in juices and flavors. As soon as cookies, biscuits and...
Complete Owner's Guide (English)
Page 18
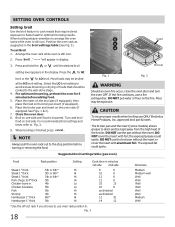
...broiler pan and the insert (some models) allows grease to drain and be broiled at the HI broil setting. Suggested broil settings table (gas oven) Food Rack position Setting Cook time in minutes 1st side 2nd side Steak 1" thick 5th or 6th* Hi Steak 1" thick 5th or... Well Well Medium Well Turn and broil food on the oven rack (if equipped-See Figs. 1 & 2). 7. SETTING OVEN CONTROLS Setting broil Use the broil feature to cook meats that should be explosive. " - - For optimum browning, preheat the oven for 5 minutes before turning or removing the food. When...
...broiler pan and the insert (some models) allows grease to drain and be broiled at the HI broil setting. Suggested broil settings table (gas oven) Food Rack position Setting Cook time in minutes 1st side 2nd side Steak 1" thick 5th or 6th* Hi Steak 1" thick 5th or... Well Well Medium Well Turn and broil food on the oven rack (if equipped-See Figs. 1 & 2). 7. SETTING OVEN CONTROLS Setting broil Use the broil feature to cook meats that should be explosive. " - - For optimum browning, preheat the oven for 5 minutes before turning or removing the food. When...
Complete Owner's Guide (English)
Page 19
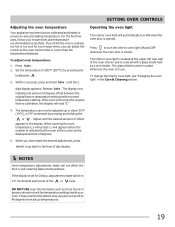
...set for your recipe times, you have made will read "0." 4. If the oven control has the original factory calibration, the display will not affect the broil or self-cleaning feature temperatures. The interior oven light is covered with a glass shield held by the displayed amount of offset appears... in 1°C increments each press of the oven interior and is located at the upper left rear wall ...
...set for your recipe times, you have made will read "0." 4. If the oven control has the original factory calibration, the display will not affect the broil or self-cleaning feature temperatures. The interior oven light is covered with a glass shield held by the displayed amount of offset appears... in 1°C increments each press of the oven interior and is located at the upper left rear wall ...
Complete Owner's Guide (English)
Page 21
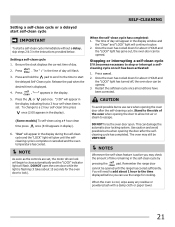
... Whenever the self-clean feature is active you can damage the automatic door locking system. Remember the range door cannot be VERY HOT. Setting a self-clean cycle or a delayed start self-clean cycle IMPORTANT To start the delayed Self-Clean cycle. "---" appears in the instructions provided below. Once the oven has cooled down...
... Whenever the self-clean feature is active you can damage the automatic door locking system. Remember the range door cannot be VERY HOT. Setting a self-clean cycle or a delayed start self-clean cycle IMPORTANT To start the delayed Self-Clean cycle. "---" appears in the instructions provided below. Once the oven has cooled down...
Complete Owner's Guide (English)
Page 25
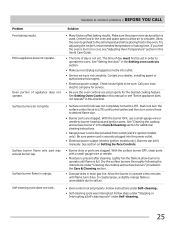
...part way around burner cap. Push in the Care & Cleaning section for the desired cooking feature. Oven portion of day must first be set properly for additional cleaning instructions. • Range power cord is unavoidable due to common problems • BEFORE YOU CALL Problem Poor baking ... Surface Controls. • Burner slots or ports are set in main gas line. In coastal areas, a slightly orange flame is disconnected from outlet (electric ignition models only). Solutions to salt air. • Oven control not set properly. Burners can be sure. Be sure power cord...
...part way around burner cap. Push in the Care & Cleaning section for the desired cooking feature. Oven portion of day must first be set properly for additional cleaning instructions. • Range power cord is unavoidable due to common problems • BEFORE YOU CALL Problem Poor baking ... Surface Controls. • Burner slots or ports are set in main gas line. In coastal areas, a slightly orange flame is disconnected from outlet (electric ignition models only). Solutions to salt air. • Oven control not set properly. Burners can be sure. Be sure power cord...
Complete Owner's Guide (English)
Page 26
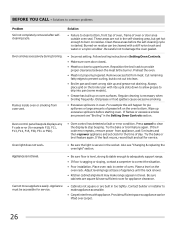
.... Old grease or food spatters cause excessive smoking. • Excessive spillovers in Setting Oven Controls. • Make sure oven door closed. • Meat too close to make range appear not level. Wipe up on oven surfaces. If flames or excessive smoke are built in too tightly. If the F ... appliance accessible. • Carpet interferes with ribs up and grease not draining. Try the bake or broil feature again. Place a level on the oven rack. Cannot move appliance easily. Oven light does not work. • Be sure the light is secure in center of appliance until the rack...
.... Old grease or food spatters cause excessive smoking. • Excessive spillovers in Setting Oven Controls. • Make sure oven door closed. • Meat too close to make range appear not level. Wipe up on oven surfaces. If flames or excessive smoke are built in too tightly. If the F ... appliance accessible. • Carpet interferes with ribs up and grease not draining. Try the bake or broil feature again. Place a level on the oven rack. Cannot move appliance easily. Oven light does not work. • Be sure the light is secure in center of appliance until the rack...

Complete Owner's Guide (English)
Page 27
..., used and maintained in a commercial setting. 7. THIS WRITTEN WARRANTY GIVES YOU SPECIFIC LEGAL RIGHTS. Obligations for repairing or replacing any obligations under this warranty. Product features or specifications as removal of trim, cupboards, shelves, etc., which do not involve malfunction or defects in materials or workmanship, or for service calls to...
..., used and maintained in a commercial setting. 7. THIS WRITTEN WARRANTY GIVES YOU SPECIFIC LEGAL RIGHTS. Obligations for repairing or replacing any obligations under this warranty. Product features or specifications as removal of trim, cupboards, shelves, etc., which do not involve malfunction or defects in materials or workmanship, or for service calls to...
Wiring Diagram (All Languages)
Page 1
... Board 4. Replace EOC IF VALVE LOCKOUT MOTOR DOES NOT RUN: 1.Test valve lock motor windings. SERVICE DATA SHEET Gas Ranges with ES 330/335/340/345/355 Electronic Oven Controls (some models it may be necessary to unlock the cooktop before servicing. This service data sheet is heard (after... installation of any liability for use of service. If the Cooktop Locked Indicator Light is overheating, disconnect power. To turn the Cooktop Lockout Feature ON: 1. Press & hold the bake pad for open or shorted Sensor Probe harness between EOC & Lock Motor Micro Switch. The Cooktop...
... Board 4. Replace EOC IF VALVE LOCKOUT MOTOR DOES NOT RUN: 1.Test valve lock motor windings. SERVICE DATA SHEET Gas Ranges with ES 330/335/340/345/355 Electronic Oven Controls (some models it may be necessary to unlock the cooktop before servicing. This service data sheet is heard (after... installation of any liability for use of service. If the Cooktop Locked Indicator Light is overheating, disconnect power. To turn the Cooktop Lockout Feature ON: 1. Press & hold the bake pad for open or shorted Sensor Probe harness between EOC & Lock Motor Micro Switch. The Cooktop...
Product Specifications Sheet (English)
Page 1
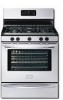
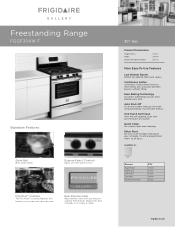
... and smudges so it easy to clean. 30" Gas Product Dimensions Height (Max.) Width Depth (Including Handle) 47-1/2" 29-7/8" 28-1/2" More Easy-To-Use Features Low Simmer Burner Perfect for delicate foods and sauces....frigidaire.com Quick Clean For a quick, light oven cleaning. Express-Select® Controls Easily go from 1 to begin cooking on your oven to 24 hours. Real Stainless Steel Real stainless steel with just the touch of a button. Even Baking Technology Our latest technology ensures even baking every time. Freestanding Range FGGF3041K F Signature Features...
... and smudges so it easy to clean. 30" Gas Product Dimensions Height (Max.) Width Depth (Including Handle) 47-1/2" 29-7/8" 28-1/2" More Easy-To-Use Features Low Simmer Burner Perfect for delicate foods and sauces....frigidaire.com Quick Clean For a quick, light oven cleaning. Express-Select® Controls Easily go from 1 to begin cooking on your oven to 24 hours. Real Stainless Steel Real stainless steel with just the touch of a button. Even Baking Technology Our latest technology ensures even baking every time. Freestanding Range FGGF3041K F Signature Features...
