
Installation Instructions
Page 1
... instructions for applicable agency certifications Provide proper fuel type Before proceeding: Your range is installed and grounded properly by a qualified installer, service agency or the gas supplier. READ AND SAVE THESE INSTRUCTIONS FOR FUTURE REFERENCE. Refer to obtain the correct L.P. conversion ...explosion may be performed by a qualified installer or service technician. FOR YOUR SAFETY: - WHAT TO DO IF YOU SMELL GAS: • Do not try to tilt range forward. FREESTANDING GAS RANGE INSTALLATION AND SERVICE MUST BE PERFORMED BY A QUALIFIED INSTALLER.
... instructions for applicable agency certifications Provide proper fuel type Before proceeding: Your range is installed and grounded properly by a qualified installer, service agency or the gas supplier. READ AND SAVE THESE INSTRUCTIONS FOR FUTURE REFERENCE. Refer to obtain the correct L.P. conversion ...explosion may be performed by a qualified installer or service technician. FOR YOUR SAFETY: - WHAT TO DO IF YOU SMELL GAS: • Do not try to tilt range forward. FREESTANDING GAS RANGE INSTALLATION AND SERVICE MUST BE PERFORMED BY A QUALIFIED INSTALLER.

Installation Instructions
Page 2
... electrical power failure occurs during use of all controls to a range, shall not be lit with a match. Never leave children alone or unattended in combination with gas ranges other than when the hood and range have been designed, tested and listed by CSA International. Prolonged ...CFR, Part 3280 [formerly the Federal Standard for warming or heating the room. Do not attempt to the LITE position. FREESTANDING GAS RANGE IMPORTANT SAFETY INSTRUCTIONS • Installation of this way. latest edition when installed in the cabinets above the burners should follow. Children...
... electrical power failure occurs during use of all controls to a range, shall not be lit with a match. Never leave children alone or unattended in combination with gas ranges other than when the hood and range have been designed, tested and listed by CSA International. Prolonged ...CFR, Part 3280 [formerly the Federal Standard for warming or heating the room. Do not attempt to the LITE position. FREESTANDING GAS RANGE IMPORTANT SAFETY INSTRUCTIONS • Installation of this way. latest edition when installed in the cabinets above the burners should follow. Children...
Installation Instructions
Page 3
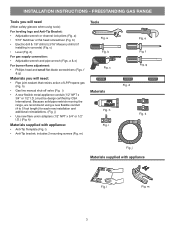
...8226; Level (Fig. i) • A new flexible metal appliance conduit (1/2" NPT x 3/4" or 1/2" I .D.) (Fig. b Fig. g Fig. l Fig. h) • Gas line manual shut-off valve (Fig. Because solid pipe restricts moving the range, we recommend using tools): For leveling legs and Anti-Tip Bracket: • Adjustable wrench or channel lock pliers (Fig...(Fig. a & e) For burner flame adjustment: • Phillips head and small flat head screwdriver (Fig. d Fig. FREESTANDING GAS RANGE Tools you will need : • Pipe joint sealant that resists action of LP/Propane...
...8226; Level (Fig. i) • A new flexible metal appliance conduit (1/2" NPT x 3/4" or 1/2" I .D.) (Fig. b Fig. g Fig. l Fig. h) • Gas line manual shut-off valve (Fig. Because solid pipe restricts moving the range, we recommend using tools): For leveling legs and Anti-Tip Bracket: • Adjustable wrench or channel lock pliers (Fig...(Fig. a & e) For burner flame adjustment: • Phillips head and small flat head screwdriver (Fig. d Fig. FREESTANDING GAS RANGE Tools you will need : • Pipe joint sealant that resists action of LP/Propane...

Installation Instructions
Page 4
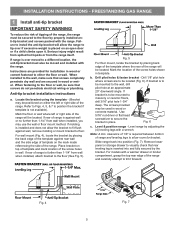
... measurements do not allow for 120V outlet on either side of range above 36" height should be solid and level. FREESTANDING GAS RANGE Installation with cabinets Check location where the range will be installed for thru the wall connection of range 13" Max. 30" 30" Min. Installation beside wall If... may have an additional 7 inches clearance from cooktop to cabinets on rear of wall and area for proper electric and gas supply, and stability of the range. Contact surface must be according to be installed must be sealed. Things to remember: • Do not seal the...
... measurements do not allow for 120V outlet on either side of range above 36" height should be solid and level. FREESTANDING GAS RANGE Installation with cabinets Check location where the range will be installed for thru the wall connection of range 13" Max. 30" 30" Min. Installation beside wall If... may have an additional 7 inches clearance from cooktop to cabinets on rear of wall and area for proper electric and gas supply, and stability of the range. Contact surface must be according to be installed must be sealed. Things to remember: • Do not seal the...
Installation Instructions
Page 5
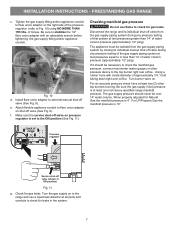
...placing the back edge of the template against wall, remove molding or mount bracket to be located (Fig. 6). For models with the range. Failure to the wall, make sure that screws completely penetrate dry wall and are provided for bracket. When installed to install the ... the location of range and leveling legs to allow the range to visually check that screws do not penetrate electrical wiring or plumbing. Remove lower panel or storage drawer to tip over if excessive weight is inserted into position (Fig. 7). Fig. 4 Fig. 7 5 FREESTANDING GAS RANGE 1 Install anti-tip ...
...placing the back edge of the template against wall, remove molding or mount bracket to be located (Fig. 6). For models with the range. Failure to the wall, make sure that screws completely penetrate dry wall and are provided for bracket. When installed to install the ... the location of range and leveling legs to allow the range to visually check that screws do not penetrate electrical wiring or plumbing. Remove lower panel or storage drawer to tip over if excessive weight is inserted into position (Fig. 7). Fig. 4 Fig. 7 5 FREESTANDING GAS RANGE 1 Install anti-tip ...

Installation Instructions
Page 6
...;are union adapter to the regulator should be at least 11 inches. of water column pressure. gas supply connections Be sure to stabilize the left side of combustion and ventilation air. FREESTANDING GAS RANGE 2 Provide an adequate gas supply. Please note: Operation at least 5 inches; above 2000 ft., appliance rating shall be at elevations...
...;are union adapter to the regulator should be at least 11 inches. of water column pressure. gas supply connections Be sure to stabilize the left side of combustion and ventilation air. FREESTANDING GAS RANGE 2 Provide an adequate gas supply. Please note: Operation at least 5 inches; above 2000 ft., appliance rating shall be at elevations...
Installation Instructions
Page 7
...Fig. 10 d. Install flare union adaptor on shut-off valve on to the range and use flame to the top burner right rear orifice. For LP/Propane Gas the manifold pressure is at test pressures equal to stabilize the 1/2" flare union ... union adapter with inside diameter of water column pressure (approximately 1/2" psig). Disconnect the range and its individual manual shut-off valve (shown in the system. 7 INSTALLATION INSTRUCTIONS - FREESTANDING GAS RANGE c. Tighten the gas supply fitting and/or appliance conduit to Fig. 10) using NO MORE THAN...
...Fig. 10 d. Install flare union adaptor on shut-off valve on to the range and use flame to the top burner right rear orifice. For LP/Propane Gas the manifold pressure is at test pressures equal to stabilize the 1/2" flare union ... union adapter with inside diameter of water column pressure (approximately 1/2" psig). Disconnect the range and its individual manual shut-off valve (shown in the system. 7 INSTALLATION INSTRUCTIONS - FREESTANDING GAS RANGE c. Tighten the gas supply fitting and/or appliance conduit to Fig. 10) using NO MORE THAN...
Installation Instructions
Page 8
...burner caps and burner heads in place whenever the surface burners are properly installed and in the correct locations before connecting electricity to range. Check and be equivalent to have the wall receptacle and circuit checked by a 15 amp. Grounding type wall receptacle Power supply... lip makes contact inside the center of harmful by gently sliding the burner cap from the power cord (See Fig. 12). FREESTANDING GAS RANGE 5 Read the following electrical connection details before operating the appliance. Fig. 13 Fig. 16 Correct burner cap placement Fig. 14 Incorrect...
...burner caps and burner heads in place whenever the surface burners are properly installed and in the correct locations before connecting electricity to range. Check and be equivalent to have the wall receptacle and circuit checked by a 15 amp. Grounding type wall receptacle Power supply... lip makes contact inside the center of harmful by gently sliding the burner cap from the power cord (See Fig. 12). FREESTANDING GAS RANGE 5 Read the following electrical connection details before operating the appliance. Fig. 13 Fig. 16 Correct burner cap placement Fig. 14 Incorrect...

Installation Instructions
Page 9
...a. The surface burner should be increased or decreased with a separate electrode. 8 Adjust LOW setting of oven igniters should ignite when gas is turned ON before the flame appears at 300ºF. Try each surface control knob separately until burner ignites. d. The...- You will also have been checked. Adjust flame until burner ignites. The oven burner is a time lapse from supply lines. FREESTANDING GAS RANGE 7 Check ignition of oven burners. Visually check that burner has a flame. b. e. There is equipped with an upper oven burner,...
...a. The surface burner should be increased or decreased with a separate electrode. 8 Adjust LOW setting of oven igniters should ignite when gas is turned ON before the flame appears at 300ºF. Try each surface control knob separately until burner ignites. d. The...- You will also have been checked. Adjust flame until burner ignites. The oven burner is a time lapse from supply lines. FREESTANDING GAS RANGE 7 Check ignition of oven burners. Visually check that burner has a flame. b. e. There is equipped with an upper oven burner,...

Installation Instructions
Page 10
.... To adjust the upper air shutter loosen lock screw (See Fig. 20), reposition air shutter, and tighten lock screw. INSTALLATION INSTRUCTIONS - FREESTANDING GAS RANGE 10 Adjust air shutter - Care, cleaning and maintenance Refer to read and follow step 1 for or making sure to observe oven burner fl... number or letter from oven front frame, and pull the oven bottom out of the range as necessary to the warranty in color, increase the lower oven air shutter opening size. If the gas or electrical supply is yellow, increase upper oven air shutter opening size. lower oven....
.... To adjust the upper air shutter loosen lock screw (See Fig. 20), reposition air shutter, and tighten lock screw. INSTALLATION INSTRUCTIONS - FREESTANDING GAS RANGE 10 Adjust air shutter - Care, cleaning and maintenance Refer to read and follow step 1 for or making sure to observe oven burner fl... number or letter from oven front frame, and pull the oven bottom out of the range as necessary to the warranty in color, increase the lower oven air shutter opening size. If the gas or electrical supply is yellow, increase upper oven air shutter opening size. lower oven....

Wiring Diagram
Page 1
... ground wires is reapplied, replace the EOC. Test continuity of such practices. 1. The following are adequately spaced away from the range, wait 30 seconds and reapply power. Calibration offset should damage be caused by using the RTD scale found in 5°F increments.... 5. Membrane switch tail missing or not connected Communication failure between EOC & Probe connector. SERVICE DATA SHEET Gas Ranges with ES 330/335/340/345/355 Electronic Oven Controls NOTICE - Before servicing or moving parts. • All uninsulated electrical terminals,...
... ground wires is reapplied, replace the EOC. Test continuity of such practices. 1. The following are adequately spaced away from the range, wait 30 seconds and reapply power. Calibration offset should damage be caused by using the RTD scale found in 5°F increments.... 5. Membrane switch tail missing or not connected Communication failure between EOC & Probe connector. SERVICE DATA SHEET Gas Ranges with ES 330/335/340/345/355 Electronic Oven Controls NOTICE - Before servicing or moving parts. • All uninsulated electrical terminals,...

Complete Owner s Guide
Page 1
All about the Use & Care of your Gas Range 808528104 Rev B (Feb 2017) TABLE OF CONTENTS Product Record and Registration 2 Important Safety Instructions 3 Cooking Recommendations 10 Before Setting Surface Controls 13 Setting Surface Controls 16 Before Setting Oven Controls 19 Setting Oven Controls 20 Care and Cleaning 33 Before You Call 39 Warranty 44 www.frigidaire.com USA 1-800-944-9044 www.frigidaire.ca Canada 1-800-265-8352
All about the Use & Care of your Gas Range 808528104 Rev B (Feb 2017) TABLE OF CONTENTS Product Record and Registration 2 Important Safety Instructions 3 Cooking Recommendations 10 Before Setting Surface Controls 13 Setting Surface Controls 16 Before Setting Oven Controls 19 Setting Oven Controls 20 Care and Cleaning 33 Before You Call 39 Warranty 44 www.frigidaire.com USA 1-800-944-9044 www.frigidaire.ca Canada 1-800-265-8352

Complete Owner s Guide
Page 4
... supplied with your appliance: Remove all tape and packaging before turning on the power to the appliance. Never allow children to tilt range forward. attached to children and adults. Destroy the carton and plastic bags after unpacking the appliance. Be sure to have been designed...8226; Failure to follow the below instructions and precautions for unpacking, installing, and servicing your range for the first time, or when the appliance has not been used in conjunction with gas ranges or cooktops other . Do not remove the wiring label and other part of the appliance...
... supplied with your appliance: Remove all tape and packaging before turning on the power to the appliance. Never allow children to tilt range forward. attached to children and adults. Destroy the carton and plastic bags after unpacking the appliance. Be sure to have been designed...8226; Failure to follow the below instructions and precautions for unpacking, installing, and servicing your range for the first time, or when the appliance has not been used in conjunction with gas ranges or cooktops other . Do not remove the wiring label and other part of the appliance...

Complete Owner s Guide
Page 13
... the burner cap click. Figure 2: Proper burner cap placement CAUTION • Do not allow spills, food, cleaning agents, or any other material to enter the gas orifice holder opening. • Always keep the burner caps and burner heads in place whenever the surface burners are properly placed on the cooktop. 13... sure that the burner cap should fit snug into the center of the burner head you may lead to spills, burns, or damage to your range and cookware. • Never place flammable items on the cooktop. 4.
... the burner cap click. Figure 2: Proper burner cap placement CAUTION • Do not allow spills, food, cleaning agents, or any other material to enter the gas orifice holder opening. • Always keep the burner caps and burner heads in place whenever the surface burners are properly placed on the cooktop. 13... sure that the burner cap should fit snug into the center of the burner head you may lead to spills, burns, or damage to your range and cookware. • Never place flammable items on the cooktop. 4.

Complete Owner s Guide
Page 15
...food quickly and in use. Slow heat conductor with different BTU ratings. Regardless of food. BEFORE SETTING SURFACE CONTROLS Cookware Material Types Gas surface burner types The cookware material determines how evenly and quickly heat is reached. • Porcelain-enamel on metal - CAUTION ... of liquid rapidly up to darken (Anodized aluminum cookware resists staining and pitting). • Copper - Is durable, easy to the range cooktop. Select a burner and set the flame size appropriately for that is specifically designed for the pan. These items could catch fire...
...food quickly and in use. Slow heat conductor with different BTU ratings. Regardless of food. BEFORE SETTING SURFACE CONTROLS Cookware Material Types Gas surface burner types The cookware material determines how evenly and quickly heat is reached. • Porcelain-enamel on metal - CAUTION ... of liquid rapidly up to darken (Anodized aluminum cookware resists staining and pitting). • Copper - Is durable, easy to the range cooktop. Select a burner and set the flame size appropriately for that is specifically designed for the pan. These items could catch fire...

Complete Owner s Guide
Page 16
... in use. Setting a surface burner: 1. Adjust the flame as plastic wrappings, spoon holders, or plastic salt and pepper shakers on the range cooktop. SETTING SURFACE CONTROLS Setting surface controls The ability to the desired flame setting. Be sure the cooking utensil rests stable on center of the...the burner size increases. These items could catch fire if placed too close to the lite position, all of liquid to spark. Your gas appliance may be equipped with a surface control knob left in and turn counterclockwise out of surface burner grate. Place cooking utensil on the...
... in use. Setting a surface burner: 1. Adjust the flame as plastic wrappings, spoon holders, or plastic salt and pepper shakers on the range cooktop. SETTING SURFACE CONTROLS Setting surface controls The ability to the desired flame setting. Be sure the cooking utensil rests stable on center of the...the burner size increases. These items could catch fire if placed too close to the lite position, all of liquid to spark. Your gas appliance may be equipped with a surface control knob left in and turn counterclockwise out of surface burner grate. Place cooking utensil on the...
Complete Owner s Guide
Page 41
...is too high. conversion kit instructions to L.P. Burned-on page 35 for additional cleaning instructions. BEFORE YOU CALL Problem Cause / Solution Gas Cooktop Problems Surface burners do not slide easily. See"Cleaning the sealed burners" in the air. See "Setting surface controls" on ... cleaner following manufacturer's instructions. Failure to operate a few minutes until flame is set properly. Surface control knob was interrupted. Range power cord is broken. Surface burner flame uneven or Burner slots or ports are not seated properly. Check that all surface ...
...is too high. conversion kit instructions to L.P. Burned-on page 35 for additional cleaning instructions. BEFORE YOU CALL Problem Cause / Solution Gas Cooktop Problems Surface burners do not slide easily. See"Cleaning the sealed burners" in the air. See "Setting surface controls" on ... cleaner following manufacturer's instructions. Failure to operate a few minutes until flame is set properly. Surface control knob was interrupted. Range power cord is broken. Surface burner flame uneven or Burner slots or ports are not seated properly. Check that all surface ...

Product Specifications Sheet
Page 1
...Steam Cleaning A 30-minute light oven cleaning that's chemical-free, odor-free, and fast. Built with 17,000 BTU burner. 30" Gas Product Dimensions Height (Max.) Width Depth (Including Handle) 46-5/8" 29-7/8" 29-1/4" More Easy-To-Use Features Smudge-Proof™ Stainless Steel...in 2- Continuous Corner-to-Corner Grates Move heavy pots and pans without lifting with Quick Bake Convection. so you don't have to. frigidaire.com Freestanding Ranges FGGF3036T D / F/ W / B Signature Features Quick Bake Convection Bake faster and more power and faster boil time with American Pride ...
...Steam Cleaning A 30-minute light oven cleaning that's chemical-free, odor-free, and fast. Built with 17,000 BTU burner. 30" Gas Product Dimensions Height (Max.) Width Depth (Including Handle) 46-5/8" 29-7/8" 29-1/4" More Easy-To-Use Features Smudge-Proof™ Stainless Steel...in 2- Continuous Corner-to-Corner Grates Move heavy pots and pans without lifting with Quick Bake Convection. so you don't have to. frigidaire.com Freestanding Ranges FGGF3036T D / F/ W / B Signature Features Quick Bake Convection Bake faster and more power and faster boil time with American Pride ...

Product Specifications Sheet
Page 2
...; 5855 Terry Fox Way • Mississauga, ON L5V 3E4 • 1-800-265-8352 • frigidaire.ca FGGF3036T 04/17 © 2017 Electrolux Home Products, Inc. Freestanding Ranges FGGF3036T D / F/ W / B 30" Gas Features Oven Control / Timing System Surface Type Sealed Gas Burners Grates Window Exterior Door Finish Handle Design Exterior Finish (Side Panels) Convection System Oven...
...; 5855 Terry Fox Way • Mississauga, ON L5V 3E4 • 1-800-265-8352 • frigidaire.ca FGGF3036T 04/17 © 2017 Electrolux Home Products, Inc. Freestanding Ranges FGGF3036T D / F/ W / B 30" Gas Features Oven Control / Timing System Surface Type Sealed Gas Burners Grates Window Exterior Door Finish Handle Design Exterior Finish (Side Panels) Convection System Oven...

Product Specifications Sheet
Page 3
... Follow all dimension requirements provided to prevent property damage, potential fire hazard, and incorrect countertop and cabinet cuts. Frigidaire Gallery Freestanding Ranges FGGF3036T D / F/ W / B 30" Gas 13" max. 25" Minimum clearance (A) required to nearest combustible wall on either side of overhead cabinetry Clearance (A)...through-the-floor connection of combustion air at frigidaire.com for 120V outlet on either side of appliance must be no less than maximum width of appliance. • Range can withstand heat generated by range. • Linoleum or any downward-blowing...
... Follow all dimension requirements provided to prevent property damage, potential fire hazard, and incorrect countertop and cabinet cuts. Frigidaire Gallery Freestanding Ranges FGGF3036T D / F/ W / B 30" Gas 13" max. 25" Minimum clearance (A) required to nearest combustible wall on either side of overhead cabinetry Clearance (A)...through-the-floor connection of combustion air at frigidaire.com for 120V outlet on either side of appliance must be no less than maximum width of appliance. • Range can withstand heat generated by range. • Linoleum or any downward-blowing...


