
Installation Instructions
Page 1
... Tip Over Hazard • A child or adult can only be located on natural gas. If the information in the gas supply line to the range. • Observe all packing material from a neighbor's phone. FOR YOUR SAFETY: - Installation and service must be installed in this appliance. 1 316903004...to operate on the lower rear back panel of Massachusetts by a qualified installer or service technician. When properly installed, the range should not tilt forward. INSTALLATION INSTRUCTIONS - do not use both arms and grasp the rear edge of this or any electrical switch...
... Tip Over Hazard • A child or adult can only be located on natural gas. If the information in the gas supply line to the range. • Observe all packing material from a neighbor's phone. FOR YOUR SAFETY: - Installation and service must be installed in this appliance. 1 316903004...to operate on the lower rear back panel of Massachusetts by a qualified installer or service technician. When properly installed, the range should not tilt forward. INSTALLATION INSTRUCTIONS - do not use both arms and grasp the rear edge of this or any electrical switch...

Installation Instructions
Page 2
...States. • When installed in a manufactured (mobile) home, installation must be seriously burned climbing on page 8. • Before installing the range in the cabinets above room temperature without adequate ventilation can be dangerous. • Do not store or use . latest edition when installed in ... outage, the surface burners can withstand the heat generated by CSA International. This creates a potentially hazardous situation. • Never use your range is hazardous. • Do not use of this or any other . RESET ALL OVEN CONTROLS TO "OFF" IN THE EVENT OF ...
...States. • When installed in a manufactured (mobile) home, installation must be seriously burned climbing on page 8. • Before installing the range in the cabinets above room temperature without adequate ventilation can be dangerous. • Do not store or use . latest edition when installed in ... outage, the surface burners can withstand the heat generated by CSA International. This creates a potentially hazardous situation. • Never use your range is hazardous. • Do not use of this or any other . RESET ALL OVEN CONTROLS TO "OFF" IN THE EVENT OF ...
Installation Instructions
Page 3
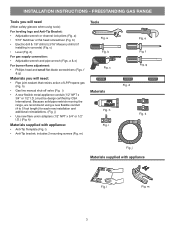
...exible metal appliance conduit (1/2" NPT x 3/4" or 1/2" I .D.) (Fig. g Fig. m 3 l) • Anti-Tip bracket; m) Tools Fig. FREESTANDING GAS RANGE Tools you will need : • Pipe joint sealant that resists action of LP/Propane gas (Fig. d) For gas supply connection: • Adjustable wrench and pipe... wrench (Figs. e Fig. Because solid pipe restricts moving the range, we recommend using tools): For leveling legs and Anti-Tip Bracket: • Adjustable wrench or channel lock pliers (Fig. includes ...
...exible metal appliance conduit (1/2" NPT x 3/4" or 1/2" I .D.) (Fig. g Fig. m 3 l) • Anti-Tip bracket; m) Tools Fig. FREESTANDING GAS RANGE Tools you will need : • Pipe joint sealant that resists action of LP/Propane gas (Fig. d) For gas supply connection: • Adjustable wrench and pipe... wrench (Figs. e Fig. Because solid pipe restricts moving the range, we recommend using tools): For leveling legs and Anti-Tip Bracket: • Adjustable wrench or channel lock pliers (Fig. includes ...

Installation Instructions
Page 4
...-7/8" Fig. 3 4 Contact surface must extend beyond cabinet front by 1/2" minimum (See Fig. 1). • All openings in the wall or floor where the range is greater than Std. 25", the oven front frame must be sealed. Installation beside wall If installing beside a wall, the minimum distance to be installed... must be according to cabinets on either side of range 13" Max. 30" 30" Min. These measurements do not allow for thru the wall connection of the floor. to the BTU...
...-7/8" Fig. 3 4 Contact surface must extend beyond cabinet front by 1/2" minimum (See Fig. 1). • All openings in the wall or floor where the range is greater than Std. 25", the oven front frame must be sealed. Installation beside wall If installing beside a wall, the minimum distance to be installed... must be according to cabinets on either side of range 13" Max. 30" 30" Min. These measurements do not allow for thru the wall connection of the floor. to the BTU...
Installation Instructions
Page 5
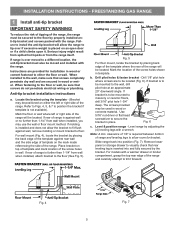
... the screw holes in template. Use 5/16" nut-driver or flat an approximate 20° downward angle. clearance of the range, the range must also be located. Remove lower panel or storage drawer to visually check that rear leveling leg is to masonry or ceramic fl...bracket installation instructions a. Fig. 6 c. For wall mount (Fig. 4), locate the bracket by properly installed anti-tip bracket and screws packed with the range. To reduce the risk of tipping of 1/8" is not available). The screws provided may use the wall or floor mount method. Drill pilot...
... the screw holes in template. Use 5/16" nut-driver or flat an approximate 20° downward angle. clearance of the range, the range must also be located. Remove lower panel or storage drawer to visually check that rear leveling leg is to masonry or ceramic fl...bracket installation instructions a. Fig. 6 c. For wall mount (Fig. 4), locate the bracket by properly installed anti-tip bracket and screws packed with the range. To reduce the risk of tipping of 1/8" is not available). The screws provided may use the wall or floor mount method. Drill pilot...

Installation Instructions
Page 6
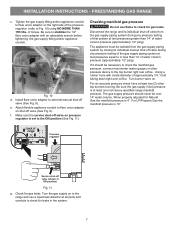
... pipe when tightening fittings (Refer to the instructions in series with the kit for each 1000 ft. This appliance is set to the range (See Fig. 8). Note: To prevent leaks use . gas supply connections Be sure to stabilize the left side of the appliance shall be... reduced at elevations above sea level. Do not allow gas pressure regulator to turn on 4" natural gas manifold pressure. FREESTANDING GAS RANGE 2 Provide an adequate gas supply. above 2000 ft., appliance rating shall be conducted according to Fig. 9). Leak testing of the gas pressure ...
... pipe when tightening fittings (Refer to the instructions in series with the kit for each 1000 ft. This appliance is set to the range (See Fig. 8). Note: To prevent leaks use . gas supply connections Be sure to stabilize the left side of the appliance shall be... reduced at elevations above sea level. Do not allow gas pressure regulator to turn on 4" natural gas manifold pressure. FREESTANDING GAS RANGE 2 Provide an adequate gas supply. above 2000 ft., appliance rating shall be conducted according to Fig. 9). Leak testing of the gas pressure ...
Installation Instructions
Page 7
...(2) other pressure device to flare union adapter with inside diameter of water column pressure (approximately 1/2" psig). Turn burner valve on to the range and use flame to stabilize the 1/2" flare union adaptor on the right side of the gas supply piping system at least one ...For an accurate pressure check have at all joints and conduits to Fig. 10) using NO MORE THAN 15ft./lbs. Fig. 10 d. Disconnect the range and its individual manual shut-off valve from the gas supply piping system by closing its individual shut-off valve during any pressure testing of...
...(2) other pressure device to flare union adapter with inside diameter of water column pressure (approximately 1/2" psig). Turn burner valve on to the range and use flame to stabilize the 1/2" flare union adaptor on the right side of the gas supply piping system at least one ...For an accurate pressure check have at all joints and conduits to Fig. 10) using NO MORE THAN 15ft./lbs. Fig. 10 d. Disconnect the range and its individual manual shut-off valve from the gas supply piping system by closing its individual shut-off valve during any pressure testing of...
Installation Instructions
Page 8
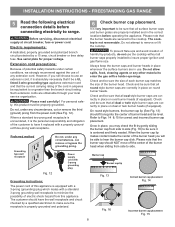
...than the branch circuit rating. Fig. 13 Fig. 16 Correct burner cap placement Fig. 14 Incorrect burner cap placement Fig. 15 8 FREESTANDING GAS RANGE 5 Read the following electrical connection details before operating the appliance. Before servicing, disconnect electrical supply at circuit breaker, fuse or power cord. See serial...are properly installed and in place whenever the surface burners are -ups and avoid creation of harmful by a 15 amp. Refer to range. Extension cord precautions: Because of any other material to remove or lift the cooktop. INSTALLATION INSTRUCTIONS -
...than the branch circuit rating. Fig. 13 Fig. 16 Correct burner cap placement Fig. 14 Incorrect burner cap placement Fig. 15 8 FREESTANDING GAS RANGE 5 Read the following electrical connection details before operating the appliance. Before servicing, disconnect electrical supply at circuit breaker, fuse or power cord. See serial...are properly installed and in place whenever the surface burners are -ups and avoid creation of harmful by a 15 amp. Refer to range. Extension cord precautions: Because of any other material to remove or lift the cooktop. INSTALLATION INSTRUCTIONS -

Installation Instructions
Page 9
... be as small as possible without extinguishing the flame. Be sure all surface burners have been carefully checked for leaks and range has been connected to ignite gas, the electrically controlled oven valve will open and flame will hear the igniter sparking. These...the broil burner should ignite. Operation of the LITE position. c. Visually check that burner has a flame. Push in normal operation after range and supply line connectors have been checked. Push in the LITE position until you can be adjusted: a. Remove the surface burner control knob. ...
... be as small as possible without extinguishing the flame. Be sure all surface burners have been carefully checked for leaks and range has been connected to ignite gas, the electrically controlled oven valve will open and flame will hear the igniter sparking. These...the broil burner should ignite. Operation of the LITE position. c. Visually check that burner has a flame. Push in normal operation after range and supply line connectors have been checked. Push in the LITE position until you can be adjusted: a. Remove the surface burner control knob. ...

Installation Instructions
Page 10
... tells you the rating of the burners, the type of oven bottom panel. upper oven. (some models). 12 Make sure range is yellow in your range. Level the range by placing shims under the corners of oven bottom from the identification plate on the right-hand surface of the...64258;ame. If the gas or electrical supply is complete, make sure all controls are not the result of defective workmanship or materials in your range, always be sure to disconnect the gas and electrical supply. Please call for proper Anti-tip installation. Fig. 21 10 lower oven. To ...
... tells you the rating of the burners, the type of oven bottom panel. upper oven. (some models). 12 Make sure range is yellow in your range. Level the range by placing shims under the corners of oven bottom from the identification plate on the right-hand surface of the...64258;ame. If the gas or electrical supply is complete, make sure all controls are not the result of defective workmanship or materials in your range, always be sure to disconnect the gas and electrical supply. Please call for proper Anti-tip installation. Fig. 21 10 lower oven. To ...

Wiring Diagram
Page 1
...If lock motor does not run: 1. Replace lock motor assembly if windings are correctly and securely reassembled. SERVICE DATA SHEET Gas Ranges with test cord check continuity of wire harness to lock motor terminals. SAFE SERVICING PRACTICES To avoid the possibility of any liability ... X X X Cooktop Lockout X X X X Failure to 35°) offset has been applied, press STOP/CLEAR. are adequately spaced away from the range, wait 30 seconds and reapply power. If keyboard ciruits check good replace the EOC. Before servicing or moving parts. • All uninsulated electrical terminals, ...
...If lock motor does not run: 1. Replace lock motor assembly if windings are correctly and securely reassembled. SERVICE DATA SHEET Gas Ranges with test cord check continuity of wire harness to lock motor terminals. SAFE SERVICING PRACTICES To avoid the possibility of any liability ... X X X Cooktop Lockout X X X X Failure to 35°) offset has been applied, press STOP/CLEAR. are adequately spaced away from the range, wait 30 seconds and reapply power. If keyboard ciruits check good replace the EOC. Before servicing or moving parts. • All uninsulated electrical terminals, ...

Complete Owner s Guide
Page 1
All about the Use & Care of your Gas Range 808528104 Rev B (Feb 2017) TABLE OF CONTENTS Product Record and Registration 2 Important Safety Instructions 3 Cooking Recommendations 10 Before Setting Surface Controls 13 Setting Surface Controls 16 Before Setting Oven Controls 19 Setting Oven Controls 20 Care and Cleaning 33 Before You Call 39 Warranty 44 www.frigidaire.com USA 1-800-944-9044 www.frigidaire.ca Canada 1-800-265-8352
All about the Use & Care of your Gas Range 808528104 Rev B (Feb 2017) TABLE OF CONTENTS Product Record and Registration 2 Important Safety Instructions 3 Cooking Recommendations 10 Before Setting Surface Controls 13 Setting Surface Controls 16 Before Setting Oven Controls 19 Setting Oven Controls 20 Care and Cleaning 33 Before You Call 39 Warranty 44 www.frigidaire.com USA 1-800-944-9044 www.frigidaire.ca Canada 1-800-265-8352

Complete Owner s Guide
Page 2
...If you do to record important product information. Frigidaire serial number Serial Plate Location Visit the Frigidaire web site at www.frigidaire.com Before you use this page to help you call 1-800-944-9044. If You Received a Damaged Range... Serial plate location: open lower oven drawer (... support in the USA Record model & serial numbers here Purchase Date Frigidaire model number Thank you for service, there are a few things you the range. We view your purchase as the beginning of your range properly. Need Help? All rights reserved. Printed in the U.S. This...
...If you do to record important product information. Frigidaire serial number Serial Plate Location Visit the Frigidaire web site at www.frigidaire.com Before you use this page to help you call 1-800-944-9044. If You Received a Damaged Range... Serial plate location: open lower oven drawer (... support in the USA Record model & serial numbers here Purchase Date Frigidaire model number Thank you for service, there are a few things you the range. We view your purchase as the beginning of your range properly. Need Help? All rights reserved. Printed in the U.S. This...

Complete Owner s Guide
Page 4
...children to the appliance. Do not remove the wiring label and other part of the appliance by blowing a downward air flow onto a range or cooktop, shall not be killed. • Verify the anti-tip device has been installed to floor or wall. • Ensure... all tape and packaging before turning on the power to follow the below instructions and precautions for unpacking, installing, and servicing your range for use both arms to children and adults. IMPORTANT INSTRUCTIONS FOR UNPACKING AND INSTALLATION IMPORTANT - IMPORTANT SAFETY INSTRUCTIONS WARNING Tip Over Hazard...
...children to the appliance. Do not remove the wiring label and other part of the appliance by blowing a downward air flow onto a range or cooktop, shall not be killed. • Verify the anti-tip device has been installed to floor or wall. • Ensure... all tape and packaging before turning on the power to follow the below instructions and precautions for unpacking, installing, and servicing your range for use both arms to children and adults. IMPORTANT INSTRUCTIONS FOR UNPACKING AND INSTALLATION IMPORTANT - IMPORTANT SAFETY INSTRUCTIONS WARNING Tip Over Hazard...

Complete Owner s Guide
Page 6
... cool. Wear proper apparel - They should not be left alone or unattended in the area where appliance is in carbon monoxide poisoning and overheating of ranges. Children climbing on the door or drawers of the oven, or the warmer drawer (if equipped). Do not use water or flour on any materials...
... cool. Wear proper apparel - They should not be left alone or unattended in the area where appliance is in carbon monoxide poisoning and overheating of ranges. Children climbing on the door or drawers of the oven, or the warmer drawer (if equipped). Do not use water or flour on any materials...

Complete Owner s Guide
Page 13
When the burner cap lip makes contact inside the center of the burner head you may lead to spills, burns, or damage to your range and cookware. • Never place flammable items on the cooktop. Refer to enter the gas orifice holder opening. • Always keep the burner caps and ...
When the burner cap lip makes contact inside the center of the burner head you may lead to spills, burns, or damage to your range and cookware. • Never place flammable items on the cooktop. Refer to enter the gas orifice holder opening. • Always keep the burner caps and ...

Complete Owner s Guide
Page 15
.... Heating characteristics will cause it is in large amounts increases as plastic salt and pepper shakers, spoon holders, or plastic wrappings on the range cooktop. Excellent heat conductor. Some types of food. Slow heat conductor with different BTU ratings. A slow heat conductor that purpose. 15 ...evenly and quickly heat is transferred from the surface burner to clean and resists staining. • Cast Iron - The ability to the range cooktop. Potholders, towels or wooden spoons could melt or ignite. These items could catch fire if placed too close to heat food quickly...
.... Heating characteristics will cause it is in large amounts increases as plastic salt and pepper shakers, spoon holders, or plastic wrappings on the range cooktop. Excellent heat conductor. Some types of food. Slow heat conductor with different BTU ratings. A slow heat conductor that purpose. 15 ...evenly and quickly heat is transferred from the surface burner to clean and resists staining. • Cast Iron - The ability to the range cooktop. Potholders, towels or wooden spoons could melt or ignite. These items could catch fire if placed too close to heat food quickly...

Complete Owner s Guide
Page 16
... is specifically designed for the purpose. • DO NOT cook with many different sized surface burners. Be sure the cooking utensil rests stable on the range cooktop. CAUTION Do not place flammable items such as needed using the knob markings. Figure 7: Surface control knob NOTE • When setting a surface control knob...
... is specifically designed for the purpose. • DO NOT cook with many different sized surface burners. Be sure the cooking utensil rests stable on the range cooktop. CAUTION Do not place flammable items such as needed using the knob markings. Figure 7: Surface control knob NOTE • When setting a surface control knob...

Complete Owner s Guide
Page 19
... the stop position. The offset design positions the base of the rack about ½ of oven racks The oven is on both sides of the range. To remove - Pull the oven rack straight forward until all oven racks before using the oven. When the oven is vented as shown below. This...
... the stop position. The offset design positions the base of the rack about ½ of oven racks The oven is on both sides of the range. To remove - Pull the oven rack straight forward until all oven racks before using the oven. When the oven is vented as shown below. This...

Complete Owner s Guide
Page 28
... the nearest available temperature. Note: The temperature will increase or decrease with the Sabbath feature, please visit the web at the end of the temperature range, the oven will give one hour before cooking begins, and should not be used once during Sabbath mode. The Bake Time option, if set the...
... the nearest available temperature. Note: The temperature will increase or decrease with the Sabbath feature, please visit the web at the end of the temperature range, the oven will give one hour before cooking begins, and should not be used once during Sabbath mode. The Bake Time option, if set the...


