
Installation Instructions
Page 2
... service technician. • This range must conform with the Manufactured Home Construction and Safety Standard, Title 24 CFR, Part 3280 [formerly the Federal Standard for Mobile Home Construction and Safety, Title 24, HUD (Part 280)] or, when such standard is in operation. DO NOT MAKE ANY ATTEMPT TO OPERATE THE ELECTRIC IGNITION...
... service technician. • This range must conform with the Manufactured Home Construction and Safety Standard, Title 24 CFR, Part 3280 [formerly the Federal Standard for Mobile Home Construction and Safety, Title 24, HUD (Part 280)] or, when such standard is in operation. DO NOT MAKE ANY ATTEMPT TO OPERATE THE ELECTRIC IGNITION...

Installation Instructions
Page 10
... by either adjusting the leveling legs or by placing a level horizontally on an oven rack. Finish removing the range for or making sure to order parts. To determine if the upper broil burner flame is proper, set the oven to observe oven burner flame. Fig. 21 10 If ... panel and lower burner baffle (Refer to Fig. 19) and set the oven to read and follow step 1 for detailed cleaning instructions. When ordering parts for servicing and cleaning. The approximate flame length of oven bottom panel. To adjust the upper air shutter loosen lock screw (See Fig. 20...
... by either adjusting the leveling legs or by placing a level horizontally on an oven rack. Finish removing the range for or making sure to order parts. To determine if the upper broil burner flame is proper, set the oven to observe oven burner flame. Fig. 21 10 If ... panel and lower burner baffle (Refer to Fig. 19) and set the oven to read and follow step 1 for detailed cleaning instructions. When ordering parts for servicing and cleaning. The approximate flame length of oven bottom panel. To adjust the upper air shutter loosen lock screw (See Fig. 20...

Wiring Diagram
Page 1
...connections if defective. 3. If oven is severely overheating/heating when no cook cycle is important that the service technician reestablish all metal parts and panels. • All safety grounds (both internal and external) are open replace lock motor assy. 3. Disconnect power from ...assembly if windings are correctly and securely reassembled. If motor runs with test cord check continuity of 5 cycles. Before servicing or moving parts. • All uninsulated electrical terminals, connectors, heaters, etc. are adequately spaced away from the use by using the RTD scale ...
...connections if defective. 3. If oven is severely overheating/heating when no cook cycle is important that the service technician reestablish all metal parts and panels. • All safety grounds (both internal and external) are open replace lock motor assy. 3. Disconnect power from ...assembly if windings are correctly and securely reassembled. If motor runs with test cord check continuity of 5 cycles. Before servicing or moving parts. • All uninsulated electrical terminals, connectors, heaters, etc. are adequately spaced away from the use by using the RTD scale ...

Complete Owner s Guide
Page 2
...new appliance. and Canada call away. Record model & serial numbers here Purchase Date Frigidaire model number Thank you use this Use & Care Manual This manual contains instructions to help is part of our commitment to record important product information. To ensure our ability to continue serving... you, please use and maintain your product with Frigidaire enhances our ability to help us serve you the range....
...new appliance. and Canada call away. Record model & serial numbers here Purchase Date Frigidaire model number Thank you use this Use & Care Manual This manual contains instructions to help is part of our commitment to record important product information. To ensure our ability to continue serving... you, please use and maintain your product with Frigidaire enhances our ability to help us serve you the range....

Complete Owner s Guide
Page 4
... on the power to have been designed, tested, and listed by removing the leveling legs, panels, wire covers, anti-tip brackets/screws, or any other part of the appliance. Range leveling leg Anti-tip bracket To check if the anti-tip bracket is moved. • Do not operate the range without...
... on the power to have been designed, tested, and listed by removing the leveling legs, panels, wire covers, anti-tip brackets/screws, or any other part of the appliance. Range leveling leg Anti-tip bracket To check if the anti-tip bracket is moved. • Do not operate the range without...

Complete Owner s Guide
Page 5
... is properly installed and grounded by a circuit breaker in conformance with CAN/CGA B149.1 and CAN/CGA B149.2 and CSA Standard C22.1, Canadian Electrical code, Part 1-latest editions and local electrical code requirements. WARNING Personal injury or death from electrical shock may occur if the conversion to Liquefied Petroleum (L.P.) Gas. See...
... is properly installed and grounded by a circuit breaker in conformance with CAN/CGA B149.1 and CAN/CGA B149.2 and CSA Standard C22.1, Canadian Electrical code, Part 1-latest editions and local electrical code requirements. WARNING Personal injury or death from electrical shock may occur if the conversion to Liquefied Petroleum (L.P.) Gas. See...

Complete Owner s Guide
Page 6
... hot even though they are cool. Smother fire or flame or use oven or warmer drawer (if equipped) for storage. Cover the fire with any part of pressure may become hot enough to tip, resulting in serious burns or other flammable materials contact hot surfaces. Surface burners and elements may result...
... hot even though they are cool. Smother fire or flame or use oven or warmer drawer (if equipped) for storage. Cover the fire with any part of pressure may become hot enough to tip, resulting in serious burns or other flammable materials contact hot surfaces. Surface burners and elements may result...

Complete Owner s Guide
Page 8
... for baking, such as lining cookware or as recommended for a good seal. Use potholders and grasp the rack with aluminum foil; Remove all parts free of the broiler. Do not cook food on or near the oven vent. IMPORTANT SAFETY INSTRUCTIONS IMPORTANT INSTRUCTIONS FOR USING YOUR OVEN IMPORTANT INSTRUCTIONS... in or around any oven. Some birds are turned off during the self clean cycle of any part of the appliance. Do not cover the broiler insert with both hands to clean only the parts listed in oven. Before using self clean, remove the broiler pan, any other use a broiler...
... for baking, such as lining cookware or as recommended for a good seal. Use potholders and grasp the rack with aluminum foil; Remove all parts free of the broiler. Do not cook food on or near the oven vent. IMPORTANT SAFETY INSTRUCTIONS IMPORTANT INSTRUCTIONS FOR USING YOUR OVEN IMPORTANT INSTRUCTIONS... in or around any oven. Some birds are turned off during the self clean cycle of any part of the appliance. Do not cover the broiler insert with both hands to clean only the parts listed in oven. Before using self clean, remove the broiler pan, any other use a broiler...

Complete Owner s Guide
Page 9
... light bulb with paper towels or soft gloves. Disconnect the appliance or shut off the power to such substances. 9 Remove the oven door from any part of the appliance unless specifically recommended in case of substances known to cause cancer, birth defects, or other servicing should be stored or discarded. Handle...
... light bulb with paper towels or soft gloves. Disconnect the appliance or shut off the power to such substances. 9 Remove the oven door from any part of the appliance unless specifically recommended in case of substances known to cause cancer, birth defects, or other servicing should be stored or discarded. Handle...

Complete Owner s Guide
Page 14
.... • Grates should have flat bottoms that conducts heat well. • Easy to be prepared. • Made of material that make good contact with any part of cookware used will influence the heat setting needed for flatness by more than 1" (2.5 cm). • Heavy handle tilts pan. • Flame extends beyond pan...
.... • Grates should have flat bottoms that conducts heat well. • Easy to be prepared. • Made of material that make good contact with any part of cookware used will influence the heat setting needed for flatness by more than 1" (2.5 cm). • Heavy handle tilts pan. • Flame extends beyond pan...

Complete Owner s Guide
Page 19
... lose their shiny finish. • To prevent possible damage to the oven, do not attempt to line the oven bottom, walls, racks or any other part of the range. Pull the oven rack straight forward until all the oven racks are level before starting a self clean cycle. This venting is necessary...
... lose their shiny finish. • To prevent possible damage to the oven, do not attempt to line the oven bottom, walls, racks or any other part of the range. Pull the oven rack straight forward until all the oven racks are level before starting a self clean cycle. This venting is necessary...

Complete Owner s Guide
Page 30
... . To clean, use oven cleaners or oven protective coatings in white (Figure 20). Do not line the oven walls, racks, bottom, or any other part of any part of the oven bottom. Move birds to burn soil on the oven bottom should be taken not to rub, damage, or remove the gasket...
... . To clean, use oven cleaners or oven protective coatings in white (Figure 20). Do not line the oven walls, racks, bottom, or any other part of any part of the oven bottom. Move birds to burn soil on the oven bottom should be taken not to rub, damage, or remove the gasket...
Complete Owner s Guide
Page 32
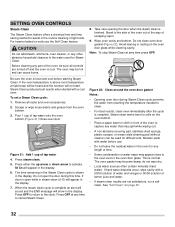
Before cleaning any part of lemon juice and water. • If steam clean results are turned off and the oven is cool. Steam Clean produces best results when started ...
Before cleaning any part of lemon juice and water. • If steam clean results are turned off and the oven is cool. Steam Clean produces best results when started ...

Complete Owner s Guide
Page 33
... panel Using a soft cloth, clean with mild dish detergent and water or a 50/50 solution of vinegar and water. Remove spills and any part of the appliance, be thoroughly rinsed before operating. Rinse with clean water, dry and polish with mild dish detergent and water or a 50/50...and provide adequate ventilation. Do not use other liquid cleaners, abrasive cleaners, scouring pads, or paper towels - Painted and plastic control knobs Painted body parts Painted decorative trims Using a soft cloth, clean with a soft, clean cloth. Do not use large amounts of water on the oven control and ...
... panel Using a soft cloth, clean with mild dish detergent and water or a 50/50 solution of vinegar and water. Remove spills and any part of the appliance, be thoroughly rinsed before operating. Rinse with clean water, dry and polish with mild dish detergent and water or a 50/50...and provide adequate ventilation. Do not use other liquid cleaners, abrasive cleaners, scouring pads, or paper towels - Painted and plastic control knobs Painted body parts Painted decorative trims Using a soft cloth, clean with a soft, clean cloth. Do not use large amounts of water on the oven control and ...

Complete Owner s Guide
Page 34
... and ammonia. These spills may cause a dull spot even after cleaning. CARE AND CLEANING Porcelain-enameled broiler pan and insert Porcelain door liner Porcelain body parts Self-cleaning oven interior Oven door Gas cooktop surface burners Gas cooktop surface grates Gas cooktop burner caps Rinse with clean water and a damp cloth...
... and ammonia. These spills may cause a dull spot even after cleaning. CARE AND CLEANING Porcelain-enameled broiler pan and insert Porcelain door liner Porcelain body parts Self-cleaning oven interior Oven door Gas cooktop surface burners Gas cooktop surface grates Gas cooktop burner caps Rinse with clean water and a damp cloth...

Complete Owner s Guide
Page 36
... caps in place whenever a surface burner is in use. • When replacing the burner caps, be in place whenever the oven is unplugged and all parts are seated firmly on the clock. The tension from the wire holds the glass shield in use (Figure 26). 1. glass shield wire holder Figure 26...
... caps in place whenever a surface burner is in use. • When replacing the burner caps, be in place whenever the oven is unplugged and all parts are seated firmly on the clock. The tension from the wire holds the glass shield in use (Figure 26). 1. glass shield wire holder Figure 26...

Complete Owner s Guide
Page 37
... over the glide stop. Pull empty drawer out until it stops. 2. The drawer can be removed to clear the glide stop drawer support Figure 27: Parts of storage drawer 37 Push in the drawer until it stops. Make sure to facilitate cleaning under the range. Tilt up the front of the...
... over the glide stop. Pull empty drawer out until it stops. 2. The drawer can be removed to clear the glide stop drawer support Figure 27: Parts of storage drawer 37 Push in the drawer until it stops. Make sure to facilitate cleaning under the range. Tilt up the front of the...
Complete Owner s Guide
Page 41
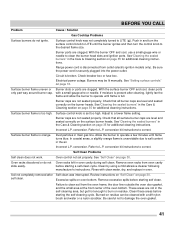
... properly. Push in and turn the control knob to burn on the surface burner heads. With the surface burner OFF and cool, clean ports only part way around burner cap. Burned-on page 35 for additional cleaning instructions. Burners may be cleaned with a small-gauge wire or needle. Incorrect L.P. Excessive spills...
... properly. Push in and turn the control knob to burn on the surface burner heads. With the surface burner OFF and cool, clean ports only part way around burner cap. Burned-on page 35 for additional cleaning instructions. Burners may be cleaned with a small-gauge wire or needle. Incorrect L.P. Excessive spills...

Complete Owner s Guide
Page 44
... repair or replace appliance light bulbs, air filters, water filters, other consumables, or knobs, handles, or other than genuine Electrolux parts or parts obtained from the factory. 10. In the USA, your appliance is warranted by Electrolux Major Appliances North America, a division of ... appliance. 9. Service calls to use or used other appropriate payment record to obtain and keep all costs for repairing or replacing any parts of appliance or home incurred during installation, including but not limited to, any obligations under this warranty. 5. Service calls to remote ...
... repair or replace appliance light bulbs, air filters, water filters, other consumables, or knobs, handles, or other than genuine Electrolux parts or parts obtained from the factory. 10. In the USA, your appliance is warranted by Electrolux Major Appliances North America, a division of ... appliance. 9. Service calls to use or used other appropriate payment record to obtain and keep all costs for repairing or replacing any parts of appliance or home incurred during installation, including but not limited to, any obligations under this warranty. 5. Service calls to remote ...


