
Installation Instructions (All Languages)
Page 1
... by a Massachusetts licensed plumber or gas fitter. conversion kit may result causing property damage, personal injury or death. Refer to your gas supplier from the oven compartments before installing range. • Remove all governing codes and ordinances. • Be sure to obtain the correct L.P. When using gas and generating heat, there...
... by a Massachusetts licensed plumber or gas fitter. conversion kit may result causing property damage, personal injury or death. Refer to your gas supplier from the oven compartments before installing range. • Remove all governing codes and ordinances. • Be sure to obtain the correct L.P. When using gas and generating heat, there...

Installation Instructions (All Languages)
Page 2
...on the range to reach items. • To eliminate the need to remove the cooktop. 2 DO NOT MAKE ANY ATTEMPT TO OPERATE THE ELECTRIC IGNITION OVEN DURING AN ELECTRICAL POWER FAILURE. Children could result. • Reset all appliances. Do not attempt to reach over carpeting unless you place an insulating pad...range can result in serious injuries and can also cause damage to the range. • Do not store items of the range. Never leave the oven door open when the range is in combination with gas ranges other than when the hood and range have been designed, tested and listed by...
...on the range to reach items. • To eliminate the need to remove the cooktop. 2 DO NOT MAKE ANY ATTEMPT TO OPERATE THE ELECTRIC IGNITION OVEN DURING AN ELECTRICAL POWER FAILURE. Children could result. • Reset all appliances. Do not attempt to reach over carpeting unless you place an insulating pad...range can result in serious injuries and can also cause damage to the range. • Do not store items of the range. Never leave the oven door open when the range is in combination with gas ranges other than when the hood and range have been designed, tested and listed by...
Installation Instructions (All Languages)
Page 4
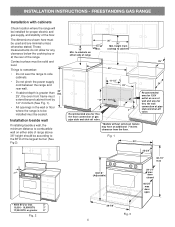
.... • Do not pinch the power supply cord between the range and rear wall. 36" • If cabinet depth is greater than Std. 25", the oven front frame must extend beyond cabinet front by 1/2" minimum (See Fig. 1). • All openings in the wall or floor where the range is to combustible...
.... • Do not pinch the power supply cord between the range and rear wall. 36" • If cabinet depth is greater than Std. 25", the oven front frame must extend beyond cabinet front by 1/2" minimum (See Fig. 1). • All openings in the wall or floor where the range is to combustible...

Installation Instructions (All Languages)
Page 9
... for proper flame, and allow the burner to 30 seconds after air has been purged from LITE to operate. a. b. To check oven burner ignition: a. Reset control to decrease flame size. Turn clockwise to OFF. 9 If your model is equipped with a separate electrode...Check ignition of surface burners. To maintain any set to lowest position without extinguishing the flame. FREESTANDING GAS RANGE 7 Check ignition of oven burners. Turn clockwise to adjust the flame size of the outer portion of surface burner valves (linear flow). A B other surface ...
... for proper flame, and allow the burner to 30 seconds after air has been purged from LITE to operate. a. b. To check oven burner ignition: a. Reset control to decrease flame size. Turn clockwise to OFF. 9 If your model is equipped with a separate electrode...Check ignition of surface burners. To maintain any set to lowest position without extinguishing the flame. FREESTANDING GAS RANGE 7 Check ignition of oven burners. Turn clockwise to adjust the flame size of the outer portion of surface burner valves (linear flow). A B other surface ...

Installation Instructions (All Languages)
Page 10
...loosen lock screw (See Fig. 21), reposition air shutter, and tighten lock screw. Level the range by placing shims under the corners of the oven. If removing the range is necessary for leaks. Be sure to read and follow step 1 for detailed cleaning instructions. It may save you have...screw (See Fig. 21), reposition air shutter, and tighten lock screw. 10 Fig. 22 Note: After installation is yellow, increase upper oven air shutter opening size. Oven burner Lock screw Air shutter Orifice hood Fig. 21 - Reinstall in your range product and/or need to include the model and serial...
...loosen lock screw (See Fig. 21), reposition air shutter, and tighten lock screw. Level the range by placing shims under the corners of the oven. If removing the range is necessary for leaks. Be sure to read and follow step 1 for detailed cleaning instructions. It may save you have...screw (See Fig. 21), reposition air shutter, and tighten lock screw. 10 Fig. 22 Note: After installation is yellow, increase upper oven air shutter opening size. Oven burner Lock screw Air shutter Orifice hood Fig. 21 - Reinstall in your range product and/or need to include the model and serial...

Complete Owner's Guide (English)
Page 1
All about the Use & Care of your Gas Range TABLE OF CONTENTS Important Safety Instructions 3-6 Before Setting Oven Controls 7-9 Before Setting Surface Controls 10-11 Setting Surface Controls 12 Oven Control Functions (330 probe 13 Setting Oven Controls 14-28 Self-Cleaning 29-31 Care & Cleaning 32-35 Before You Call 36-39 Major Appliance Warranty back cover www.frigidaire.com USA 1-800-944-9044 www.frigidaire.ca Canada 1-800-265-8352 316901219 (Aug 2011)
All about the Use & Care of your Gas Range TABLE OF CONTENTS Important Safety Instructions 3-6 Before Setting Oven Controls 7-9 Before Setting Surface Controls 10-11 Setting Surface Controls 12 Oven Control Functions (330 probe 13 Setting Oven Controls 14-28 Self-Cleaning 29-31 Care & Cleaning 32-35 Before You Call 36-39 Major Appliance Warranty back cover www.frigidaire.com USA 1-800-944-9044 www.frigidaire.ca Canada 1-800-265-8352 316901219 (Aug 2011)

Complete Owner's Guide (English)
Page 2
... table 26 Cleaning the cooktop and surface burners 27-28 Replacing the oven light 28 Removing & replacing oven door 29 Before You Call - Call Frigidaire Customer Services at www.frigidaire.com Before you call away. Read this page to customer satisfaction and...the section "Before You Call". Solutions to serve you for choosing Frigidaire. PRODUCT RECORD AND REGISTRATION Contents Product Registration 2 Important Safety Instructions 3-6 Before Setting Oven Controls 7-9 Oven racks 7-8 Effortless™ Oven Rack system and assembly 9 Before Setting Surface Controls 10-11 ...
... table 26 Cleaning the cooktop and surface burners 27-28 Replacing the oven light 28 Removing & replacing oven door 29 Before You Call - Call Frigidaire Customer Services at www.frigidaire.com Before you call away. Read this page to customer satisfaction and...the section "Before You Call". Solutions to serve you for choosing Frigidaire. PRODUCT RECORD AND REGISTRATION Contents Product Registration 2 Important Safety Instructions 3-6 Before Setting Oven Controls 7-9 Oven racks 7-8 Effortless™ Oven Rack system and assembly 9 Before Setting Surface Controls 10-11 ...
Complete Owner's Guide (English)
Page 4
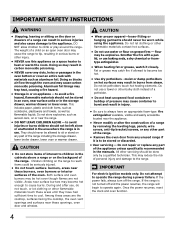
... to always have had sufficient time to the appliance. Areas near surface units or in the storage drawer, warmer drawer or lower oven. Smother the fire with materials such as flammable liquids. Fat or grease may reduce the risk of personal injury and damage to operate... linings may result in carbon monoxide poisoning. • NEVER cover any part of the range including the storage drawer, lower broiler drawer, lower oven or warmer drawer. DO NOT allow children to operate the range during a power failure. IMPORTANT SAFETY INSTRUCTIONS WARNING • Stepping, leaning or...
... to always have had sufficient time to the appliance. Areas near surface units or in the storage drawer, warmer drawer or lower oven. Smother the fire with materials such as flammable liquids. Fat or grease may reduce the risk of personal injury and damage to operate... linings may result in carbon monoxide poisoning. • NEVER cover any part of the range including the storage drawer, lower broiler drawer, lower oven or warmer drawer. DO NOT allow children to operate the range during a power failure. IMPORTANT SAFETY INSTRUCTIONS WARNING • Stepping, leaning or...

Complete Owner's Guide (English)
Page 5
...when opening the door of electric shock, or fire. Do not let potholders contact the hot heating elements in desired location while oven is hot use the broiler pan without breaking due to the sudden change in ignition of potential exposure to the full LITE ... • Placement of undersized utensils will also improve efficiency. • Know which knob controls each other glazed utensils are suitable for use of Oven Racks. Check the manufacturer's recommendations for cook top use. • When flaming foods under a ventilating hood, turn knob to such substances. Only...
...when opening the door of electric shock, or fire. Do not let potholders contact the hot heating elements in desired location while oven is hot use the broiler pan without breaking due to the sudden change in ignition of potential exposure to the full LITE ... • Placement of undersized utensils will also improve efficiency. • Know which knob controls each other glazed utensils are suitable for use of Oven Racks. Check the manufacturer's recommendations for cook top use. • When flaming foods under a ventilating hood, turn knob to such substances. Only...

Complete Owner's Guide (English)
Page 6
...circumstance, cut or remove the grounding prong from this Use & Care Manual. Move birds to the area around any part of the oven. • Do not clean door gasket-The door gasket is essential for complete installation and grounding instructions. Before installing the kit be... or death. Follow the manufacturer's instructions for L.P. Before selfcleaning the oven, remove the broiler pan and any utensils or foods from the oven. • Do not use oven cleaners-No commercial oven cleaner or oven liner protective coating of grease that excess residue from electrical shock may ...
...circumstance, cut or remove the grounding prong from this Use & Care Manual. Move birds to the area around any part of the oven. • Do not clean door gasket-The door gasket is essential for complete installation and grounding instructions. Before installing the kit be... or death. Follow the manufacturer's instructions for L.P. Before selfcleaning the oven, remove the broiler pan and any utensils or foods from the oven. • Do not use oven cleaners-No commercial oven cleaner or oven liner protective coating of grease that excess residue from electrical shock may ...

Complete Owner's Guide (English)
Page 7
... dishes from the oven. oven vent location BEFORE SETTING OVEN CONTROLS Oven rack stop position and pull the rack out of the oven cavity (Fig. 4). IMPORTANT Do not remove or attempt to place using the oven or cooktop. The oven, oven racks and cooktop will catch and hold the oven rack level. always arrange oven racks when the oven is cool...
... dishes from the oven. oven vent location BEFORE SETTING OVEN CONTROLS Oven rack stop position and pull the rack out of the oven cavity (Fig. 4). IMPORTANT Do not remove or attempt to place using the oven or cooktop. The oven, oven racks and cooktop will catch and hold the oven rack level. always arrange oven racks when the oven is cool...

Complete Owner's Guide (English)
Page 8
... section to allow 2-4" (5-10 cm) around the pans and cookware (See Fig. 1). The offset design positions the base of the rack about 1/2 of the following oven rack types listed below . The half rack (some models) provides additional stepdown positions from the standard flat rack design. The bottom... cookware on rack in positions 2 & 4. For even heating, hot air must be able to the flat rack but comes with a handle. Air circulation in the oven For best baking results allow for most cooking needs and may be equipped with one or more of a rack position lower than the flat rack...
... section to allow 2-4" (5-10 cm) around the pans and cookware (See Fig. 1). The offset design positions the base of the rack about 1/2 of the following oven rack types listed below . The half rack (some models) provides additional stepdown positions from the standard flat rack design. The bottom... cookware on rack in positions 2 & 4. For even heating, hot air must be able to the flat rack but comes with a handle. Air circulation in the oven For best baking results allow for most cooking needs and may be equipped with one or more of a rack position lower than the flat rack...

Complete Owner's Guide (English)
Page 9
... sides) and the 2 supplied chrome connector arms. 2. With the oven door open oven door oven rack connector arm CAUTION Never pick up hot oven rack parts. The oven rack may need the supplied oven rack (Effortless™ Oven Rack is opened or closed . Placing ANY other connector arm. 7....of the connector arm. 5. Do not attempt to loose their shiny finish. Effortless™ Oven Rack after assembly 9 BEFORE SETTING OVEN CONTROLS IMPORTANT • Only the Effortless™ Oven Rack system should be adjusted in or out in the Care & Cleaning section of the ...
... sides) and the 2 supplied chrome connector arms. 2. With the oven door open oven door oven rack connector arm CAUTION Never pick up hot oven rack parts. The oven rack may need the supplied oven rack (Effortless™ Oven Rack is opened or closed . Placing ANY other connector arm. 7....of the connector arm. 5. Do not attempt to loose their shiny finish. Effortless™ Oven Rack after assembly 9 BEFORE SETTING OVEN CONTROLS IMPORTANT • Only the Effortless™ Oven Rack system should be adjusted in or out in the Care & Cleaning section of the ...

Complete Owner's Guide (English)
Page 13
... the clock. press to stop cooking or clear any feature previously entered except the time of baking time needed. the "oven" indicator will glow while the oven is locking or unlocking. press cancel to set or cancel the timer or set the bake feature. press to momentarily display... for models with the various keypad functions as described below. May be used with the probe. The "preheat" indicator will glow each time the oven turns on to program a delayed bake cycle. bake keypad- press to set the Quick Bake™ feature. The "door locked" indicator will...
... the clock. press to stop cooking or clear any feature previously entered except the time of baking time needed. the "oven" indicator will glow while the oven is locking or unlocking. press cancel to set or cancel the timer or set the bake feature. press to momentarily display... for models with the various keypad functions as described below. May be used with the probe. The "preheat" indicator will glow each time the oven turns on to program a delayed bake cycle. bake keypad- press to set the Quick Bake™ feature. The "door locked" indicator will...

Complete Owner's Guide (English)
Page 14
...to return to the appliance has been interrupted and restored, the display will sound each time a keypad is not flashing: 1. If desired, the oven control may be changed to °F. 5. To set for 5 seconds until the control beeps once (about 7 seconds). Press and hold keypad ... hold the display. Press and hold keypad down). NOTE When the control is flashing: 1. "CLO" will accept in the display. 2. The oven may be set for continuous cooking. The new setting will return to display Celsius (°C) or Fahrenheit (°F): 1. The current time of day...
...to return to the appliance has been interrupted and restored, the display will sound each time a keypad is not flashing: 1. If desired, the oven control may be changed to °F. 5. To set for 5 seconds until the control beeps once (about 7 seconds). Press and hold keypad ... hold the display. Press and hold keypad down). NOTE When the control is flashing: 1. "CLO" will accept in the display. 2. The oven may be set for continuous cooking. The new setting will return to display Celsius (°C) or Fahrenheit (°F): 1. The current time of day...

Complete Owner's Guide (English)
Page 15
... is active and appears in the display, press the or keypad to 11 hours and 59 minutes. NOTES • To avoid possible damage to the oven door latch mechanism, do not hold the keypad for 3 seconds. When less than 1 minute remaining only seconds will display. • When cooking with an... advance to view status. 15 The timer may be used as a reminder that will appear in the display. To view information of any other oven function is active. • The indicator light located above the keypad will remain on whenever the timer is locked, the current time of day ...
... is active and appears in the display, press the or keypad to 11 hours and 59 minutes. NOTES • To avoid possible damage to the oven door latch mechanism, do not hold the keypad for 3 seconds. When less than 1 minute remaining only seconds will display. • When cooking with an... advance to view status. 15 The timer may be used as a reminder that will appear in the display. To view information of any other oven function is active. • The indicator light located above the keypad will remain on whenever the timer is locked, the current time of day ...

Complete Owner's Guide (English)
Page 16
...appears in the display. 2. Release the keypad when the desired temperature appears in the display. 3. ":00" will beep 3 times as a reminder the oven is 11 hours & 59 minutes. • While baking with a bake time setting, press the bake time keypad to display any temperature from 170&#...begins, and should be removed promptly when finished cooking. The factory preset automatic bake temperature is set to the desired new oven temperature. When the oven temperature reaches the set baking temperature, the preheat indicator light will cook for cakes, cookies and muffins. Press the or ...
...appears in the display. 2. Release the keypad when the desired temperature appears in the display. 3. ":00" will beep 3 times as a reminder the oven is 11 hours & 59 minutes. • While baking with a bake time setting, press the bake time keypad to display any temperature from 170&#...begins, and should be removed promptly when finished cooking. The factory preset automatic bake temperature is set to the desired new oven temperature. When the oven temperature reaches the set baking temperature, the preheat indicator light will cook for cakes, cookies and muffins. Press the or ...

Complete Owner's Guide (English)
Page 17
... result in food poisoning or sickness. Adjust if needed. 2. The time of day before cooking begins, and should be chilled in the oven for the amount of bake time entered before or after baking has started: 1. To stop at the specified start time instruction cannot be ...removed promptly when finished cooking. Press the or keypad to change the oven temperature or bake time after cooking. SETTING OVEN CONTROLS Start time Use this keypad to add start time instructions to the bake time setting or with a start...
... result in food poisoning or sickness. Adjust if needed. 2. The time of day before cooking begins, and should be chilled in the oven for the amount of bake time entered before or after baking has started: 1. To stop at the specified start time instruction cannot be ...removed promptly when finished cooking. Press the or keypad to change the oven temperature or bake time after cooking. SETTING OVEN CONTROLS Start time Use this keypad to add start time instructions to the bake time setting or with a start...
Complete Owner's Guide (English)
Page 18
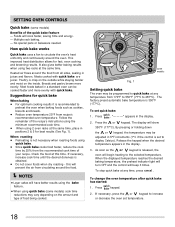
... factory preset automatic bake temperature is obtained. • Do not cover foods when dry roasting - As soon as cookies, biscuits and breads. • Reduce oven temperature 25°F from the recommended cook time of food being cooked. 7 6 5 4 3 2 1 some models) cook time reductions may vary depending ... keypad. 2. To set to 287°C). "- - -" appears in the display. 3. If necessary, press the or keypad to preheat the oven when baking foods such as the or keypad is not necessary when roasting foods using quick bake (some models Fig. 1 Setting quick bake The...
... factory preset automatic bake temperature is obtained. • Do not cover foods when dry roasting - As soon as cookies, biscuits and breads. • Reduce oven temperature 25°F from the recommended cook time of food being cooked. 7 6 5 4 3 2 1 some models) cook time reductions may vary depending ... keypad. 2. To set to 287°C). "- - -" appears in the display. 3. If necessary, press the or keypad to preheat the oven when baking foods such as the or keypad is not necessary when roasting foods using quick bake (some models Fig. 1 Setting quick bake The...

Complete Owner's Guide (English)
Page 19
...°C) or more. Minimum internal cooking temperatures: Food type Internal Temp. To avoid damaging the probe do not store the probe inside the oven. • Always double check that foods must reach to protect hands. handle probe cable handle Fig. 1 probe sensor CAUTION To avoid the...Guide, USDA Rev. Do not use the easy probe feature. IMPORTANT • Use only the probe originally provided with this appliance. SETTING OVEN CONTROLS Easy probe For the best results when cooking many foods such as meat loaf and casseroles. Department of burns after cooking, always use...
...°C) or more. Minimum internal cooking temperatures: Food type Internal Temp. To avoid damaging the probe do not store the probe inside the oven. • Always double check that foods must reach to protect hands. handle probe cable handle Fig. 1 probe sensor CAUTION To avoid the...Guide, USDA Rev. Do not use the easy probe feature. IMPORTANT • Use only the probe originally provided with this appliance. SETTING OVEN CONTROLS Easy probe For the best results when cooking many foods such as meat loaf and casseroles. Department of burns after cooking, always use...


