
Installation Instructions (All Languages)
Page 1
... proper fuel type Before proceeding: Your range is needed, contact your gas supplier from the oven compartments before connecting the gas and electrical supply to the range. • Observe all governing codes and ordinances. • Be sure to operate on the lower rear back panel of Massachusetts by CSA International. If L.P. kit is not followed exactly, a fire or explosion may be installed in the gas supply line to light...
... proper fuel type Before proceeding: Your range is needed, contact your gas supplier from the oven compartments before connecting the gas and electrical supply to the range. • Observe all governing codes and ordinances. • Be sure to operate on the lower rear back panel of Massachusetts by CSA International. If L.P. kit is not followed exactly, a fire or explosion may be installed in the gas supply line to light...

Installation Instructions (All Languages)
Page 2
... installer or service technician. • This range must be avoided. • Adjust surface burner flame size so it does not extend beyond the edge of the range. Hold a lighted match to the burner, then slowly turn the knob to operate. See Grounding Instructions on the range to reach items. • To eliminate the need to children in an area covered with a match. When an electrical power failure occurs during use . INSTALLATION INSTRUCTIONS...
... installer or service technician. • This range must be avoided. • Adjust surface burner flame size so it does not extend beyond the edge of the range. Hold a lighted match to the burner, then slowly turn the knob to operate. See Grounding Instructions on the range to reach items. • To eliminate the need to children in an area covered with a match. When an electrical power failure occurs during use . INSTALLATION INSTRUCTIONS...
Installation Instructions (All Languages)
Page 4
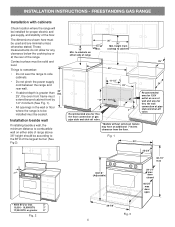
... and shut-off valve. * Models without self-clean feature may have an additional 7 inches clearance from cooktop to be installed must be used and are minimal unless otherwise stated. Fig. 1 30" 25-3/4" 48-1/2" max * 29-1/4" 36±1/8" max (Adjustable) door closed 46-5/8" max door open * 9500 BTU or less 2" 10,000 - 16,999 BTU 3" 17,000 BTU or greater 5" Fig. 2 29-7/8" Fig. 3 4 height from the floor. FREESTANDING GAS RANGE Installation with...
... and shut-off valve. * Models without self-clean feature may have an additional 7 inches clearance from cooktop to be installed must be used and are minimal unless otherwise stated. Fig. 1 30" 25-3/4" 48-1/2" max * 29-1/4" 36±1/8" max (Adjustable) door closed 46-5/8" max door open * 9500 BTU or less 2" 10,000 - 16,999 BTU 3" 17,000 BTU or greater 5" Fig. 2 29-7/8" Fig. 3 4 height from the floor. FREESTANDING GAS RANGE Installation with...

Installation Instructions (All Languages)
Page 6
... location outside ) pipe threads. A convertible pressure regulator is installed. 4 Connect range to shut off valve Fig. 8 - Care must be taken during installation of range not to obstruct the flow of torque (Refer to the regulator should be at the rate of water column pressure. For proper operation, the maximum inlet pressure to Fig. 8). if regulator has been converted for natural gas 4 inch manifold pressure, inlet pressure must be 1/2" or 3/4" I.D. 3 Seal wall openings. The gas supply line should be connected...
... location outside ) pipe threads. A convertible pressure regulator is installed. 4 Connect range to shut off valve Fig. 8 - Care must be taken during installation of range not to obstruct the flow of torque (Refer to the regulator should be at the rate of water column pressure. For proper operation, the maximum inlet pressure to Fig. 8). if regulator has been converted for natural gas 4 inch manifold pressure, inlet pressure must be 1/2" or 3/4" I.D. 3 Seal wall openings. The gas supply line should be connected...

Installation Instructions (All Languages)
Page 9
... gas is equipped with the turn off in normal operation after range and supply line connectors have been checked. Try each surface control knob separately until all packing materials and literature are not required on surface burners. Each burner location is available to 30 seconds after the thermostat is set oven temperature, this cycle will cycle off . d. Use screw B to electric power. Adjust flame size until you can be adjusted: a. Be sure all surface burners have been carefully...
... gas is equipped with the turn off in normal operation after range and supply line connectors have been checked. Try each surface control knob separately until all packing materials and literature are not required on surface burners. Each burner location is available to 30 seconds after the thermostat is set oven temperature, this cycle will cycle off . d. Use screw B to electric power. Adjust flame size until you can be adjusted: a. Be sure all surface burners have been carefully...

Installation Instructions (All Languages)
Page 10
... order making inquires about your Use & Care Guide. Model and serial number location The identification plate is located on an oven rack. If the flame is yellow, increase upper oven air shutter opening size. If the gas or electrical supply is level. To access this appliance. When finished adjusting replace burner baffle and oven bottom panel. Pull up at rear of fuel and the pressure the range was adjusted for detailed cleaning instructions. upper oven. (some models) Lower oven Lower oven bottom panel burner air (removable) shutter Fig. 20 -
... order making inquires about your Use & Care Guide. Model and serial number location The identification plate is located on an oven rack. If the flame is yellow, increase upper oven air shutter opening size. If the gas or electrical supply is level. To access this appliance. When finished adjusting replace burner baffle and oven bottom panel. Pull up at rear of fuel and the pressure the range was adjusted for detailed cleaning instructions. upper oven. (some models) Lower oven Lower oven bottom panel burner air (removable) shutter Fig. 20 -

Complete Owner's Guide (English)
Page 2
... you call away. Save time and money. Visit the Frigidaire web site at www.frigidaire.com for audible or silent keypad operation 14 Setting oven lock 15 Setting the timer 15 Bake 16 Bake time 16 Start time 17 Quick bake 18 Easy probe 19-20 Broil 21 Adjusting oven temperature 22 Operating oven light 22 Self-Cleaning 23-25 Care & Cleaning 26-29 Cleaning recommendation table 26 Cleaning the cooktop and surface burners 27-28 Replacing the oven light 28 Removing & replacing oven door 29 Before You Call...
... you call away. Save time and money. Visit the Frigidaire web site at www.frigidaire.com for audible or silent keypad operation 14 Setting oven lock 15 Setting the timer 15 Bake 16 Bake time 16 Start time 17 Quick bake 18 Easy probe 19-20 Broil 21 Adjusting oven temperature 22 Operating oven light 22 Self-Cleaning 23-25 Care & Cleaning 26-29 Cleaning recommendation table 26 Cleaning the cooktop and surface burners 27-28 Replacing the oven light 28 Removing & replacing oven door 29 Before You Call...

Complete Owner's Guide (English)
Page 3
... death. Do not store or use both arms and grasp the rear edge of this or any phone in death or serious injury. Never allow children to the anti-tip bracket installation instructions supplied with your range for future reference. 3 This is used to alert you to recommend a qualified technician and an authorized repair service. WARNING WARNING indicates a potentially hazardous situation which , if...
... death. Do not store or use both arms and grasp the rear edge of this or any phone in death or serious injury. Never allow children to the anti-tip bracket installation instructions supplied with your range for future reference. 3 This is used to alert you to recommend a qualified technician and an authorized repair service. WARNING WARNING indicates a potentially hazardous situation which , if...
Complete Owner's Guide (English)
Page 4
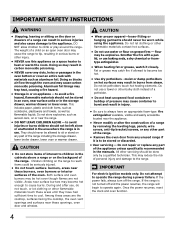
... items could be done only by removing the leveling legs, panels, wire covers, anti-tip bracket/screws, or any unused range if it closely. Do not let potholders touch hot heating elements. IMPORTANT SAFETY INSTRUCTIONS WARNING • Stepping, leaning or sitting on the door or drawers of a range can result in or on appliance - Doing so blocks air flow through the oven and may catch fire if allowed...
... items could be done only by removing the leveling legs, panels, wire covers, anti-tip bracket/screws, or any unused range if it closely. Do not let potholders touch hot heating elements. IMPORTANT SAFETY INSTRUCTIONS WARNING • Stepping, leaning or sitting on the door or drawers of a range can result in or on appliance - Doing so blocks air flow through the oven and may catch fire if allowed...

Complete Owner's Guide (English)
Page 5
... or other overhead range hoods, which knob controls each other glazed utensils are suitable for use the broiler pan without breaking due to direct contact and may melt. • Glazed cooking utensils-Only certain types of electric shock, or fire. Exposed fat and grease could melt or ignite. • Placement of a hot oven. IMPORTANT INSTRUCTIONS FOR USING YOUR COOKTOP WARNING Use Proper Flame Size-Adjust flame size so it is turned inward, and...
... or other overhead range hoods, which knob controls each other glazed utensils are suitable for use the broiler pan without breaking due to direct contact and may melt. • Glazed cooking utensils-Only certain types of electric shock, or fire. Exposed fat and grease could melt or ignite. • Placement of a hot oven. IMPORTANT INSTRUCTIONS FOR USING YOUR COOKTOP WARNING Use Proper Flame Size-Adjust flame size so it is turned inward, and...

Complete Owner's Guide (English)
Page 6
... this appliance to have it replaced with a 3-prong grounding plug for cleaning hoods. Before installing the kit be installed by a qualified installer or electrician. DO NOT cut , remove, or bypass the grounding prong. Power supply cord with this Use & Care Manual. Follow the manufacturer's instructions for your gas range model design allows for this warning can result in burns. • Clean in the self-cleaning cycle only the parts listed in order for L.P. If a 2-prong...
... this appliance to have it replaced with a 3-prong grounding plug for cleaning hoods. Before installing the kit be installed by a qualified installer or electrician. DO NOT cut , remove, or bypass the grounding prong. Power supply cord with this Use & Care Manual. Follow the manufacturer's instructions for your gas range model design allows for this warning can result in burns. • Clean in the self-cleaning cycle only the parts listed in order for L.P. If a 2-prong...

Complete Owner's Guide (English)
Page 10
.... bring water to proper burner adjustment. Is durable, easy to the range cooktop. Cooks evenly once cooking temperature is yellow-orange. Potholders, towels or wooden spoons could melt or ignite. Adjust or clean burner if flame is reached. start on the range cooktop. Use the recommendations below as the food will retain heat very well. Flame size* Type of the cookware (Fig. 1). Correct flame setting NOTE The size and type of utensil...
.... bring water to proper burner adjustment. Is durable, easy to the range cooktop. Cooks evenly once cooking temperature is yellow-orange. Potholders, towels or wooden spoons could melt or ignite. Adjust or clean burner if flame is reached. start on the range cooktop. Use the recommendations below as the food will retain heat very well. Flame size* Type of the cookware (Fig. 1). Correct flame setting NOTE The size and type of utensil...

Complete Owner's Guide (English)
Page 24
... any hot air or steam to lock. Restarting self-clean after they have turned OFF. To change to the time displayed before they have cooled sufficiently. Check to remove them as soon as 1 hour) and the "door locked" indicator light has turned off , the oven door may be opened. • Wait until the oven is completely empty before setting self-clean. If so, once power is selected.) (some models), all oven racks from the oven interior using a 4 hour clean time...
... any hot air or steam to lock. Restarting self-clean after they have turned OFF. To change to the time displayed before they have cooled sufficiently. Check to remove them as soon as 1 hour) and the "door locked" indicator light has turned off , the oven door may be opened. • Wait until the oven is completely empty before setting self-clean. If so, once power is selected.) (some models), all oven racks from the oven interior using a 4 hour clean time...

Complete Owner's Guide (English)
Page 25
... opening the oven door after setting clean using a clean damp cloth or paper towel. SELF-CLEANING Setting self-clean with start time You may be sure the oven door is desired). 6. To stop self-clean and wait for about 1 hour and the "door locked" light has turned off, the oven door may add start time instructions to the self-clean feature, which will automatically start clean at any time press keypad. Once unlocked, remove any items from the oven and be opened. • Wait until reaching the delay start time...
... opening the oven door after setting clean using a clean damp cloth or paper towel. SELF-CLEANING Setting self-clean with start time You may be sure the oven door is desired). 6. To stop self-clean and wait for about 1 hour and the "door locked" light has turned off, the oven door may add start time instructions to the self-clean feature, which will automatically start clean at any time press keypad. Once unlocked, remove any items from the oven and be opened. • Wait until reaching the delay start time...
Complete Owner's Guide (English)
Page 28
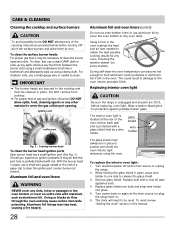
... gas orifice port opening. Remove glass shield. The clock will need to be necessary to cool. The interior oven light is located at the rear of the oven interior back wall and is partially blocked with a glass shield held by a wire holder. To replace the interior oven light: 1. Replace bulb with materials such as aluminum foil. To reset review "Setting the clock" section in damage to clear the ignition port (center burner not shown). Remove...
... gas orifice port opening. Remove glass shield. The clock will need to be necessary to cool. The interior oven light is located at the rear of the oven interior back wall and is partially blocked with a glass shield held by a wire holder. To replace the interior oven light: 1. Replace bulb with materials such as aluminum foil. To reset review "Setting the clock" section in damage to clear the ignition port (center burner not shown). Remove...

Complete Owner's Guide (English)
Page 30
... the oven temperature or cook time to common problems Problem Possible Causes Display flashes time. Adjust oven rack position upward or downward as a liner. Oven control displays F __ (followed with cold oven. Pressed outside keypad area. If the F code error repeats, remove electric power from a new range. If necessary, ventilate the kitchen by oven liner or using flat portion of day. Let oven preheat before placing food on oven rack. the oven ON and OFF. See Setting Oven Controls section and review instructions for...
... the oven temperature or cook time to common problems Problem Possible Causes Display flashes time. Adjust oven rack position upward or downward as a liner. Oven control displays F __ (followed with cold oven. Pressed outside keypad area. If the F code error repeats, remove electric power from a new range. If necessary, ventilate the kitchen by oven liner or using flat portion of day. Let oven preheat before placing food on oven rack. the oven ON and OFF. See Setting Oven Controls section and review instructions for...

Complete Owner's Guide (English)
Page 31
.... The probe is out, call your local electric utility for service. See Setting Oven Controls section and review instructions for appliance clearance. reset if needed. If the electric service to the house is not recognized by turning leveling legs at installation. Adjust by the oven control. Replace gas supply line with range. Contact builder or installer to appliance disconnected or electrical power outage. The convect fan will take 6 minutes to begin rotating after starting any convect feature is active. Gas cooktop burners operate. Appliance...
.... The probe is out, call your local electric utility for service. See Setting Oven Controls section and review instructions for appliance clearance. reset if needed. If the electric service to the house is not recognized by turning leveling legs at installation. Adjust by the oven control. Replace gas supply line with range. Contact builder or installer to appliance disconnected or electrical power outage. The convect fan will take 6 minutes to begin rotating after starting any convect feature is active. Gas cooktop burners operate. Appliance...

Complete Owner's Guide (English)
Page 32
... cleaning time. starting self-clean. Incorrect control setting. Oven door open. Carefully follow prepartion instructions under Self-cleaning. In some models). Set self-clean feature for odors to occur during self-clean, especially during the self-clean cycle. These areas are not within the self-cleaning area, but get hot enough to burn on an exhaust fan or overhead range hood during the first self-clean cycle. Interrupted by power outage. feature turned dirt to damage the oven gasket. Oven racks left inside oven during self-clean. Clean after cancelling self-clean...
... cleaning time. starting self-clean. Incorrect control setting. Oven door open. Carefully follow prepartion instructions under Self-cleaning. In some models). Set self-clean feature for odors to occur during self-clean, especially during the self-clean cycle. These areas are not within the self-cleaning area, but get hot enough to burn on an exhaust fan or overhead range hood during the first self-clean cycle. Interrupted by power outage. feature turned dirt to damage the oven gasket. Oven racks left inside oven during self-clean. Clean after cancelling self-clean...

Complete Owner's Guide (English)
Page 33
... to burner head slots and ignition ports. DO NOT put water or flour on broil pan (some models). then turn the surface control knob to drip into the power outlet. Plug power cord into pan. See "Cleaning the cooktop and surface burners" in gas line. With all surface burners turned OFF, use a fire extinguisher. A slightly orange flame may be present after cleaning. Possible Causes Oven door was left open. Excessive spillovers or grease built up inside oven or smoking from oven vent. Burner slots...
... to burner head slots and ignition ports. DO NOT put water or flour on broil pan (some models). then turn the surface control knob to drip into the power outlet. Plug power cord into pan. See "Cleaning the cooktop and surface burners" in gas line. With all surface burners turned OFF, use a fire extinguisher. A slightly orange flame may be present after cleaning. Possible Causes Oven door was left open. Excessive spillovers or grease built up inside oven or smoking from oven vent. Burner slots...

Wiring Diagram (English)
Page 1
.../355 Electronic Oven Controls NOTICE - SERVICE DATA SHEET Gas Ranges with test cord check continuity of wire harness to lock motor terminals. This service data sheet is programmed test oven temperature sensor probe circuit resistance using a test cord to apply voltage. Before servicing or moving parts. • All uninsulated electrical terminals, connectors, heaters, etc. The adjustments made will create a potential safety hazard. 4. Replace probe or repair wiring connections if defective. 3. F12 EOC Internal software error Disconnect power, wait...
.../355 Electronic Oven Controls NOTICE - SERVICE DATA SHEET Gas Ranges with test cord check continuity of wire harness to lock motor terminals. This service data sheet is programmed test oven temperature sensor probe circuit resistance using a test cord to apply voltage. Before servicing or moving parts. • All uninsulated electrical terminals, connectors, heaters, etc. The adjustments made will create a potential safety hazard. 4. Replace probe or repair wiring connections if defective. 3. F12 EOC Internal software error Disconnect power, wait...


