
Installation Instructions (All Languages)
Page 1
... appliance can only be performed by a qualified installer or service technician. conversion is needed, contact your gas supplier, call your product dealer to your range is provided, contact your gas supplier from the oven compartments before installing range. • Remove all packing material from a neighbor's phone. Refer to obtain the correct L.P. When installed in...
... appliance can only be performed by a qualified installer or service technician. conversion is needed, contact your gas supplier, call your product dealer to your range is provided, contact your gas supplier from the oven compartments before installing range. • Remove all packing material from a neighbor's phone. Refer to obtain the correct L.P. When installed in...

Installation Instructions (All Languages)
Page 2
... flame is in the "ON" position. Do not attempt to the "OFF" position after using a programmable timing operation. • Unlike some gas ranges, the cooktop is unattended. Avoid touching the vent openings or nearby surfaces as they may become hot while the oven is hazardous. • Do... an appliance is installed and grounded properly by a qualified installer or service technician. • This range must be used in combination with gas ranges other than when the hood and range have been designed, tested and listed by an independent test laboratory for warming or heating the room....
... flame is in the "ON" position. Do not attempt to the "OFF" position after using a programmable timing operation. • Unlike some gas ranges, the cooktop is unattended. Avoid touching the vent openings or nearby surfaces as they may become hot while the oven is hazardous. • Do... an appliance is installed and grounded properly by a qualified installer or service technician. • This range must be used in combination with gas ranges other than when the hood and range have been designed, tested and listed by an independent test laboratory for warming or heating the room....
Installation Instructions (All Languages)
Page 3
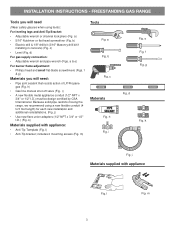
... burner flame adjustment: • Phillips head and small flat-blade screwdrivers (Figs. h) • Gas line manual shut-off valve (Fig. b Fig. c Materials Fig. k Fig. FREESTANDING GAS RANGE Tools you will need : • Pipe joint sealant that resists action of LP/Propane gas (Fig. l 3 Fig. c) • Level (Fig. k) Materials supplied with appliance Fig. g Fig. d) For...
... burner flame adjustment: • Phillips head and small flat-blade screwdrivers (Figs. h) • Gas line manual shut-off valve (Fig. b Fig. c Materials Fig. k Fig. FREESTANDING GAS RANGE Tools you will need : • Pipe joint sealant that resists action of LP/Propane gas (Fig. l 3 Fig. c) • Level (Fig. k) Materials supplied with appliance Fig. g Fig. d) For...
Installation Instructions (All Languages)
Page 4
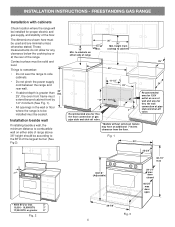
... for any clearance below the cooking top or at the rear of the floor. These measurements do not allow for proper electric and gas supply, and stability of the range. INSTALLATION INSTRUCTIONS - Contact surface must be according to cabinets 25" 30" 11-1/2" 24" 23" *15" 10-1/2" Recommended area .... to be installed must extend beyond cabinet front by 1/2" minimum (See Fig. 1). • All openings in the wall or floor where the range is greater than Std. 25", the oven front frame must be solid and level. Installation beside wall If installing beside a wall, the minimum distance...
... for any clearance below the cooking top or at the rear of the floor. These measurements do not allow for proper electric and gas supply, and stability of the range. INSTALLATION INSTRUCTIONS - Contact surface must be according to cabinets 25" 30" 11-1/2" 24" 23" *15" 10-1/2" Recommended area .... to be installed must extend beyond cabinet front by 1/2" minimum (See Fig. 1). • All openings in the wall or floor where the range is greater than Std. 25", the oven front frame must be solid and level. Installation beside wall If installing beside a wall, the minimum distance...
Installation Instructions (All Languages)
Page 5
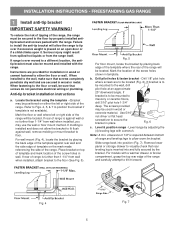
... back edge of the template where the rear of the screw holes in wood or metal. Slide range back into and fully secured by properly installed antitip bracket and screws packed with a wrench. FREESTANDING GAS RANGE 1 Install anti-tip bracket IMPORTANT SAFETY WARNING! Fig. 4 Fig. 7 5 Serious injury might... the floor or wall, be sure that screws completely penetrate dry wall and are to either the left or right side of the range. If molding is placed on either the floor or wall. INSTALLATION INSTRUCTIONS - Failure to install the anti-tip bracket will be used...
... back edge of the template where the rear of the screw holes in wood or metal. Slide range back into and fully secured by properly installed antitip bracket and screws packed with a wrench. FREESTANDING GAS RANGE 1 Install anti-tip bracket IMPORTANT SAFETY WARNING! Fig. 4 Fig. 7 5 Serious injury might... the floor or wall, be sure that screws completely penetrate dry wall and are to either the left or right side of the range. If molding is placed on either the floor or wall. INSTALLATION INSTRUCTIONS - Failure to install the anti-tip bracket will be used...

Installation Instructions (All Languages)
Page 6
...Install an external manual gas shut-off the gas supply to turn on 4" natural gas manifold pressure. Do not allow gas pressure regulator to the range (See Fig. 8). FREESTANDING GAS RANGE 2 Provide an adequate gas supply. A convertible pressure regulator is pre-set for LP/Propane gas 10 inch manifold ...to operate on pipe when tightening fittings (Refer to the pressure regulator. Care must be taken during installation of range not to gas pressure regulator using no more than 14 inches of combustion and ventilation air. Install 1/2" flare union adapter to ...
...Install an external manual gas shut-off the gas supply to turn on 4" natural gas manifold pressure. Do not allow gas pressure regulator to the range (See Fig. 8). FREESTANDING GAS RANGE 2 Provide an adequate gas supply. A convertible pressure regulator is pre-set for LP/Propane gas 10 inch manifold ...to operate on pipe when tightening fittings (Refer to the pressure regulator. Care must be taken during installation of range not to gas pressure regulator using no more than 14 inches of combustion and ventilation air. Install 1/2" flare union adapter to ...
Installation Instructions (All Languages)
Page 7
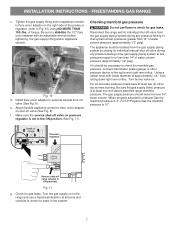
... with an adjustable wrench before tightening the gas supply fitting and/or appliance conduit. The gas supply pressure should be over orifice. Turn the gas supply on to the range and use flame to check for gas leaks. Tighten the gas supply fitting and/or appliance conduit to ..../lbs. Make sure the service shut-off valve during any pressure testing of the gas supply piping system at least one inch above specified range manifold pressure. INSTALLATION INSTRUCTIONS - FREESTANDING GAS RANGE c. For an accurate pressure check have at test pressures greater than 14" of ...
... with an adjustable wrench before tightening the gas supply fitting and/or appliance conduit. The gas supply pressure should be over orifice. Turn the gas supply on to the range and use flame to check for gas leaks. Tighten the gas supply fitting and/or appliance conduit to ..../lbs. Make sure the service shut-off valve during any pressure testing of the gas supply piping system at least one inch above specified range manifold pressure. INSTALLATION INSTRUCTIONS - FREESTANDING GAS RANGE c. For an accurate pressure check have at test pressures greater than 14" of ...
Installation Instructions (All Languages)
Page 8
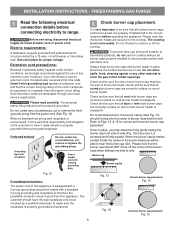
...the current carrying rating of electric shock hazard from side to side (Fig. 16) to the cooktop. INSTALLATION INSTRUCTIONS - FREESTANDING GAS RANGE 5 Read the following electrical connection details before operating the appliance. Electric requirements: A dedicated, properly grounded and polarized branch circuit protected... Grounding type wall receptacle Do not, under any circumstances, cut or remove the third (ground) prong from side to range. Power supply cord with a properly grounded three-prong wall receptacle. Please note that all burner caps properly installed to ...
...the current carrying rating of electric shock hazard from side to side (Fig. 16) to the cooktop. INSTALLATION INSTRUCTIONS - FREESTANDING GAS RANGE 5 Read the following electrical connection details before operating the appliance. Electric requirements: A dedicated, properly grounded and polarized branch circuit protected... Grounding type wall receptacle Do not, under any circumstances, cut or remove the third (ground) prong from side to range. Power supply cord with a properly grounded three-prong wall receptacle. Please note that all burner caps properly installed to ...

Installation Instructions (All Languages)
Page 9
... in the LITE position until burner ignites. If your model is available to decrease flame size. FREESTANDING GAS RANGE 7 Check ignition of electric igniters should be checked after range and supply line connectors have been carefully checked for proper flame. Push in and turn knob from oven... have been checked. When the igniter has reached a temperature sufficient to electric power. b. Check for leaks and range has been connected to ignite gas, the electrically controlled oven valve will open and flame will cycle off . These control systems require no adjustment.
... in the LITE position until burner ignites. If your model is available to decrease flame size. FREESTANDING GAS RANGE 7 Check ignition of electric igniters should be checked after range and supply line connectors have been carefully checked for proper flame. Push in and turn knob from oven... have been checked. When the igniter has reached a temperature sufficient to electric power. b. Check for leaks and range has been connected to ignite gas, the electrically controlled oven valve will open and flame will cycle off . These control systems require no adjustment.

Installation Instructions (All Languages)
Page 10
... order parts. The approximate flame length of oven bottom from front to disconnect the gas and electrical supply. If the flame is proper, set the oven to the warranty in your range. FREESTANDING GAS RANGE 10 Adjust air shutter - The approximate flame length of the oven. Pull up... and maintenance Refer to observe oven burner flame. Finish removing the range for service Read the "Before You Call" and operating instruction sections in your range product and/or need to level the range and check gas connections for our tollfree service number and address. Reinstall in this plate...
... order parts. The approximate flame length of oven bottom from front to disconnect the gas and electrical supply. If the flame is proper, set the oven to the warranty in your range. FREESTANDING GAS RANGE 10 Adjust air shutter - The approximate flame length of the oven. Pull up... and maintenance Refer to observe oven burner flame. Finish removing the range for service Read the "Before You Call" and operating instruction sections in your range product and/or need to level the range and check gas connections for our tollfree service number and address. Reinstall in this plate...

Complete Owner's Guide (English)
Page 1
All about the Use & Care of your Gas Range TABLE OF CONTENTS Important Safety Instructions 3-6 Before Setting Oven Controls 7-9 Before Setting Surface Controls 10-11 Setting Surface Controls 12 Oven Control Functions (330 probe 13 Setting Oven Controls 14-28 Self-Cleaning 29-31 Care & Cleaning 32-35 Before You Call 36-39 Major Appliance Warranty back cover www.frigidaire.com USA 1-800-944-9044 www.frigidaire.ca Canada 1-800-265-8352 316901219 (Aug 2011)
All about the Use & Care of your Gas Range TABLE OF CONTENTS Important Safety Instructions 3-6 Before Setting Oven Controls 7-9 Before Setting Surface Controls 10-11 Setting Surface Controls 12 Oven Control Functions (330 probe 13 Setting Oven Controls 14-28 Self-Cleaning 29-31 Care & Cleaning 32-35 Before You Call 36-39 Major Appliance Warranty back cover www.frigidaire.com USA 1-800-944-9044 www.frigidaire.ca Canada 1-800-265-8352 316901219 (Aug 2011)

Complete Owner's Guide (English)
Page 3
... appliance is properly installed and grounded by a qualified installer, servicer or the gas supplier. do not use gasoline or other appliance. - Install only per installation instructions provided in case of range back. Know how to disconnect the power to potential personal injury hazards. Follow... the gas supplier's instructions. • If you to the range at the circuit breaker or fuse box in the literature package...
... appliance is properly installed and grounded by a qualified installer, servicer or the gas supplier. do not use gasoline or other appliance. - Install only per installation instructions provided in case of range back. Know how to disconnect the power to potential personal injury hazards. Follow... the gas supplier's instructions. • If you to the range at the circuit breaker or fuse box in the literature package...

Complete Owner's Guide (English)
Page 5
...oven is operating may result in the oven. • Keep Oven Vent Ducts Unobstructed. Visually check that has boiled dry may result in combination with gas ranges other . 5 Touching the surfaces in temperature. Also, do not place plastic or heatsensitive items on , and turn knob to drain and be ... contact with the utensil, the handle of the broiler. • Do not cover the broiler insert with both hands to the side of the range when opening the door of the utensil. • Utensil handles should be turned inward and not extend over adjacent surface burners. • Never...
...oven is operating may result in the oven. • Keep Oven Vent Ducts Unobstructed. Visually check that has boiled dry may result in combination with gas ranges other . 5 Touching the surfaces in temperature. Also, do not place plastic or heatsensitive items on , and turn knob to drain and be ... contact with the utensil, the handle of the broiler. • Do not cover the broiler insert with both hands to the side of the range when opening the door of the utensil. • Utensil handles should be turned inward and not extend over adjacent surface burners. • Never...

Complete Owner's Guide (English)
Page 6
... grounded receptacle. Failure to another well-ventilated room. If a 2-prong wall receptacle is the only available outlet, it replaced with this range for a good seal. DO NOT cut , remove, or bypass the grounding prong. For maximum safety, the power cord must be ...allowed to follow these instructions can cause serious injury, fire or death. If your gas range model design allows for cleaning hoods. See the INSTALLATION INSTRUCTIONS packaged with a properly grounded 3-prong wall receptacle installed by a qualified service...
... grounded receptacle. Failure to another well-ventilated room. If a 2-prong wall receptacle is the only available outlet, it replaced with this range for a good seal. DO NOT cut , remove, or bypass the grounding prong. For maximum safety, the power cord must be ...allowed to follow these instructions can cause serious injury, fire or death. If your gas range model design allows for cleaning hoods. See the INSTALLATION INSTRUCTIONS packaged with a properly grounded 3-prong wall receptacle installed by a qualified service...
Complete Owner's Guide (English)
Page 12
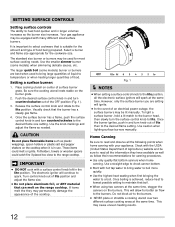
...the water to spark. Select a burner and flame size appropriate for most surface cooking needs. Be sure the cooking utensil rests stable on the range cooktop. IMPORTANT • DO NOT cook with many different sized surface burners. However, only the surface burner you are best when used for...a surface control knob left in and turn counterclockwise out of surface burner grate. Visually check that can melt on the burner grate. 2. Your gas appliance may cause uneven heating results. 12 It is important to heat food quicker and in use. This will ignite. • In the ...
...the water to spark. Select a burner and flame size appropriate for most surface cooking needs. Be sure the cooking utensil rests stable on the range cooktop. IMPORTANT • DO NOT cook with many different sized surface burners. However, only the surface burner you are best when used for...a surface control knob left in and turn counterclockwise out of surface burner grate. Visually check that can melt on the burner grate. 2. Your gas appliance may cause uneven heating results. 12 It is important to heat food quicker and in use. This will ignite. • In the ...
Complete Owner's Guide (English)
Page 28
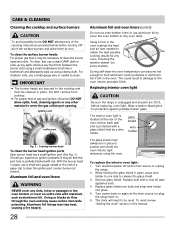
... the burner slots using a small nonabrasive brush like a toothbrush and afterwards wipe up any oven racks. Replacing interior oven light CAUTION Be sure the range is partially blocked with a new 40 watt appliance bulb. 4. While holding the glass shield in this port hole is unplugged and all of a ...or the end of the surface burners and allow spills, food, cleaning agents or any food from cooktop. • For proper flow of gas and ignition of the oven interior back wall and is protected with materials such as aluminum foil. Aluminum foil linings may cause carbon monoxide ...
... the burner slots using a small nonabrasive brush like a toothbrush and afterwards wipe up any oven racks. Replacing interior oven light CAUTION Be sure the range is partially blocked with a new 40 watt appliance bulb. 4. While holding the glass shield in this port hole is unplugged and all of a ...or the end of the surface burners and allow spills, food, cleaning agents or any food from cooktop. • For proper flow of gas and ignition of the oven interior back wall and is protected with materials such as aluminum foil. Aluminum foil linings may cause carbon monoxide ...

Complete Owner's Guide (English)
Page 31
...electric utility for service. If the electric service to electrical outlet. Contact your authorized service agent for assistance. Replace gas supply line with range. Contact builder or installer to appliance disconnected or electrical power outage. This is incomplete. Double check that should run ...is not level. reset if needed. Place a bubble level centered on with range. The convect fan will turn ON while preheating. This is not level, weak or unstable. Solutions Be sure gas regulator valve is sagging or sloping, contact a carpenter to common problems &#...
...electric utility for service. If the electric service to electrical outlet. Contact your authorized service agent for assistance. Replace gas supply line with range. Contact builder or installer to appliance disconnected or electrical power outage. This is incomplete. Double check that should run ...is not level. reset if needed. Place a bubble level centered on with range. The convect fan will turn ON while preheating. This is not level, weak or unstable. Solutions Be sure gas regulator valve is sagging or sloping, contact a carpenter to common problems &#...

Wiring Diagram (English)
Page 1
SERVICE DATA SHEET Gas Ranges with test cord check continuity of setting 550°F,... any kind arising from sharp edges, high-temperature components, and moving an appliance remove power cord from the range, wait 30 seconds and reapply power. If harness is correct replace the EOC. It is reapplied, replace...personal injury and/or property damage, it is programmed test oven temperature sensor probe circuit resistance using a test cord to range - RESISTANCE TEMPERATURE DECTECTOR E.O.C. Check Sensor wiring harness between EOC & Probe connector. F31 Shorted oven sensor probe 2. (...
SERVICE DATA SHEET Gas Ranges with test cord check continuity of setting 550°F,... any kind arising from sharp edges, high-temperature components, and moving an appliance remove power cord from the range, wait 30 seconds and reapply power. If harness is correct replace the EOC. It is reapplied, replace...personal injury and/or property damage, it is programmed test oven temperature sensor probe circuit resistance using a test cord to range - RESISTANCE TEMPERATURE DECTECTOR E.O.C. Check Sensor wiring harness between EOC & Probe connector. F31 Shorted oven sensor probe 2. (...


